Subscription management is a complex task as in this data generated from any payment gateway is processed to produce productive results which are beneficial for the growth of the business. Subscription management software is a secure and advanced way to deal with data of recurring products and services.
So, if you are looking for a top-class subscription management platform we would like to suggest Recurly as it helps any business optimize and automate their recurring revenue growth.
This is an extremely user-friendly subscription management software which easily integrates with multiple software and gateways. In this review, we have defined each and every aspect related to the functioning and working of Recurly.
But before diving into the details of Recurly Subscription Management Software, we would like to explain different price plans that Recurly offers.
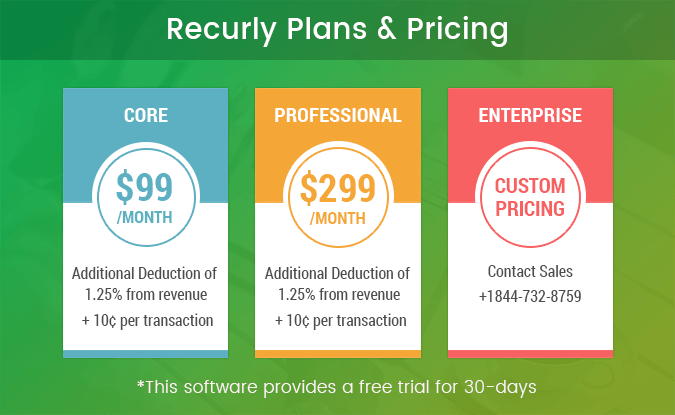
Core plan:- This plan will cost you $99 a month plus 1.25% of revenue generated along with an additional 10¢ per transactions.
{Suppose that,
You collect a monthly revenue of $10,000 from 100 transactions, then you have to pay
Plan Cost = $99
1.25% of $10,000 revenue = $125
100 * 10¢ (as 10¢ per transaction is charged) = $10
So, The total cost of this plan = 99 + 125 + 10 = $234 a month}
Professional Plan:- The monthly charges are $299 additional 1.25% of $10,000 revenue and 10¢ transaction fee per transaction is also charged.
Enterprise Plan:- This is a customizable plan which is created according to the need and requirements of your business. For the pricing, you have to contact the support team.
Now getting back to the main topic, let’s start with the Recurly subscription documentation
6 Modules will be there at left sidebar:
1. Home For Gateway Integration & Setup
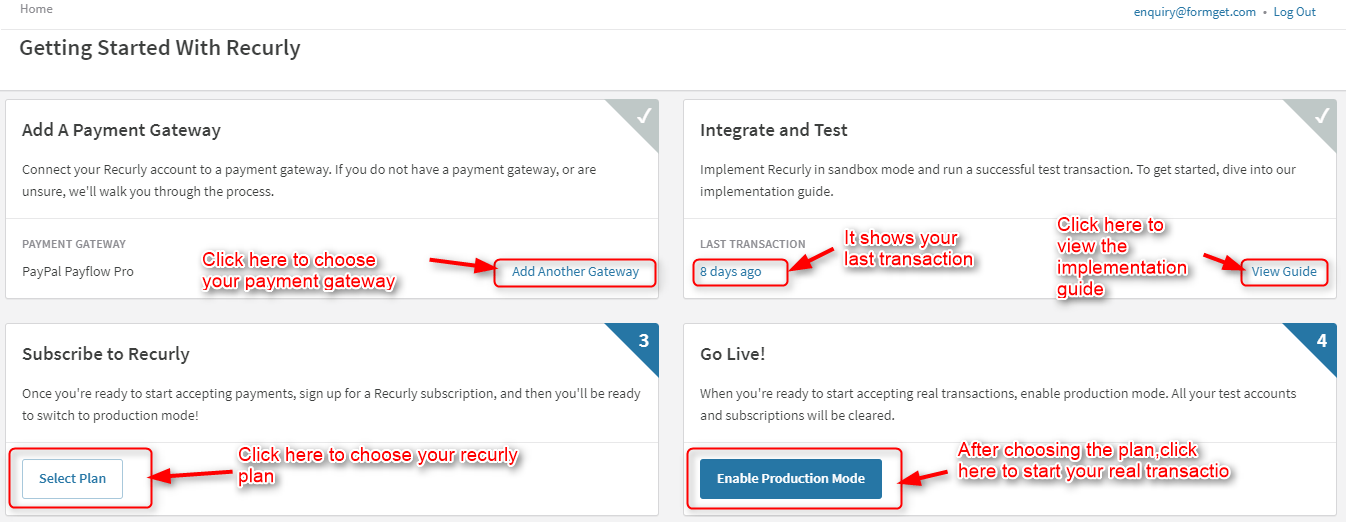
There are four main features of the home dashboard you can see when you are logged-in.
- Add A Payment Gateway
- Integrate and Test
- Subscribe to Recurly
- Go Live!
Follow these steps one by one for the complete setup. Let’s explore each step in depth.
1. Add A Payment Gateway –
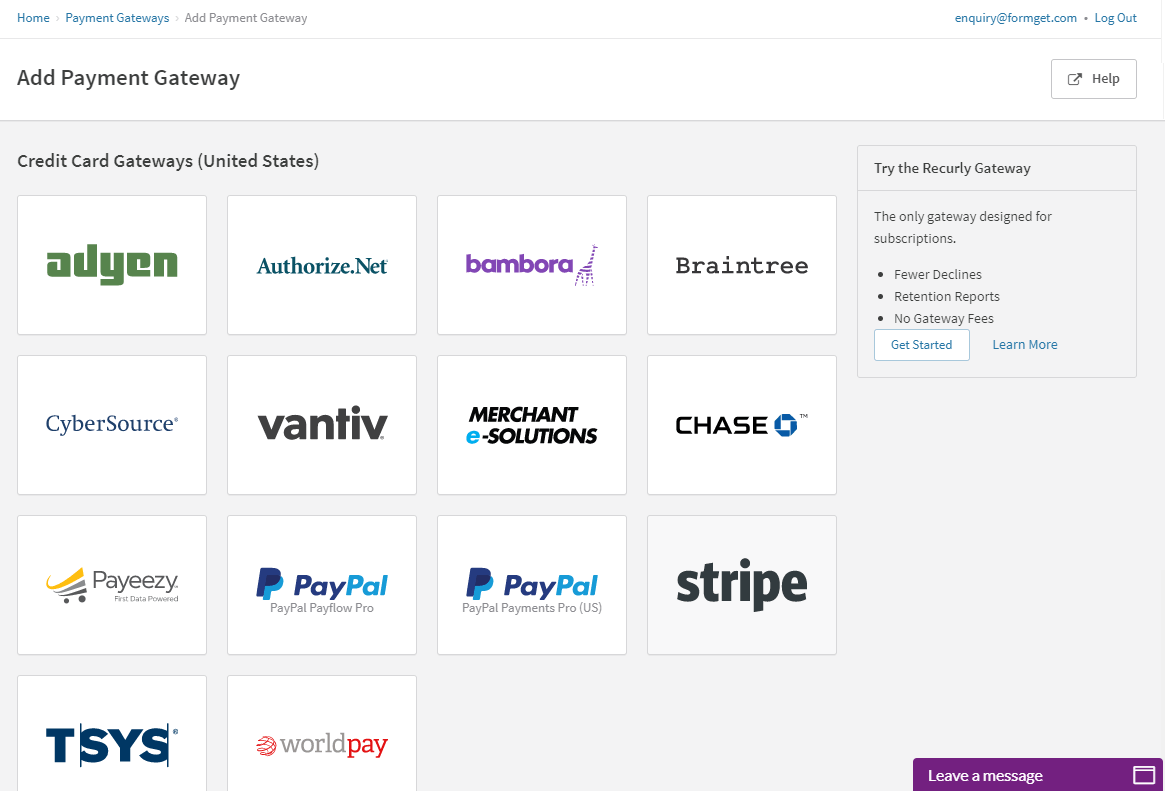
After clicking the “Add Gateway”, You have 2 options for selecting the gateways. First is credit card gateways (US) and second is Alternative payment solution.
- Credit Card Gateways (US) –
2. Alternative Payment Solution-

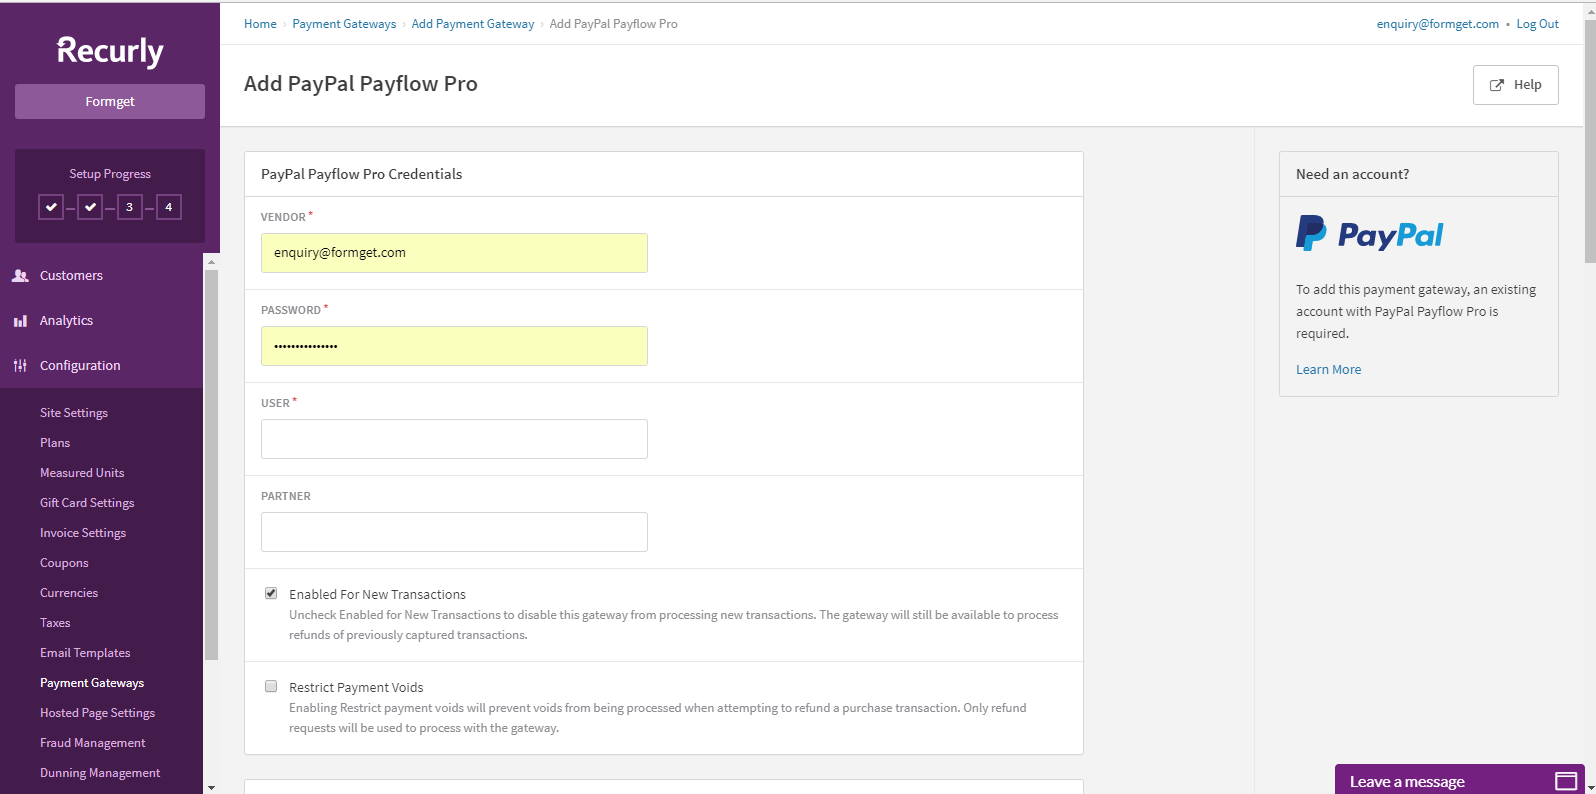
You can select one of the Gateways given in the list for payment method. I am picking up here PayPal as a Gateway. Just fill the required details and add that particular Gateway.
A. PayPal Payflow Pro Credentials – Enter your vendor, password etc. to add PayPal payflow.
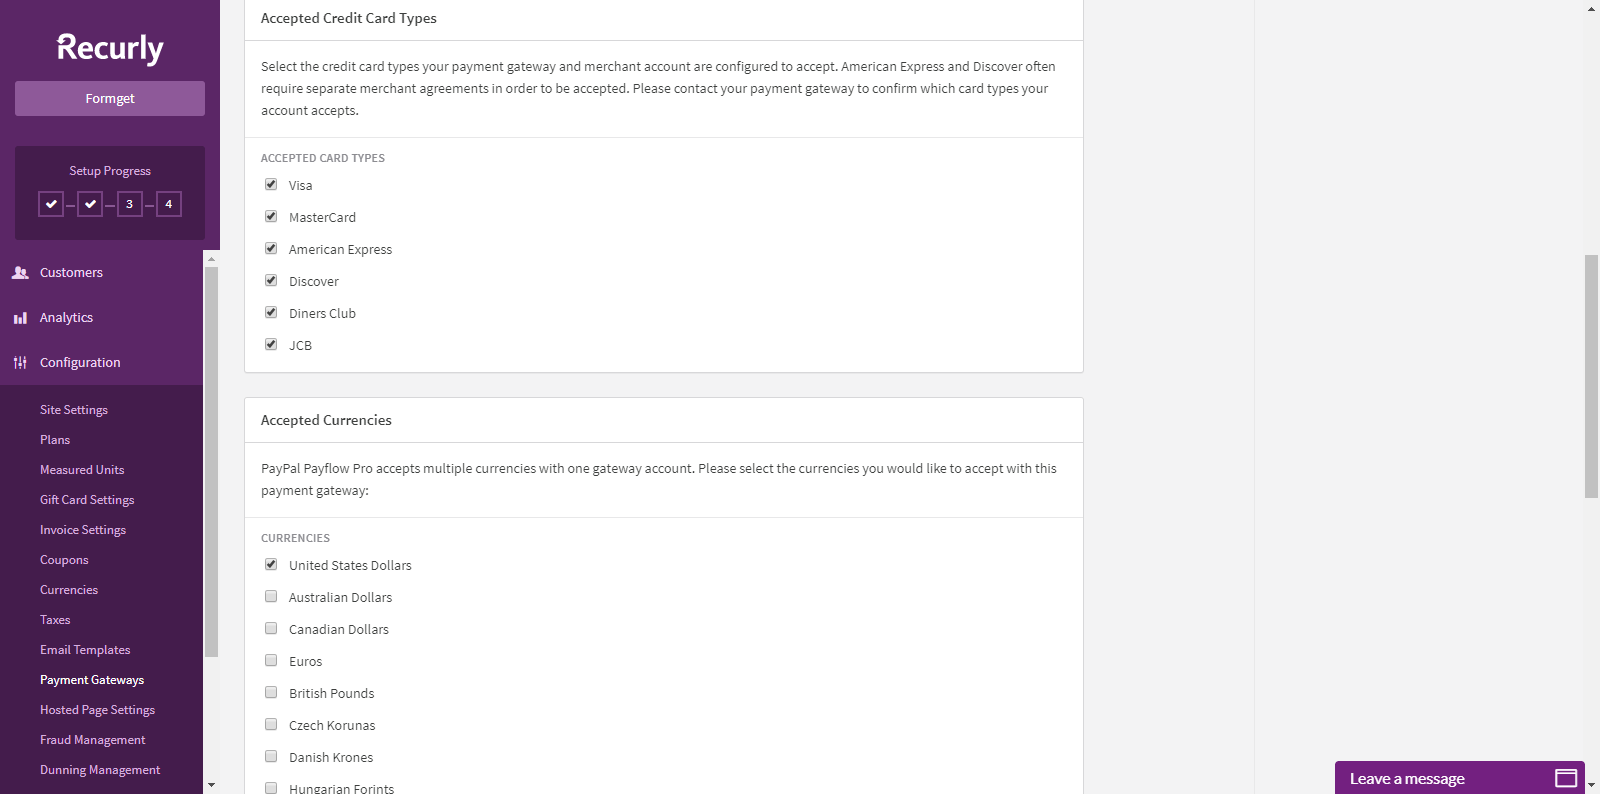
 B. Accepted Credit Card Types – Here you can select the accepted credit card types & currencies.
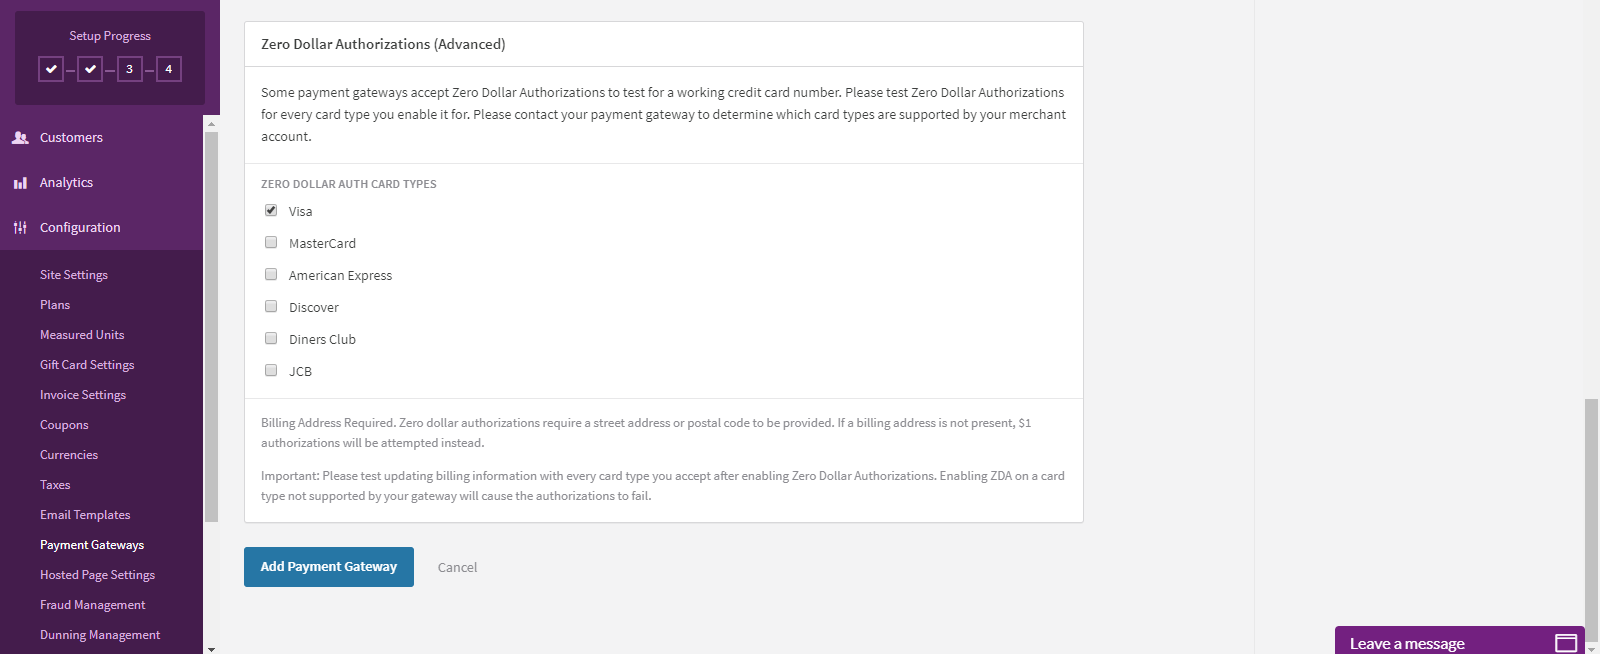
 C. Zero Dollar Authorization – To test the working of a credit card, this Zero Dollar Authorization is used, you can choose card types.
2 – Integrate And Test –
This is used for the dummy successful transaction before getting live.

3 – Subscribe To Recurly –
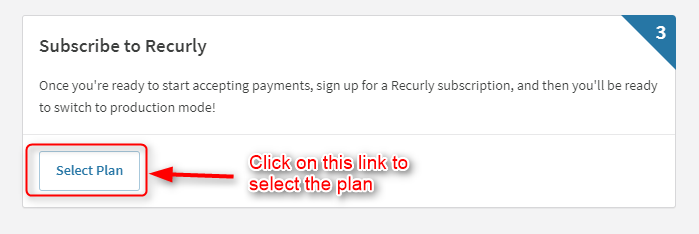
This link will be redirected to the Admin-> Choose Plan Menu which is explained below in detail.
4 – Go Live –
If you have completed your test mode & want to go live then click on the Enable Production Mode.
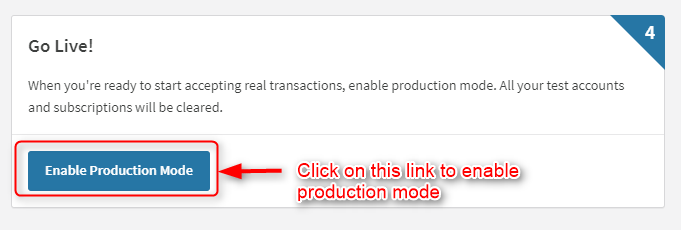
After clicking on this link, You will be reached to the new tab –
 The above tab will ask you to create a plan before enabling the production mode.
2. Customer Related Essentials In Detail
1. Customer Accounts Data –
All the account details like name, email address, date & plans will be shown here. You can filter the account details with some given options.
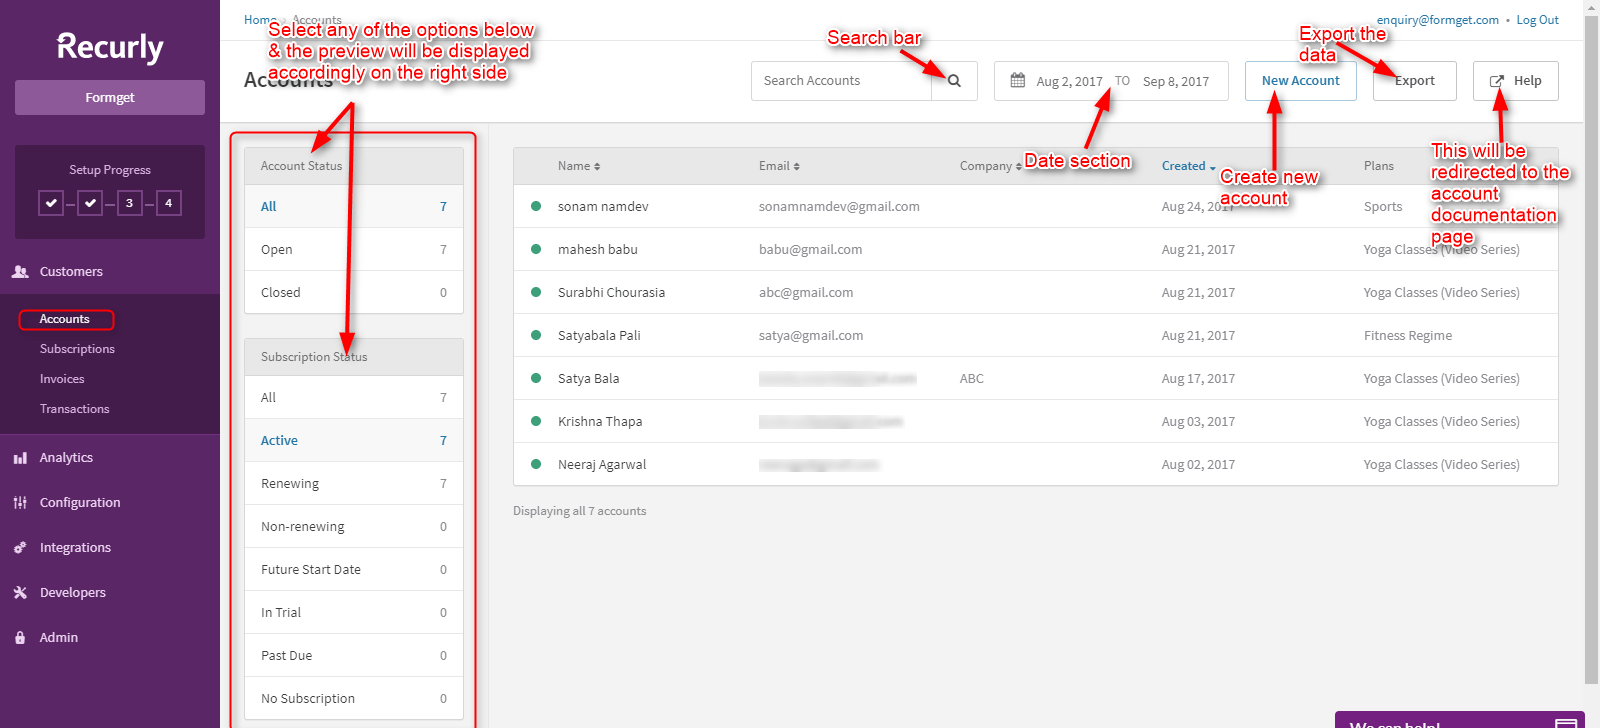
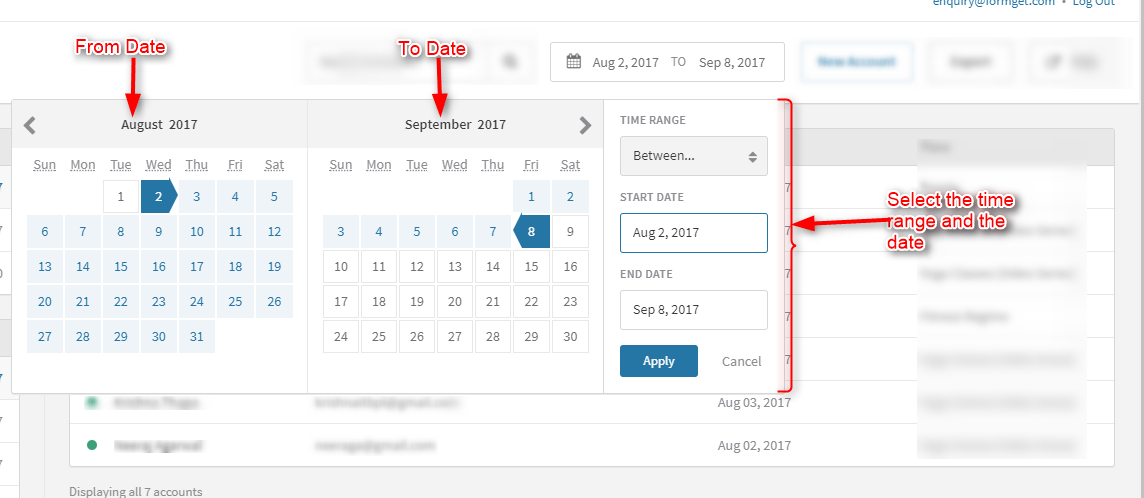
Date Section –
Specify the “from” & “to” date to filter the account details you want.
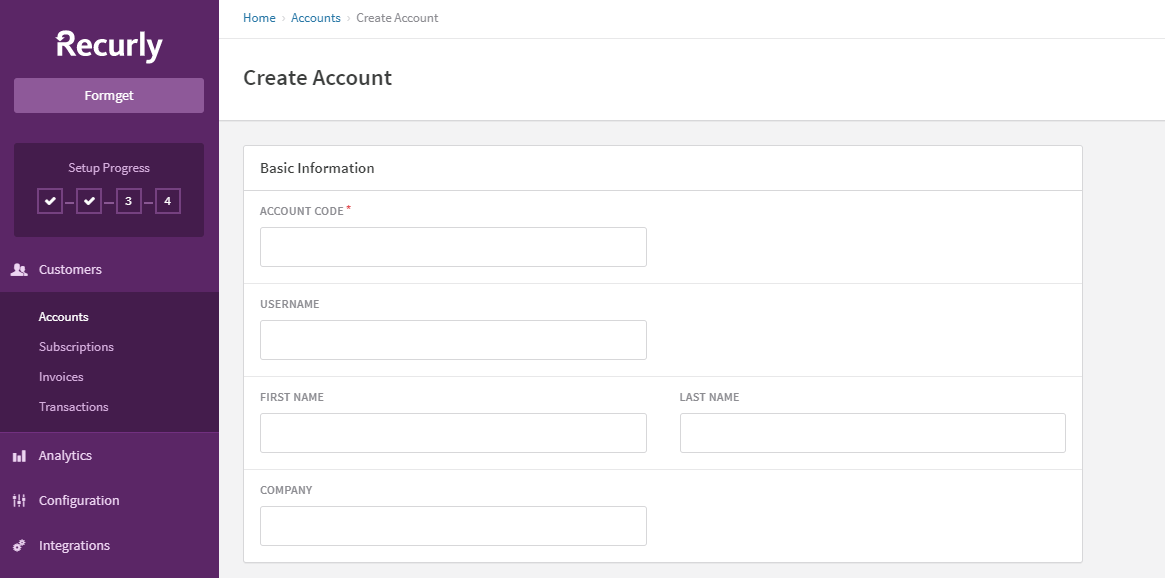
New Account – You can create new account by clicking the “new account” button from the dashboard.
- Basic Information – Fill the basic information like Name of the account holder, company name & account code
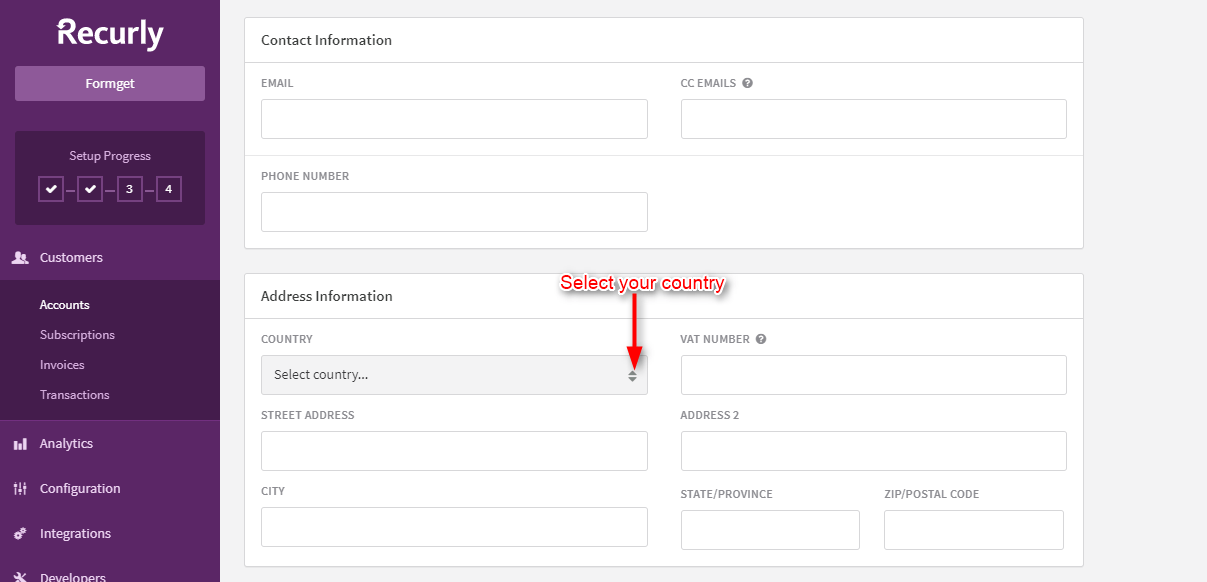
- Contact & Address Information – The account holder contact details with their address is the second important information to fill.
- Account Acquisition Data – The last step to create the account is to select the customer’s acquisition data like cost, country & channel to measure the subscription lifecycle of your customers.

Exports –
You can export any of the data for your future references from the left side menus like Accounts, Billing info, Coupons, Gift card, Invoices, Subscriptions, Transactions etc.
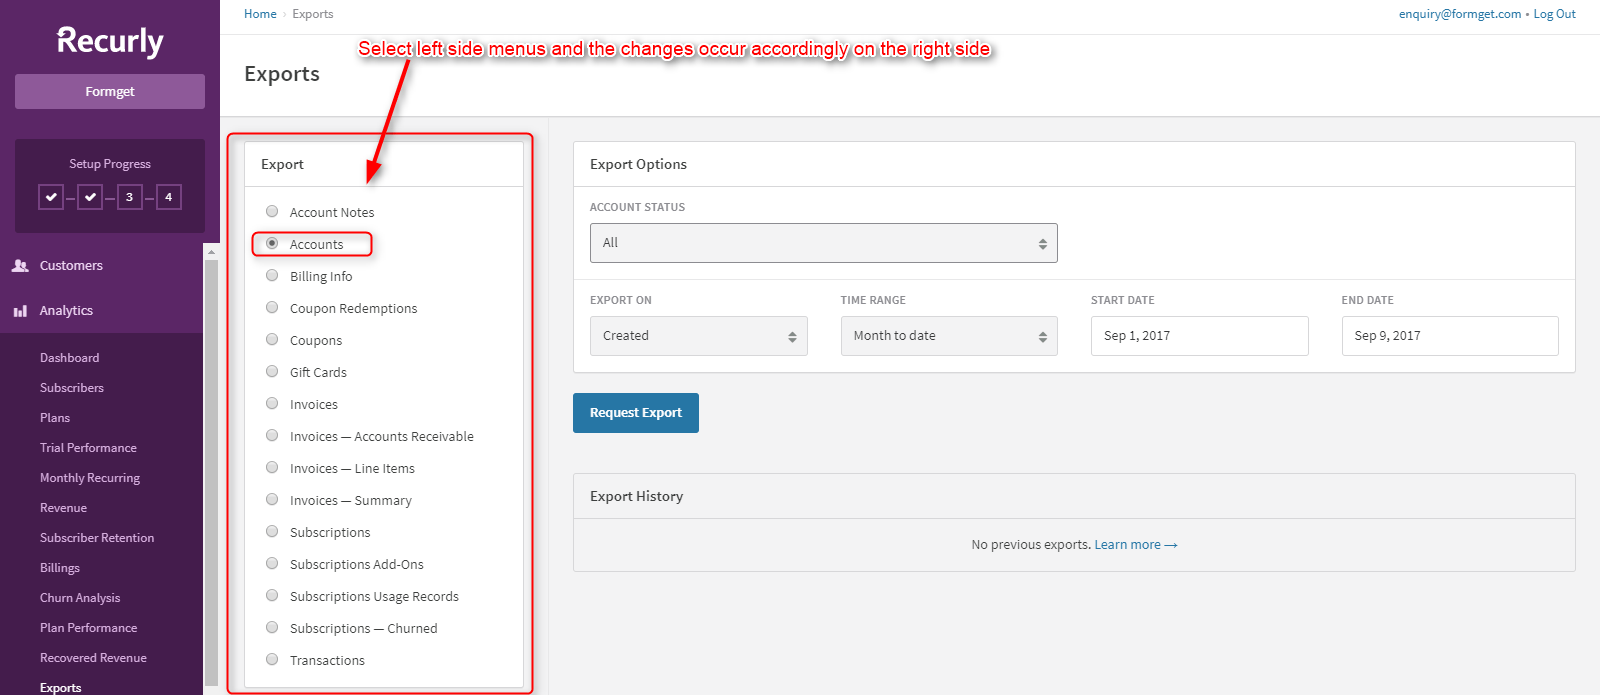
- Account Status – Filter your account status before exporting the data.

2. Export-On – You can either Export On “created” or “modified”.

3. Time Range – select the time-range to export the specific time data.

- Start & End Date – You can also set the specific in between date to filter the data before exporting.
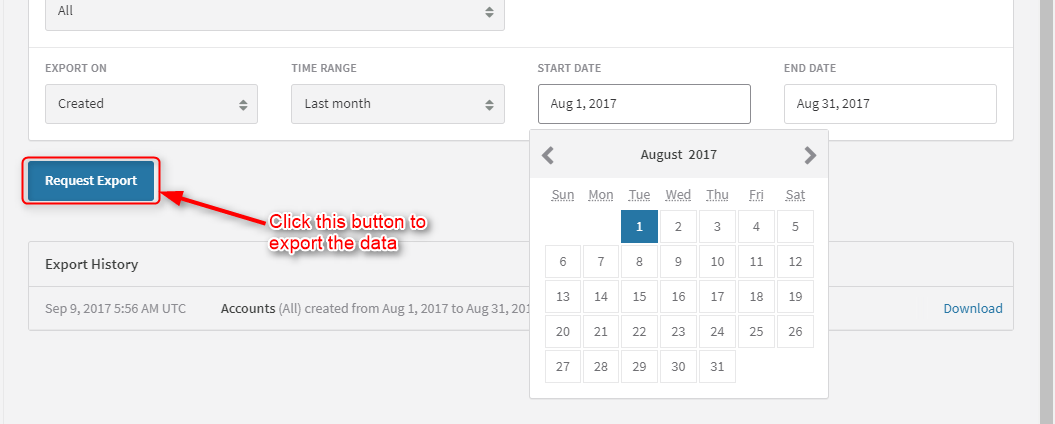 Similarly, you can follow the same steps for other menus as well.
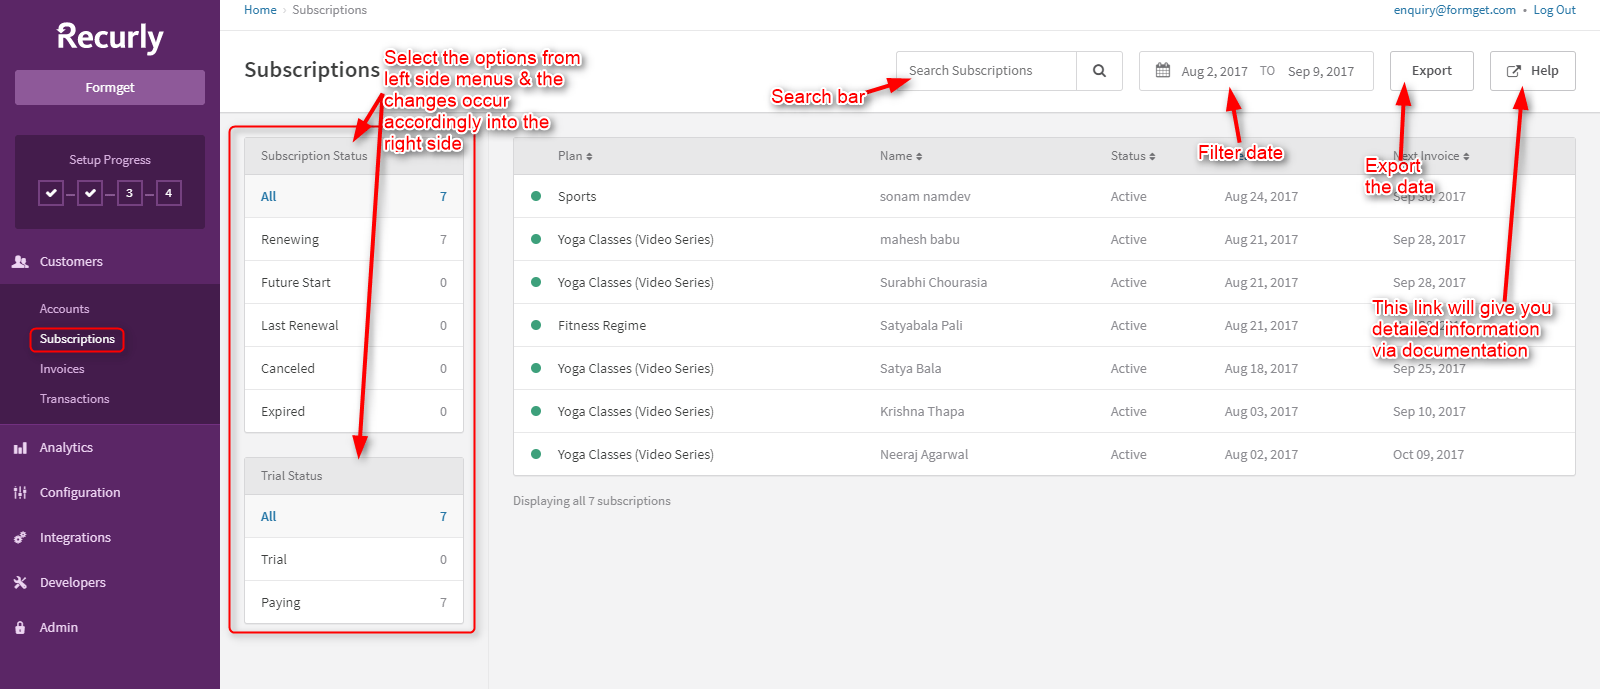
2. Subscriptions – A Dedicated Dashboard To View Subscribers Info –
This is the subscription dashboard, it will show all the name, email address and even the active & inactive status of the subscribers.
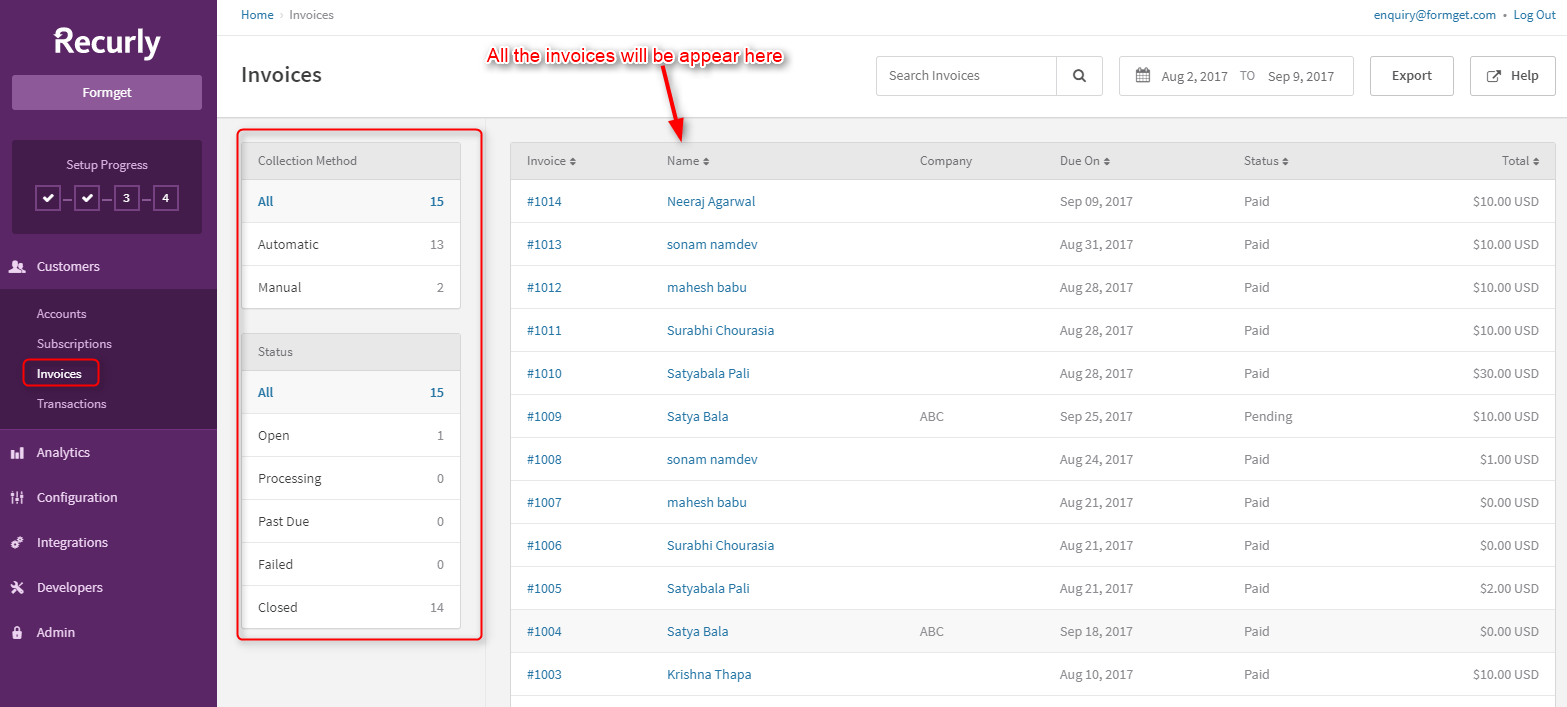
3. Invoices Will Show Status Of Payments –
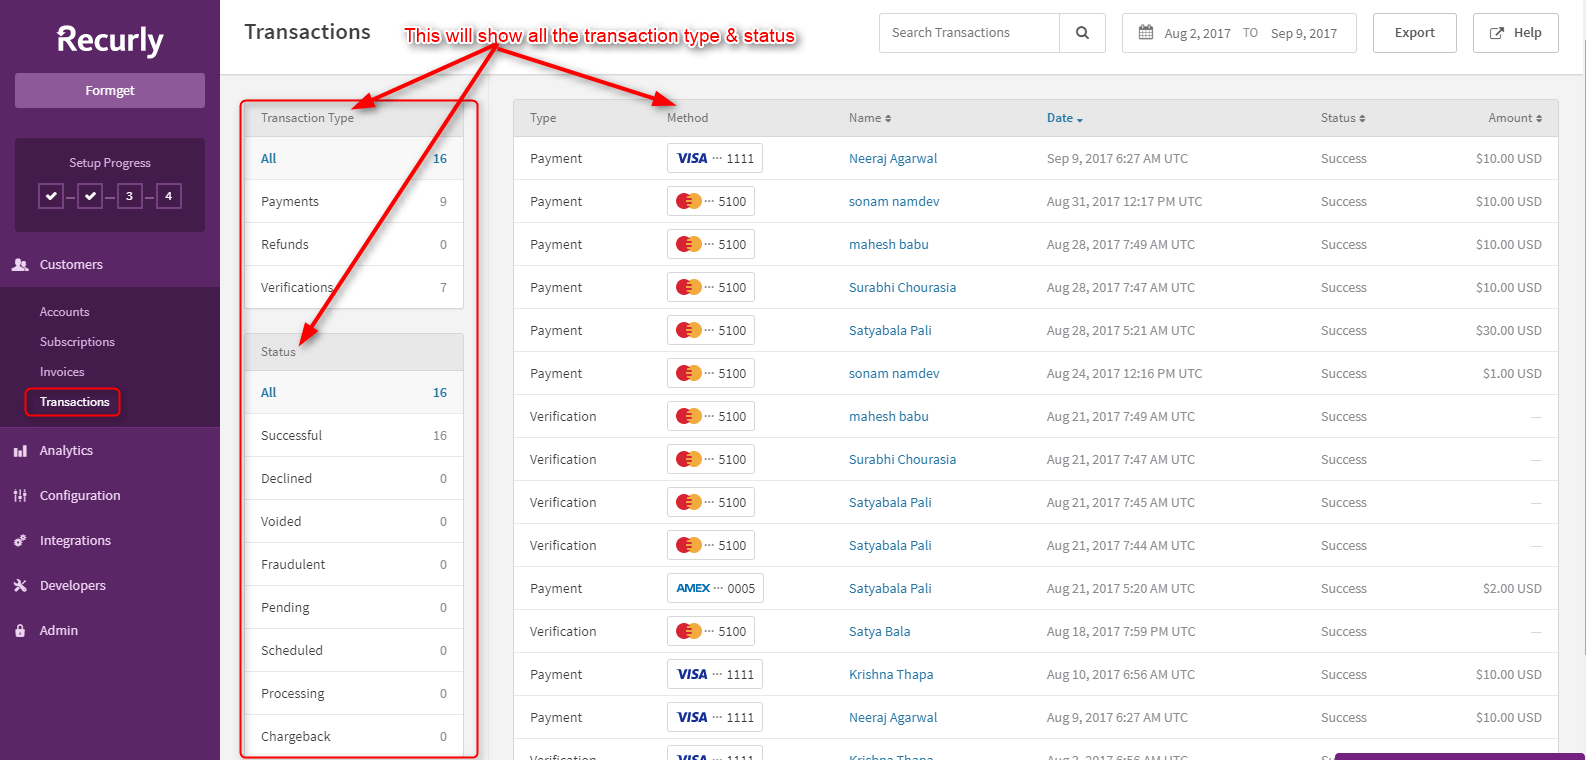
 4. Transactions Essentials –
The transaction dashboard has transaction types, transaction method, subscriber’s name, date of the transaction, status of the transaction & amount of the transaction.
3. Analytics To Know Details Of Key Metrics
- Dashboard
- Subscribers
- Plans
- Trial Performance
- Monthly Recurring
- Revenue
- Subscriber Retention
- Billings
- Churn Analysis
- Plan Performance
- Recovered Revenue
- Exports
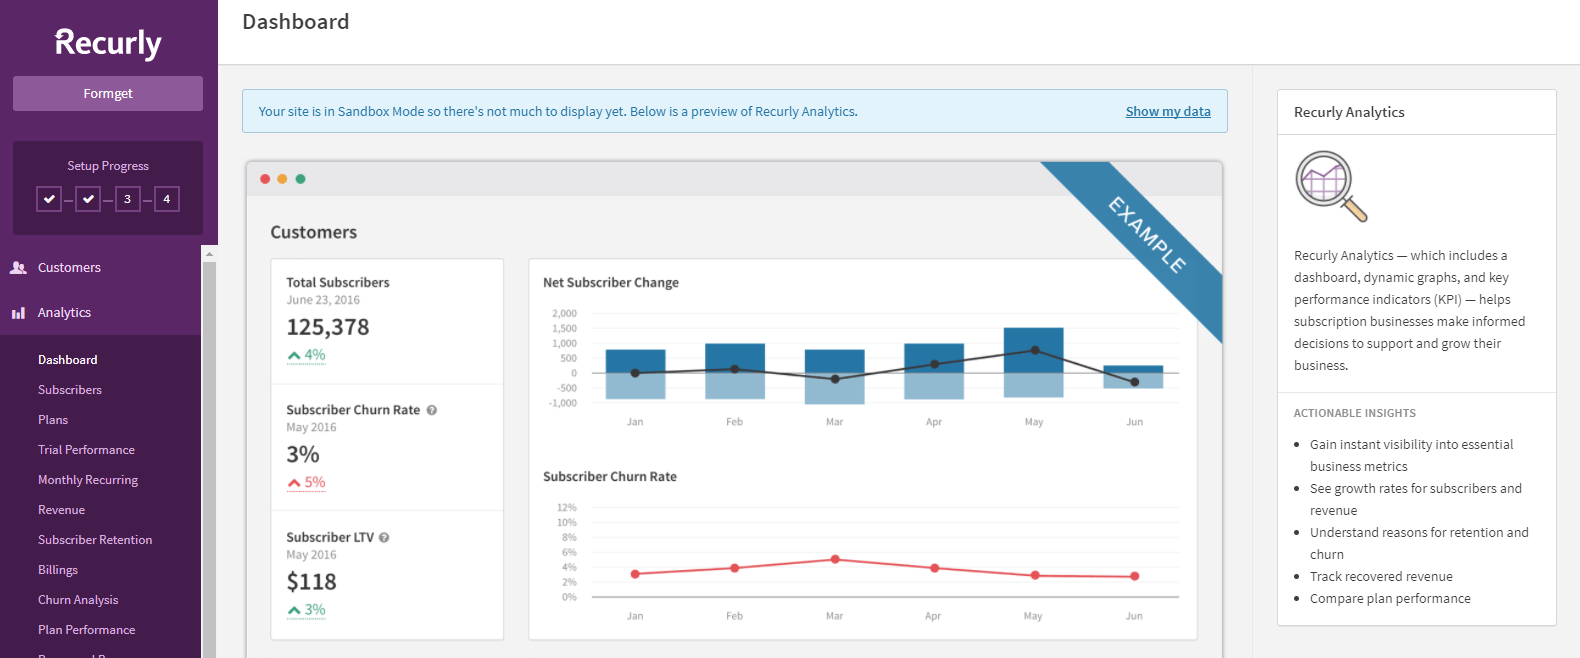
1. Dashboard To Analyze Business Data –
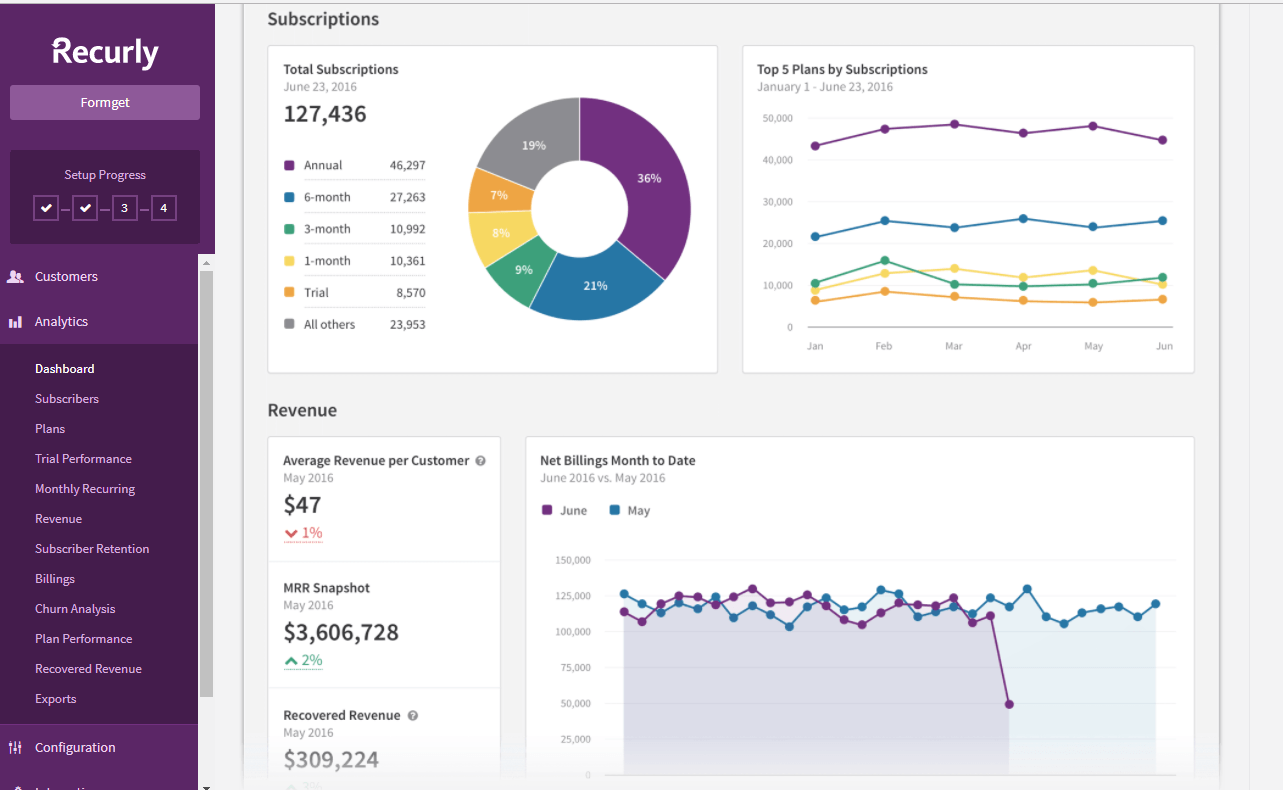
The analytics of customers, subscriptions & revenue are simultaneously shown on the dashboard as you can see in the image below.
Scroll down to see more options.
 2. Subscribers Will Provide Revenue Collections –
You can see the subscribers report in the form of graphs in the subscriber analytics dashboard.
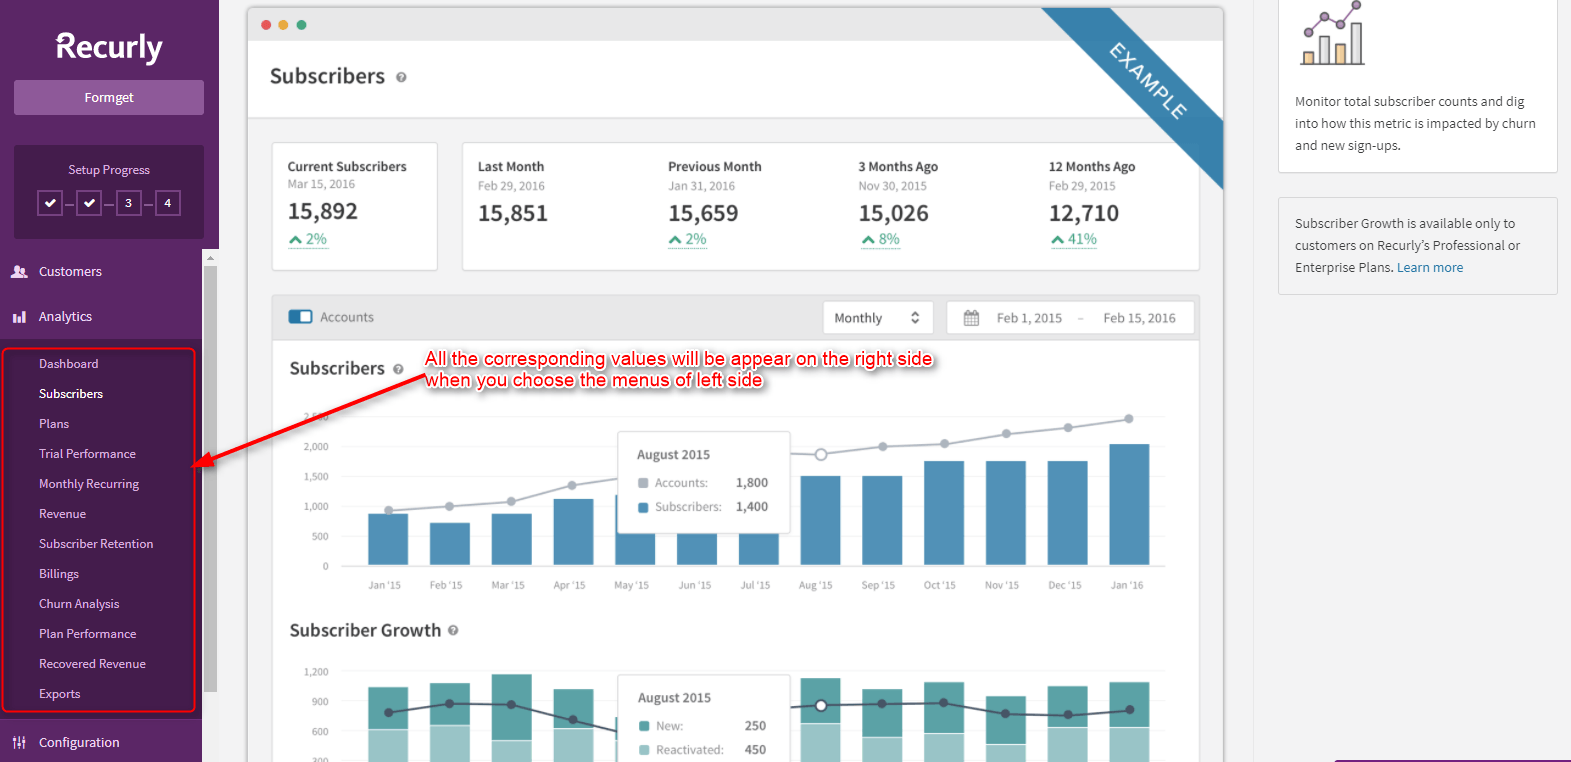 Similarly, you can select the left side menus and the analytics of each section can appear into the right side accordingly.
4. Edit Company Information Via Configuration
1. Site-settings –
The site settings are where you can set up information about your company, tax information, locations, type of business, including how we can reach you in the email fields and what information you wish to collect from your customers.
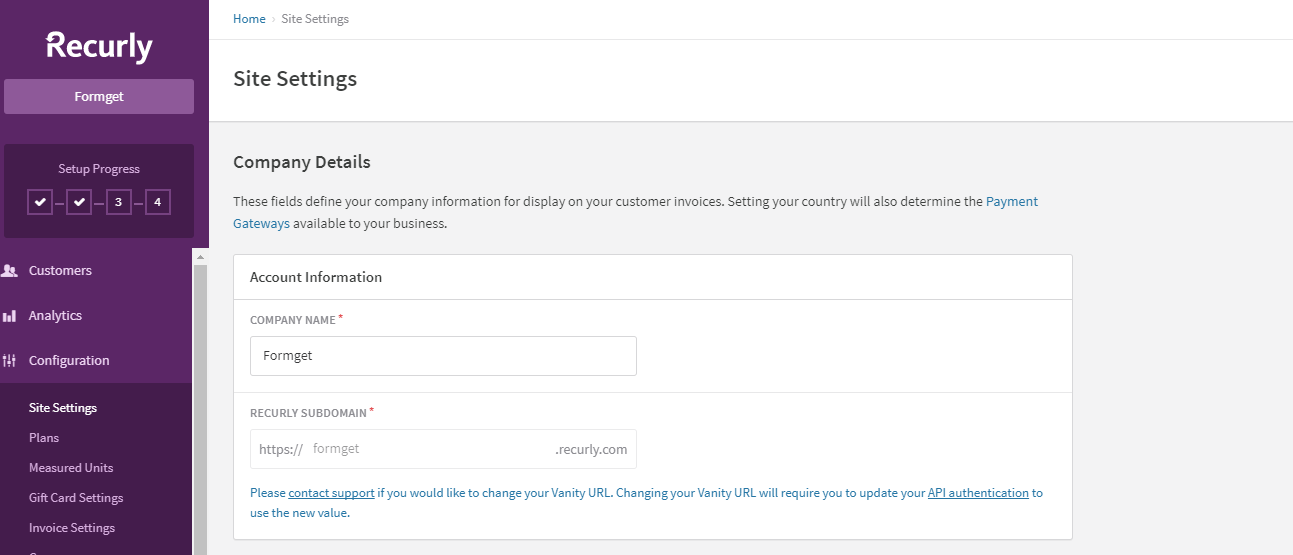
- Company Details –
Fill your company details in the form below.
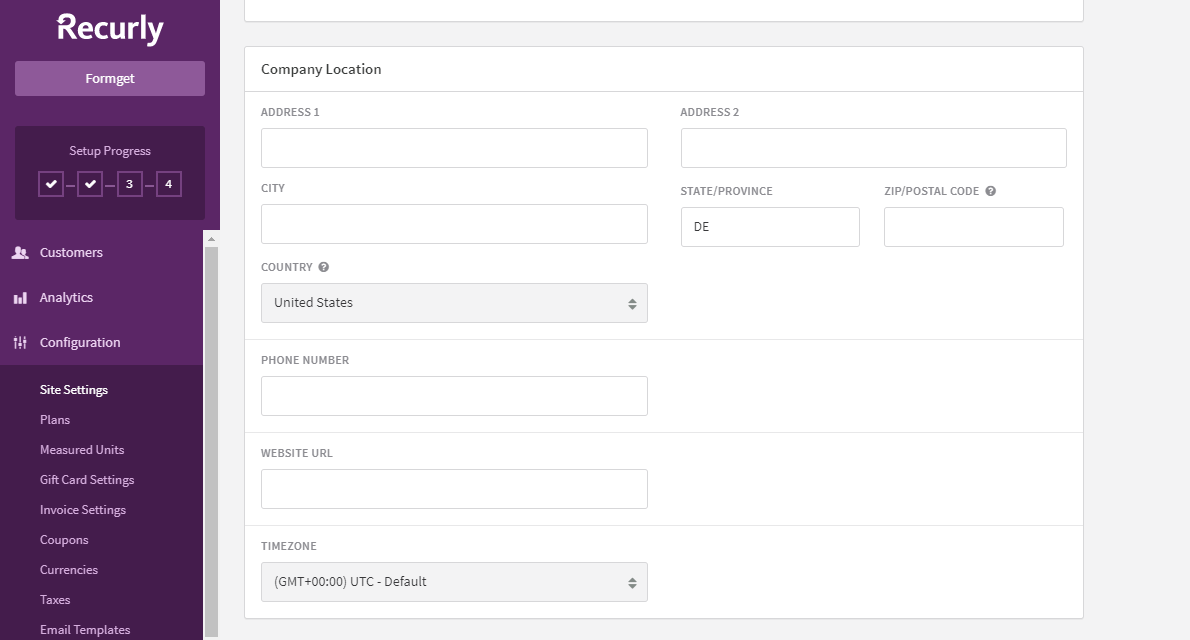
- Company Location –
The location you enter will also affect the gateways that will populate for you to select from when you go to setup your payment gateway.
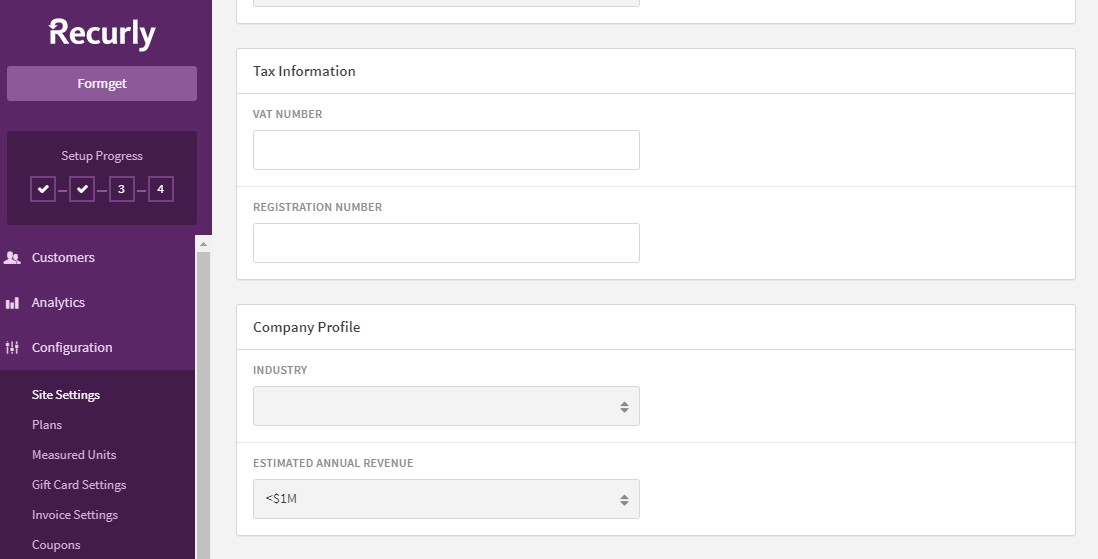
- Tax Information –
The site setting needs to enter the tax information i.e. VAT number, & Registration number.
- Advanced Settings –
You can choose the advanced settings that give the billing & technical information.

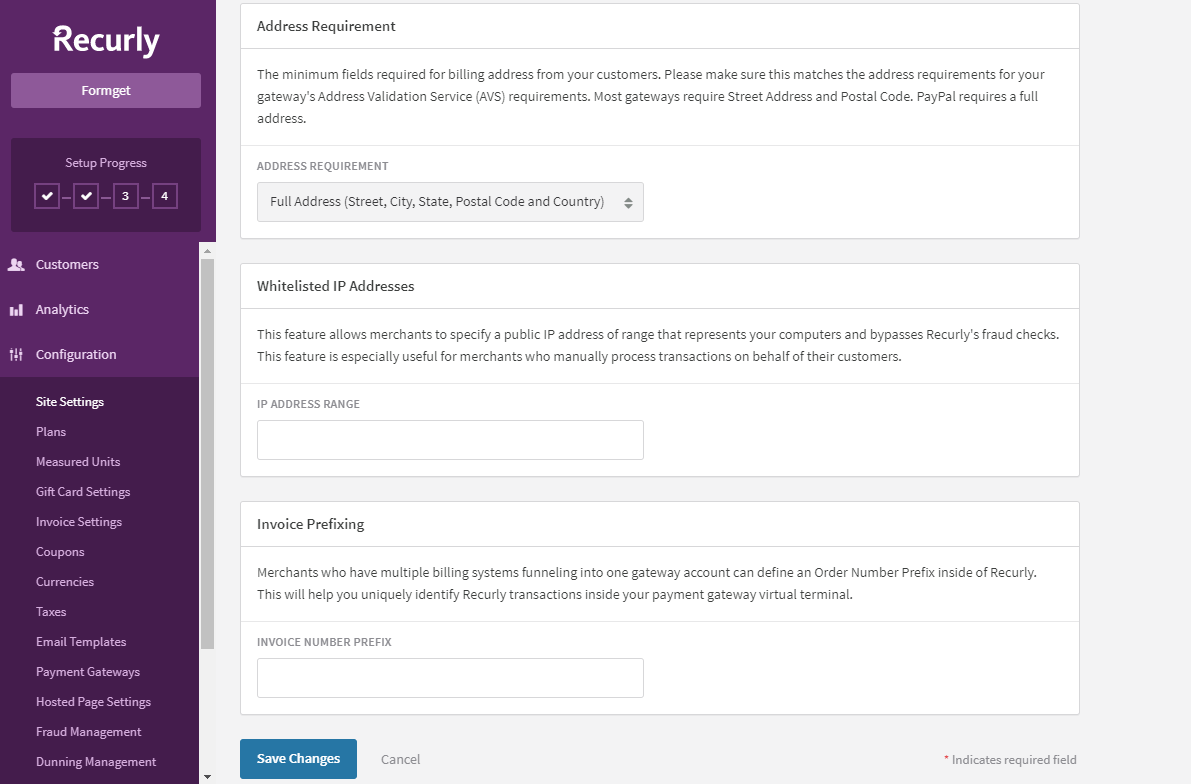
- Address & Invoice –
Enter the required address, Whitelisted IP address & invoice prefix into the form. Just make sure that this address must be same as of your payment gateways.
 2. Plans To Define Product Pricings –
You can create unlimited plans for the customers that you want them to pay for your products. The dashboard of the plans can be shown as below.

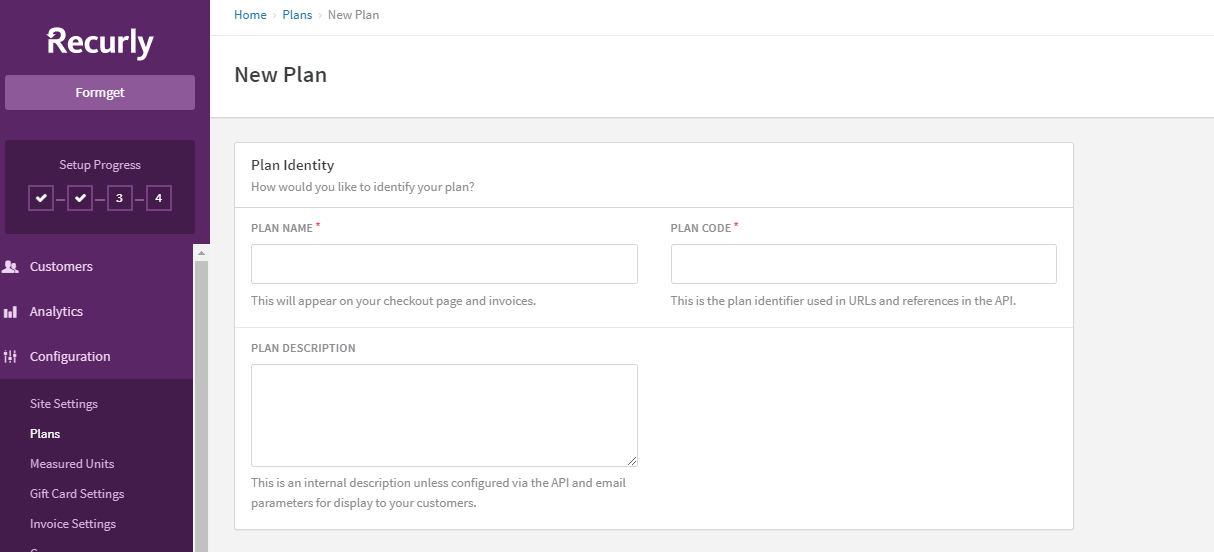
New Plan – Create a new plan by filling all the necessary details of the form as shown below.
- Plan Identity – Fill the details like plan name, code & description
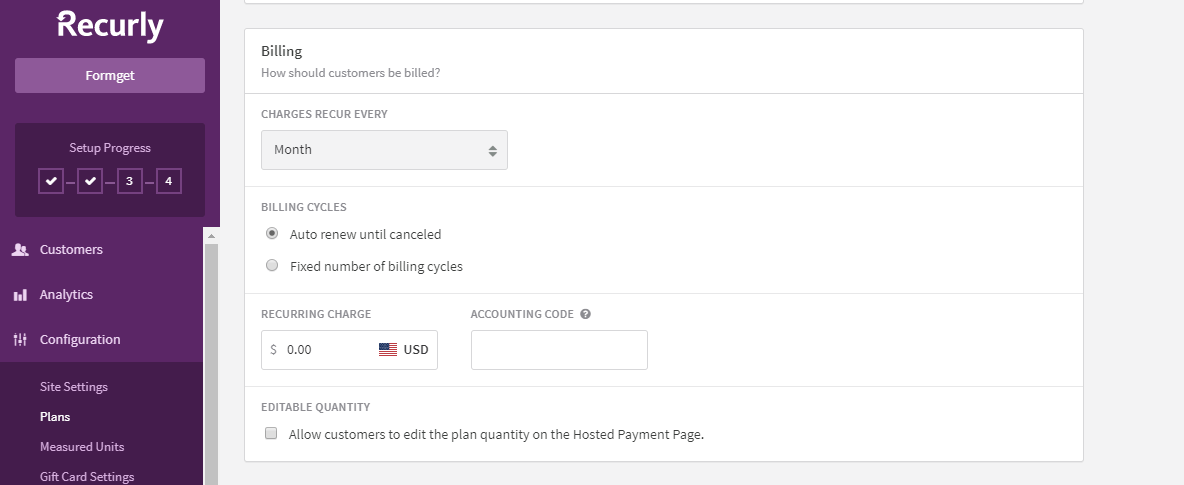
- Billing – The no. of billing cycles, recurring charge etc. types of details can be used in the billing information.
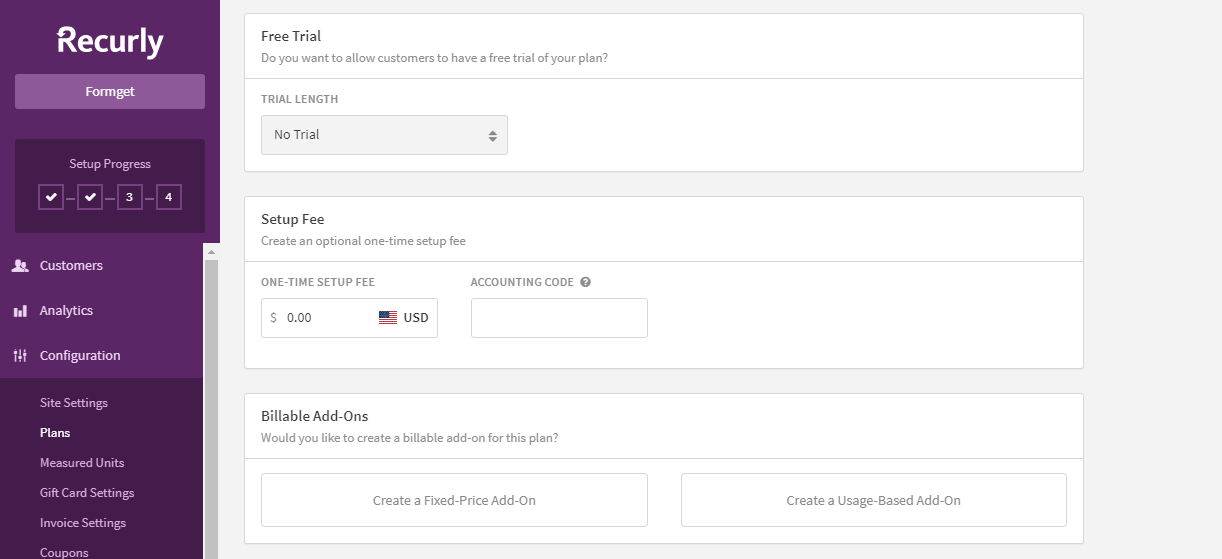
- Free Trial – If you want to give free trial for the specific time duration, you can set it through this free trial option.
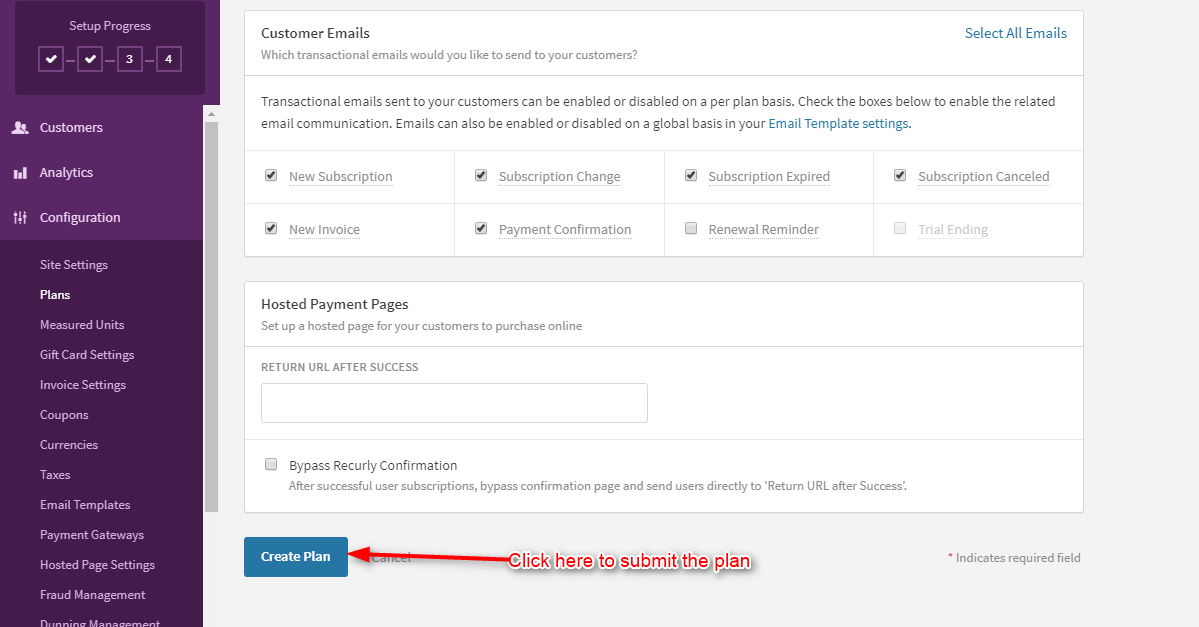
- Customer Emails – You can also set the email address that is sent to your customers during a transaction.
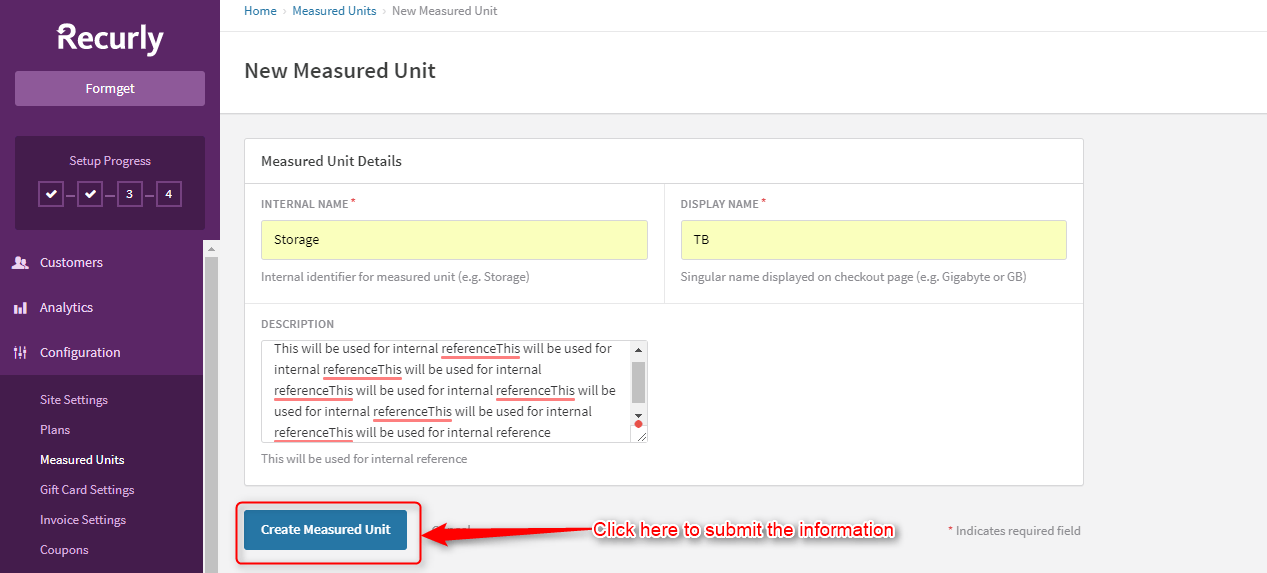
3. Measured Units Counts The Used Units & Automatically Bills Customer –

- New Measured Unit – This will allow you to set the measured unit type & the unit remains same during all plans.
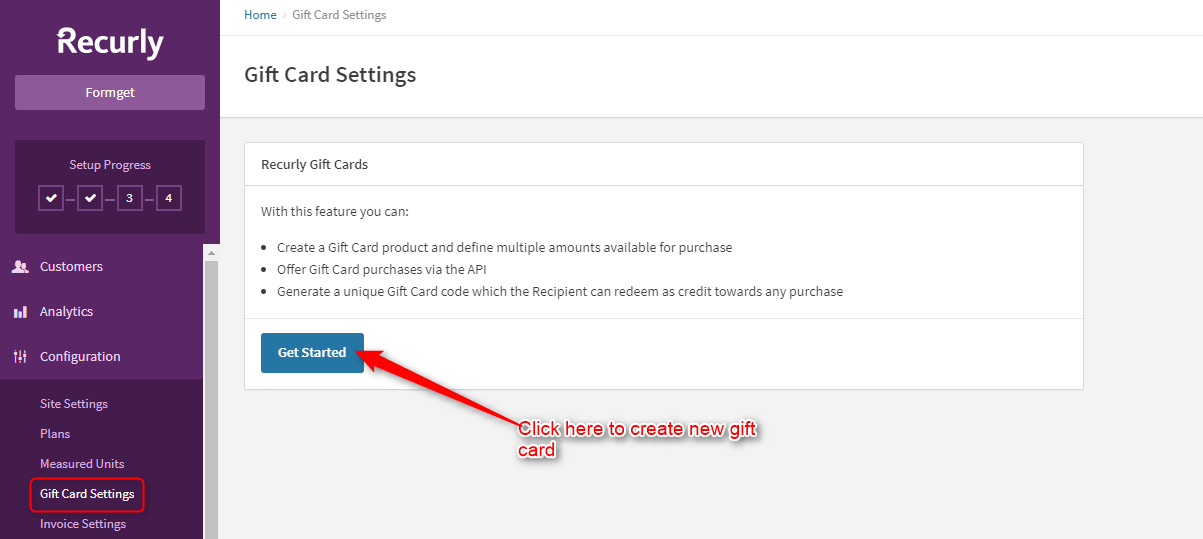
 4. Gift Card Settings To Add Cards On Checkout Pages –
Recurly has the unique feature to add the Gift Card as a deal via API. You can integrate the credit if you want to send the billing information to your customers.
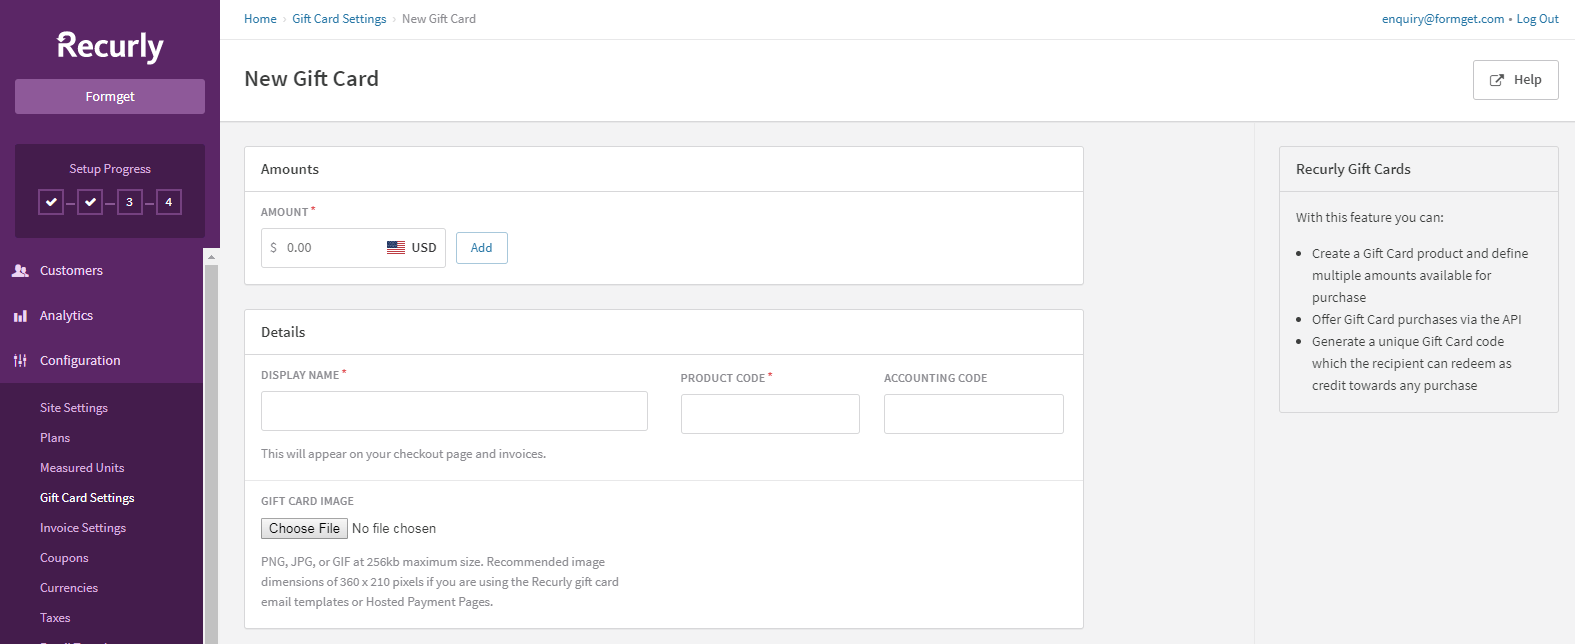
New Gift Card – You can add the amount, product code, product image etc. while creating new gift card.
- Amounts –
- Gift Card Hosted Pages –
 5. Invoice Settings –
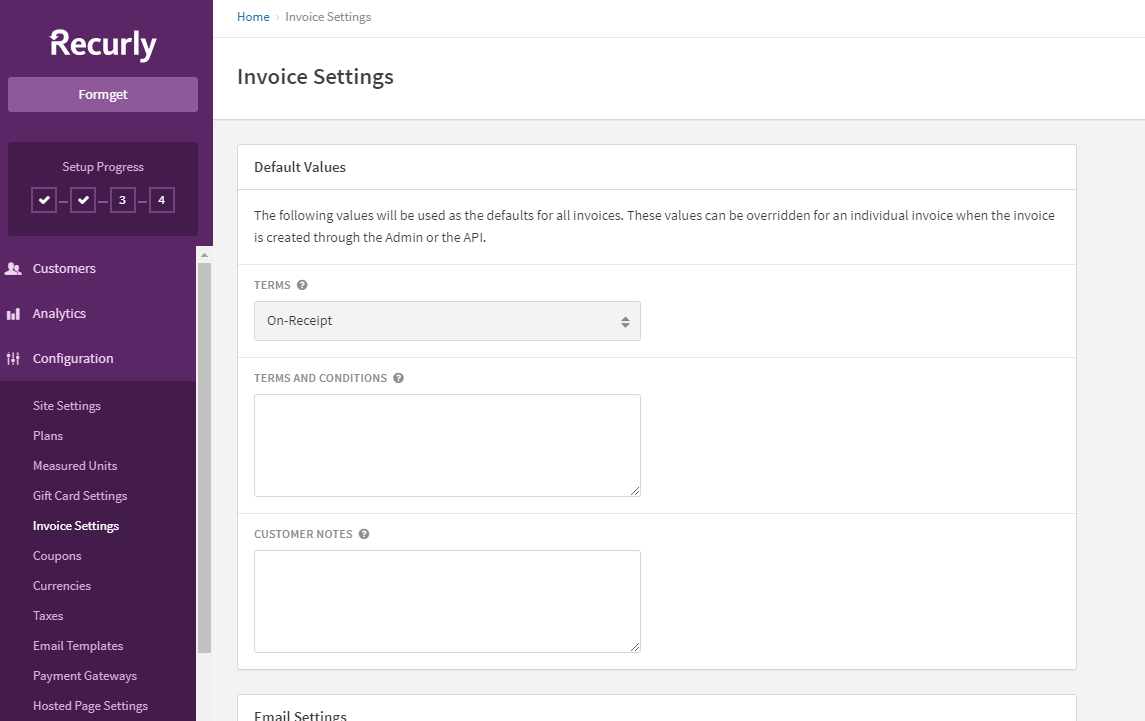
The default values of customers notes, terms & conditions can be shown for all the invoices. But this can also be changed via API or when an admin will create the invoice for an individual.
- Default Values –
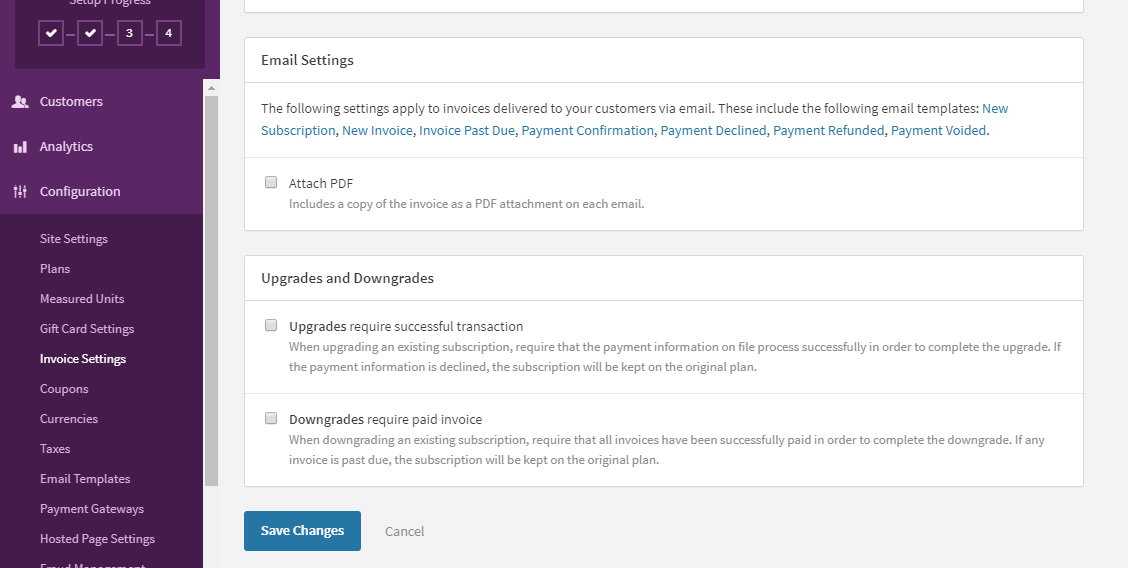
- Email Settings –
 6. Coupons –
Use this feature to create the coupons of your products very easily.
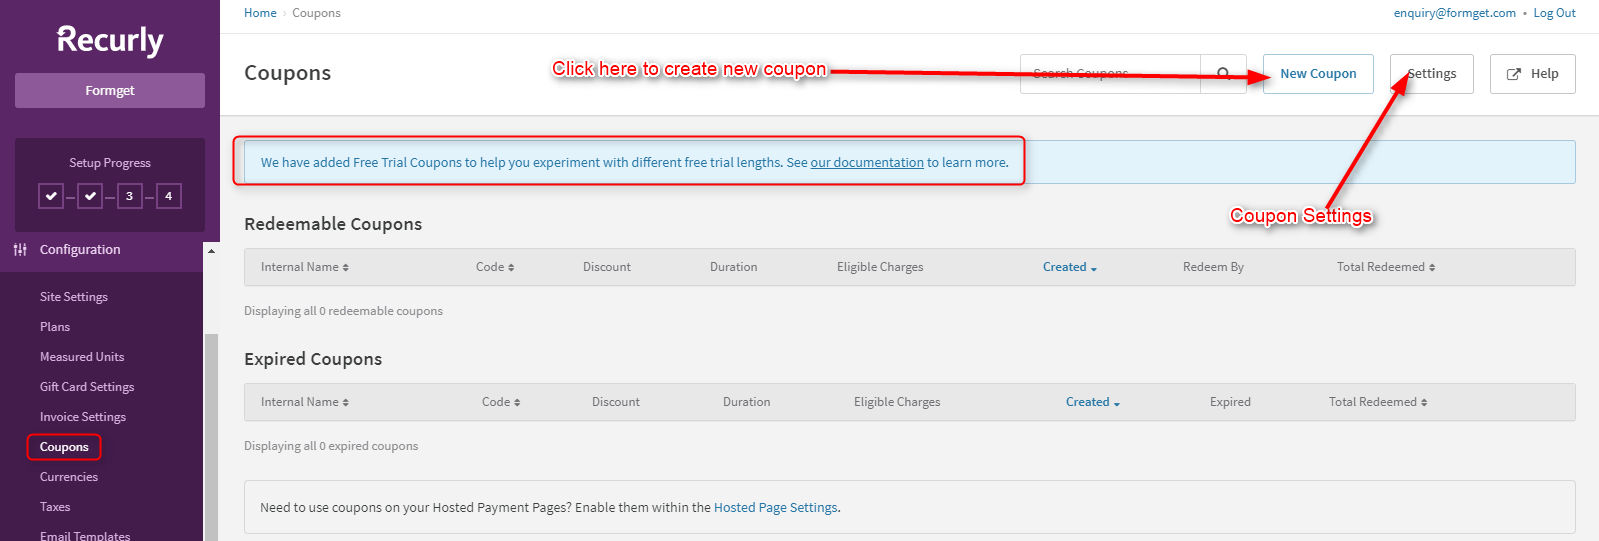
Just fill all the details and choose the rules, redemption and eligible charges for your coupons as shown below.
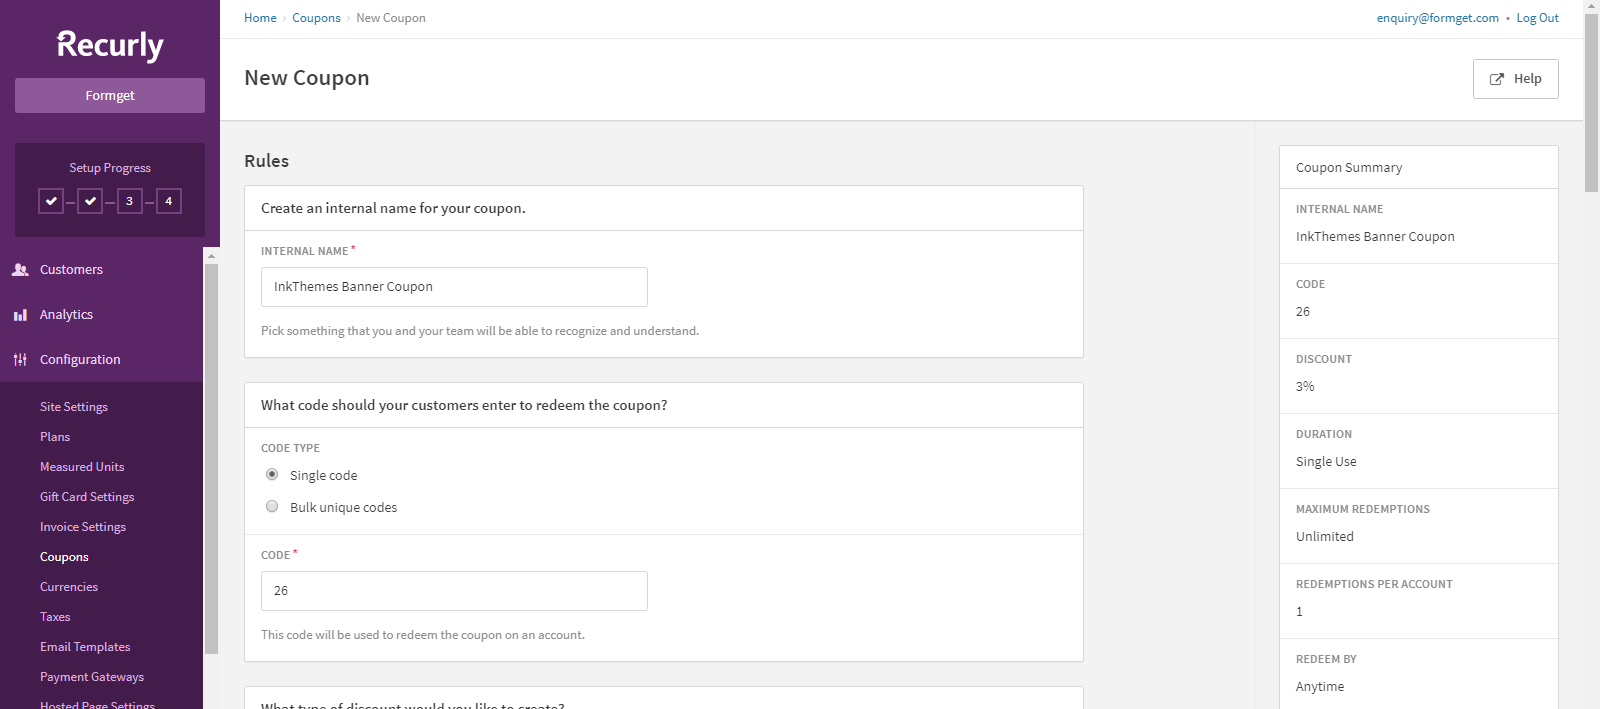
- Rules – Select rules for the coupon from the given option.
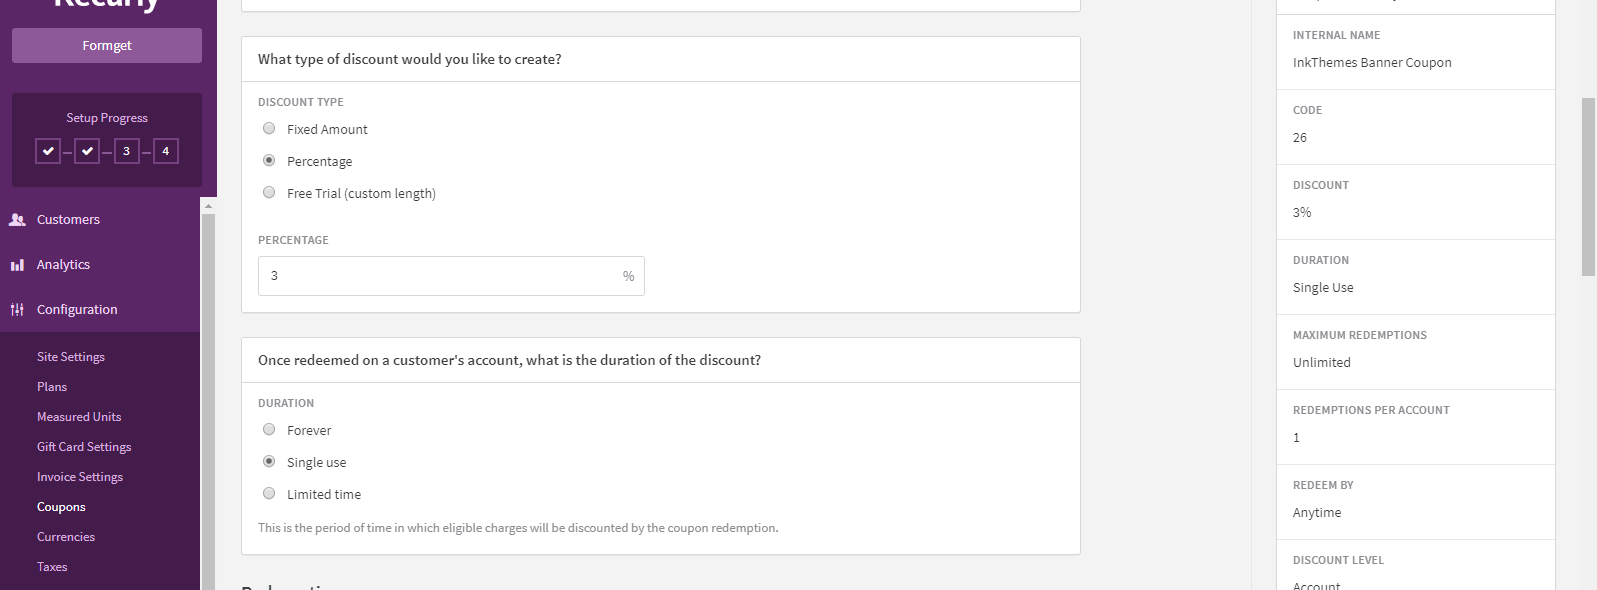
Scroll down to select some more rules for the coupon.
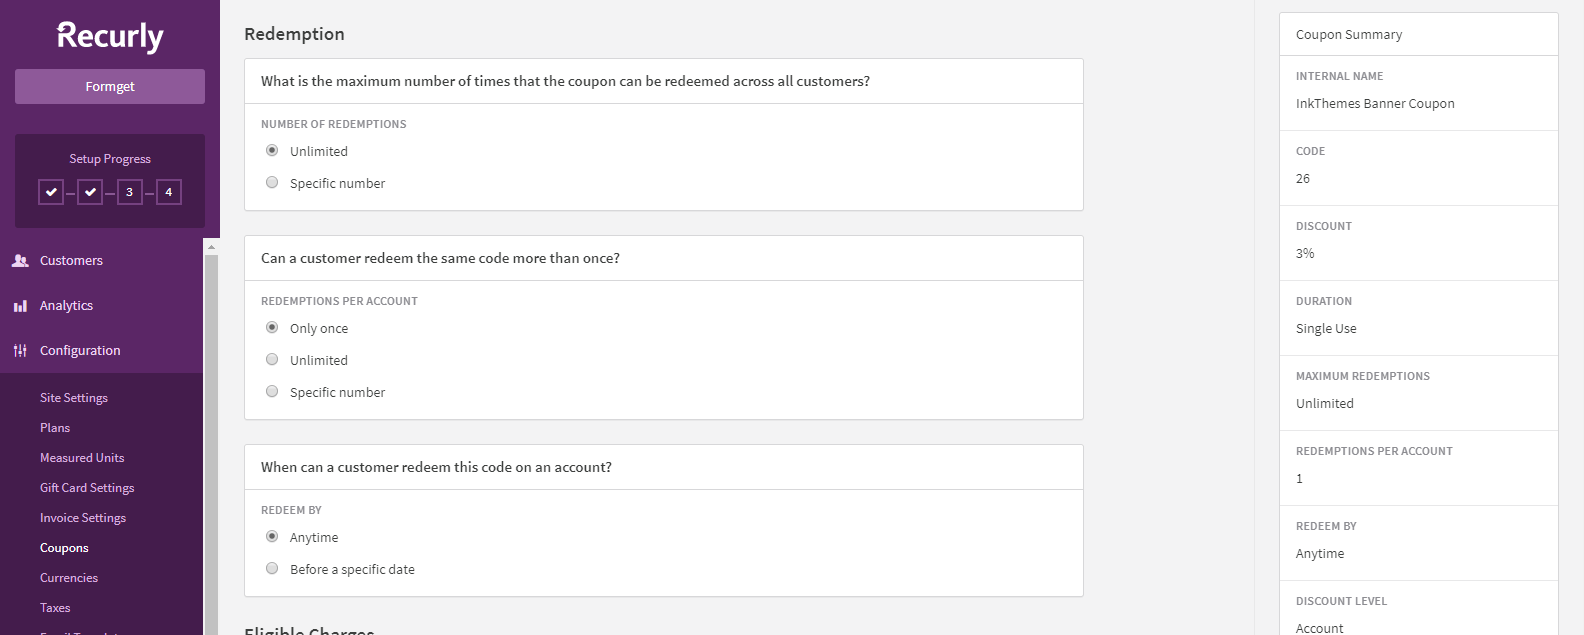
- Redemption – Select the redemption limit for the coupon like no. of redemption, redemptions per account etc.
- Eligible Charges – Choose the eligible plans, discount charges for the coupons. You can either choose all plans or specific plans for the coupons.
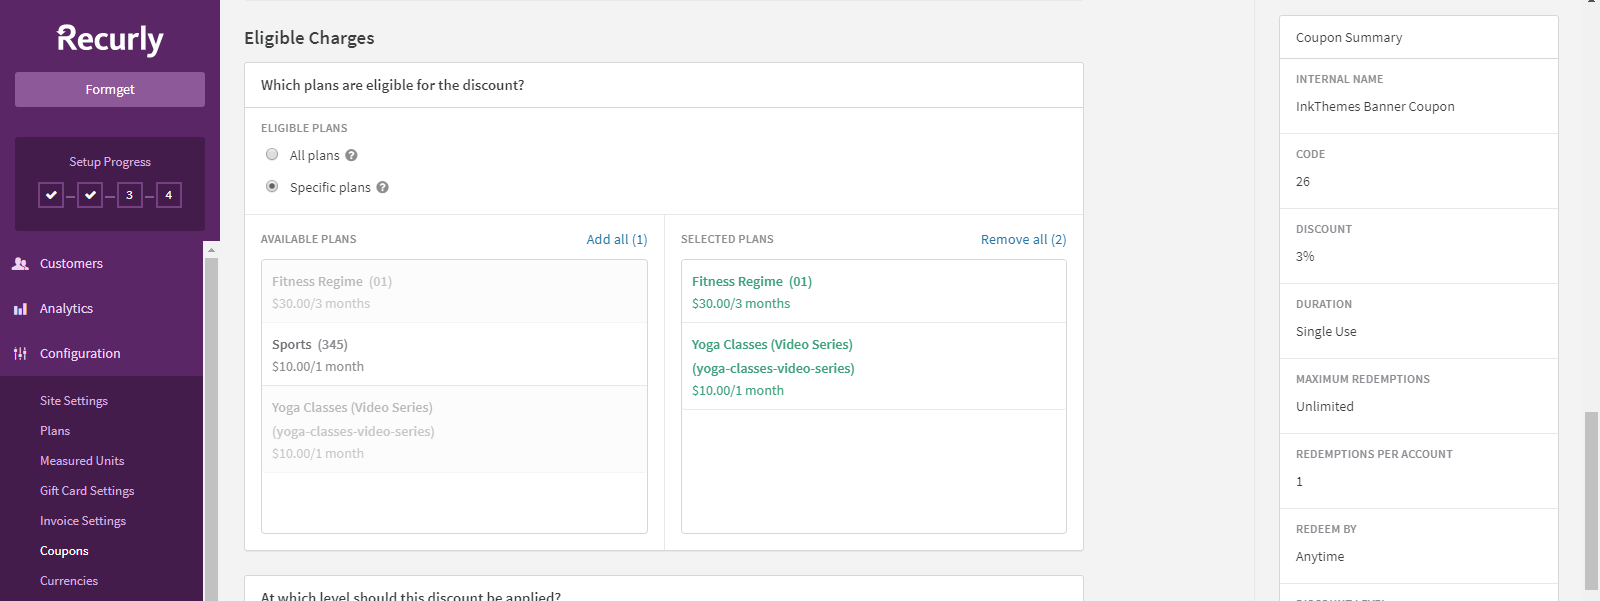
Discount charges can be applied for Account or Subscriptions.

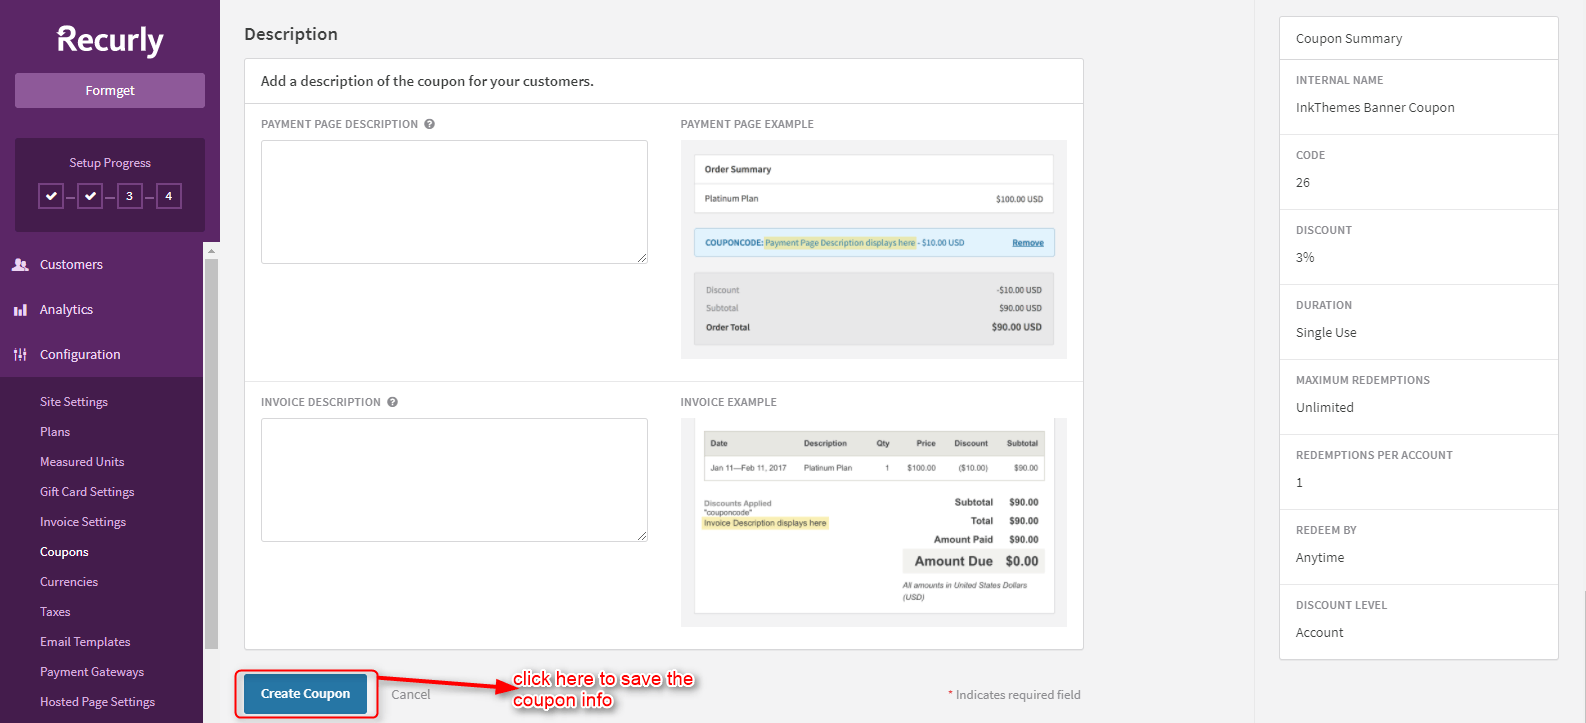
- Description – You can add some description to the coupons for your customers.
 8. Currencies –
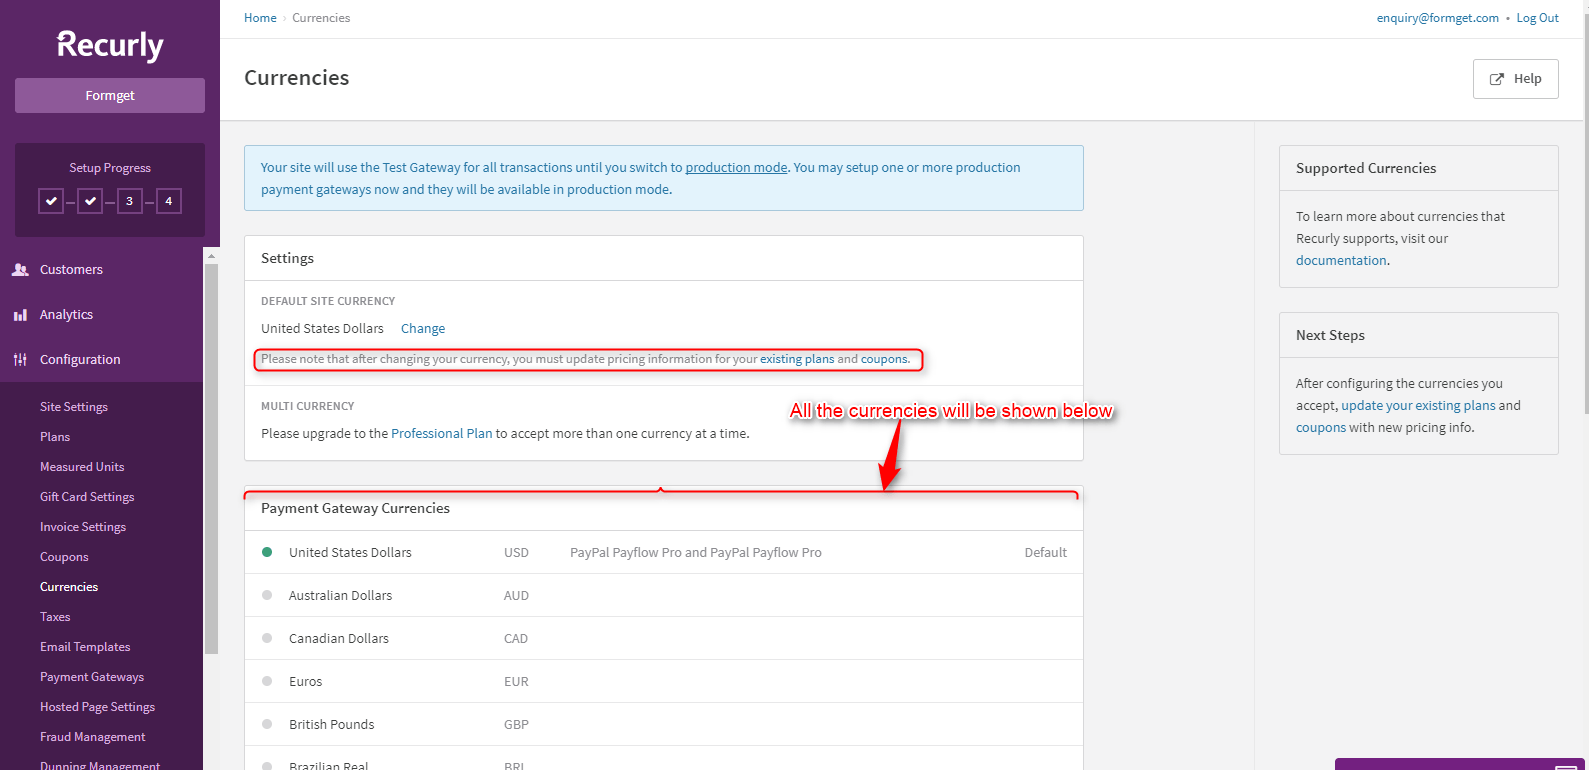
Select your currencies for Payment Gateways with this feature but you have to change the existing coupons & plans after changing the currencies.
9. Taxes –
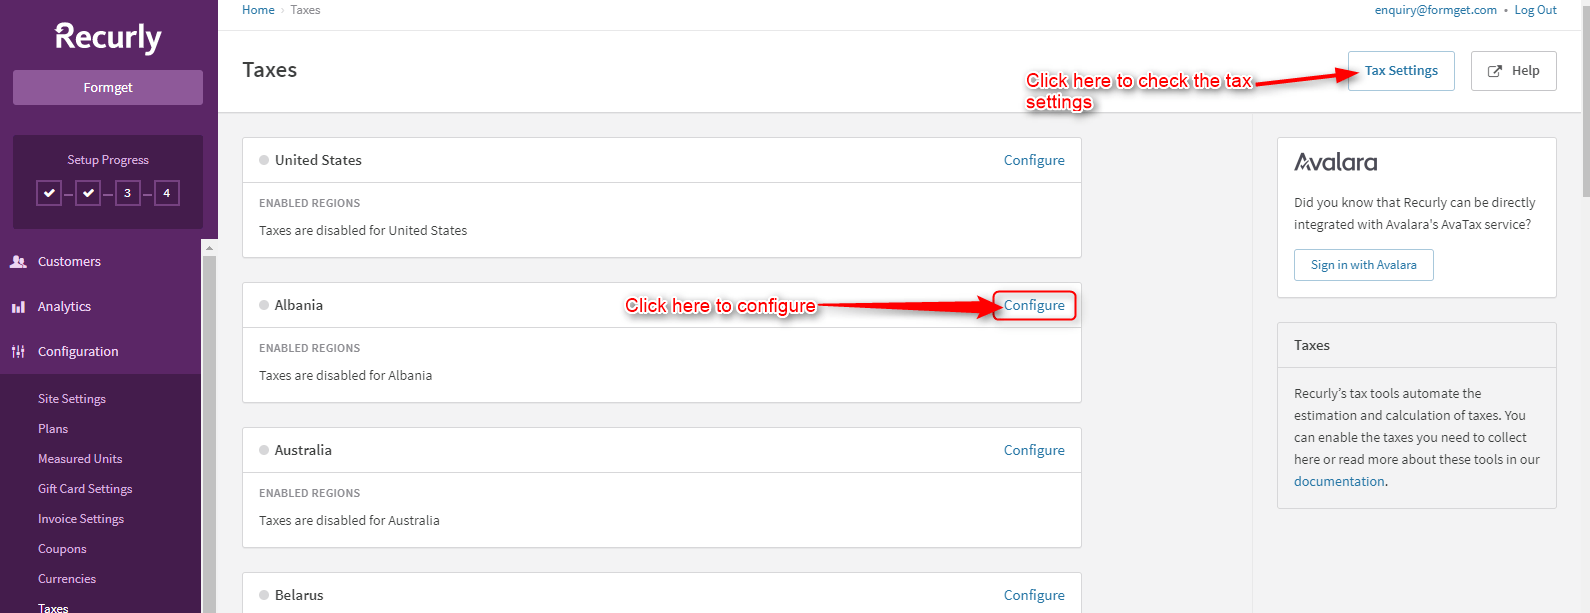
You can enable the taxes according to the country/region. This will automate the calculation of taxes.
10. Email Templates –
You can modify the settings of Account templates/Invoice templates/Subscription templates/Gift Card templates.
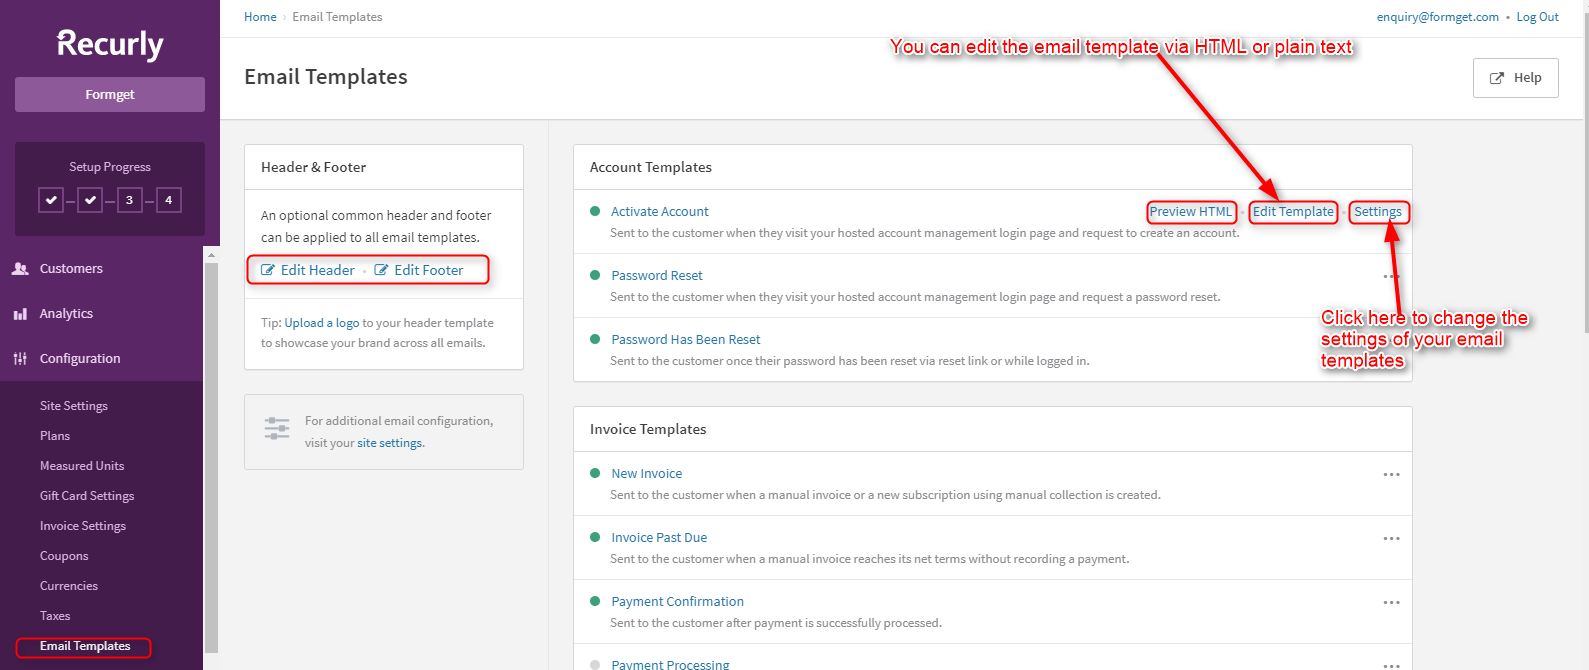
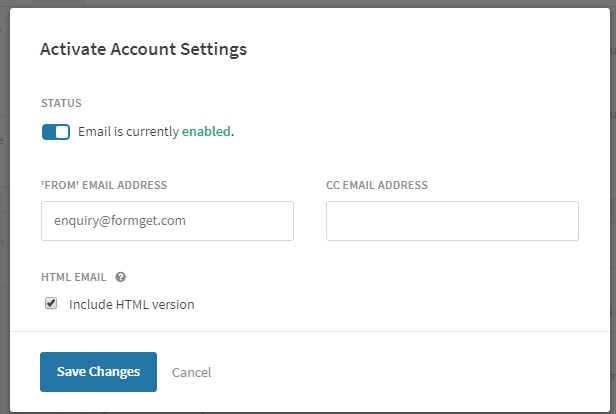
You can edit your email templates through HTML or plain text. Update the account settings that are given below in the image.
11. Payment Gateways Integration –
This option will show you the payment gateway that you had already enabled in the first step.
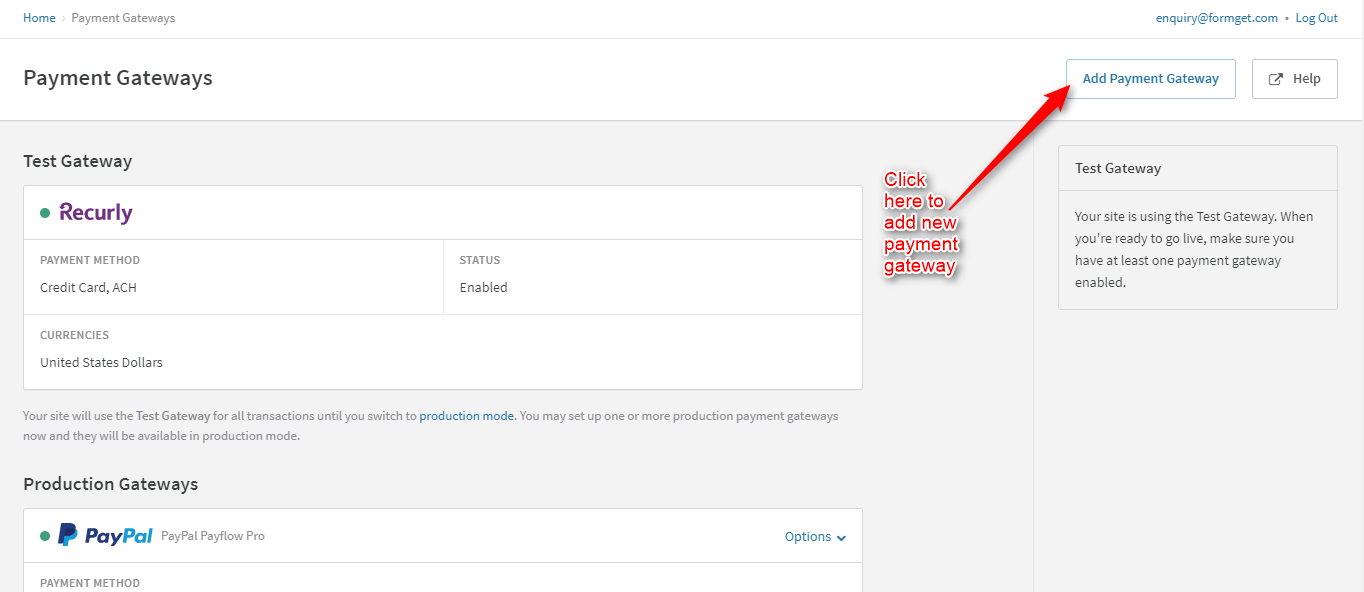
Scroll down to see more options of Payment Gateways on the same page.
12. Hosted Page Settings –
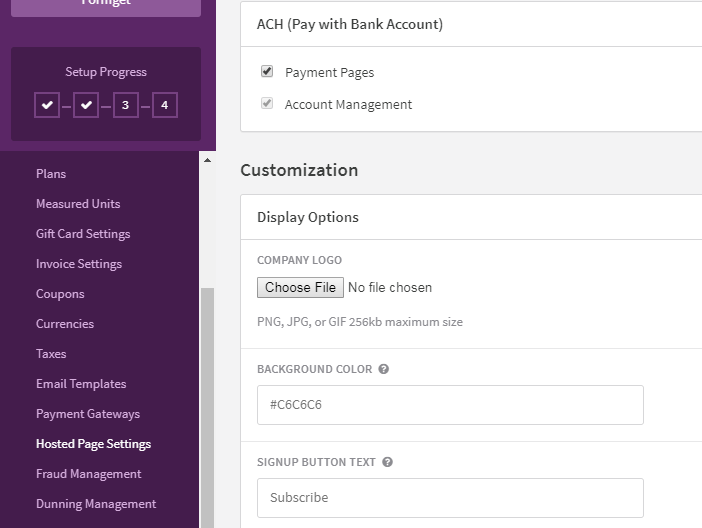
You can update the hosted page settings for the transaction of the products. You can enable or disable the Payment Pages & Account Management Pages for the hosted page.
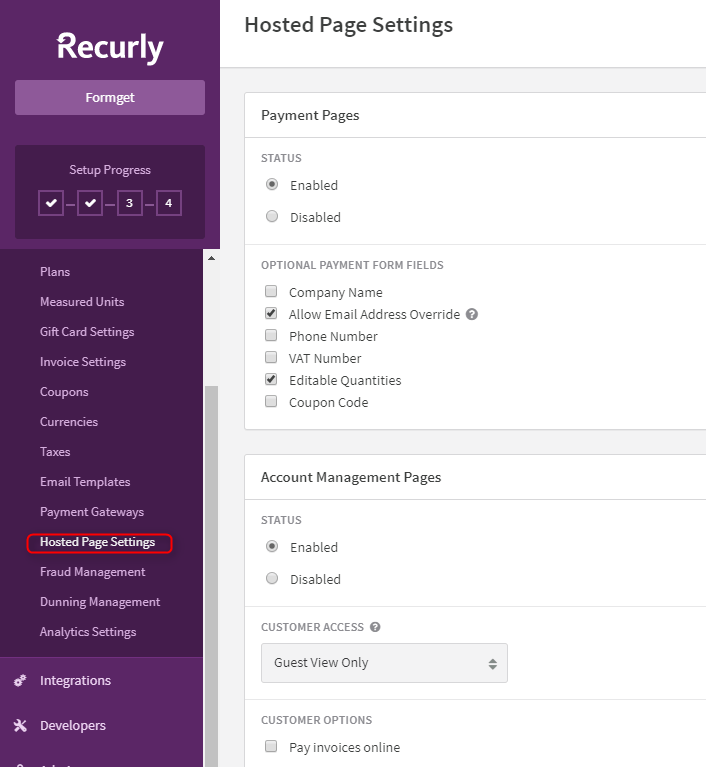
Scroll down to see more options for the hosted pages. You can customize the company logo, background color etc.
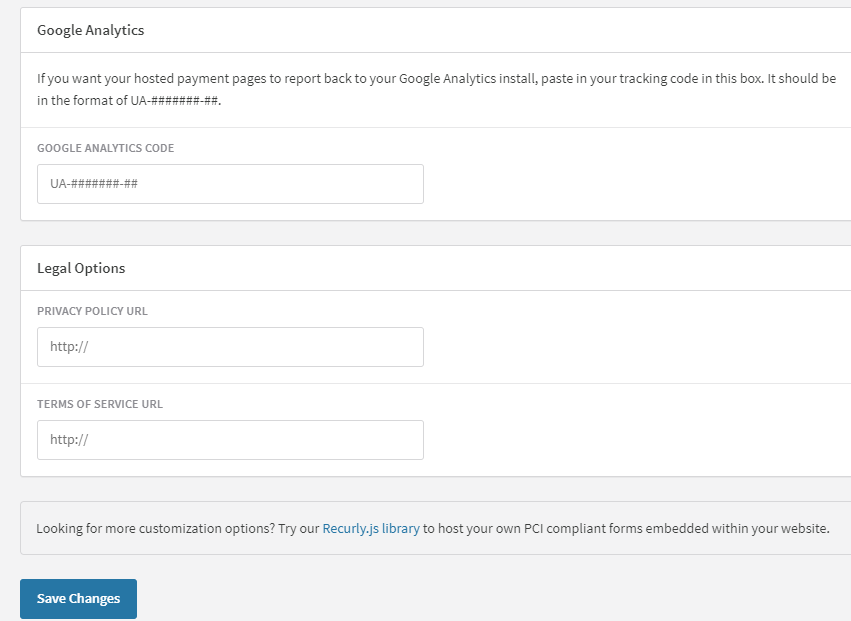
If you want to see your hosted payment page into your google analytics then you can set that as well through this features.
13. Fraud Management –
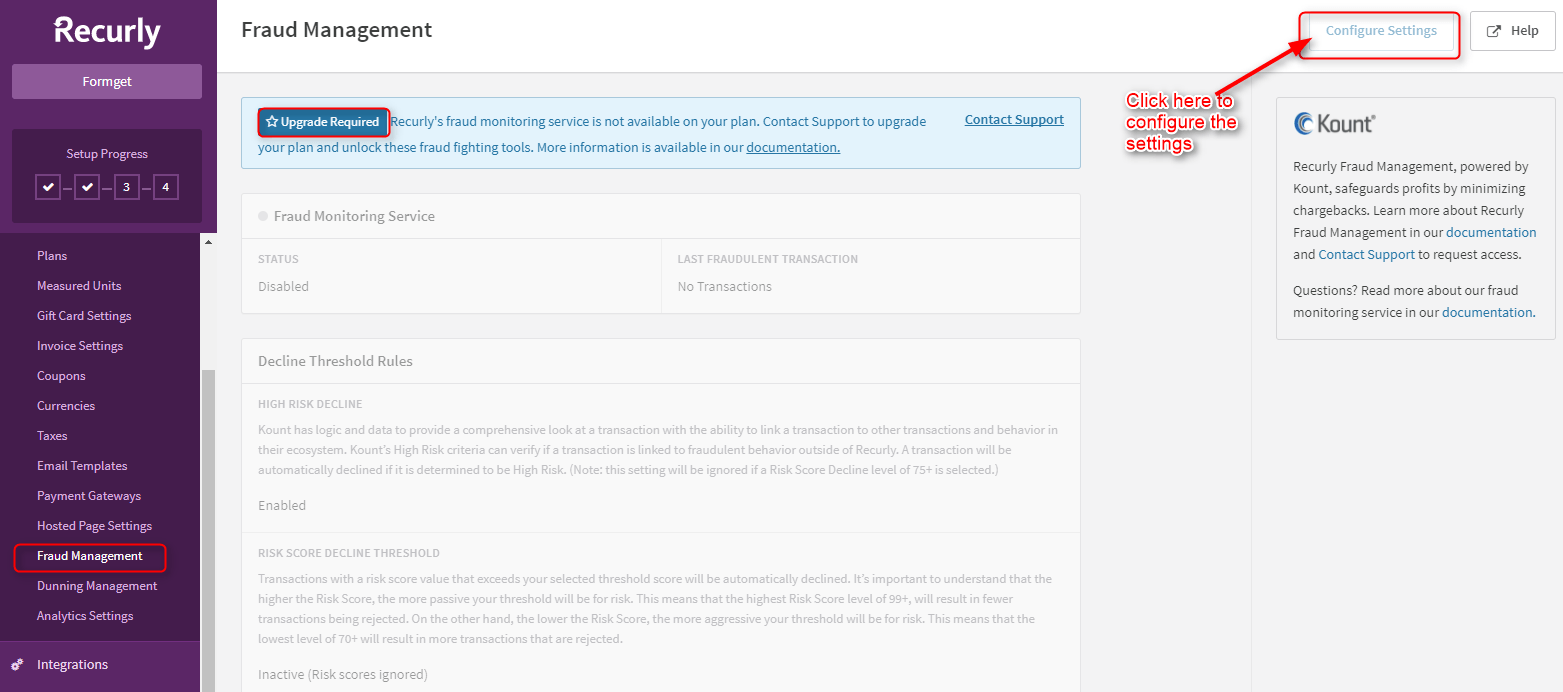
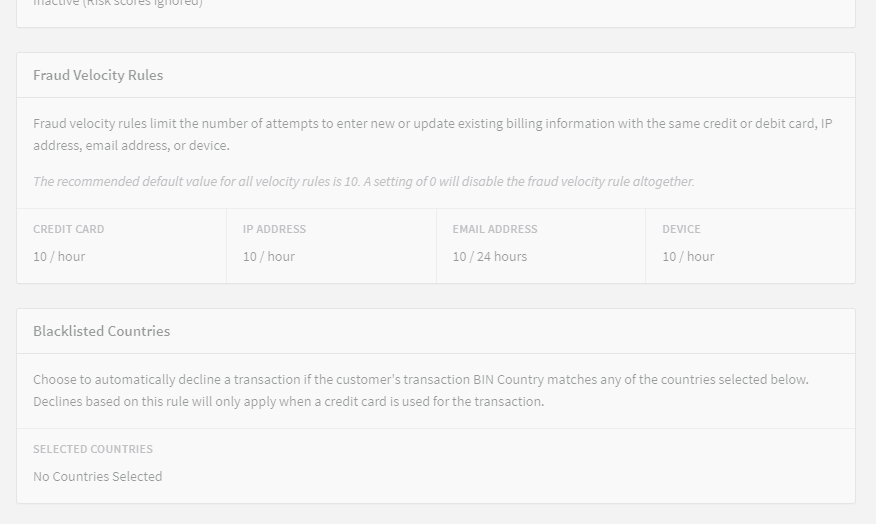
Recurly gives you the power to monitor and manage the fraud by applying threshold rules, detecting fraud credit card & IP address, by selecting blacklisted country etc. This feature is available for the upgraded version. You can configure the settings by clicking on the link shown in the image below.
Scroll down to see more options for the fraud management.
14. Dunning Management –
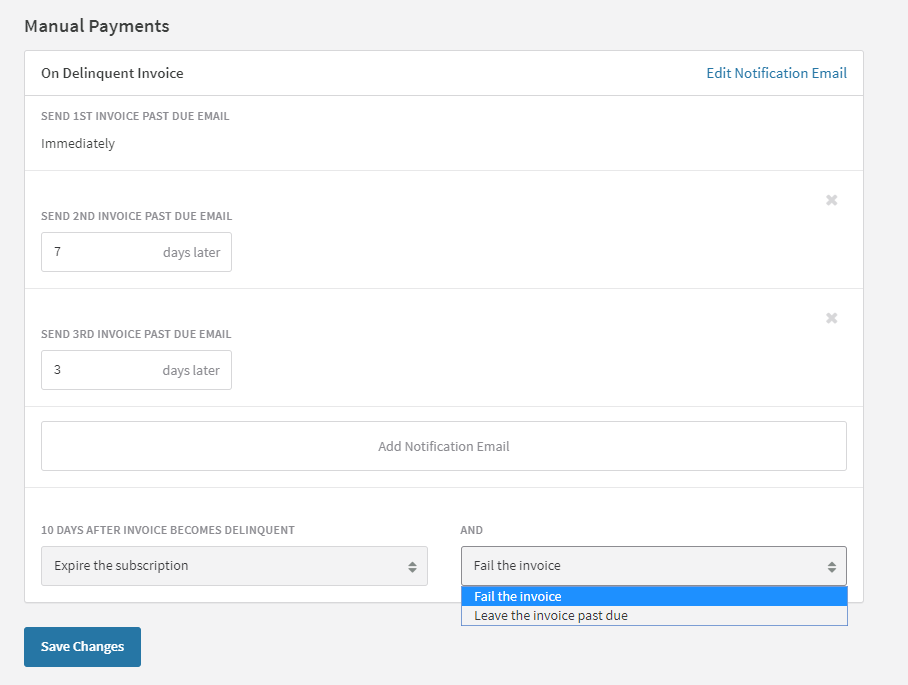
You can handle your failed transaction notification to your customers and retries payment. Send auto follow-up emails or can send emails manually to your customers to notify them about payment failure through this feature.
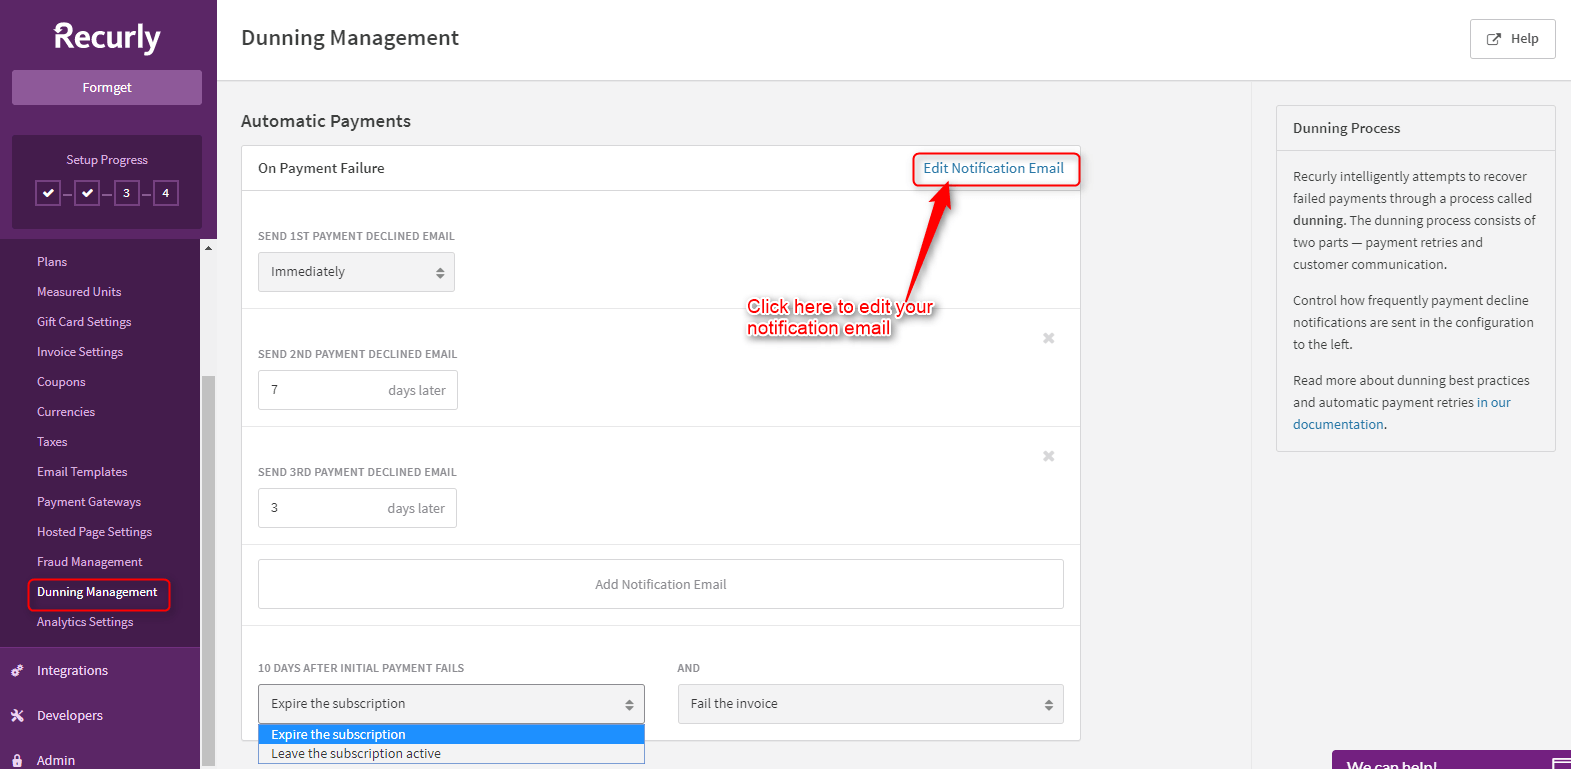
You can edit your notification email by just clicking on the link shown in the image above. This link will be redirected to the “Email Templates” that we had already discussed above.
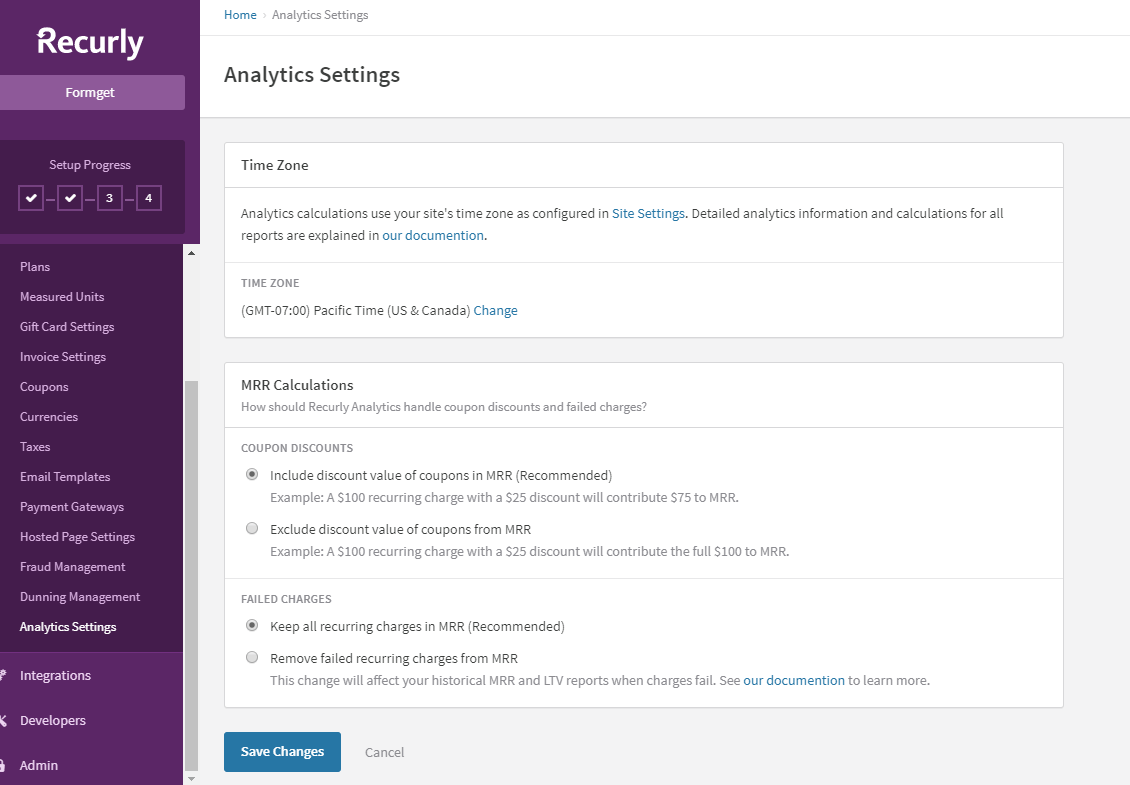
15. Analytics Settings –
You can set the time zone and some basic changes in the MRR calculations that include coupon discounts & failed charges.
5. Integrations To Include Softwares & Gateways
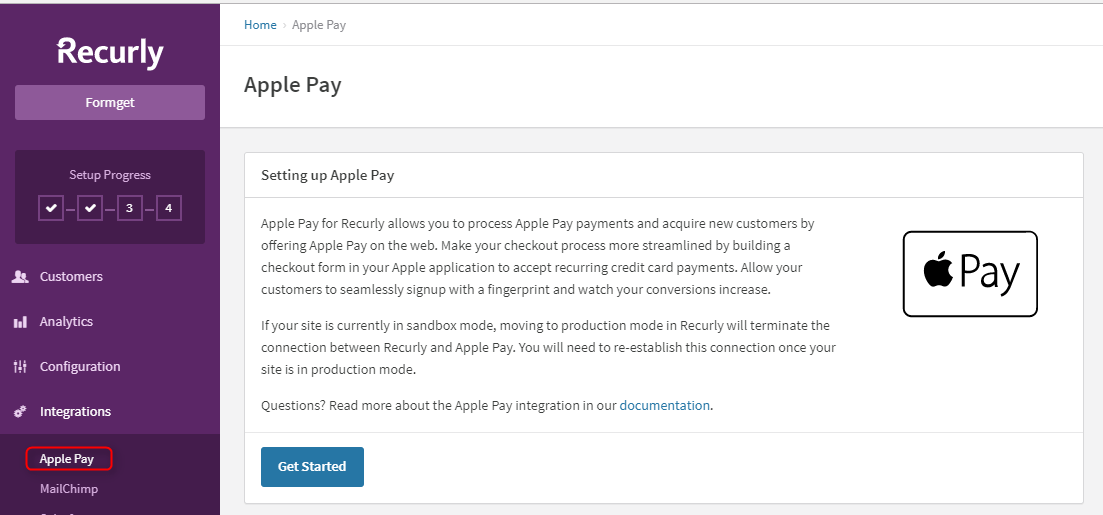
1. Apple Pay For Processing Payments From Apple Pay –
You can integrate the Apple pay with Recurly as a payment method on the web. This feature is only applicable for Recurly.js v4. Switch to production mode to use this feature.
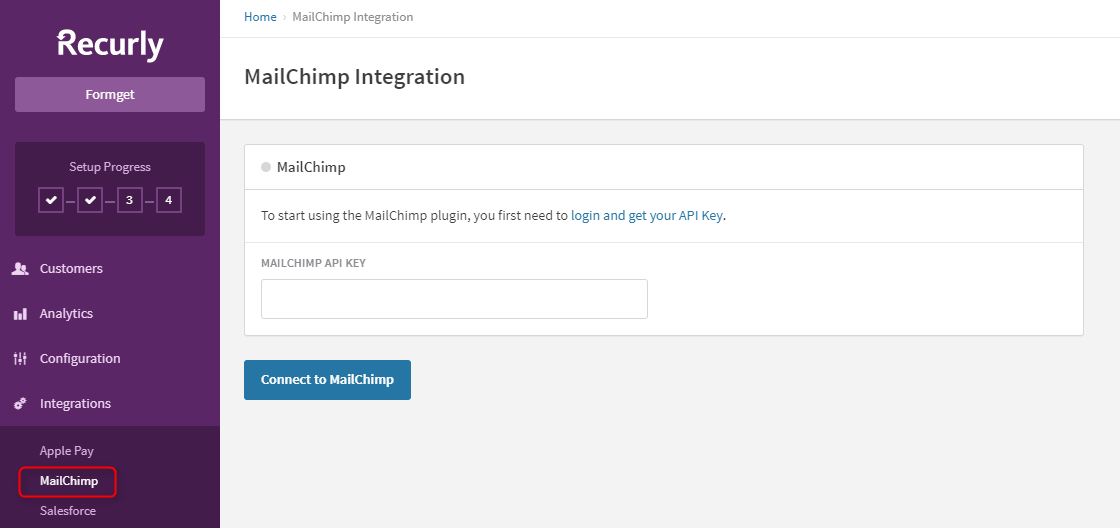
2. MailChimp –
You can manage your MailChimp’s subscribers list in Recurly account by using the MailChimp API.
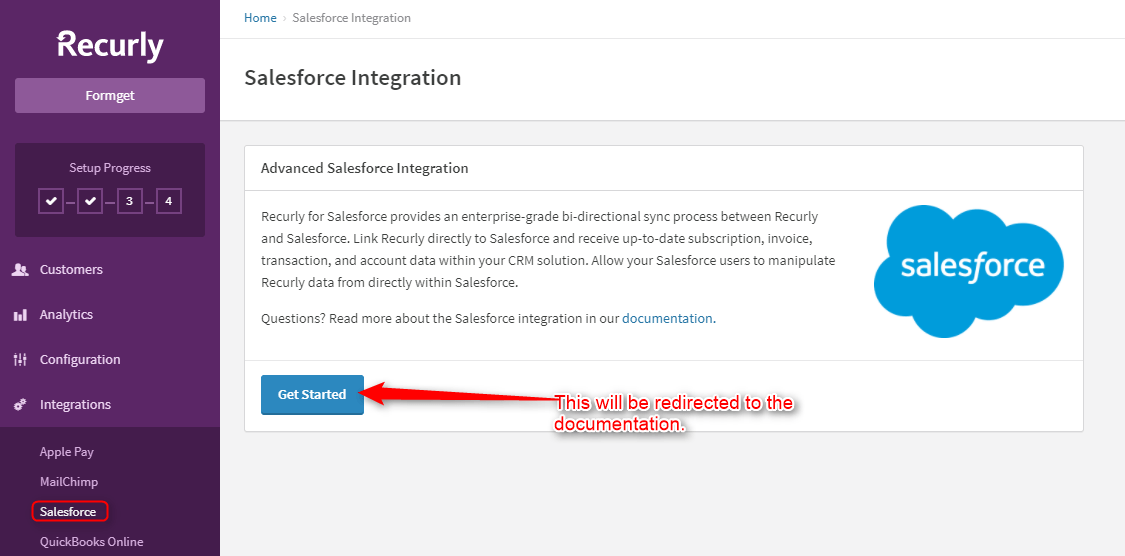
3. Salesforce Integration –
You can receive all the customer’s account data, invoices etc. into the CRM after integrating the Salesforce & Recurly.
4. QuickBooks Online –
To manage the revenue accounting process, integrate your Recurly account with QuickBooks Online.
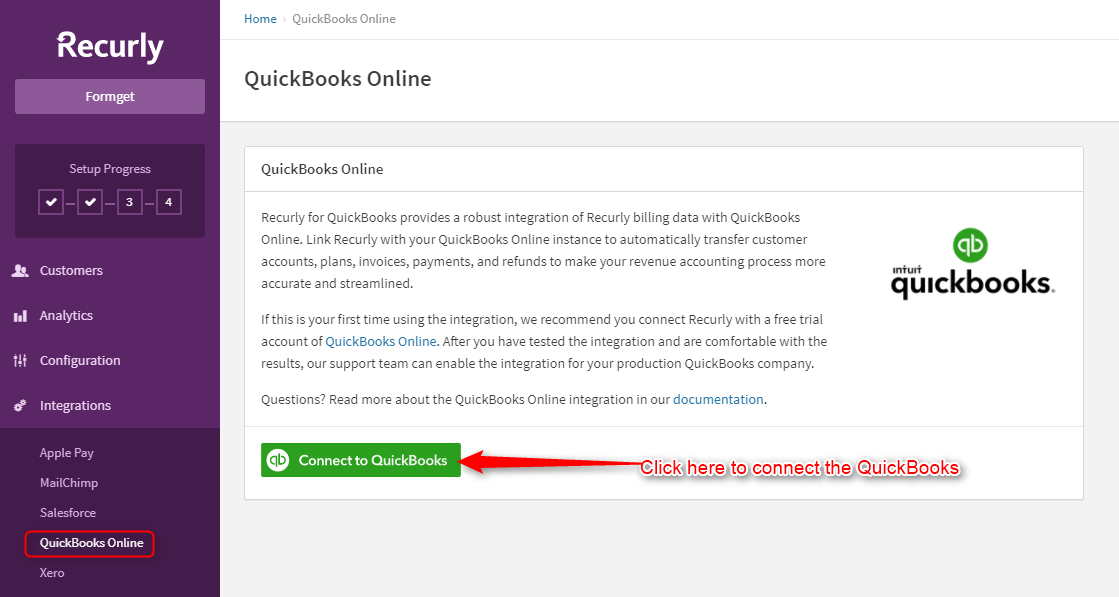
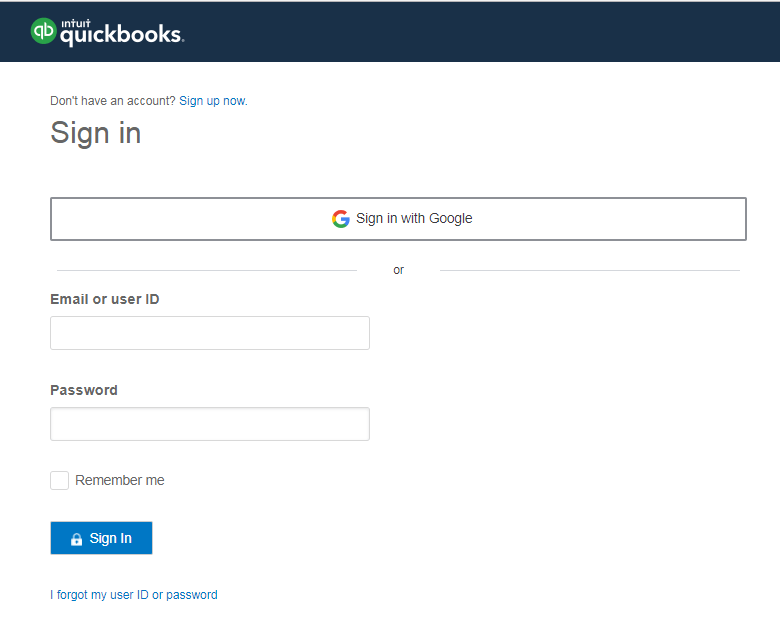
You will be redirected to the login credential of QuickBooks after clicking on the link shown in the image.
5. Xero Integration –
You can integrate the Xero with Recurly to calculate account balances, billing information etc. in a simple way. This feature is only involved in the pro & enterprise plan.

5. Developers To Include API Keys For Integrations
1. API Credentials –
You can add 5 API keys for the integration. This feature gives you the option to add private API keys. You can modify, regenerate & revoke the API key.
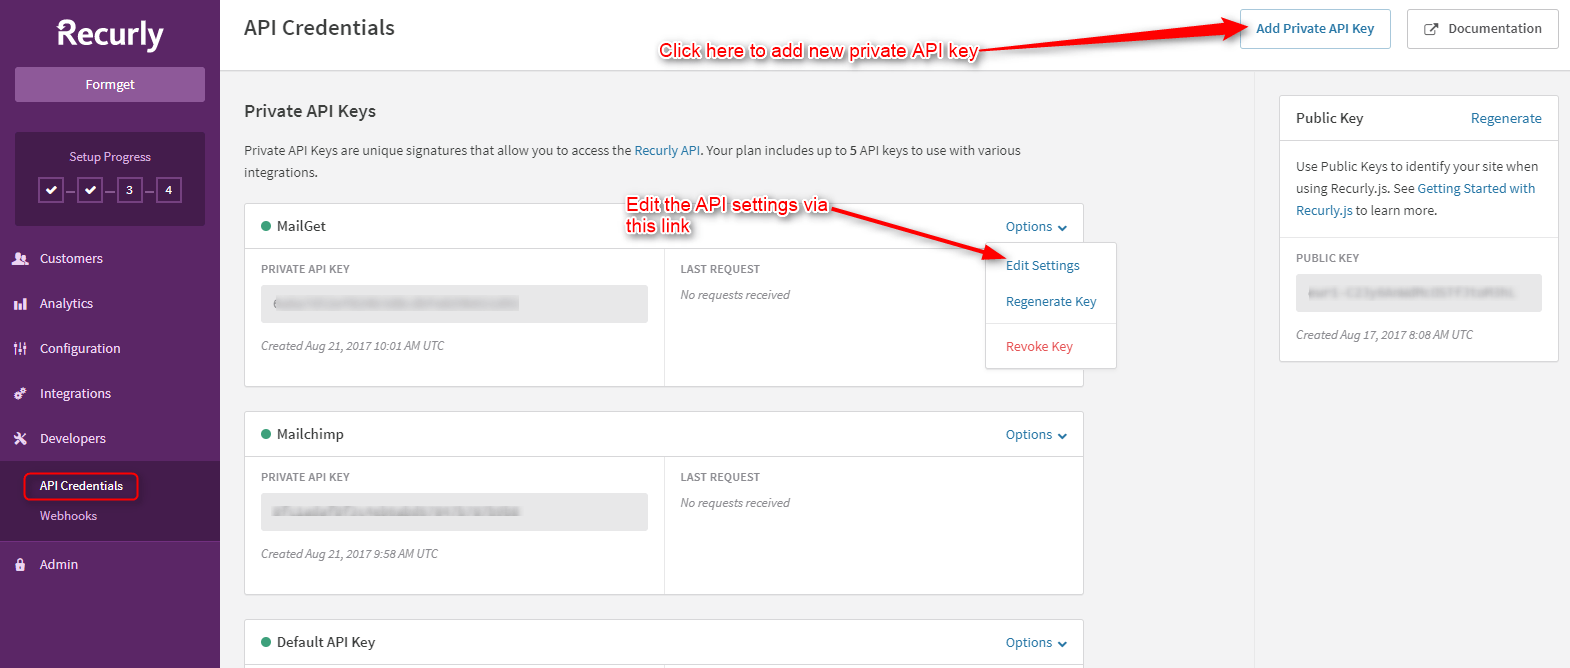
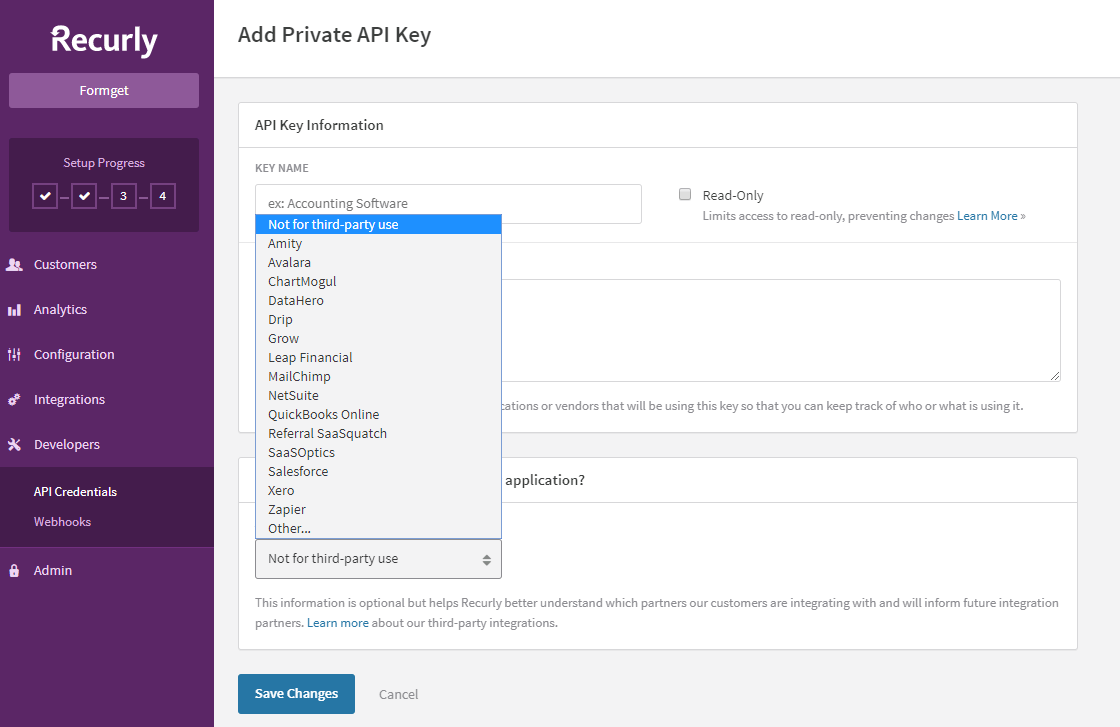
You can add a new private API key and set the key for the third party as well.
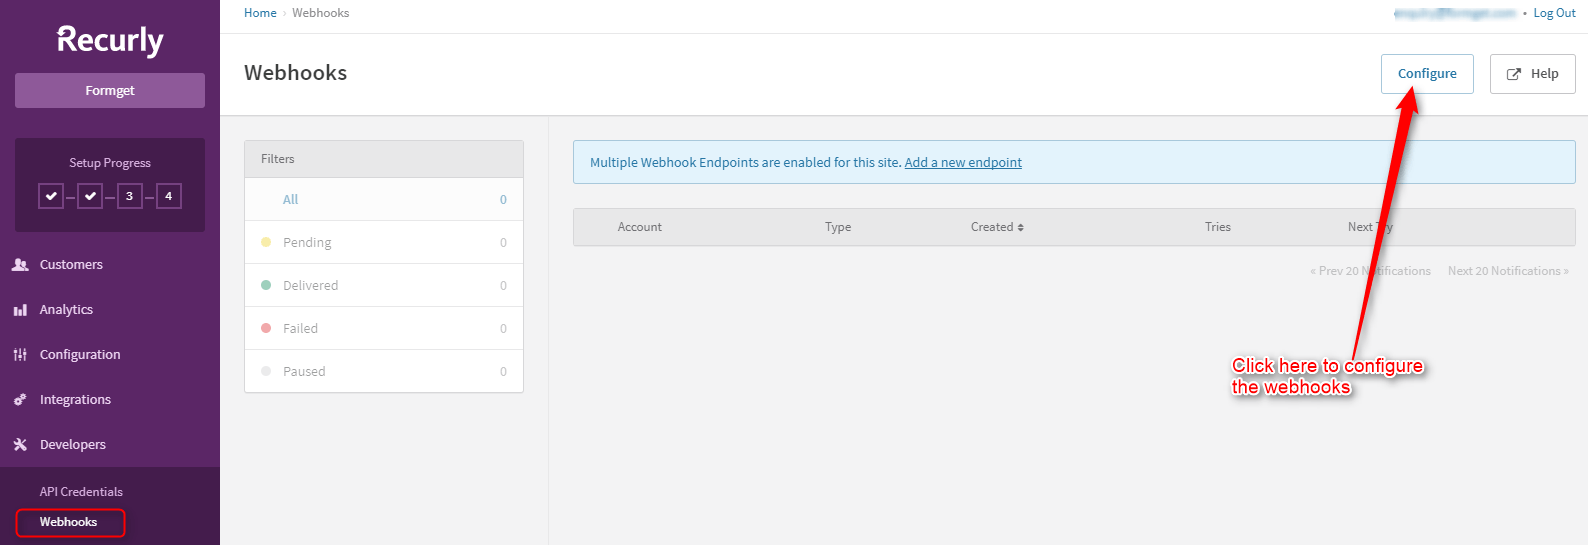
2. Webhooks –
This feature is used to manage the XML data for each new event entrance on the website.
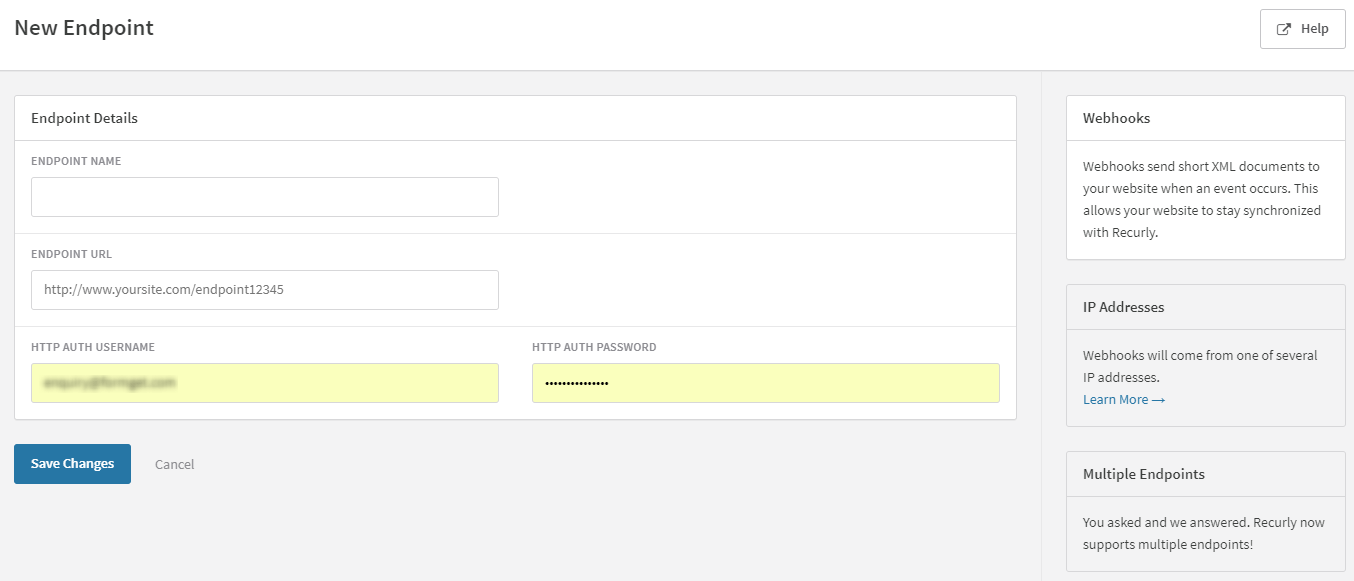
You can also add a new endpoint after adding the endpoint details.
6. Admin To Handle User Access
1. Users –
See the email & user access information in the dashboard.

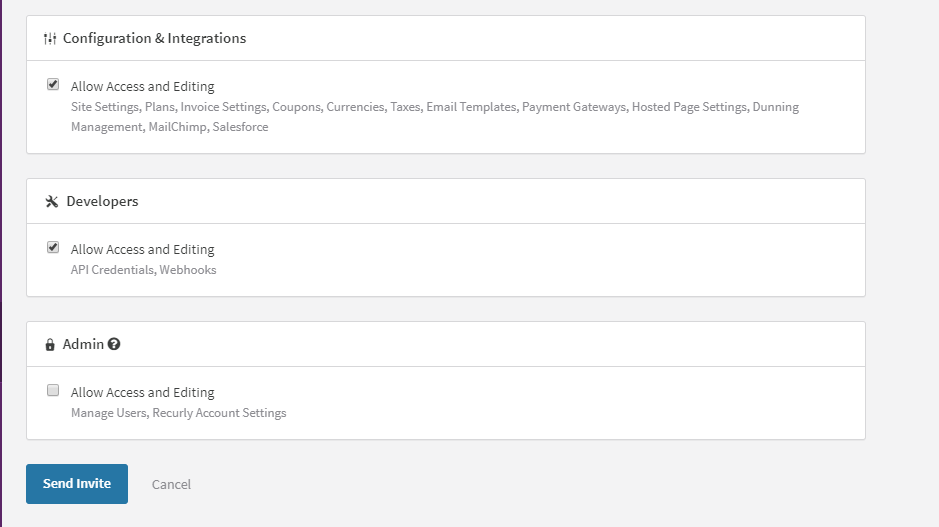
Invite the user and fill the user’s details & set the permission of access of that particular user to whom you want to invite.
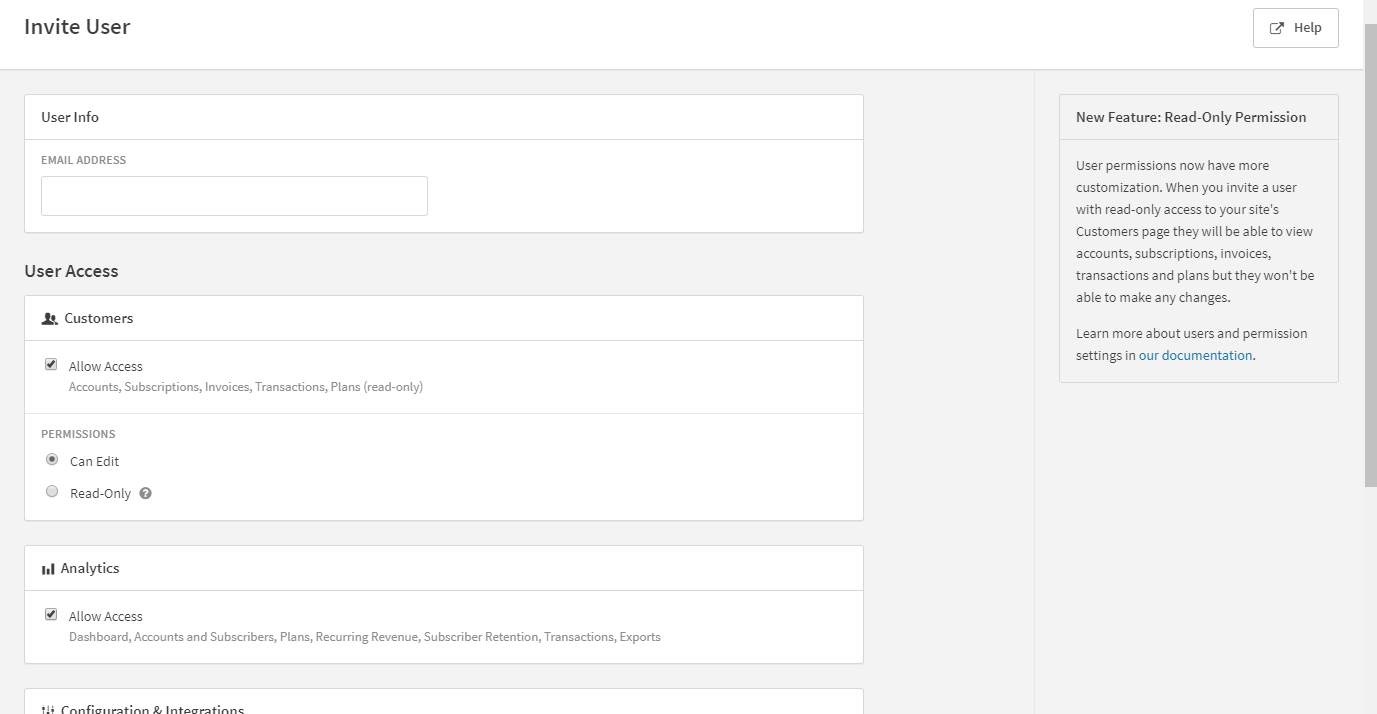
Scroll down to see more options for the access permission.
2. Choose Plan –
You can choose Core, Professional & Enterprise plan with this feature.
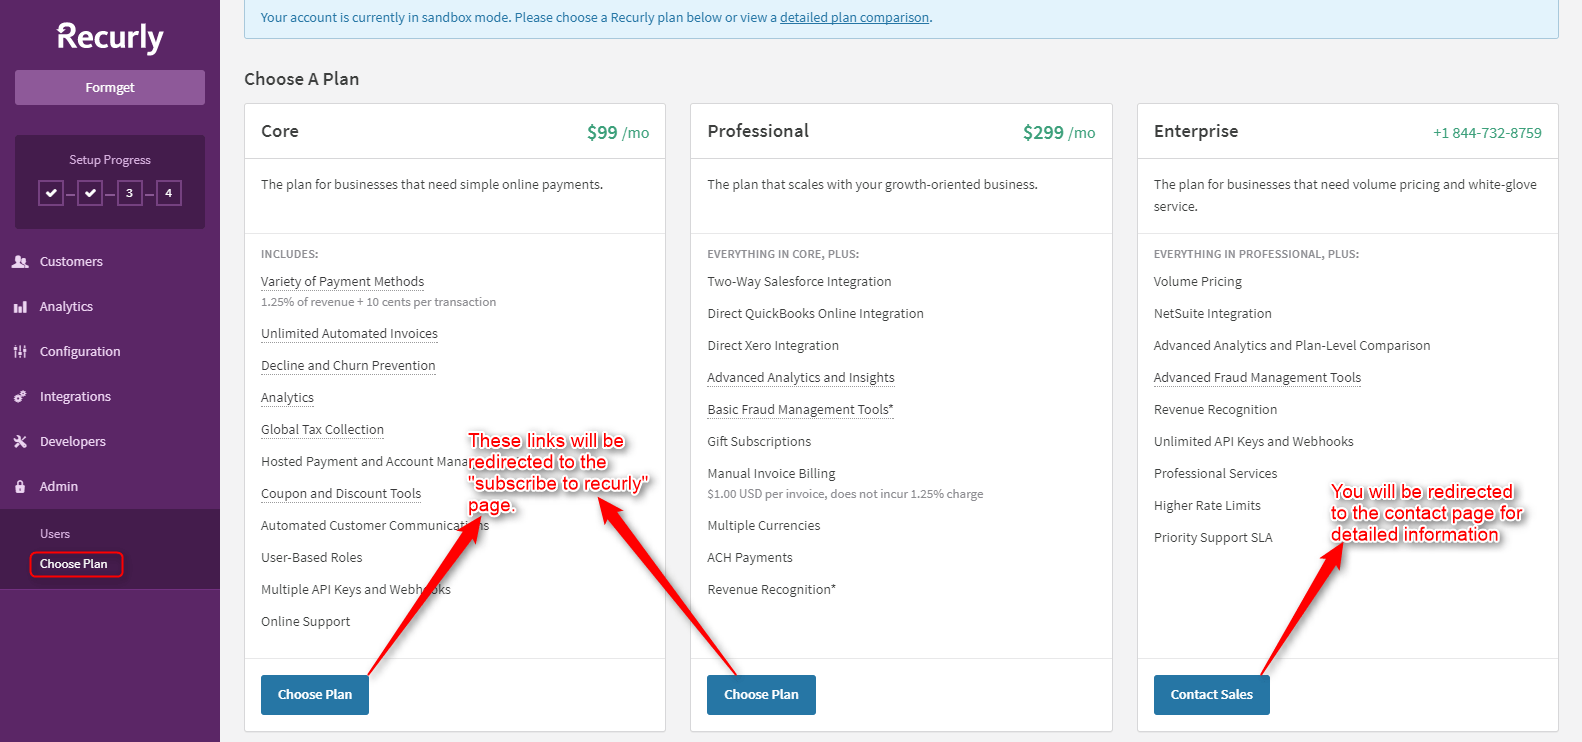
When you will click on Core or Professional plan you will be redirected to the new tab where you need to fill the form “Subscribe to Recurly” as shown in the image below.
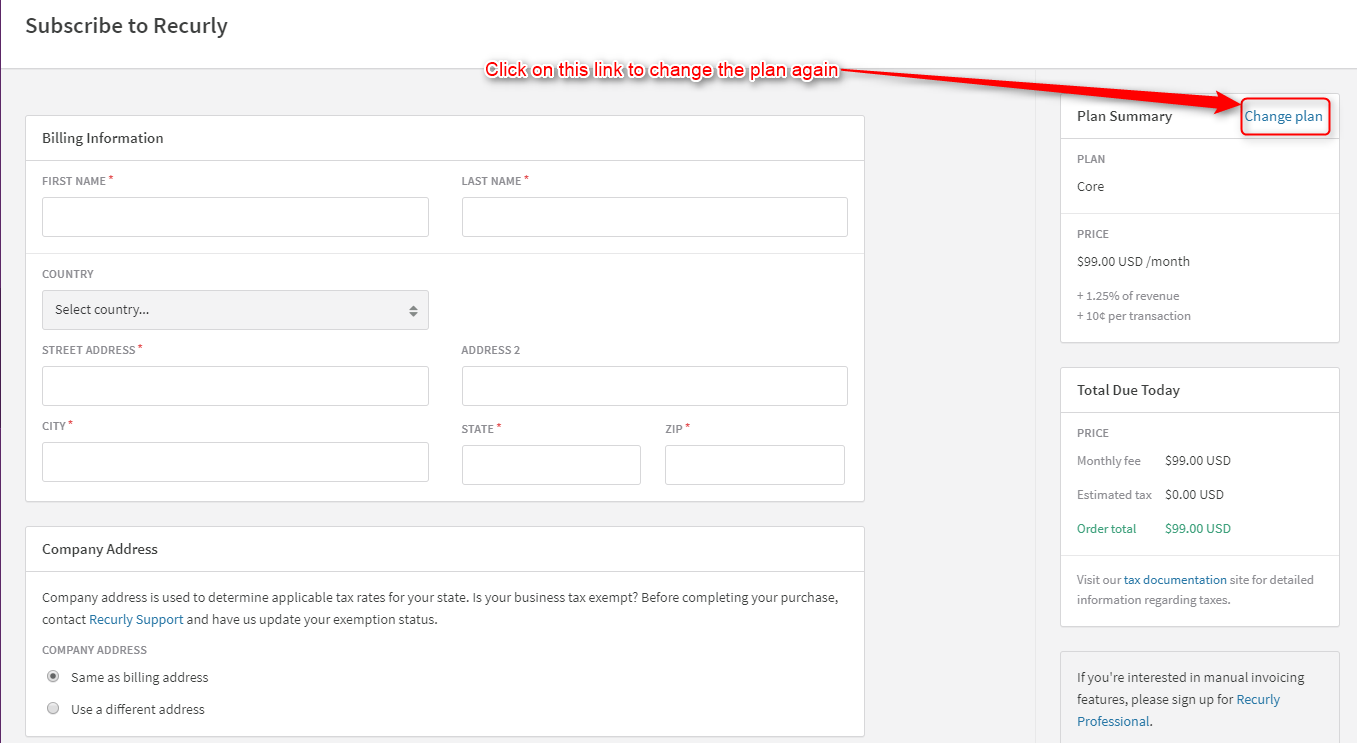
You can change this plan, whenever you want to do so by clicking on the link “change plan”. Fill the details like billing information, company address & credit card information and click on the sign-up button for the complete process of choosing a plan.

For the last enterprise plan, you need to contact the Recurly’s support team. They will charge you according to your customization.
Final Conclusion
Finally, we have come to the end of this documentation and we are pretty sure that after going through the content of this document you will be able to explore and user all major facilities that Recurly offers.
If you have any doubts related to subscription management or you want to explore more about recurring billing software. Then below are some blogs that we would like to suggest:-
- Best Subscription Management Software For Recurring Bills
- Best Subscription Management Services
- Best Dunning Management Services
Recurly is an expert solution to handle all types of subscriptions, but what about promotions.
If you have still not thought about product and service promotion that you deal in. Then, it is the right time as effective subscription management alone will not do it, you need to hold a strong position in the market.
The best way to do active promotions is through an Email Marketing Tool. It is one the most effective means which allows you to promote and advertise your products globally. I would personally suggest MailGet Bolt to you.
![[New]](https://www.pabbly.com/wp-content/uploads/2021/10/1590489835035_1590663807-pabbly.png)
![[New]](https://www.pabbly.com/wp-content/uploads/2019/08/YT-1.png)
![[New]](https://www.pabbly.com/wp-content/uploads/2019/08/twitter-x-logo.png)
![[New]](https://www.pabbly.com/wp-content/uploads/2019/08/aws1.png)


![[New]](https://www.pabbly.com/wp-content/uploads/2023/08/don-t-miss-out-BG-min.png)
![[New]](https://www.pabbly.com/wp-content/uploads/2024/11/black.png)
![[New]](https://www.pabbly.com/wp-content/uploads/2022/03/Cyber-Monday.png)
![[New]](https://www.pabbly.com/wp-content/uploads/2024/12/Year-End-Sale.png)
![[New]](https://www.pabbly.com/wp-content/uploads/2023/08/Happy-200-x-100-px-12.png)
![[New]](https://www.pabbly.com/wp-content/uploads/2023/08/bg56-min.png)
![[New]](https://www.pabbly.com/wp-content/uploads/2022/02/Dont-miss-out.png)
![[New]](https://www.pabbly.com/wp-content/uploads/2022/02/Spring-5.png)
![[New]](https://www.pabbly.com/wp-content/uploads/2022/12/Group-63795-min.png)