Want to know the easiest way to automatically notify your team about every new payment?

If yes then you definitely need to follow this step by step procedure. As I’m going to integrate Stripe with Telegram without any hard coding using the Pabbly Connect service.
Pabbly Connect is an easy to use automation software that helps you to integrate multiple services together to automate manual & daily tasks in real-time. Moreover, you can create any number of workflows with multi-step calls for automation. Also, you can make use of the in-built tools such as path-routers, filters, formatters etc to format the data as per your requirement.
Another great advantage of using Pabbly Connect for this automation is, you only have to carry out this procedure once, after that, the created workflow will automatically notify your team about every new payment.
Why Choose This Method Of Integration?
In contrast with other integration services-
- Pabbly Connect does not charge you for its in-built apps like filters, Iterator, Router, Data transformer and more
- Create “Unlimited Workflows” and smoothly define multiple tasks for each action
- As compared to other services which offer 750 tasks at $24.99, Pabbly Connect offers 50000 tasks in the starter plan of $29 itself
- Unlike Zapier, there’s no restriction on features. Get access to advanced features even in the basic plan
- Try before you buy! Before spending your money, you can actually signup & try out the working of Pabbly Connect for FREE
Now, let’s discuss Stripe and Telegram a little. Stripe is a renowned payment processing software. Whereas, Telegram is a freeware messaging service.
By integrating Stripe with Telegram I’m going to notify my Telegram team about every new payment. This way, whenever a new is made on Stripe, a Telegram message will be sent instantly.
Additionally, you can follow this video tutorial for this particular automation.
Further, you can click on the image given below to make use of this workflow template. Also, you can have a visit to the Pabbly Connect Marketplace for more integrations and apps.
Now, buckle up and discover the Stripe and Telegram integration.
Step 1: Sign up to Pabbly Connect
Start the procedure to notify team members about Stripe payments automatically by visiting the Pabbly Connect website. Then, click on the ‘Sign-Up Free‘ button. The next step is to sign-up, either use your existing Google credentials for direct signup or you can simply fill out the registration form.
Step 2: Access Pabbly Connect
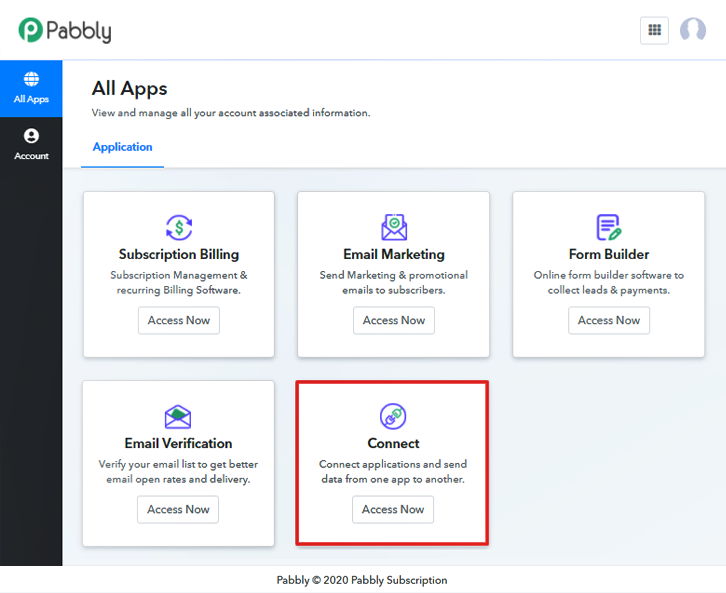
After logging in successfully, click on the ‘Access Now’ button of the software ‘Connect’ amongst various Pabbly applications.
Step 3: Workflow for Stripe and Telegram Integration
(a) Start with a New Workflow
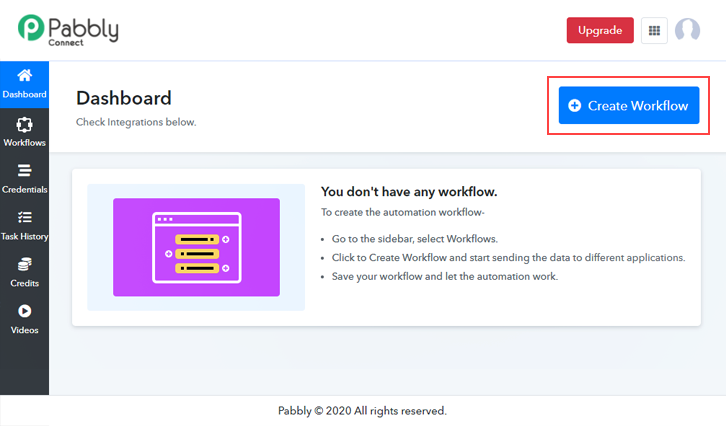
Further, start with creating a workflow for Stripe to Telegram integration & to do this click the ‘Create Workflow’ button available on the dashboard.
(b) Name the Workflow
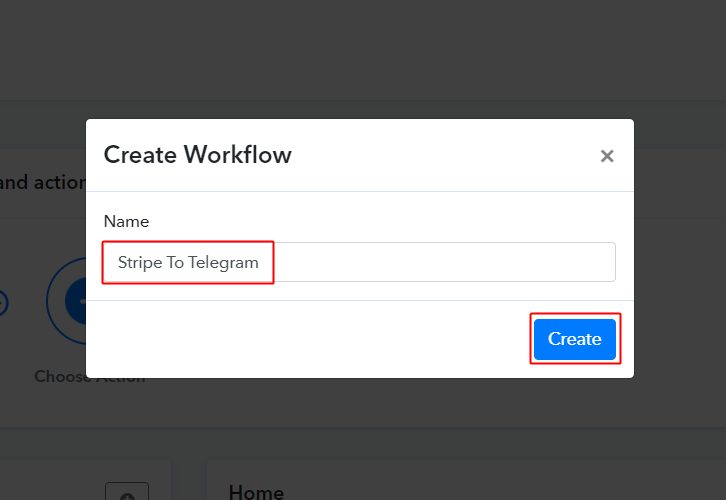
Now, name the workflow in the window that pops up as per the integration or use-case (for instance: Stripe To Telegram etc). Lastly, click on the ‘Create’ button.
Step 4: Setting Trigger for Stripe to Telegram Integration
For trigger set up, you’ll need to set up a trigger condition on the new Stripe charges and then its respective action using Pabbly Connect.
(a) Select Application you want to integrate
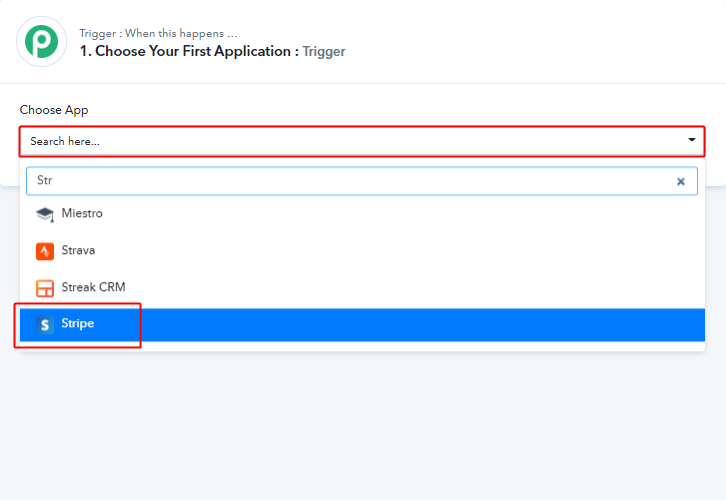
Once you name the workflow, a page asking for a trigger condition will open up.
Pick the ‘Stripe’ app from the ‘Choose App’ drop-down options.
(b) Select Event & Connect
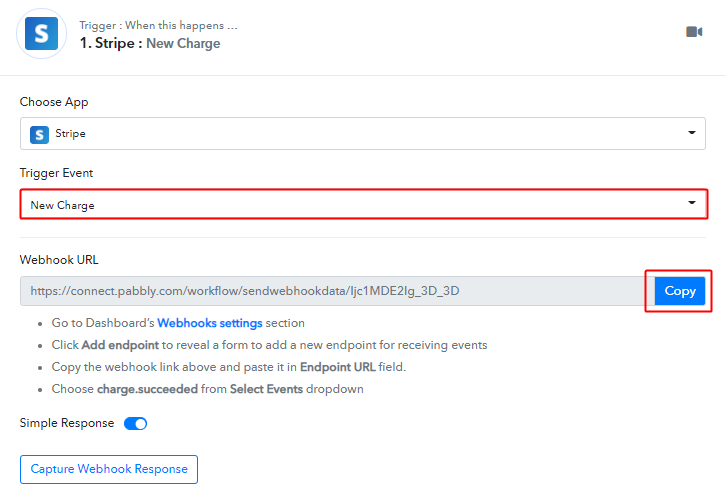
Select the event as ‘New Chanrge’ & then click on ‘Copy’.
Step 5: Connecting Stripe to Pabbly Connect
(a) Go to Your Stripe Account & Add an Endpoint
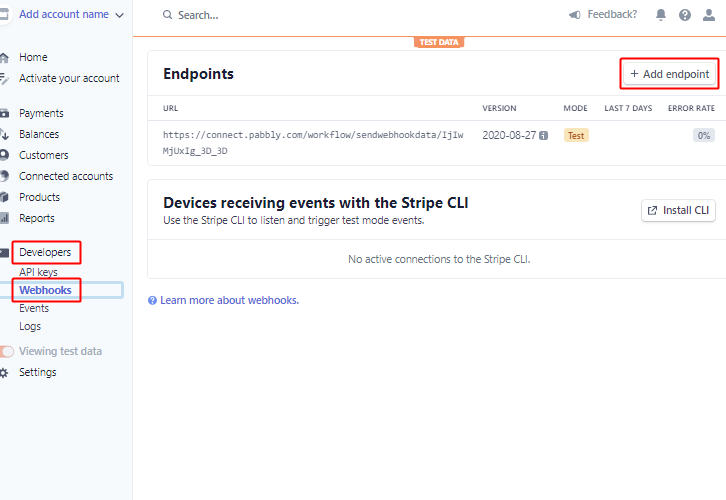
Log in to your Stripe account and then click on the ‘Developers’ option available in the left verticle menu. A secondary menu will open up, click on the ‘Webhook’ option from it.
Lastly, push the ‘Add endpoint’ button.
(b) Add the Endpoint on Stripe
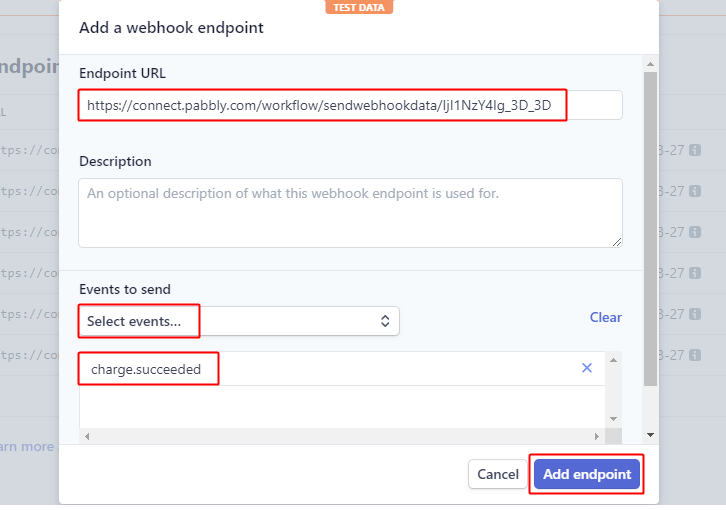
In the next pop-up window, paste the copied Webhook URL in the ‘Endpoint URL’ field. Also, select the event as ‘customer.succeeded’, then click on the ‘Add endpoint’ button.
Step 6: Test the Response in Pabbly Connect Dashboard
As we can see, we are done setting up the trigger for the Stripe and Telegram integration. So, let’s test the Stripe trigger by making a test request.
(a) Capture Webhook Response
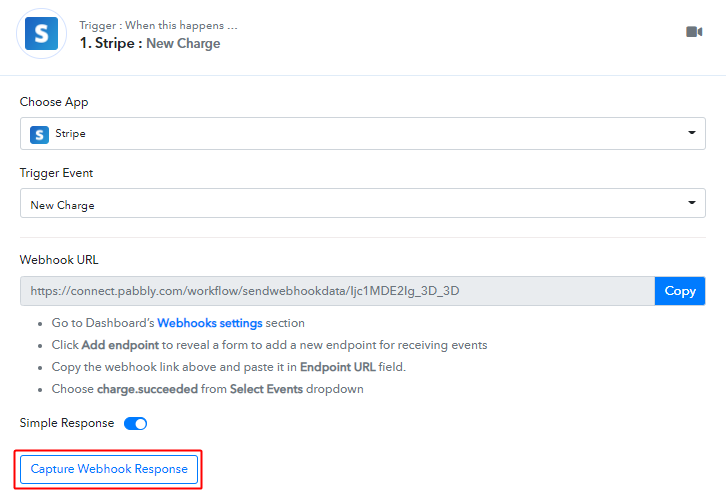
Now first, click on the ‘Capture Webhook Response’ button available in your Pabbly Connect trigger window.
(b) Make a Test Payment
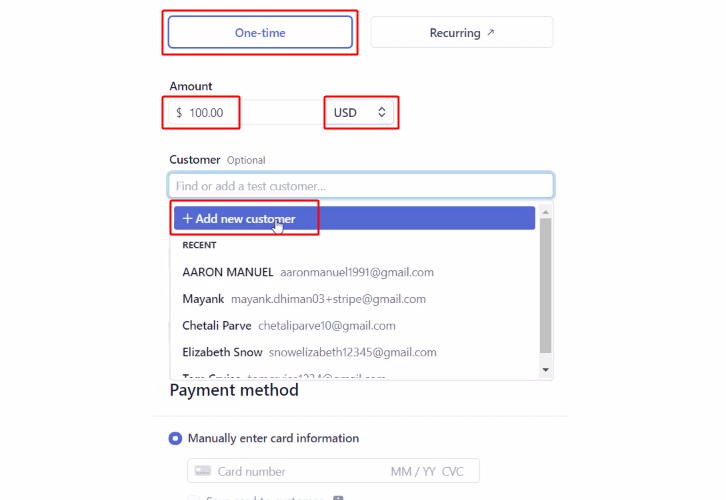
Now, make a test payment by selecting the payment type, amount, current and then add a customer.
(c) Click on Submit Payment
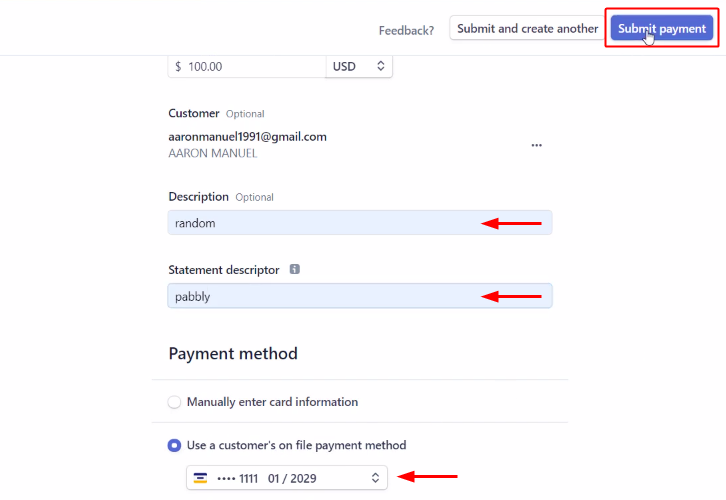
Enter all the required information in the payment form and click on ‘Submit payment’.
(d) Check and Save the Trigger API Response
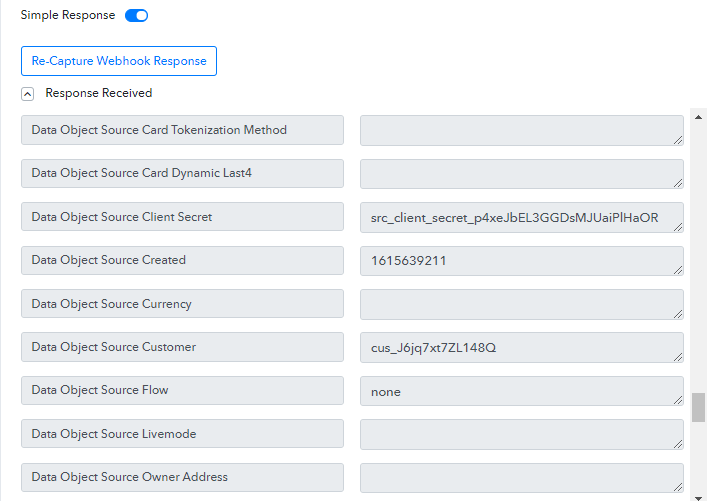
Check the Stripe trigger API response, you’ll notice that some data is inappropriate and the customer data isn’t even available.
Step 7: Retrieve Stripe Customer Details
(a) Select Application you want to Integrate
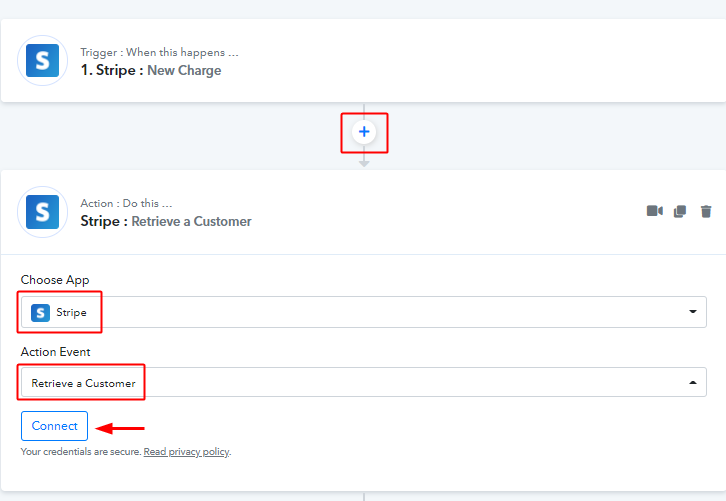
First, click on the plus button that is available next to your trigger window.
To retrieve the customer details, select the ‘Stripe’ app from the ‘Choose App’ field’s drop-down options.
Select the action event as ‘Retrieve a Customer’ and then click the ‘Connect’ button.
(b) Go to your Stripe Account & Reveal the API Key
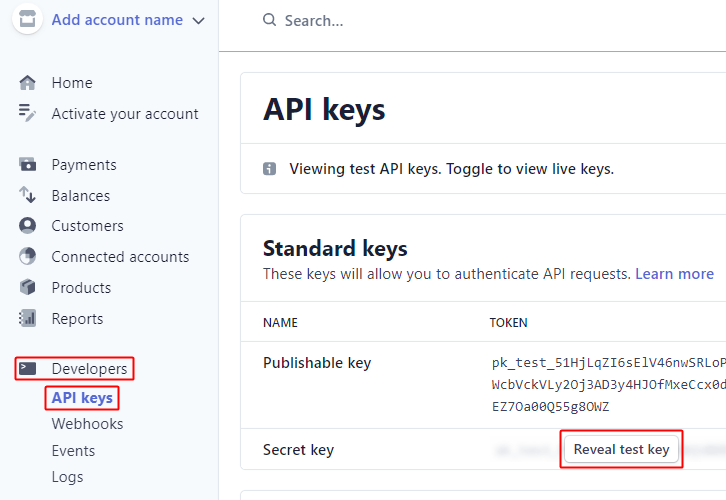
Now, go back to your Stripe account & click on the ‘Developers’ option from the menu.
In the secondary menu, click on the API keys option.
Lastly, click on the ‘Reveal test key’ button available next to the Secret key.
(c) Copy the API Key
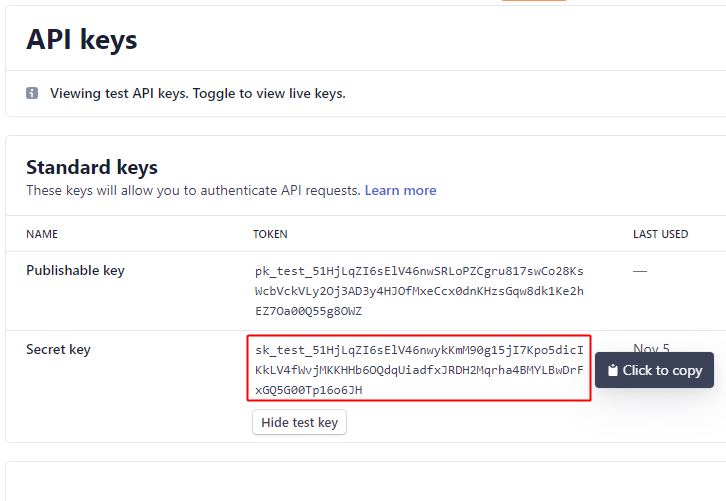
Click on the revealed API key and it will get automatically copied to the clipboard.
(d) Paste the Stripe API Key on Pabbly Connect
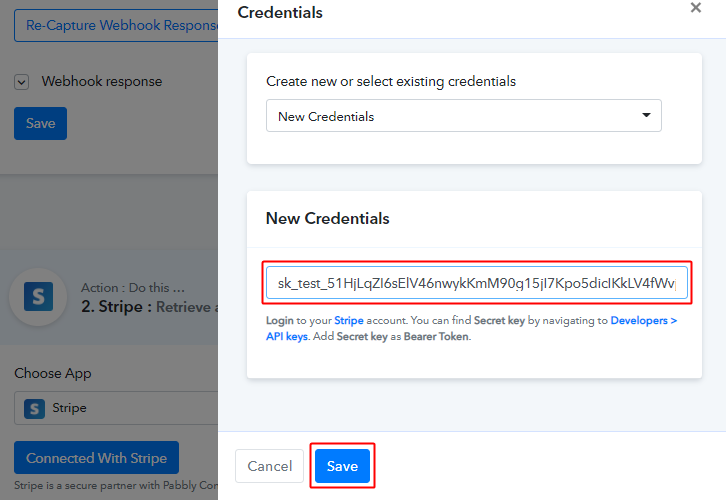
Paste the copied Stripe API key on the connection window.
(e) Map Fields & Send Test Request
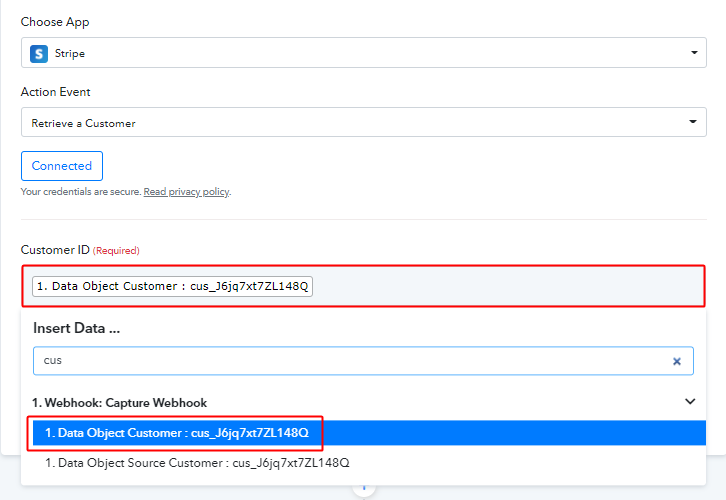
Now, map the customer id with the field provided.
And then click on the ‘Save & Send Test Request’ button.
(f) Check API Response & Save
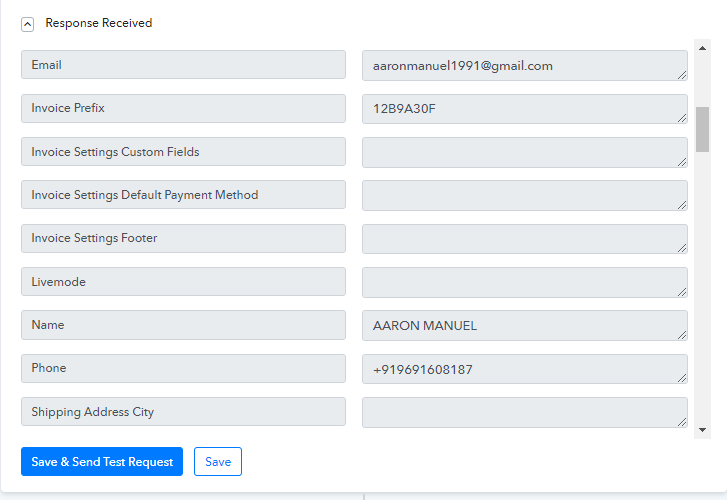
You can check all the customer details in the response.
Also, save the Stripe API response.
Step 8: Trim Amount
(a) Select Application you want to Integrate
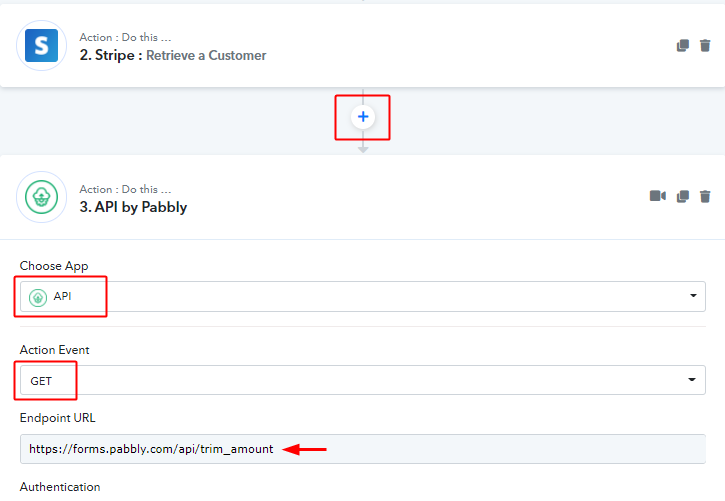
You have also noticed the amount value in the trigger response is not exactly the value entered while making the test payment.
So, we need to trim the amount here for this click on the plus button next to your Stripe action window.
And then select the ‘API’ option for the Choose App field and ‘GET’ as the Action Event.
Also, paste ‘https://forms.pabbly.com/api/trim_amount’ in the endpoint URL field.
(b) Map Amount & Send Test Request
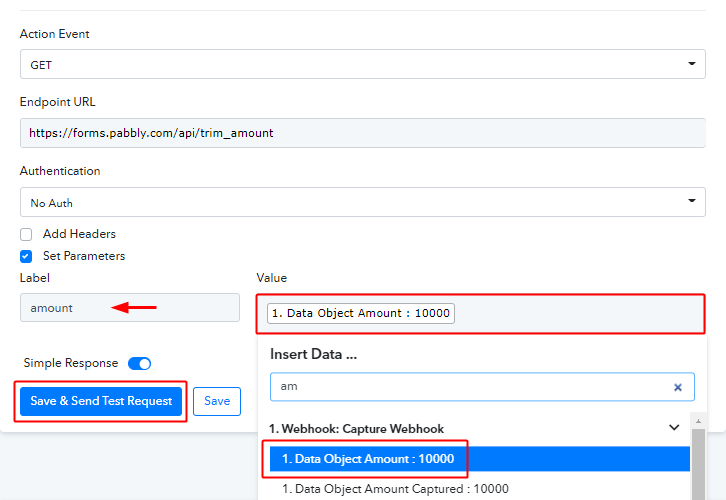
Tick select the ‘Set Parameters’ checkbox and mention the field value as ‘amount’.
Next, map the amount from the gathered trigger response and click on the ‘Save & Send Test Request’ button.
(c) Check & Save the Trimmed Amount Response
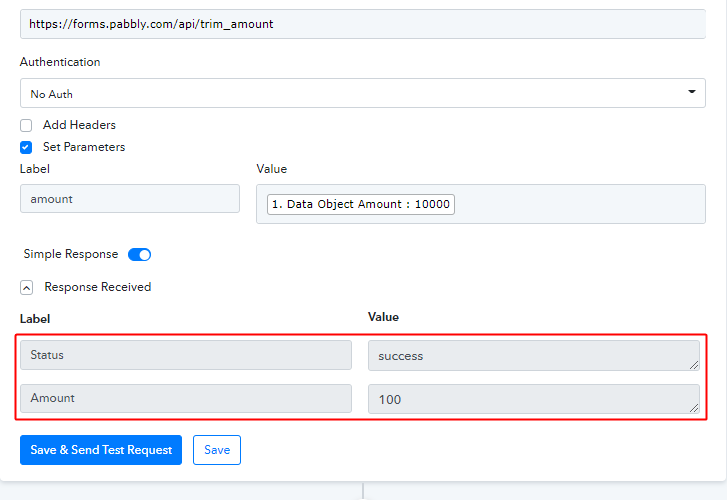
Check the success status and the correct amount value in the response and ‘Save’ this.
Step 9: Setting Action for Stripe to Telegram Integration
Now, we have gathered the Stripe charge data. So, now let’s move forward to the action step. After that, a message will be delivered automatically whenever a new Stripe charge is made.
(a) Select Application you want to Integrate
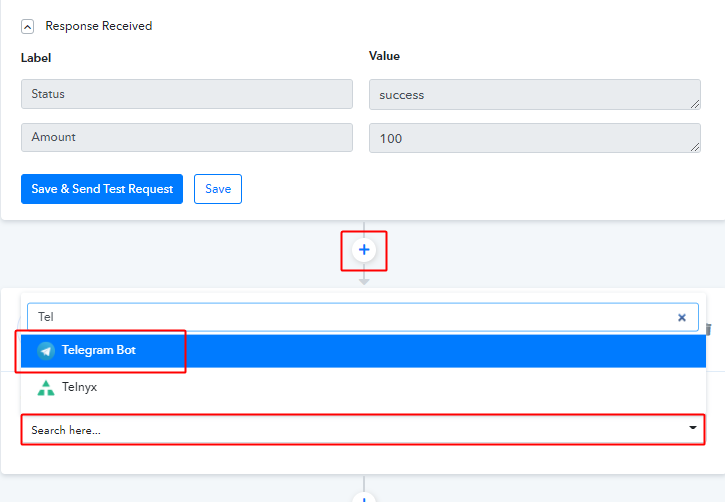
Click on the plus button available next to your Stripe trigger window.
Select the app to integrate here as ‘Telegram Bot’.
(b) Select Event & Connect with Telegram
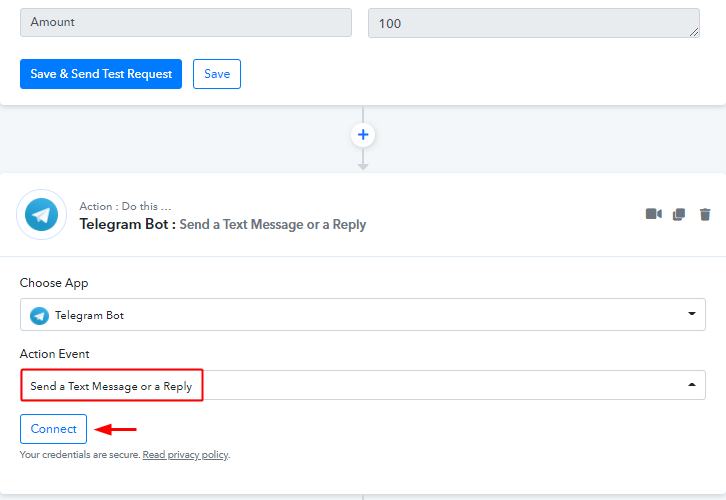
Next, select the action event option as ‘Send a Text Message or a Reply’.
Then, click the ‘Connect’ button.
Step 10: Connecting Telegram to Pabbly Connect
Our next step is to connect Telegram with Pabbly Connect. For this first, sign in to your Telegram account.
(a) Click on the BotFather Link
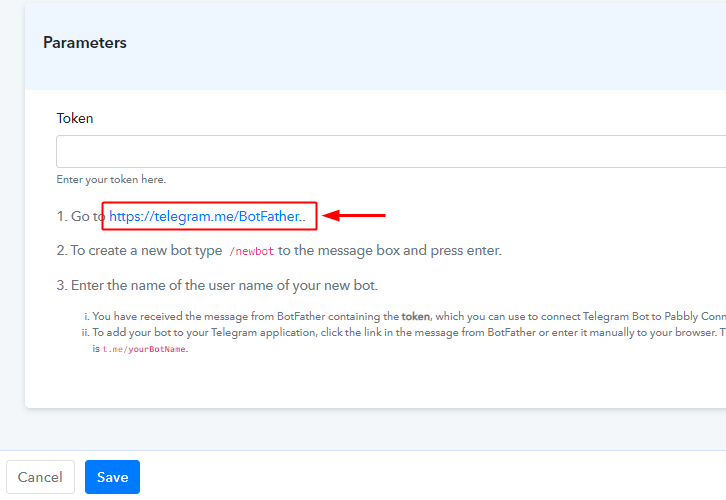
In the Pabbly Connect connection window that slides in from the right. Click on the BotFather link available in the help text or type ‘BotFather’ in your Telegram App search.
(b) Click Start on BotFather Chat
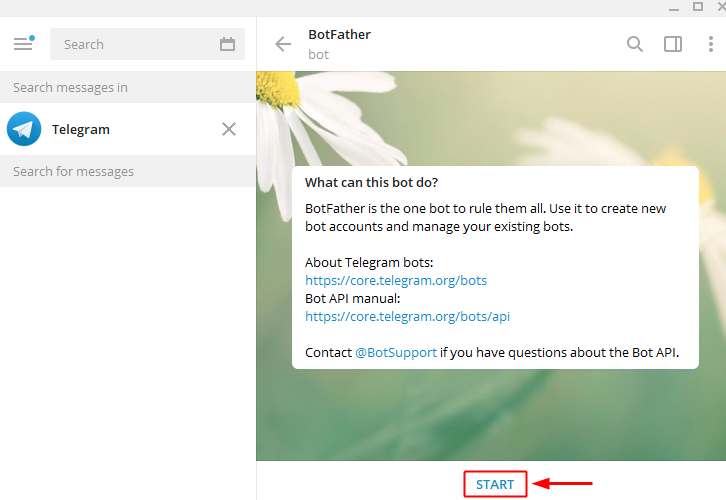
Next, in the BotFather chat window, click on the ‘START’ button.
(c) Create a New Bot
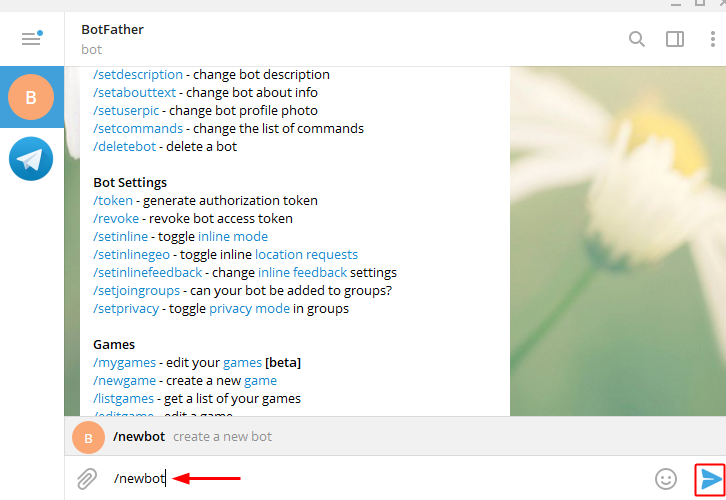
Now, create a new bot by typing ‘/newbot’ & then click Enter/Send button.
(d) Name Your Created Bot
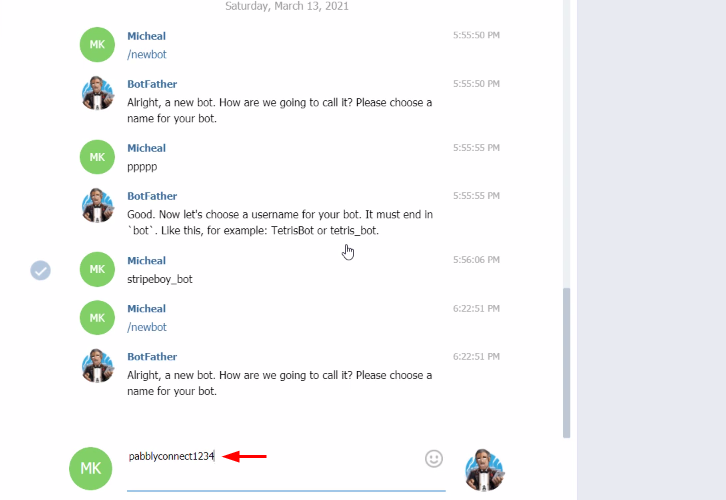
Next, it’ll ask you for a bot name. So, type a bot name that you want to give to the recently created bot & then hit the send.
(e) Enter a Bot Username
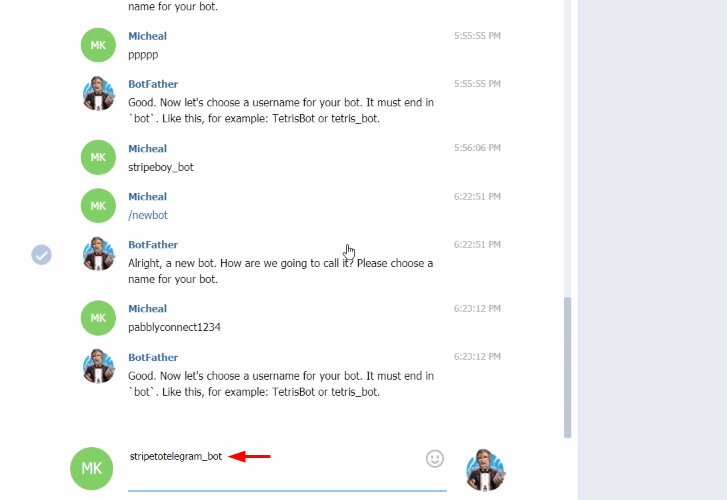
Lastly, fill in a username for the created bot that ends with the suffix ‘bot’.
(f) Copy the Token
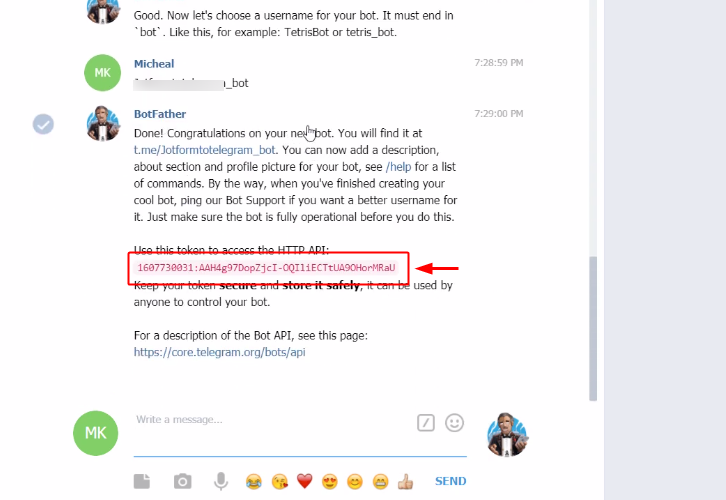
You’ll see a token is generated for the created bot, simply select and copy it.
(g) Paste the Token
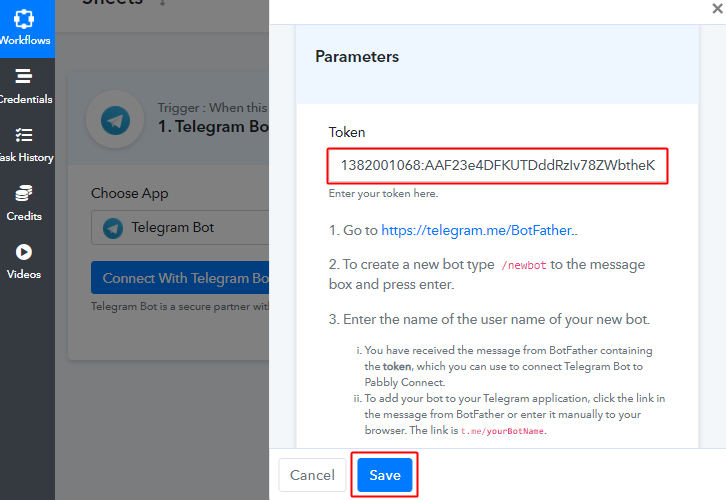
Paste the copied token in the connection window & click on ‘Save’.
(h) Create Telegram Group
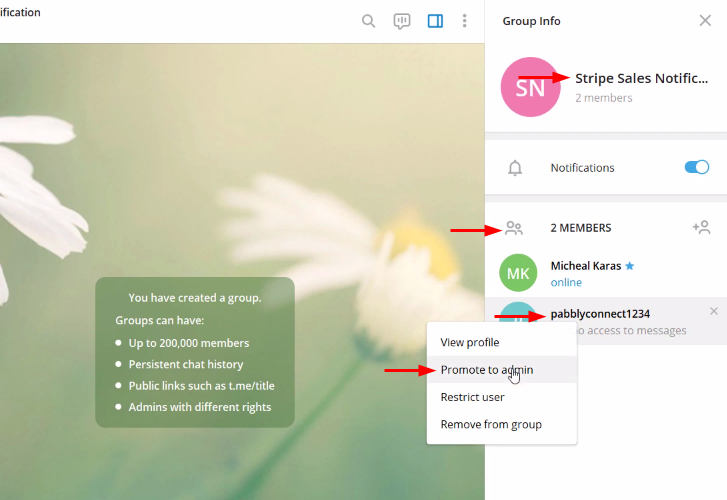
Now, create a group on the connected Telegram account, add members along with the created bot and remember to promote the bot as the admin of the group.
(I) Copy Chat ID
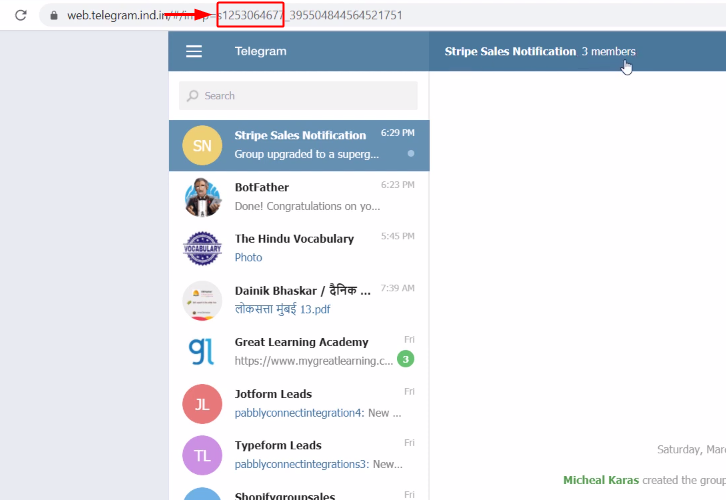
In the group URL, the digit sequence between ‘=<some_letter>’ and underscore is the chat ID, copy this digit sequence from the URL. Also, you can refer to the help text below the Chat ID field in the Connection window.
(j) Paste Chat ID & Create Message
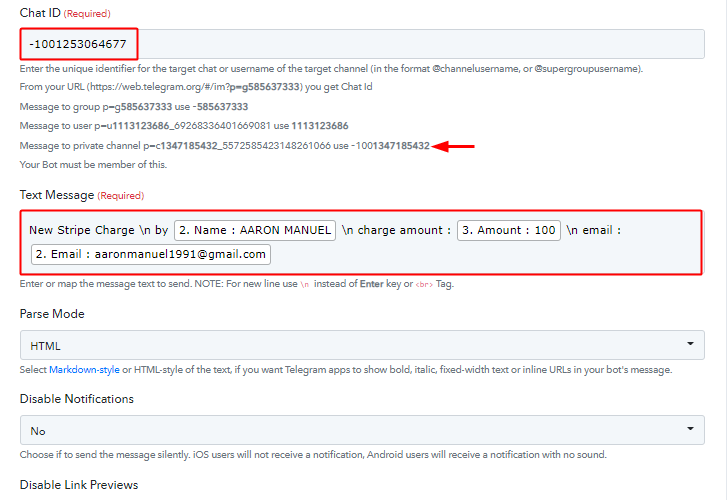
Now, paste the copied Chat ID in the Chat ID field with the prefix ‘-100’ for a private channel message.
Also, create a message to send to your team by combining the trigger response values and some plain text.
(k) Send Test Request
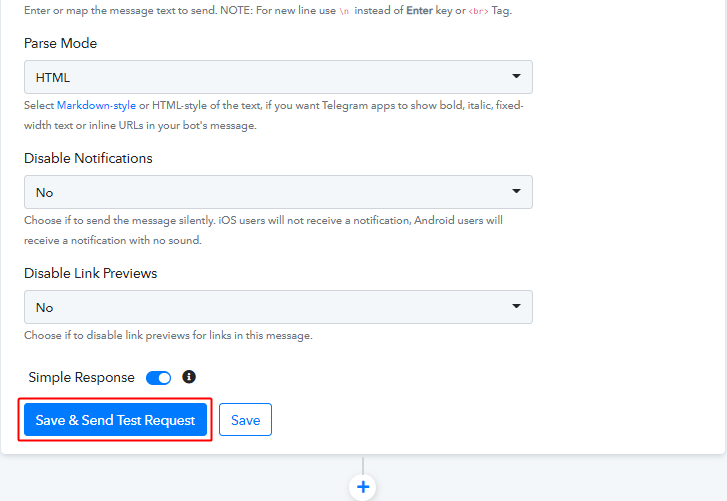
Now, click on ‘Save & Send Test Request’.
(l) Check & Save the Action Response
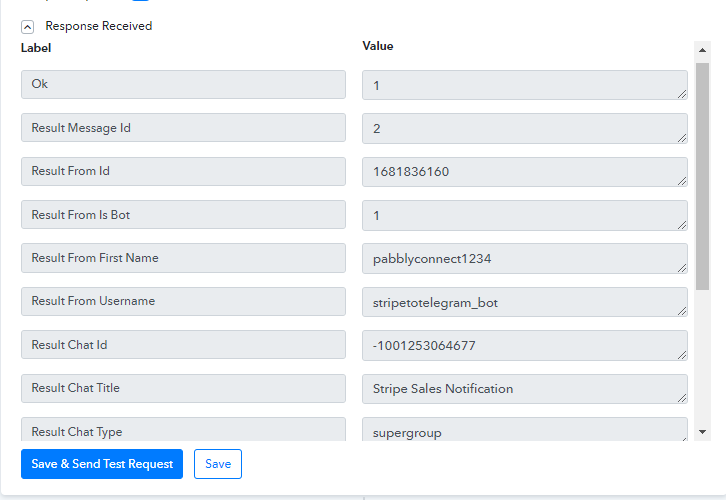
Certainly, you can check & save the Telegram action response. If there’s been some error while sending the data then the response window will start showing you an error message.
Step 11: Check Response in WhatsApp
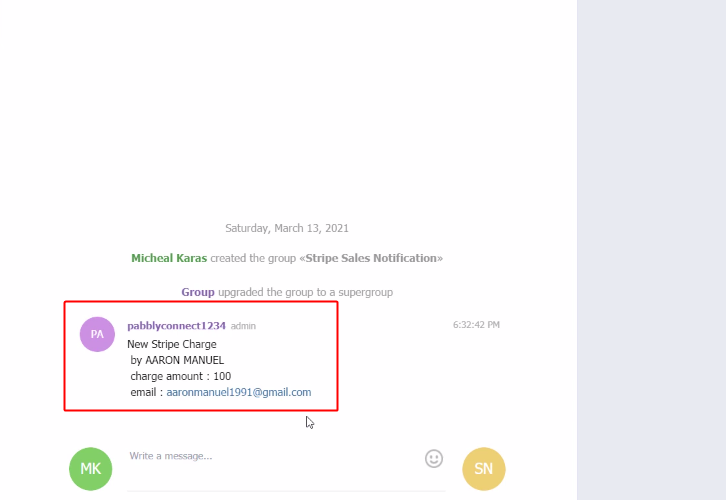
Lastly, check the message on the connected Telegram account.
Conclusion –
This was all about ‘How to notify team members about Stripe payments’. Consequently, after completing this procedure, you will end up notifying your team about every new Stripe payment automatically.
You can also use Pabbly Connect for FREE with all its premium features.
Also, share your experience with this automation in the comment section below.


