If you are looking for some easy way to get notified whenever a product is added to your WooCommerce cart then this article might help you. WooCommerce site does so for various customer engagement purposes such as to recover abandoned carts, to run deals on the most added to cart product etc.
In this blog, we’ll set-up an email notification system for the WooCommerce add to cart action step by step. We are going to do this with the help of Pabbly Connect. It will help us in easily setting up the workflow by fixing a trigger on the ‘Add to Cart’ button click of the WooCommerce site and its respective email notification action.
Pabbly Connect supports joining two or more services together to create unlimited workflows and set-up instant triggers on certain conditions. Besides, it also allows you to use various formatters, filters, routers etc without writing a single line of code. Further, you can define an action using multi-steps calls based on the trigger condition.
Why Choose This Method Of Integration?
In contrast with other integration services-
- Pabbly Connect does not charge you for its in-built apps like filters, Iterator, Router, Data transformer and more
- Create “Unlimited Workflows” and smoothly define multiple tasks for each action
- As compared to other services which offer 750 tasks at $24.99, Pabbly Connect proffers 50000 tasks in the starter plan of $29 itself
- Unlike Zapier, there’s no restriction on features. Get access to advanced features even in the basic plan
- Try before you buy! Before spending your money, you can actually signup & try out the working of Pabbly Connect for FREE
In a matter of few minutes, it allows you to send notifications for all add to cart action from WooCommerce to Gmail. So, save your time and accessing all Pabbly Connect features without any restriction even in its free plan.
Momentarily, let’s get started with the step by step procedure to integrate WooCommerce and Gmail to send automatic emails notification on add to cart customer action.
Step 1: Sign up to Pabbly Connect
 Go to the official website of Pabbly Connect and then click on the ‘Sign-Up Free‘ button. On the registration page, either signup using an existing Gmail account or manually fill out the form to get into the system.
Step 2: Access Pabbly Connect

After signing up successfully, click the ‘Access Now’ button of the software ‘Connect’ Pabbly application.
Step 3: WorkFlow for WooCommerce with Gmail Integration
(a) Start with a New Workflow

Start with creating a workflow to send automatic emails notifications when customer hits add to cart button in WooCommerce and to do this strike the ‘Create New Workflow’ button.
(b) Name the Workflow
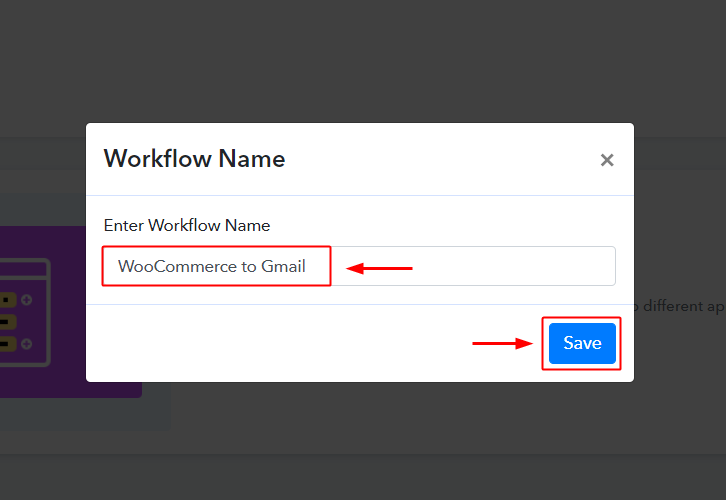
Now, name the workflow as per your need (for instance: WooCommerce to Gmail or WooCommerce Notification Automation etc) and push the ‘Save’ button.
Step 4: Select Triggers for WooCommerce – Gmail Integration
To send automatic emails whenever an item is added to cart on your WooCommerce store, you need to set-up a trigger and its respective action. So, let’s get started with setting up the trigger first.
(a) Select Application you want to integrate
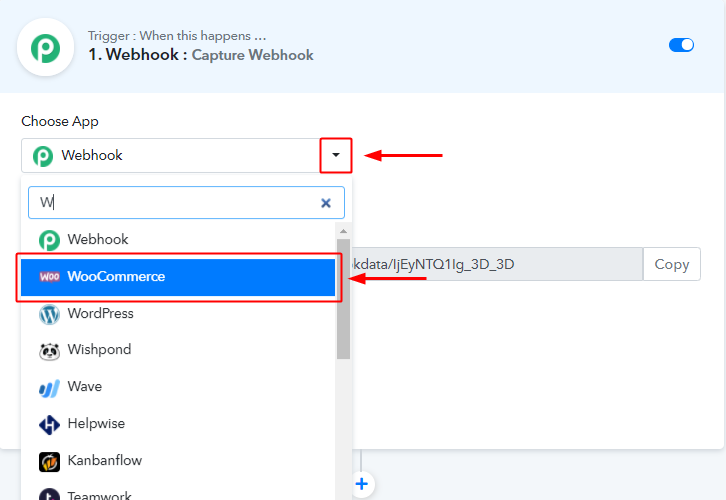
When you hit the save button to create a workflow, a trigger window will open next.
You’ll need to select the ‘WooCommerce’ option from the ‘Choose App’ field drop-down options.
(b) Select the WooCommerce Method
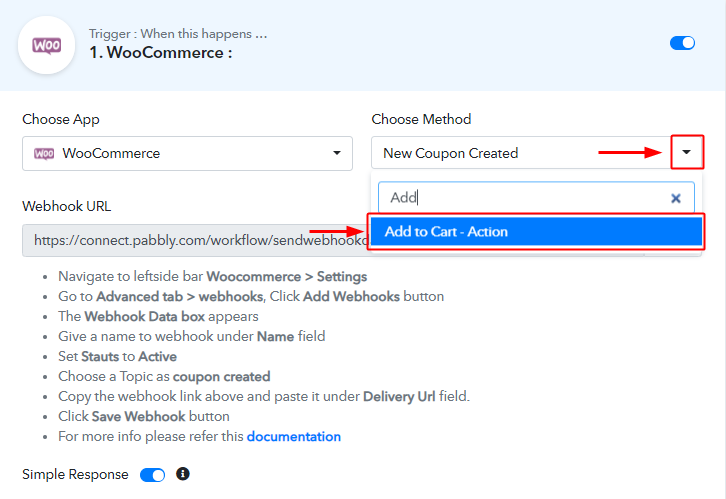
Next, select the ‘Add to Cart – Action’ from the ‘Choose Method’ field’s drop-down options.
(c) Copy the Webhook URL
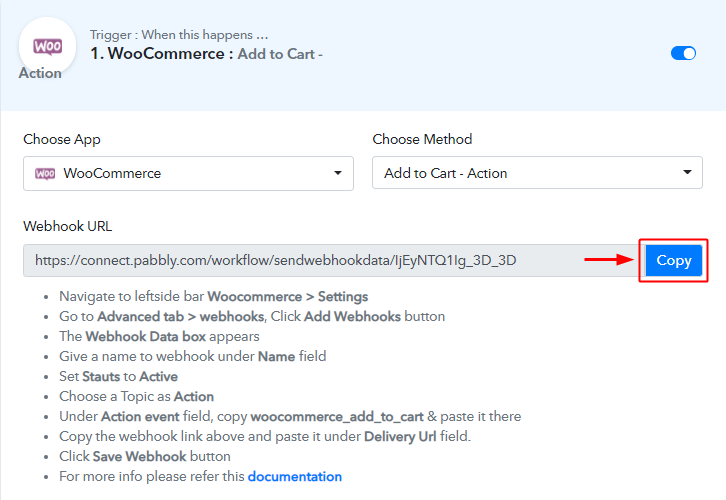
Further, copy the ‘Webhook URL’ by clicking the ‘Copy’ button on this page.
Up to this point, we are half-way done with the WooCommerce to Gmail trigger settings. As we have generated a Webhook URL, next we’ll need to paste this URL on our WP WooCommerce plugin settings to get the trigger working.
Step 5: Connecting WooCommerce to Pabbly Connect
(a) Go to Your WordPress WooCommerce Settings
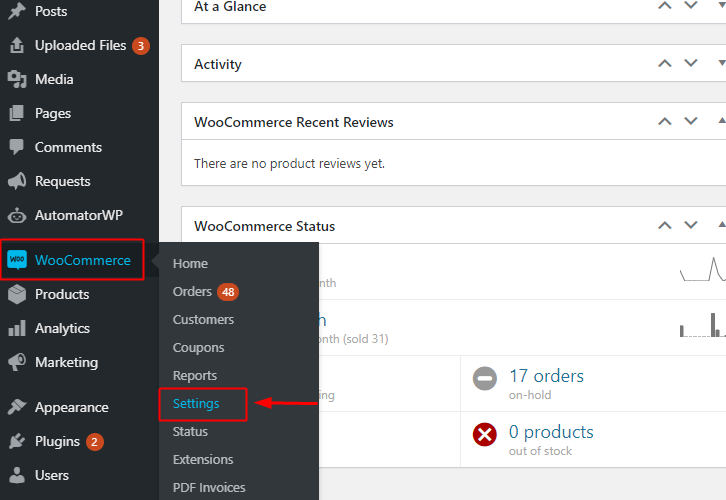
Go to your WordPress site dashboard and if you have the WooCommerce plugin enabled then click on the ‘WooCommerce’ option available in the WP dashboard menu. And then click the ‘Settings’ option on the secondary many that become visible after clicking ‘WooCommerce’.
On the other hand, if you don’t have the WooCommerce plugin enabled then do enable it first. And then only perform the above-explained method in this step.
(b) Click on the Advanced Settings Option
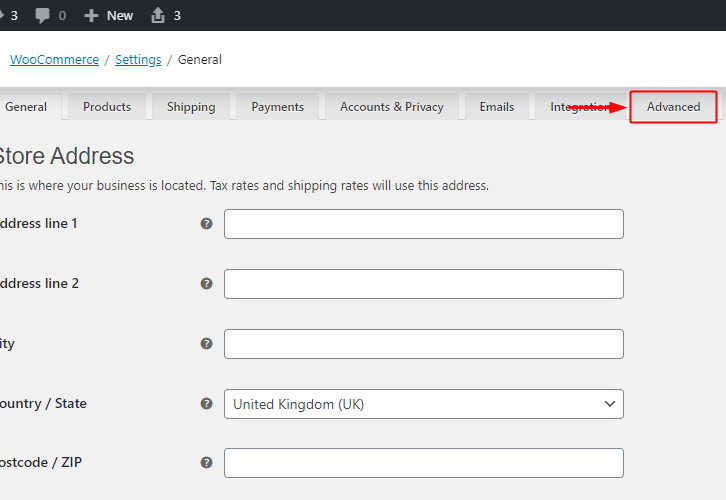
Next, you will see a page carrying the WooCommerce general settings, click on the ‘Advanced’ option on the page’s menu.
(c) Click on Webhooks
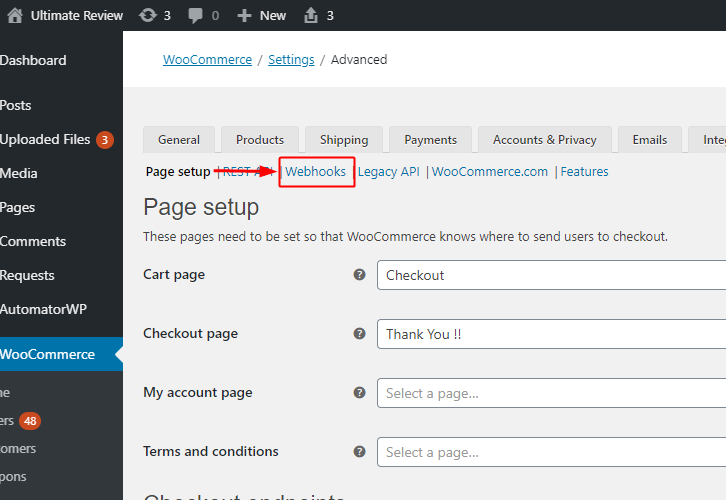
Afterwards, another page will open up carrying another menu below the setting’s menu. Click on the ‘Webhook’ option.
(d) Click on Add Webhook Button
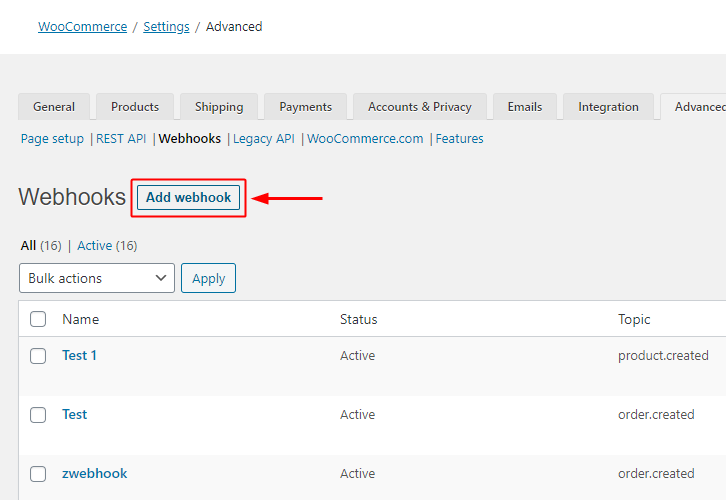
The page carrying all the webhooks created so far will open up.
Push the ‘Add webhook’ button present next to the ‘Webhooks’ head.
(e) Fill the Webhook Data Box Entries
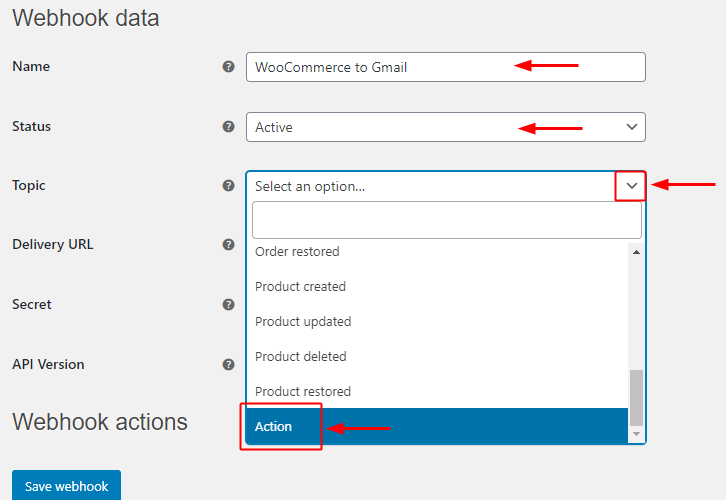
A page carrying the Webhook data box will open up.
Fill in the name that you wanna give to your Webhook.
Change the value of the ‘Status’ field to be ‘Active’ by selecting the same option from this field’s drop-down.
Next, accurately select the ‘Topic’ field value to be an ‘Action’ from the field’s drop-down menu.
(f) Mention the Action Event & Paste the Delivery URL
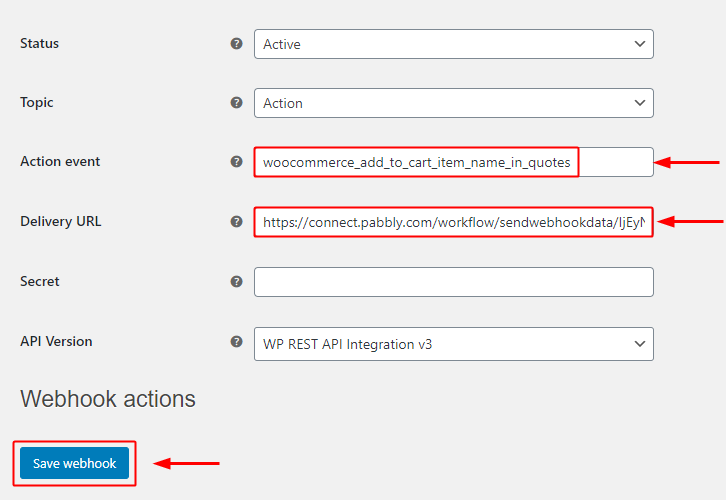
Next, in the ‘Action event’ field you’ll need to paste a code i.e, “woocommerce_add_to_cart_item_name_in_quotes”. This code is to get the name of the item that has been added to cart recently. Also, there are other actions to carry out on the ‘Add to Cart’ action as well. You can always get more action event codes on the WooCommerce site.
Lastly, paste the copied Pabbly Connect Webhook URL in the ‘Delivery URL’ field and save the webhook settings by clicking the ‘Save Webhook’ button.
Step 6: Test the Trigger Response in Pabbly Connect Dashboard
As we can see we are done setting up the trigger to get email notified when product is added in WooCommerce cart. So, let’s just test the trigger by making a test ‘Add to Cart’ action.
(a) Go to Pabbly Connect Trigger & Click Capture Webhook Response
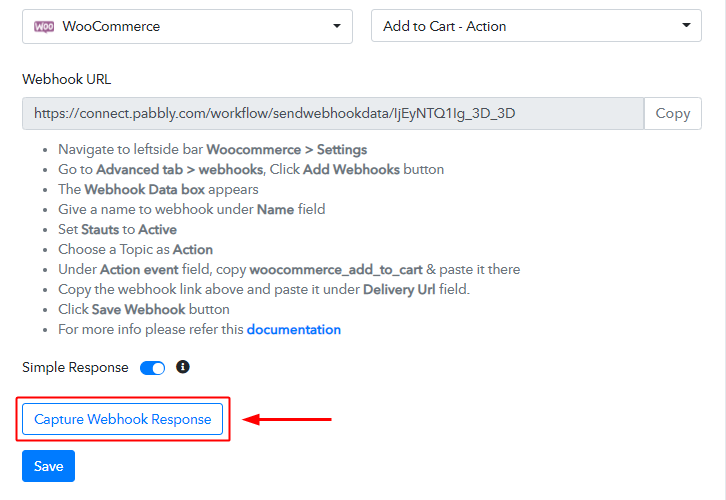
Well, to capture the response of your testing activity. First, hit the ‘Capture Webhook Response’ button on the Pabbly Connect trigger window.
This way when you make an action afterwards, the response will be stored here.
(b) Go to a Product & Press the Add to Cart Button
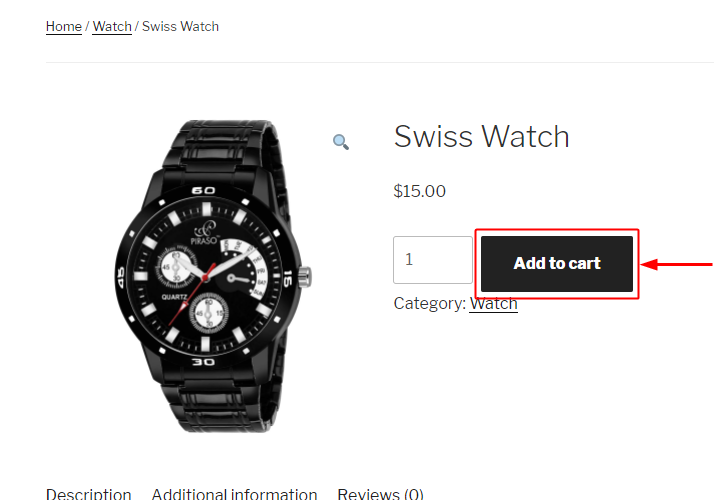
Now, open any of your product and press the ‘Add to Cart’ button.
(c) Check the Trigger Response
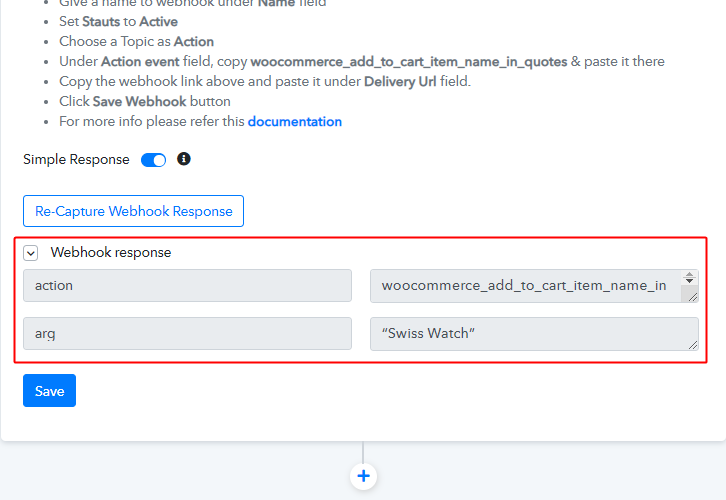
You can see the response of your ‘Add to Cart’ action on the trigger response.
The response will start showing the name of the item that is recently been added to your WooCommerce cart.
Step 7: Select Action for WooCommerce – Gmail Integration
As we can see the response of our set trigger is perfect as expected and now we can move forward towards taking an action on the received data from WooCommerce.
(a) Select Application You Want to Integrate
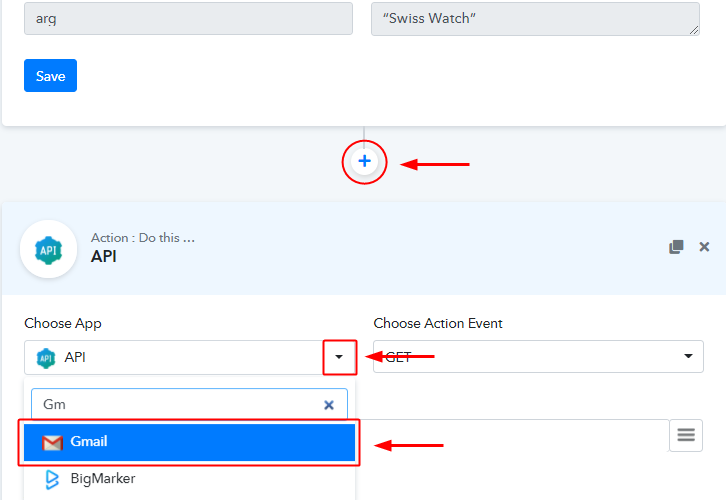
First, click the plus button available next to your trigger set-up.
Then, select the application that you want to integrate as Gmail from the Choose App field’s drop-down choices.
(b) Connect with Your Gmail Account
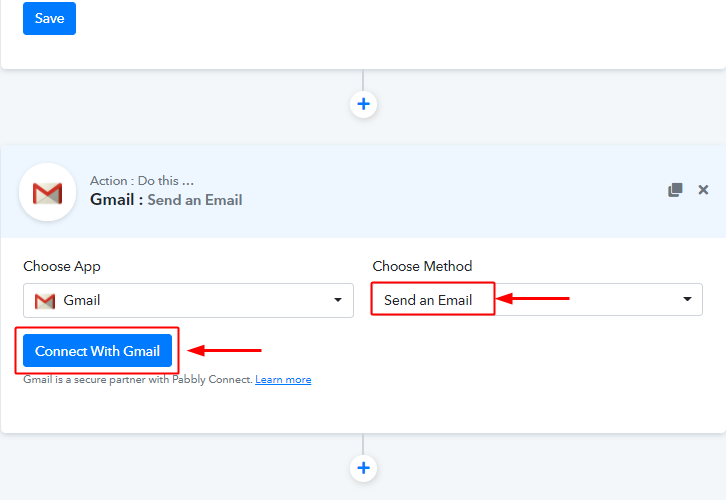
Make sure of the method to be ‘Send an Email’ in the ‘Choose Method’ field.
Lastly, hit the ‘Connect with Gmail’ button.
(c) Authorize Gmail Account
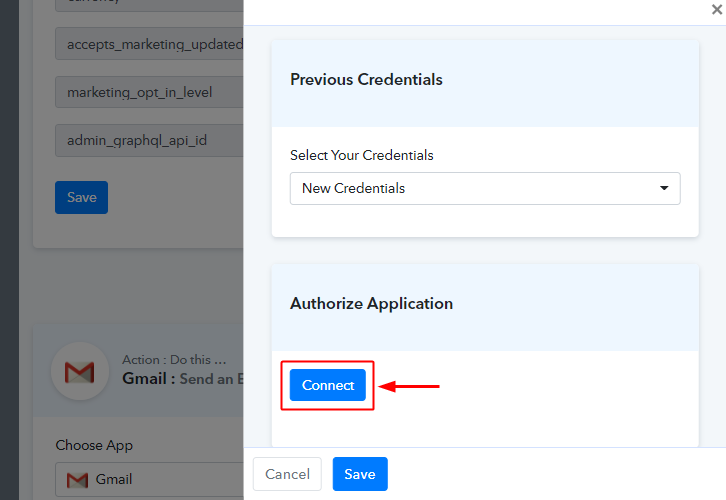
On the page that slides in from the right side, click the ‘Connect’ button to add as well as authorize a Gmail account.
(d) Fill Email Details
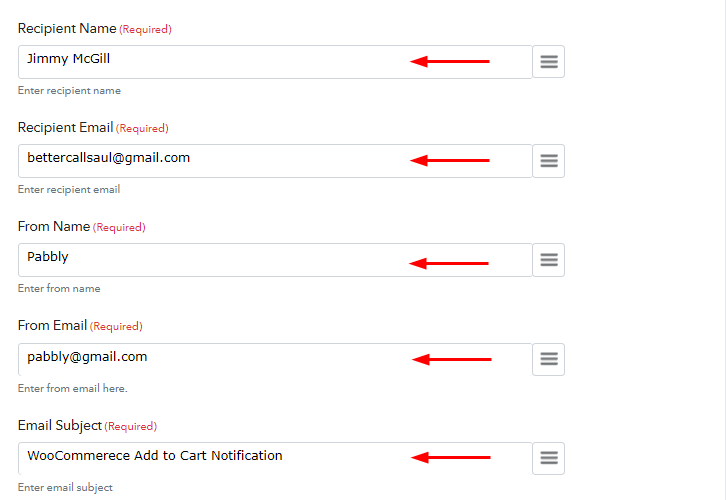
Carefully, fill up all the email details asked such as the recipient name to whom we want to notify the action, ‘From Name’ as from which site the notification is and the Email Subject etc.
(e) Map the Action Value in Email
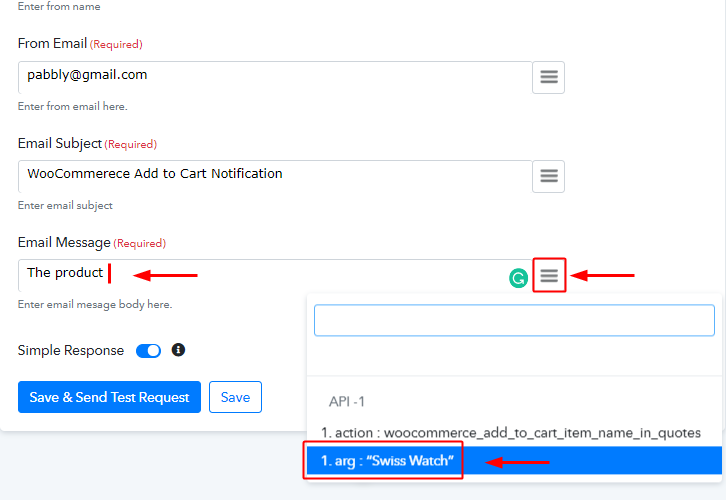
This is an important step and you can map the values that you got from the WooCommerce response and send them as an email notification.
You can always use the WooCommerce response values in any field. To map a value, place your cursor to the position on which you wanna map the value, click the menu button (three verticle lines) next to that particular field and then click select the value that you want to map.
Moreover, you can format the Email Message field as per your need.
(f) Save the Action & Send Test Request
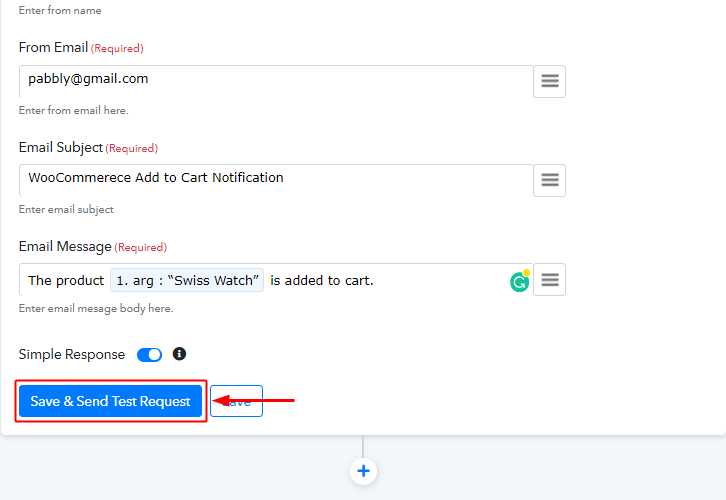
Lastly, save & send test request for testing the action.
(g) Check Action Response
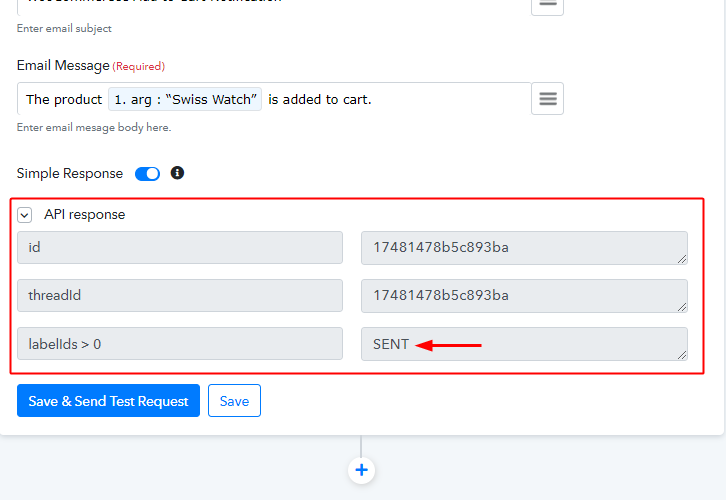
You can observe the response value labelled as SENT, reflecting the success of your designed workflow.
Step 8: Check the Final Response
(a) Check Response in the Test Email Inbox
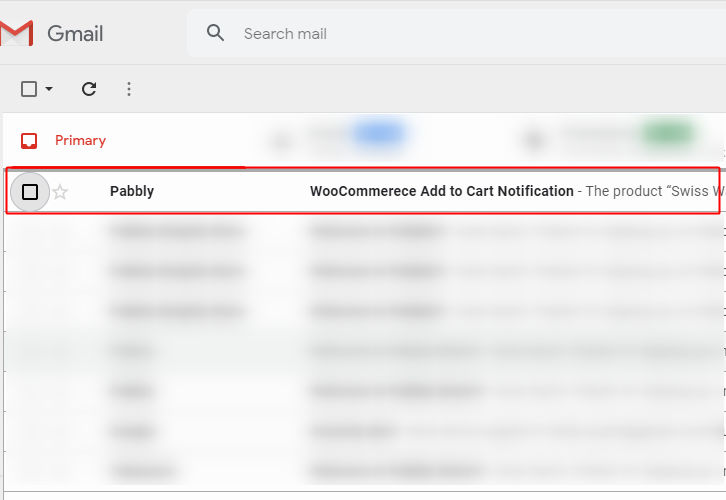
Also, you can check the email delivery in the receivers email inbox too.
(b) Save the Webhook
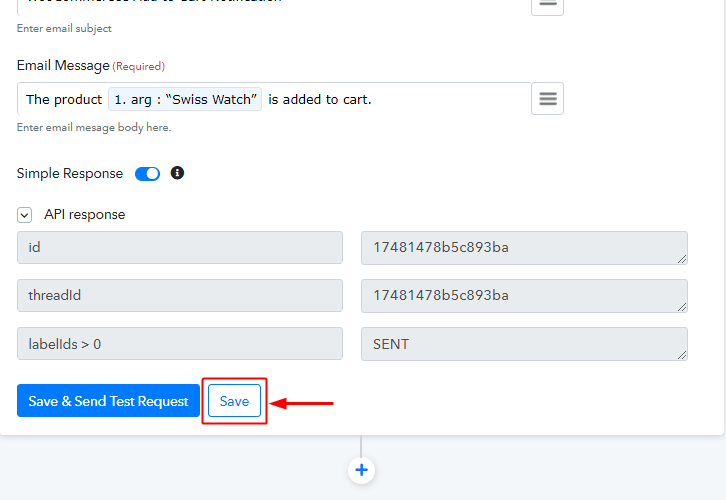
As we can see the Webhook is working perfectly. So, simply save the webhook by clicking the last action’s save button.
Wind-Up
Well, this is all about ‘How to get email notified when product is added in WooCommerce cart’. Consequently, after completing the step by step procedure, you will end up receiving automated emails notification when a product is added in the WooCommerce cart. Most importantly, the procedure is very easy to implement and you don’t need any coding knowledge to follow the steps.
Do you want to try Pabbly Connect for FREE?
For any further queries, do comment below.


