Have you ever tried to create Xero invoices automatically for new Stripe payments? You might have but here we are going to show the simplest way to integrate Stripe and Xero using Pabbly Connect.

But before jumping on that, let’s understand why there is a need of connecting Stripe with Xero. Stripe is a payment processing platform that helps companies of all sizes. The software allows companies to issue virtual and physical cards, obtain support, control company expenses, and much more.
Whereas Xero is a software for business accounting that monitors for other accounting activities such as creating an invoice, balance of bank accounts, and much more. Many times we want to send an invoice to customers instantly as soon as the Stripe payment is received. But doing it manually consumes times so we search for a way to integrate both the software.
But believe us, Integrating this software can be a troublesome process as there is no such direct integration available. This is exactly why we are recommending Pabbly Connect which allows you to integrate both software in a matter of time.
Why Choose This Method Of Integration?
In contrast with other integration services-
- Pabbly Connect does not charge you for its in-built apps like filters, Iterator, Router, Data transformer, and more
- Create “Unlimited Workflows” and smoothly define multiple tasks for each action
- As compared to other services which offer 750 tasks at $24.99, Pabbly Connect proffers 50000 tasks in the starter plan of $29 itself
- Unlike Zapier, there’s no restriction on features. Get access to advanced features even in the basic plan
- Try before you buy! Before spending your money, you can actually signup & try out the working of Pabbly Connect for FREE
Pabbly Connect allows you to create seamless workflows without the need for any technological expertise. The software makes business automation a walk-in park. It can be used to move data in real-time.
Not only this but also in its free plan, it offers features like limitless apps, filters, path-routers and much more.
Here, in this article, we will learn how to connect Stripe and Xero in real-time.
So, without any further ado, let’s start the integration process.
Step 1: Sign up to Pabbly Connect
Start the process of connecting Stripe to Xero by clicking on the “Sign Up Free” icon on the Pabbly Connect dashboard. Further, either fill-up the details manually or sign up using Gmail credentials.
Try Pabbly Connect for FREE
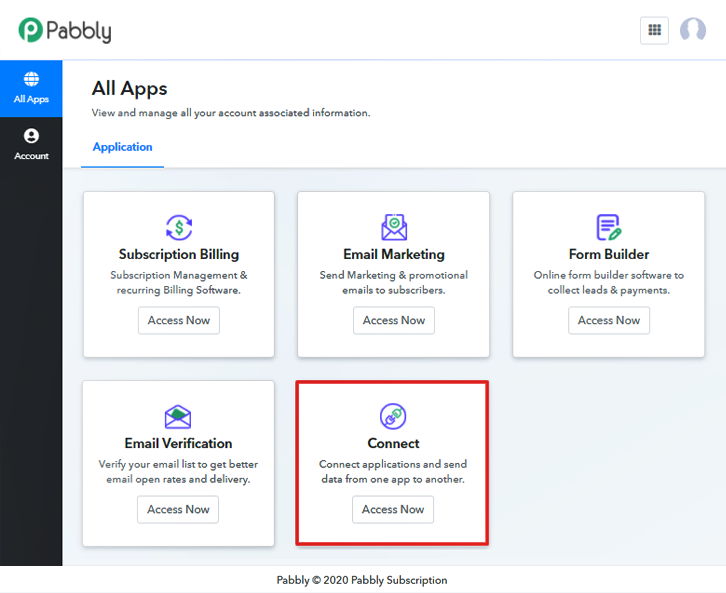
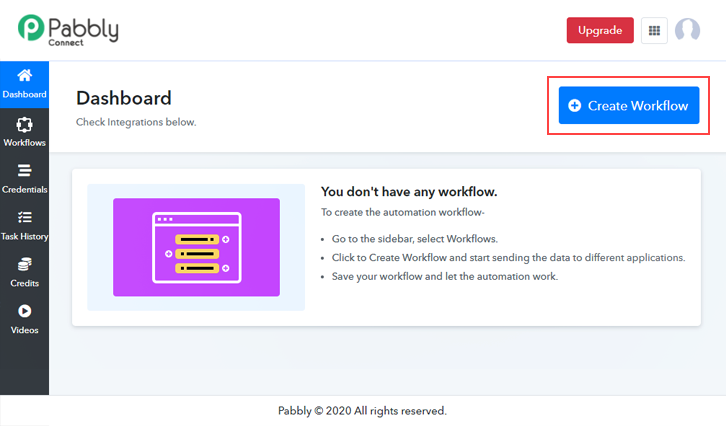
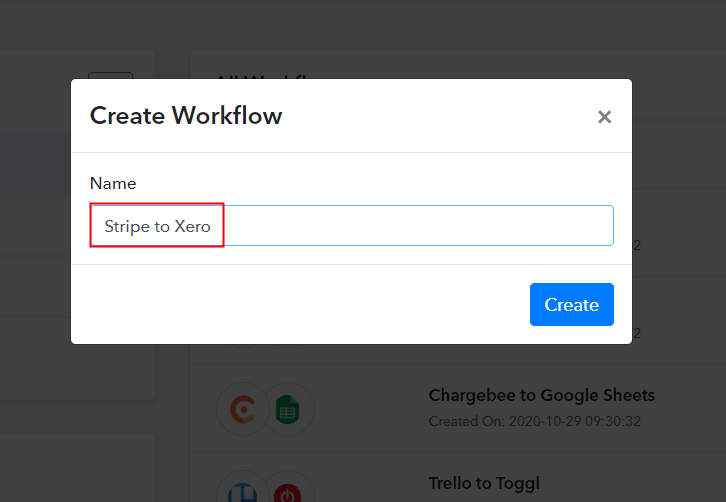
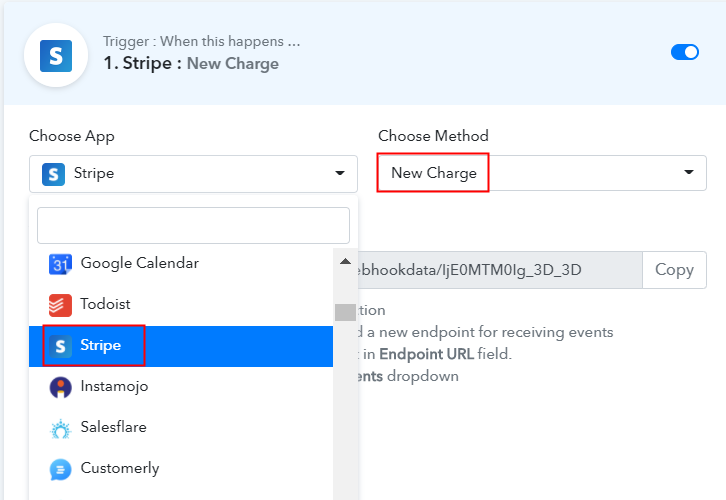
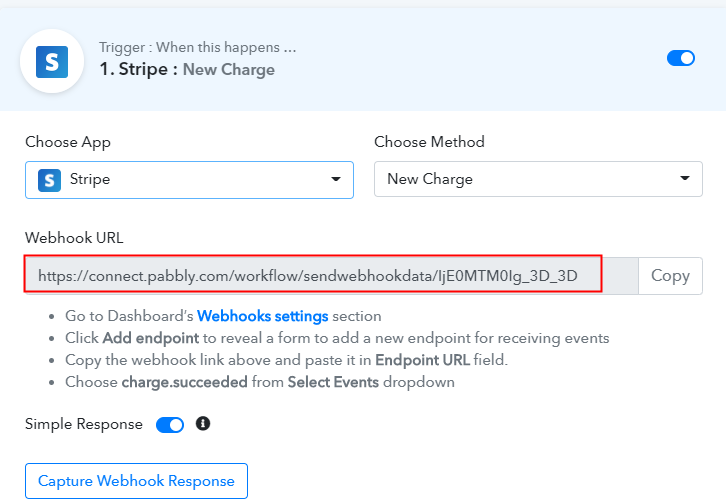
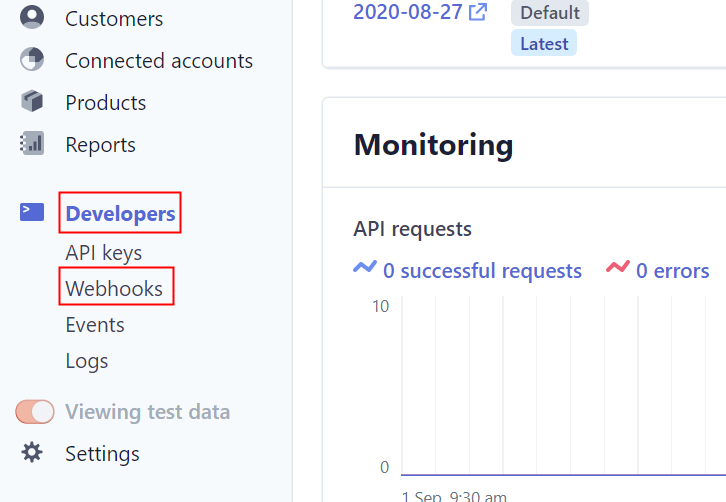
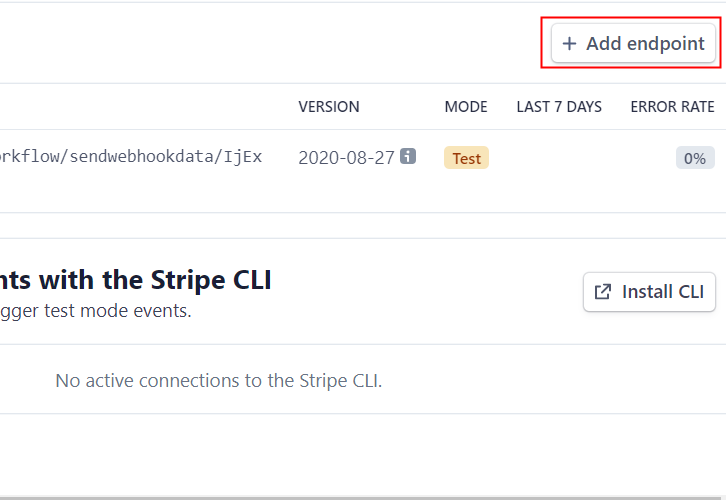
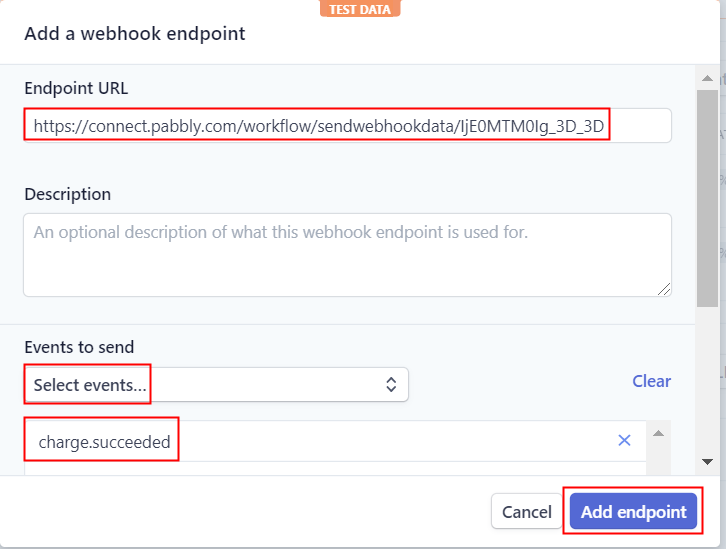
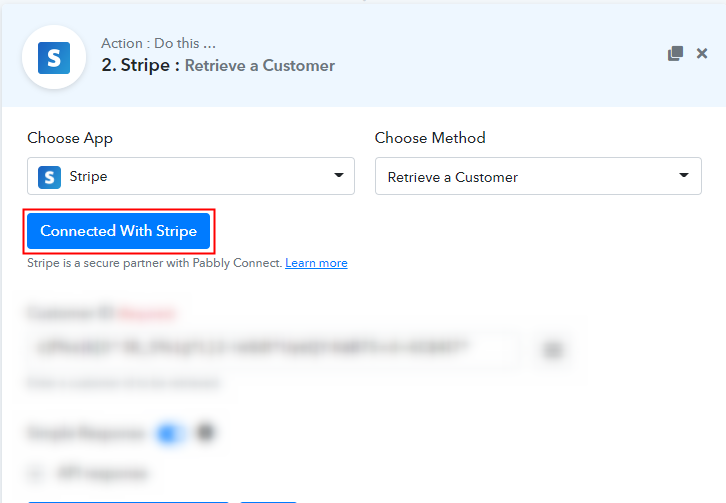
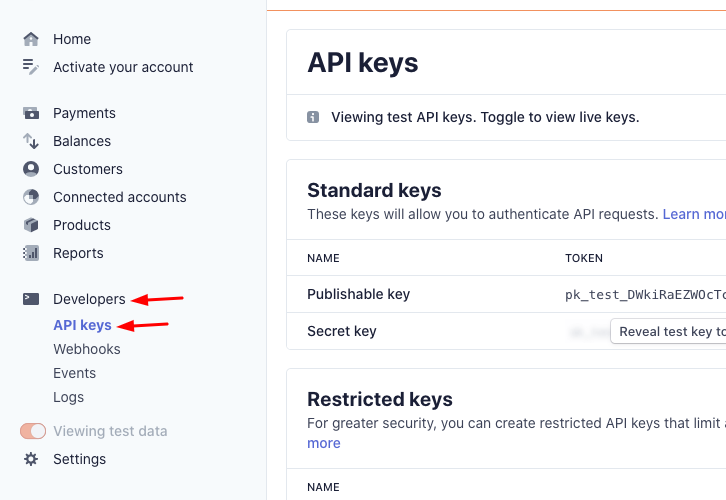
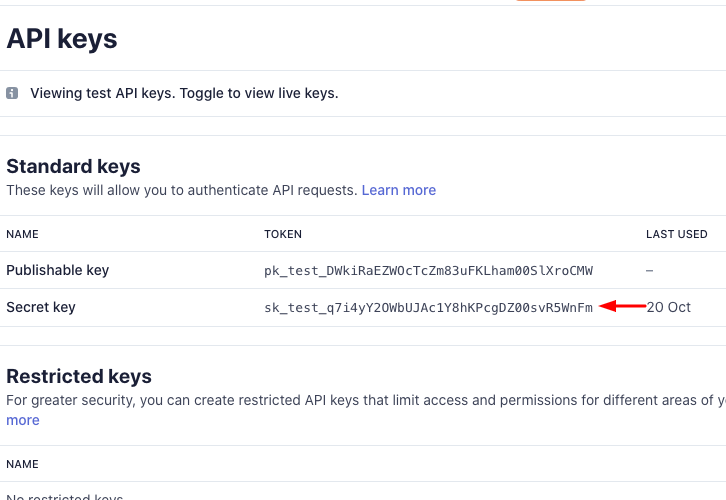
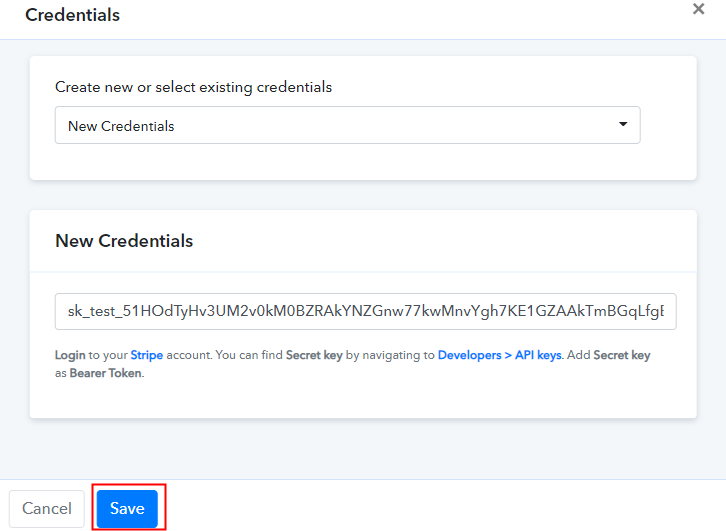
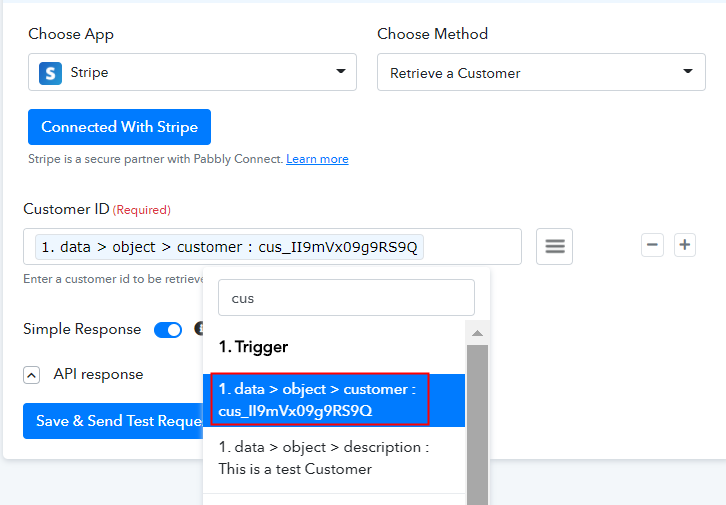
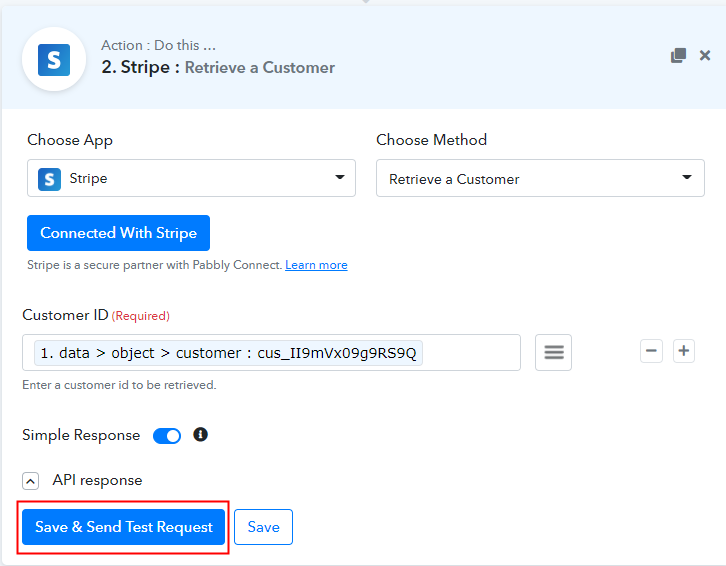
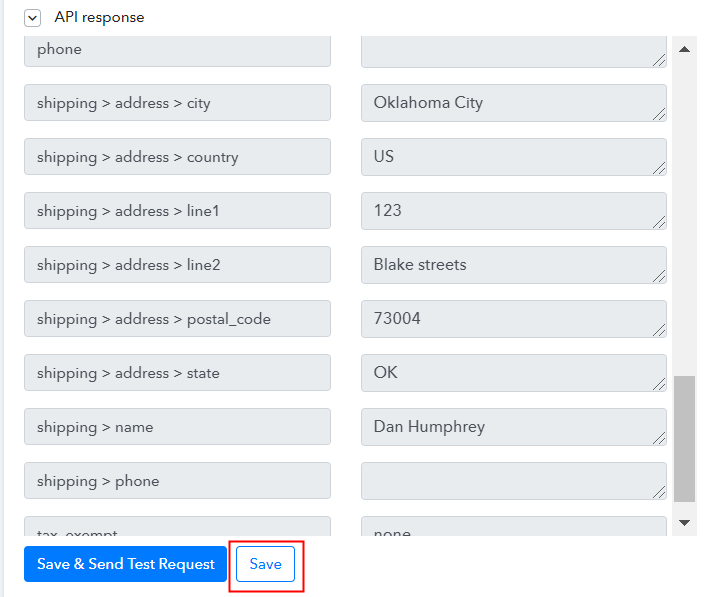
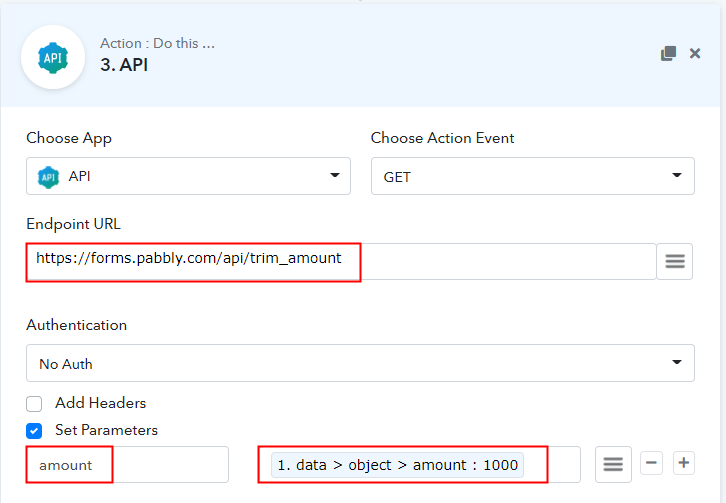
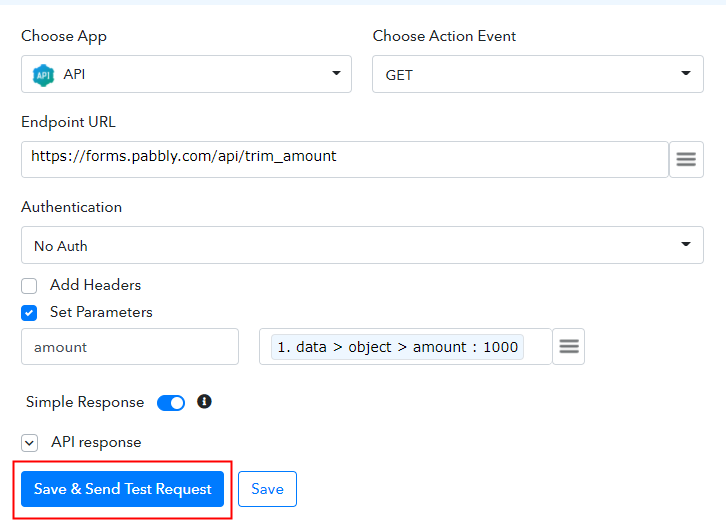
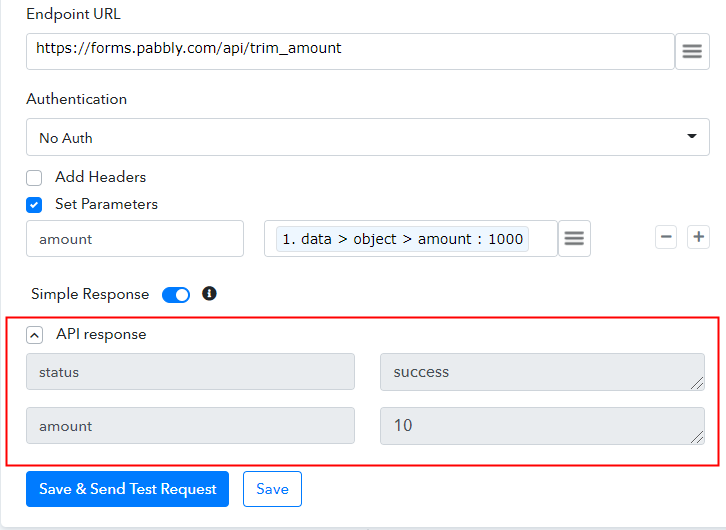
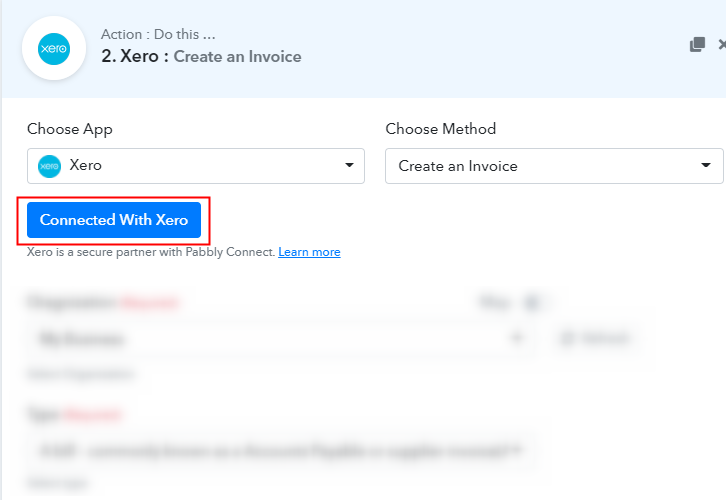
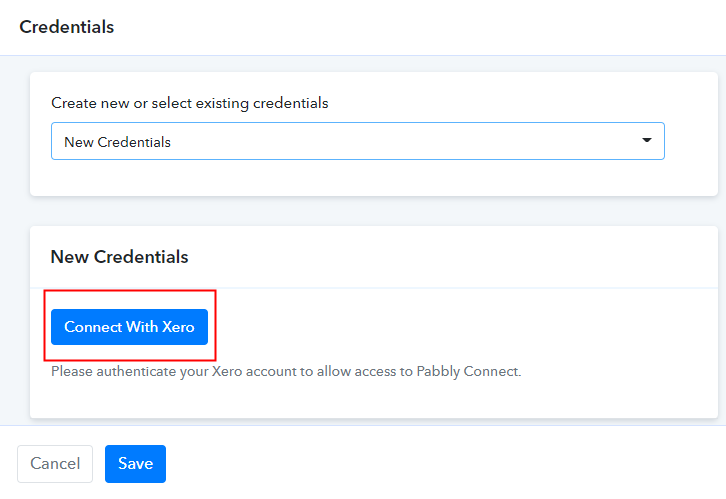
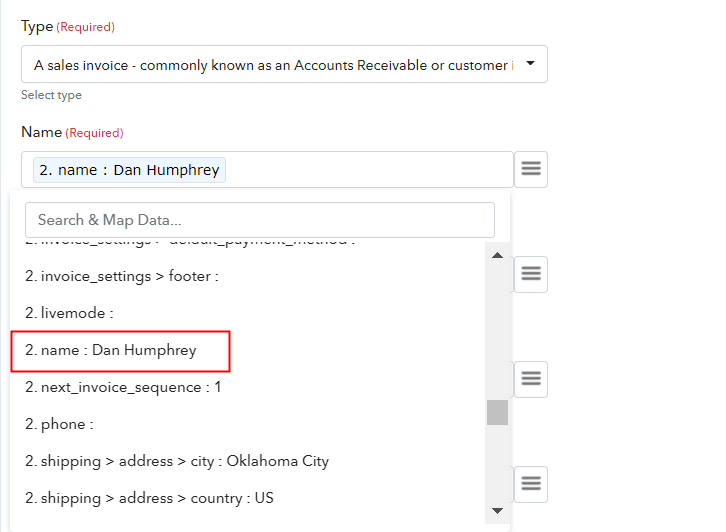
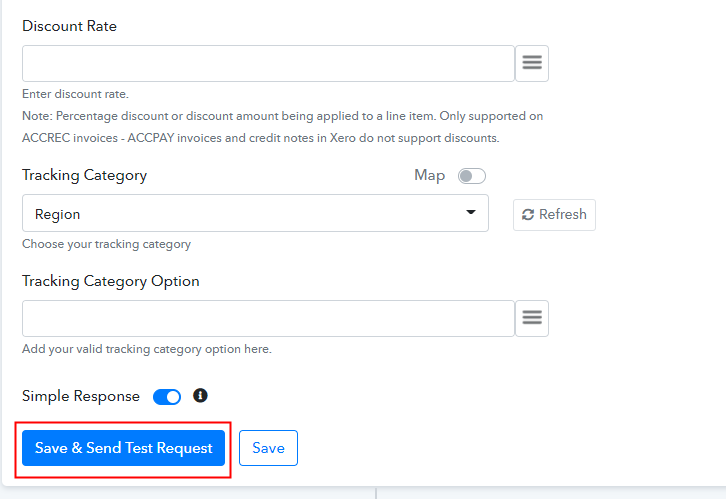
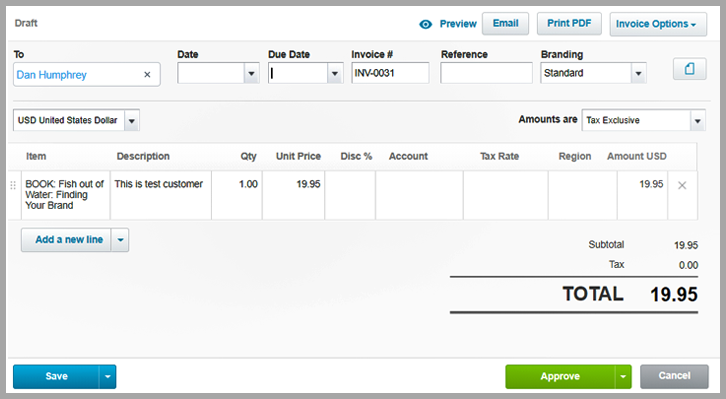
Next, after logging into the account, click on the “Access Now” button as shown in the above image. Start the process of building a workflow for integration by clicking on the “Create New Workflow” button. Moreover, add the name of workflow which in our case is “Stripe to Xero”. Nevertheless, you can always name the workflow according to your requirements. Next, after building a workflow, you have to choose the integration app to create a workflow for connecting Stripe to Xero. Using Pabbly Connect you can avail unlimited actions and triggers, click here to sign up for unlimited workflows for free. The accompanying step is to choose “Stripe” from the dropdown, then choose the “New Charge” option to create Xero invoices. The next step is to copy the webhook URL which is appearing on the dashboard. To create Xero invoices automatically for new Stripe payments, you gotta paste the copied Webhook URL in the software. For that, you have to log in to your Stripe account. After logging into the Stripe account, go to the “Developer” section on the left of the dashboard. Then click on the “Webhooks” option. Further, when you click on “Webhooks”, it will open up an endpoint tab, Just click on the “Add Endpoint” option to paste the Webhook URL. As soon as you press the ‘Add Endpoint’ button, the options window opens. Simply paste the copied URL into the segment called Endpoint URL. In the “Event to Send” tab, be sure to pick charge.succeeded. Finally, to save the setting, click on ‘Add Endpoint’. On the left of the dashboard, go back to the “Payment” tab, then click on the “New” button to add payment. After clicking on the “New” button, a pop-up will appear. Just fill in all the required details and hit the “Submit Payment” button at the bottom. But before pressing the button, make sure to click capture webhook response in the Pabbly Connect dashboard. As soon as you click on the “Add Payment” option, the entry will appear on the “Pabbly Connect” dashboard. Then, click on the “Save” option. Now as you see in Test response, it is not capturing email address so the next step is to retrieve Stripe customers details such as name, email, address through customers id. Now in this step, click on the + button below and choose “Stripe” and in the method section select “Retrieve a Customer”. After choosing the application click on the “Connected with Stripe” button to move forward. A window will slide in from the right side asking for a “Bearer Token” after clicking on the connect button. Next, click on the ‘Developers’ button and then click on the ‘API Keys’ button on the Stripe account to copy the API key. To go on, simply copy the API key provided in front of the “Secret key.” Paste the copied API key and then click on the “Save” button. Now all you have to do is map the customer id from the dropdown. Now after mapping all the fields, just hit the “Save & Send Test Request” button. Here, you will see, from the customer ID, we have obtained the customer’s details including name, email, address, etc. Save the response from the API and move forward. Now as you know the amount is not exact so we are setting an action to trim the amount. Next, click on the + button below and choose “API” and in the Choose Action Event method, select “GET”. Now in the URL section paste “https://forms.pabbly.com/api/trim_amount” to trim the amount. In the parameters column, fill the amount and then select the amount of data from the dropdown. Now after filling endpoint URL and parameters, click on “Save and Send Test Request”. As soon as you click on the “Save and Send Test Request”, we will get the API response. Now all you have to do is hit the “Save” button. To make this Stripe Xero integration work, you have to choose the action for your trigger. In addition, press the + icon to add an action to your trigger. We will choose “Xero” from the drop-down field here. Then, select the choice to “Create an Invoice”. Now, after making all the necessary changes, click on the “Connected with Xero” button. Further, it will ask for account authorization for which you have to click on the “Connect” button. Further, it will automatically fetch the data of the organization and type after successful login. Now, all you have to do is add the required field from drop-down such as for the email field, select the email option, and for the name field select the name option. After making all the changes, save the setting and then “Send Test Request”. Lastly, when you check the Xero dashboard, the entered customer’s invoice gets automatically drafted in software. Now you know how to create Xero invoices for new Stripe payments. This is a one-time process, after this every time whenever a purchase happens, the customer’s invoice will get append in business accounting software. Okay! Now you know how easy is to create Xero invoices automatically for new Stripe payments. We understand how daunting a way of integrating two applications can be. This is why individuals are searching for assets that can support them. You can prevent manual hard work and improve your work productivity with the help of a business automation tool. And software such as Pabbly Connect can be a great help in such situations, allowing you to connect and create infinite workflows. So, wait no longer. By signing up for a free account, go and grab your access.Step 2: Access Pabbly Connect
Step 3: Workflow for Stripe to Xero Integration
(a) Start with a New Workflow
(b) Name the Workflow
Step 4: Setting Trigger for Stripe to Xero Integration
(a) Select Application you Want to Integrate
(b) Copy the Webhook URL
Step 5: Connecting Stripe to Pabbly Connect
(a) Go to Developer Section
(b) Click on Add Endpoint
(c) Paste the Webhook URL
(d) Click on Payment Option
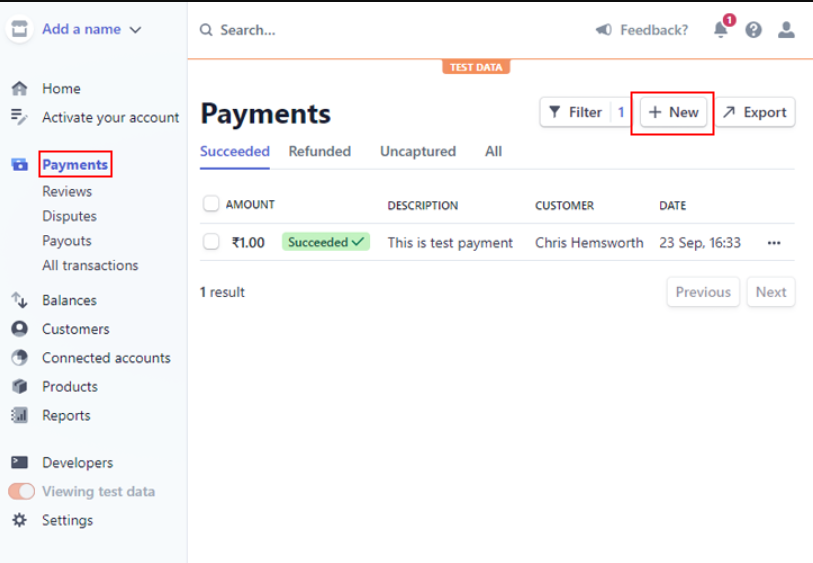
(e) Add Payment
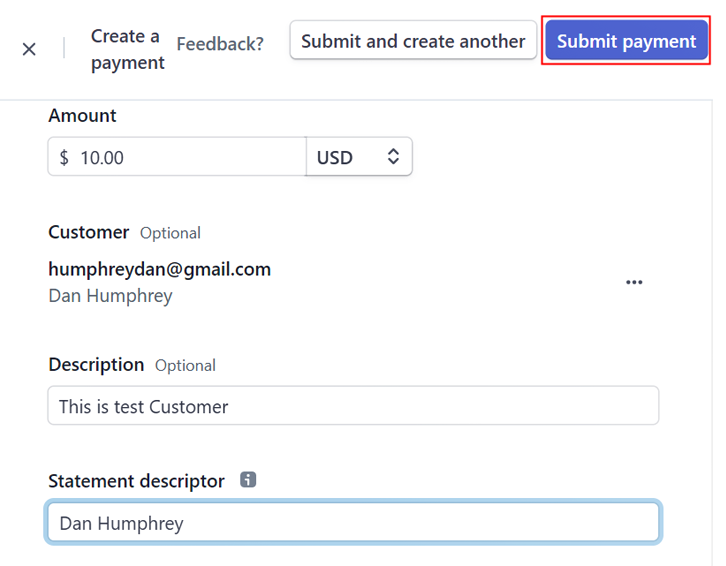
Step 6: Test the Response in Pabbly Connect Dashboard
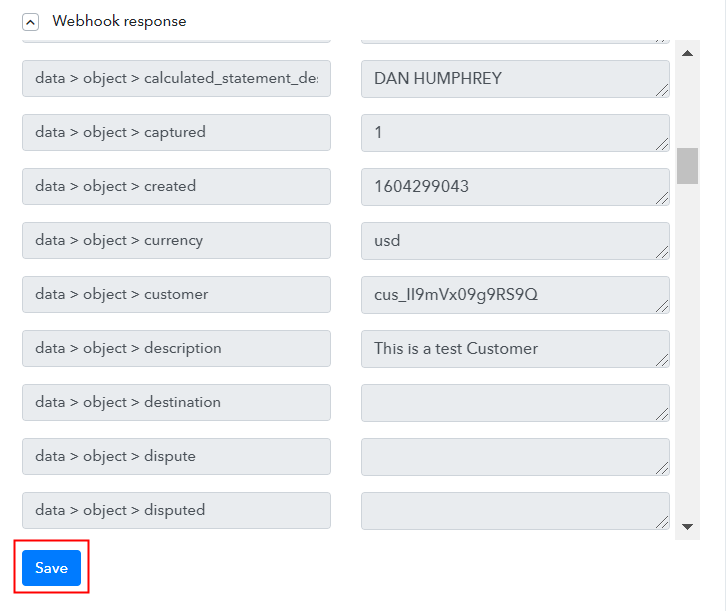
Step 7: Retrieve Stripe Customers Details
(a) Select Application you want to Integrate
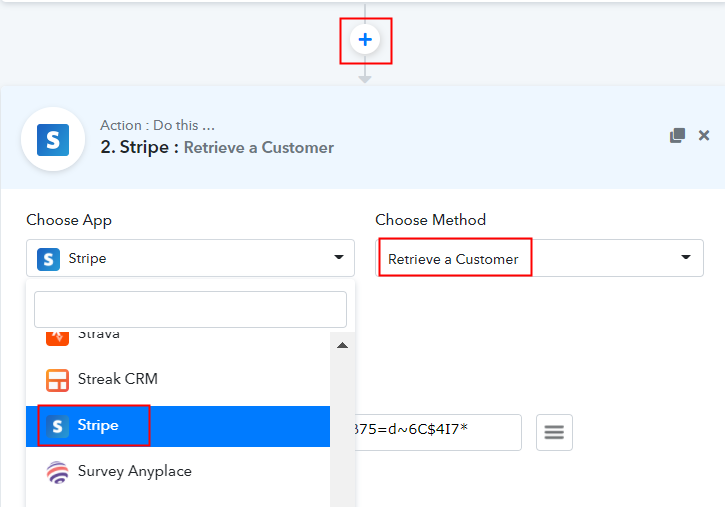
(b) Click on Connect Button
(c) Click on Developers
(d) Copy the API Key
(e) Paste the API Key
(f) Map Customer ID
(g) Save and Send Test Request
(h) Test the Response
Step 8: Setting Action to Trim Amount
(a) Select Application you want to Integrate
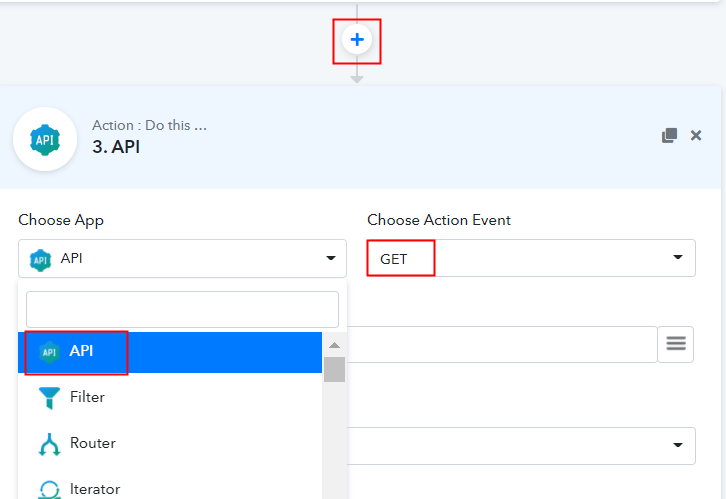
(b) Paste Endpoint URL & Set Parameters
(c) Save and Send Test Request
(d) Test the Response
Step 9: Setting Action for Stripe to Xero Integration
(a) Select Application you Want to Integrate
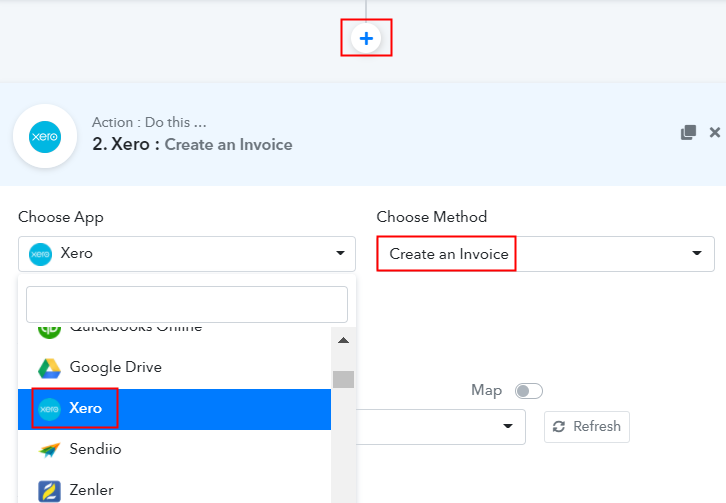
(b) Click the Connect Button
(c) Authorize Xero Account
(d) Map Field Data
(e) Save and Send Test Request
Step 10: Check Response in Xero Dashboard
Conclusion –
You May Also Like to Read –


