How to Send Mail via Gmail from New BigCommerce Order

How to Send Mail via Gmail from New BigCommerce Order

Are you tired of searching for a way to send mail via Gmail from new BigCommerce order? If yes, then you’re at the right place.
How to Send Mail via Gmail from New BigCommerce Order

Long gone those days when people used to rely on manual efforts. Now more than anything everyone is looking for resources that can ease our repetitive work. In such cases, software like Pabbly Connect is a great help.

Pabbly Connect is an integration and automation software that lets you connect multiple premium applications for data transmission. Not just this, you don’t need any kind of technical expertise to use this software. Even in its free plan, you will get access to premium features like path routers, filters, etc.

Why Choose This Method Of Integration?

In contrast with other integration services-

  • Pabbly Connect does not charge you for its in-built apps like filters, Iterator, Router, Data transformer, and more
  • Create “Unlimited Workflows” and smoothly define multiple tasks for each action
  • As compared to other services which offer 750 tasks at $24.99, Pabbly Connect offers 50000 tasks in the starter plan of $29 itself
  • Unlike Zapier, there’s no restriction on features. Get access to advanced features even in the basic plan
  • Try before you buy! Before spending your money, you can actually signup & try out the working of Pabbly Connect for FREE

Sign Up To Pabbly Connect   

But before jumping on the integration process, let’s cast a light on software and the need for integration. Basically, BigCommerce is a leading e-commerce builder, providing extreme scalability for online stores. Whereas, Gmail is a free email service developed by Google.

By integrating BigCommerce and Gmail via Pabbly Connect, one can send emails to customers whenever an order is placed in BigCommerce. It helps to keep customers updated about every small detail.

We have also embedded a video for you. Just go through it.

Furthermore, we have a template for this integration that can assist you to begin your integration journey in no time. Also, if you need assistance with any other integration, just go to Marketplace and look for the apps you use to start integration immediately. Simply tap on the image below to get started.

Clone Template BigCommerce and Gmail

Here, in this article, we will understand how to integrate BigCommerce and Gmail.

So, let’s begin the process.

Step 1: Sign up to Pabbly Connect

Sign Up

Start the process to send mail via Gmail from new BigCommerce order by clicking on the “Sign Up Free” icon on the Pabbly Connect dashboard. Afterward, either fill-up the details manually or sign up using your Gmail credentials.

Try Pabbly Connect for FREE

Step 2: Access Pabbly Connect

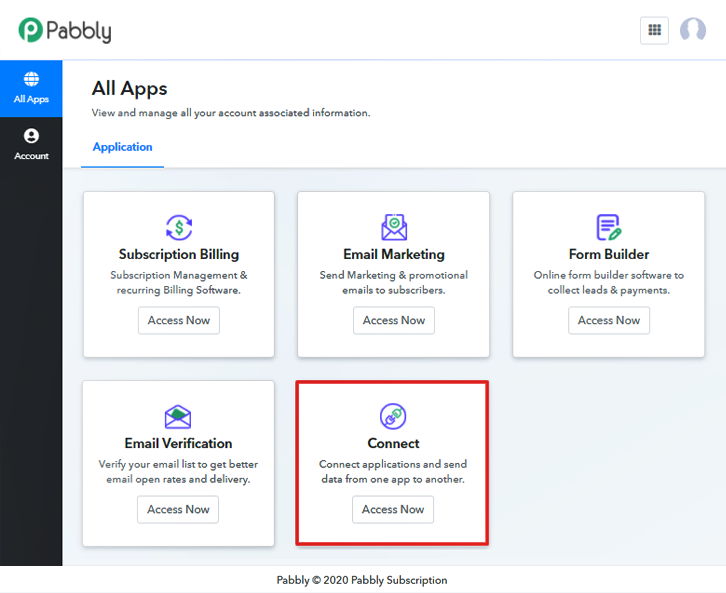
Select Connect

Further, after logging into the account, click on the “Access Now” button as shown in the above image.

Step 3: Workflow for BigCommerce to Gmail Integration

(a) Start with a New Workflow
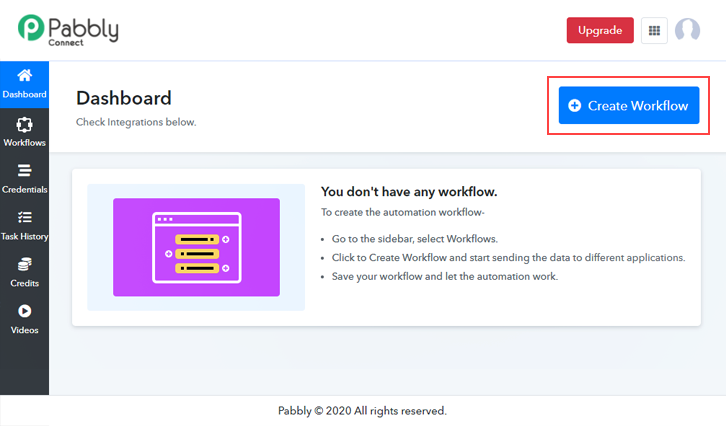
Create New Workflow

Begin the process of creating a workflow for integration by clicking on the “Create Workflow” button.

(b) Name the Workflow

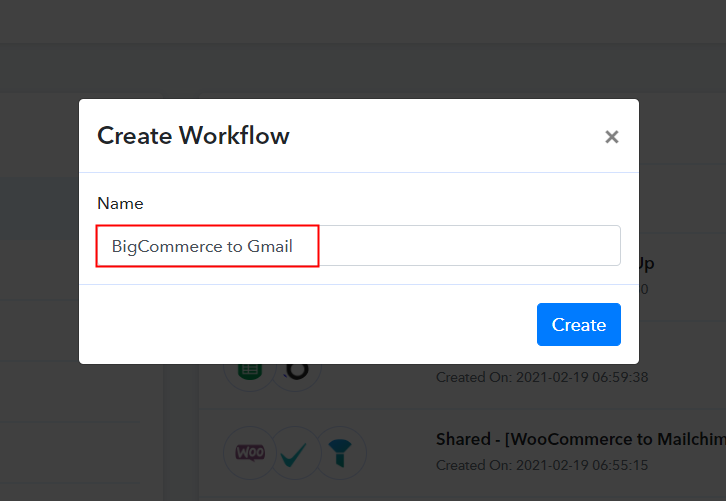
Name the Workflow

Moreover, add the name of workflow which in our case is “BigCommerce to Gmail”. Although, you can always name the workflow according to your requirements.

Step 4: Setting Trigger for BigCommerce to Gmail Integration

Following, after creating a workflow, you have to choose the integration app to send mail via Gmail from new BigCommerce order. Pabbly Connect allows you to create infinite workflows within flashes, click here to sign up for unlimited integrations for free.

(a) Select Application you Want to Integrate
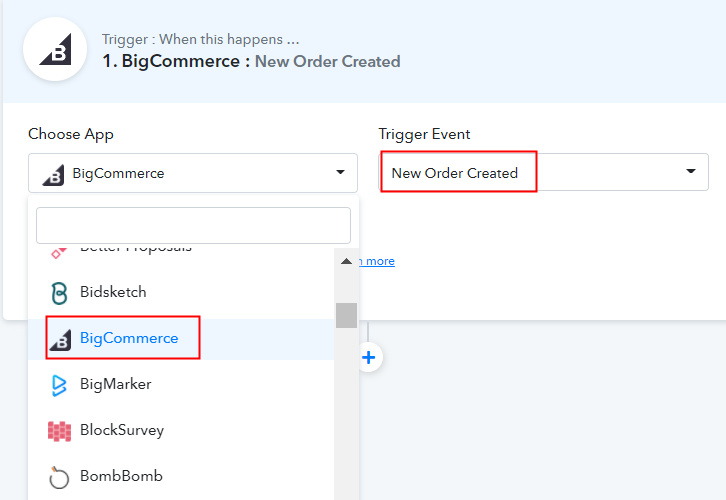
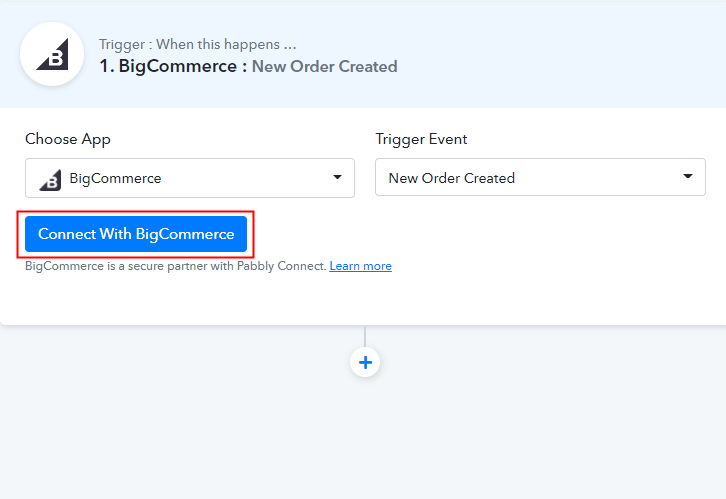
Select BigCommerce

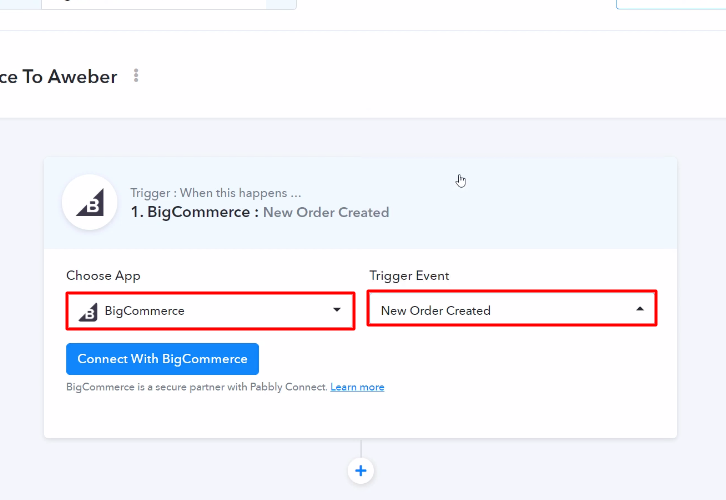
The following step is to select “BigCommerce” from the dropdown, then choose the “New Order Created” option to send mail via Gmail for a BigCommerce order.

(b) Click on Connect Button

Click on Connect Button

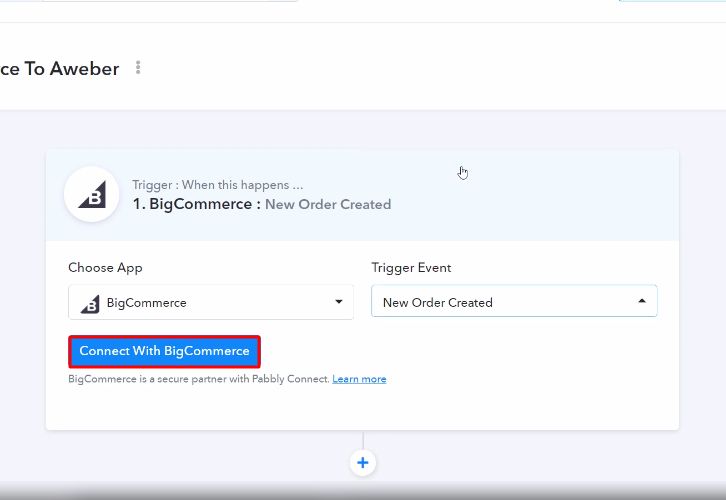
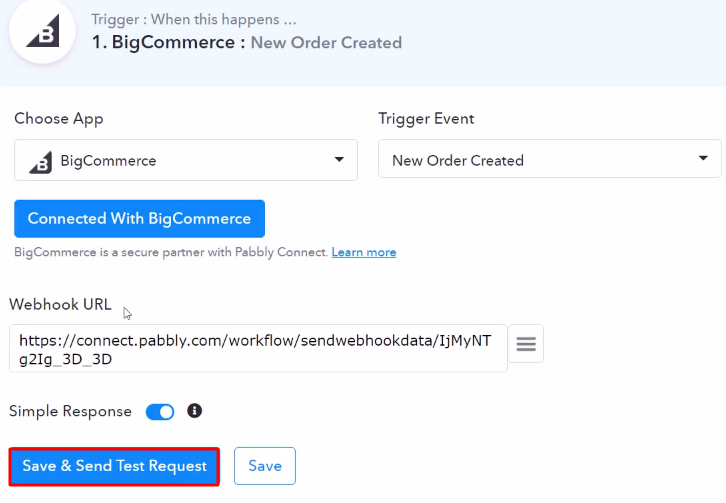
The following step is to click on the “Connect with BigCommerce” button.

Step 5: Connecting BigCommerce to Pabbly Connect

Next, to integrate BigCommerce with Pabbly Connect, you have to paste the client id, access token, and store hash keys in the Pabbly Connect dashboard. For that, you must log in to your BigCommerce account.

(a) Head to BigCommerce Advanced Settings
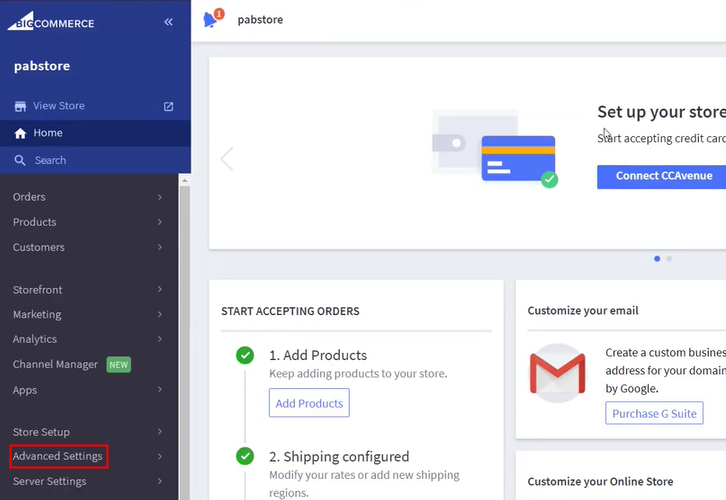
Head to  BigCommerce Advanced Settings

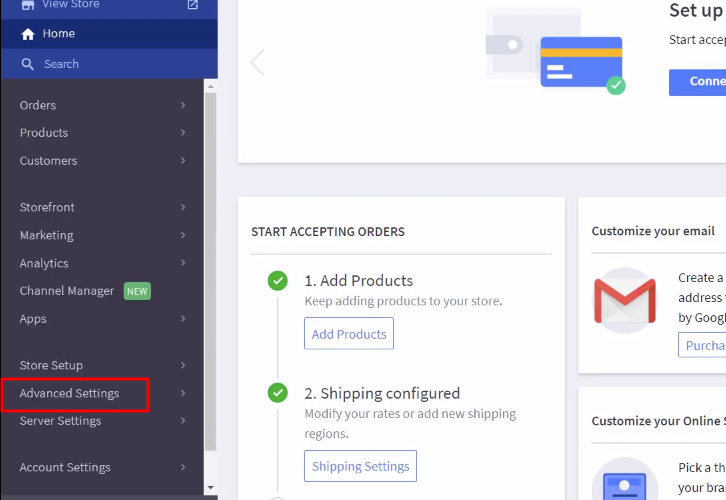
After logging into your BigCommerce account, go to the dashboard and click on “Advanced Settings”.

(b) Click on API Accounts

Click on API Accounts

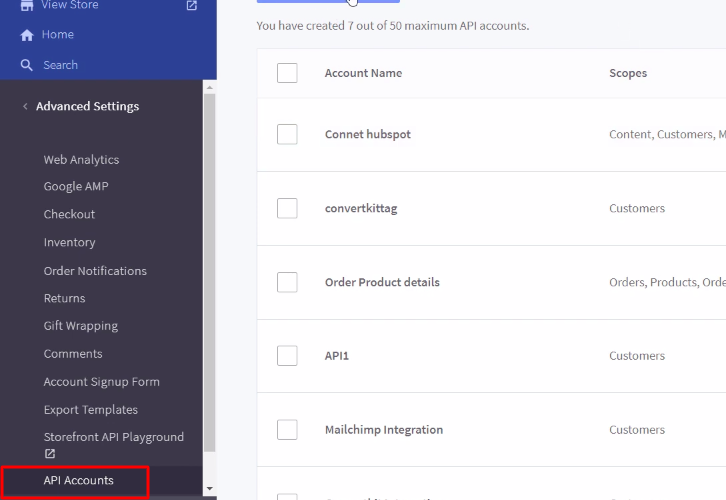
Now, click on the “API Accounts” to move further.

(c) Create an API Account

Create API Account

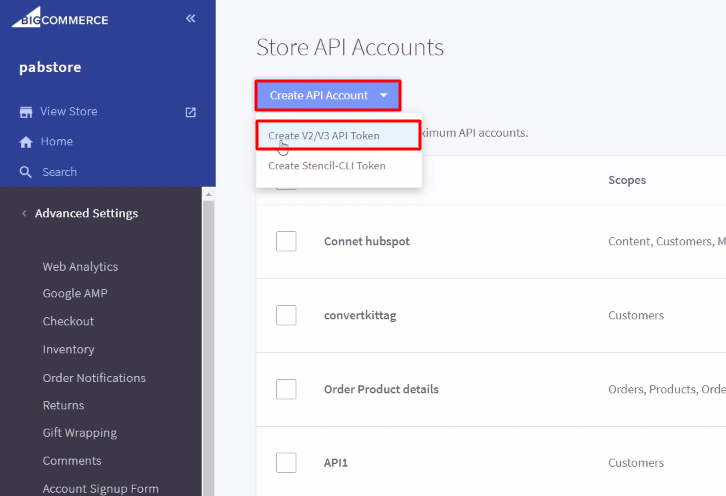
Subsequently, push the button named “Create API Account” and then pick the option “Create V2/V3 API Token”.

(d) Copy the API Path Key

Copy the API Path Key

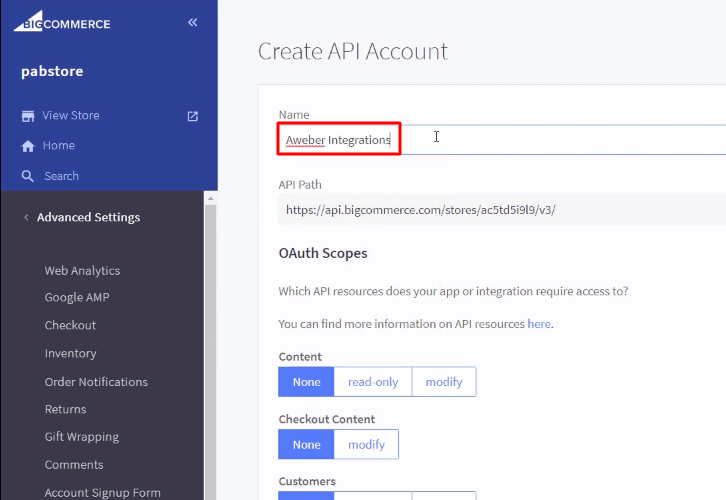
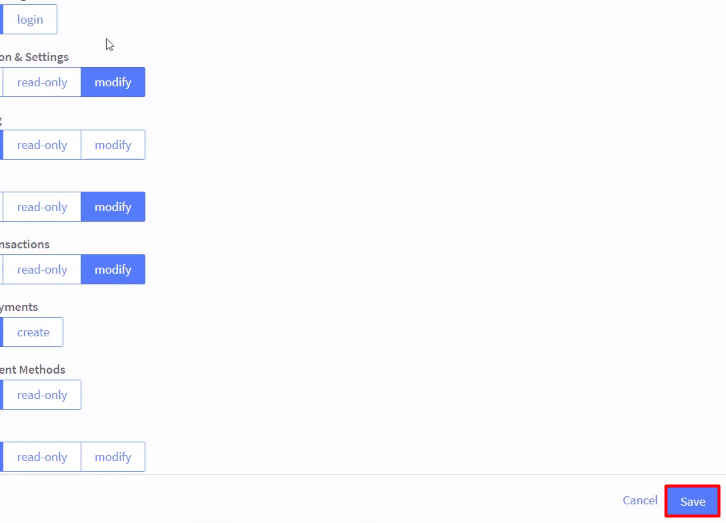
Moreover, copy the API Path highlighted in the image and then click on the “Save” key to continue further.

(e) Copy the Client ID and Access Token

Copy the Client ID and Access Token

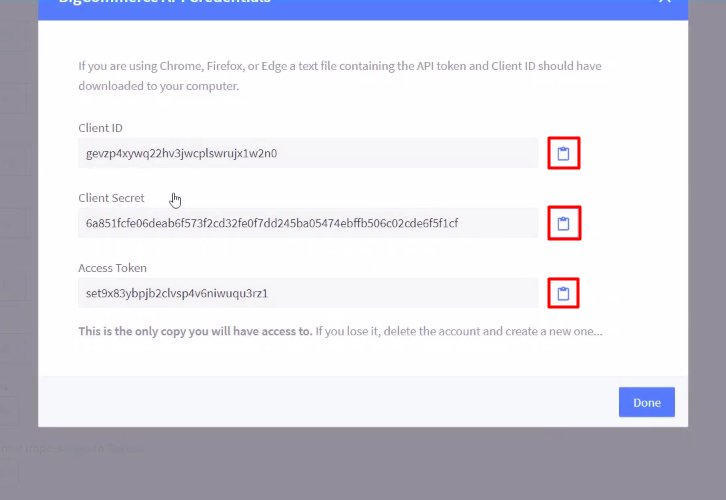
As soon as you click on the “Save” button, a window will pop-up with API keys. Simply copy the “Client ID and Access Token” then click on the “Done” button.

(f) Paste the Credentials in Pabbly Connect
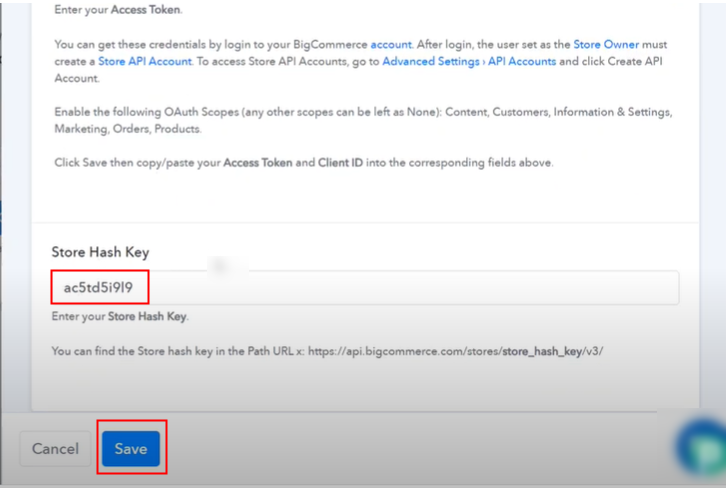
Paste the Credentials in Pabbly Connect

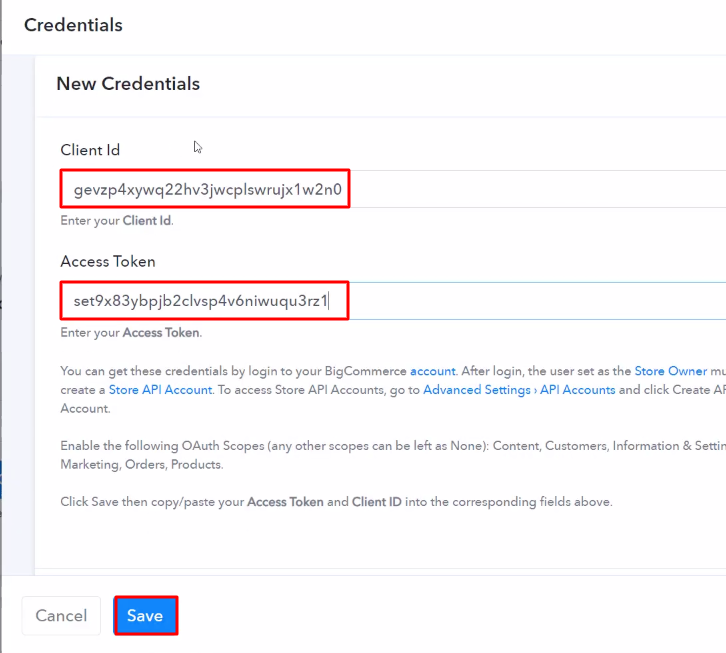
Next, paste the respective API keys and tokens in the mentioned columns. Then press the “Save” button.

Step 6: Make a Test Purchase

Now, in order to check this BigCommerce and Gmail integration, we will capture the data from BigCommerce, and for that, we will create a dummy order in BigCommerce.

(a) Capture Webhook Response

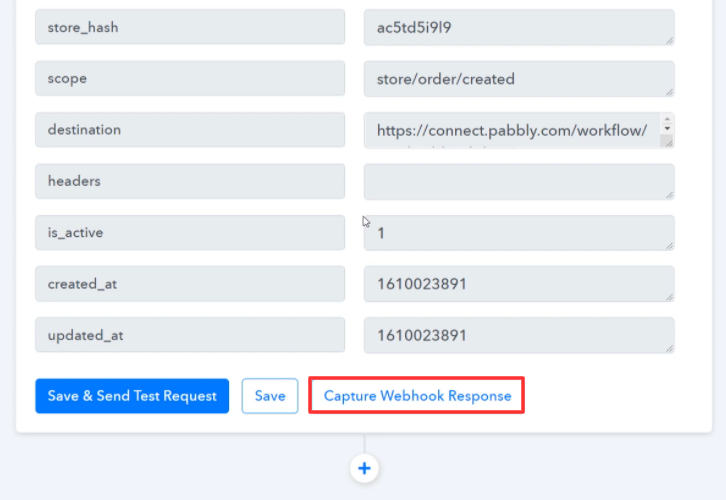
Capture Webhook Response

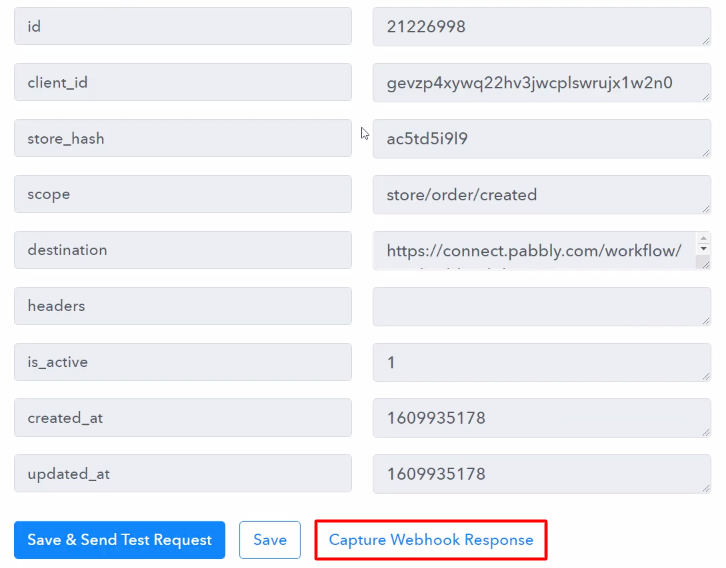
After adding the webhook URL to your BigCommerce account, now we will click on the “Capture Webhook Response” button to capture the data from BigCommerce.

(b) Make a Test Purchase

Make a Test Purchase

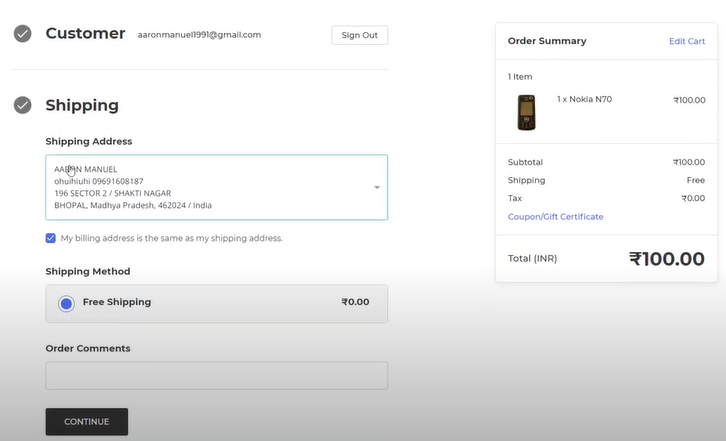
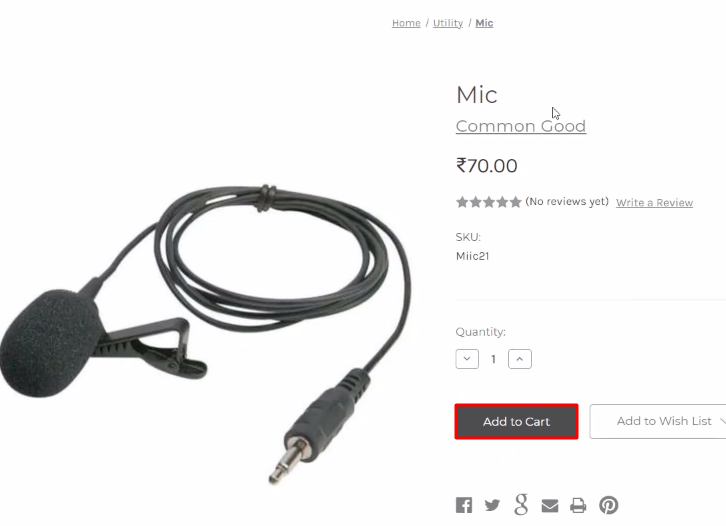
In order to add a new order, just go to Bigcommerce account and make a dummy purchase.

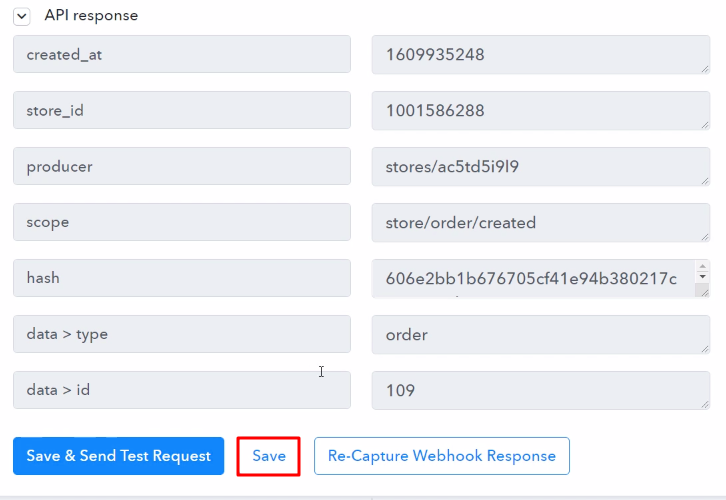
Step 7: Test the Response in Pabbly Connect Dashboard
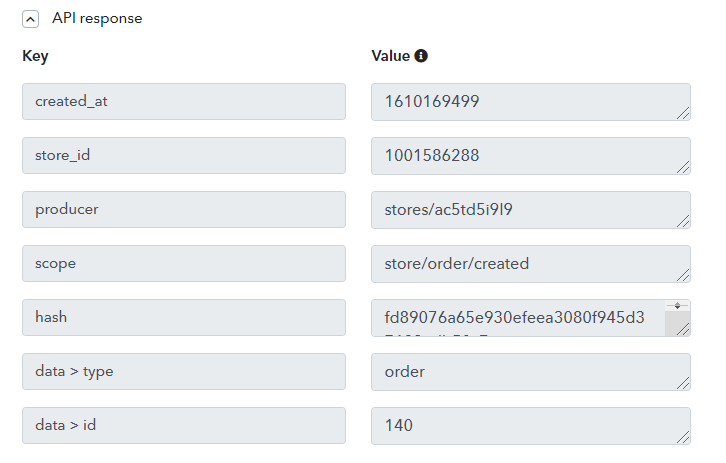
Test the Response in Pabbly Connect Dashboard

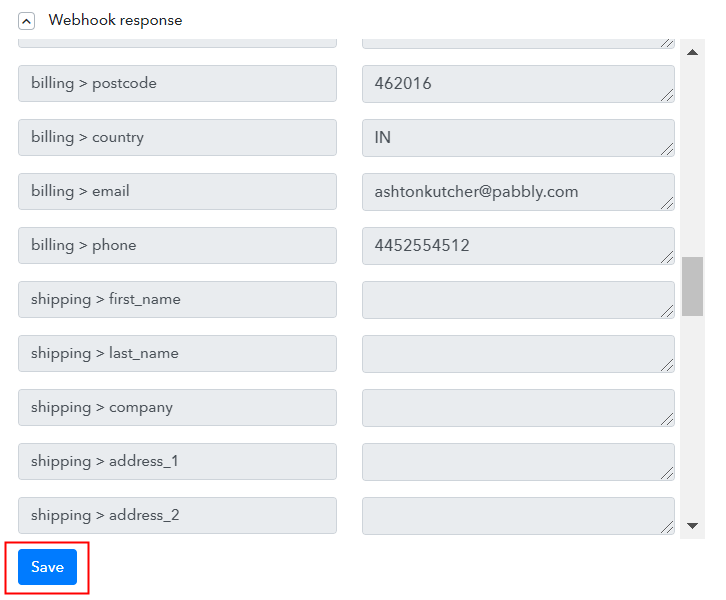
Once you are done placing the order in BigCommerce, the order info will appear on the Pabbly Connect dashboard. Then, click on the “Save” button.

Step 8: Setting Actions for BigCommerce to Gmail Integration

To make this BigCommerce-Gmail integration work, you have to choose two actions for your trigger. The first action is to get the information about the order from BigCommerce and the next is to send mail via Gmail.

(a) Select Application you Want to Integrate
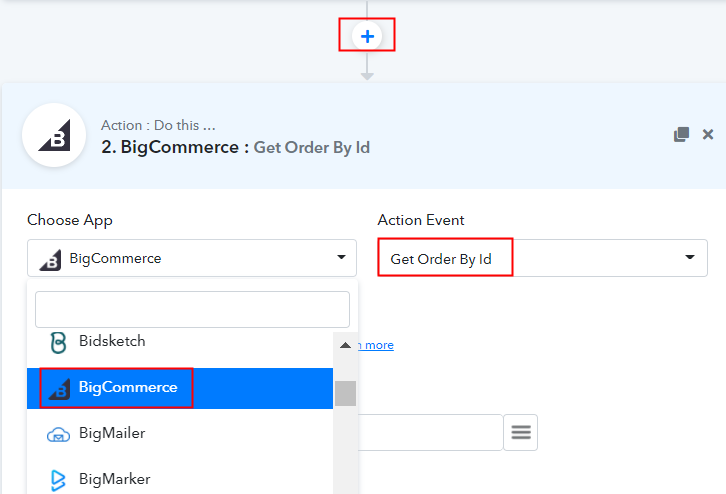
Select BigCommerce

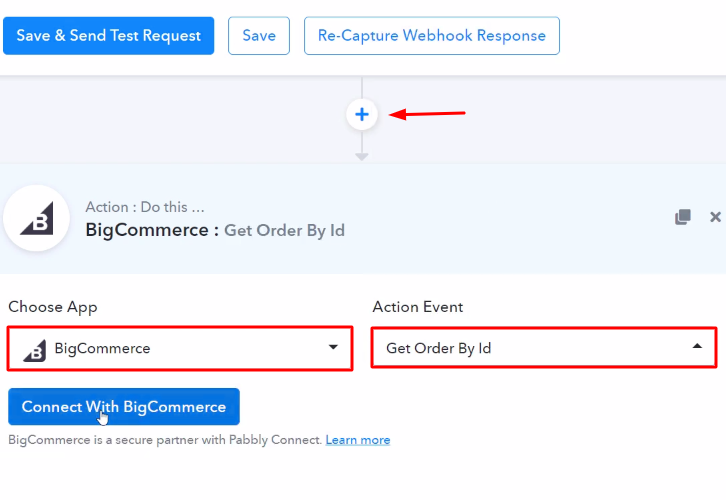
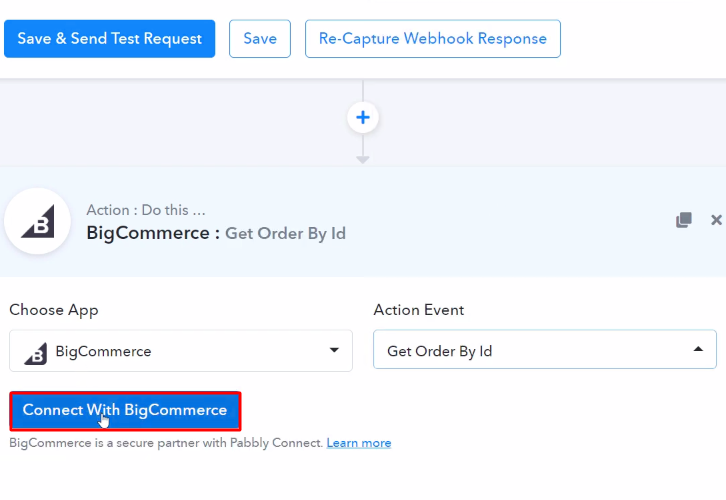
Next, click on the “+” button below and choose the application that you want to integrate. Here we will choose “BigCommerce” and in the method section select “Get Order By Id”. After choosing the application click on the “Connect with BigCommerce” button.

(b) Connect with BigCommerce

Authorize Application

Now, as we have already signed in to the account, we are going to use previous credentials.

(c) Map the Fields

Map the Fields

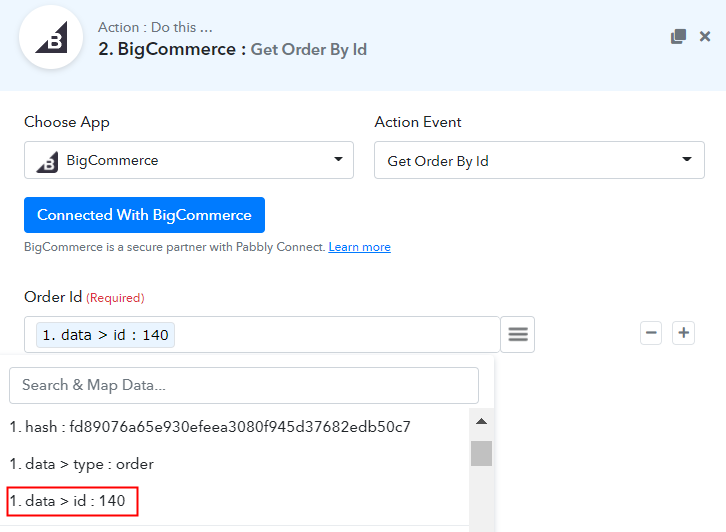
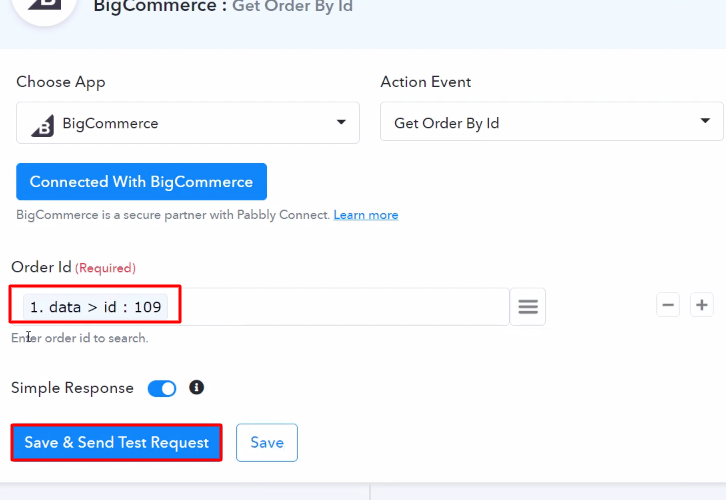
Now as we all know to get the order details, we have to map the order id first.

(d) Save & Send Test Request

Save & Send Test Request

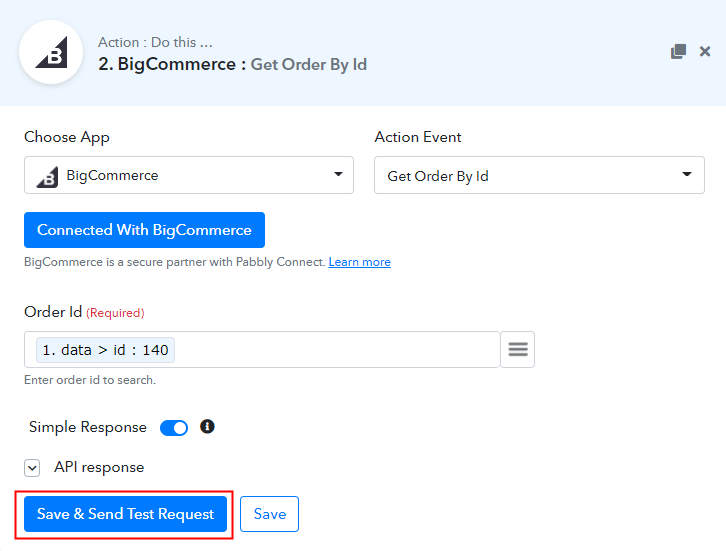
Now, after connecting with your BigCommerce account, map the “Order ID” and then hit the “Save & Send Test Request” button.

(e) Save the API Response

Save the API Response

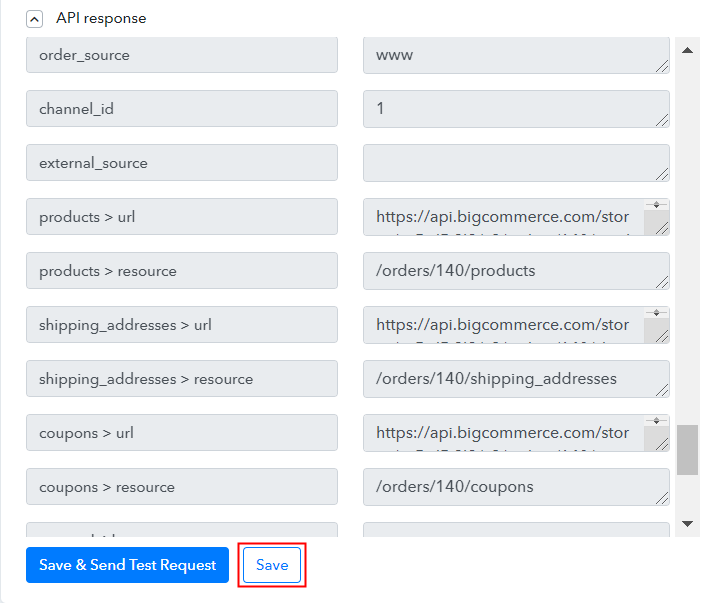
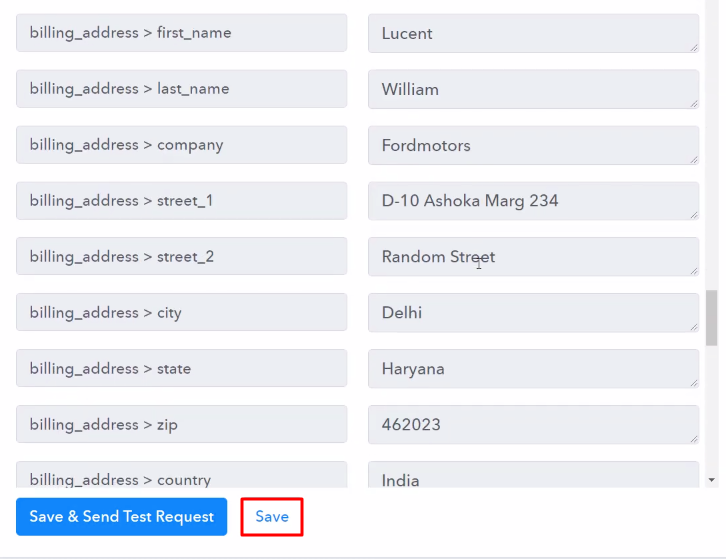
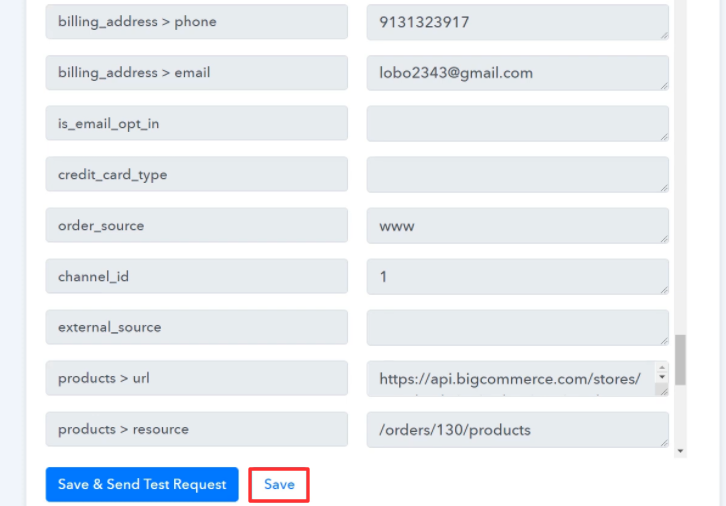
Here, we can see that all the information about the new order is obtained within Pabbly Connect. Hit the “Save” button to move forward.

(f) Select Application you Want to Integrate
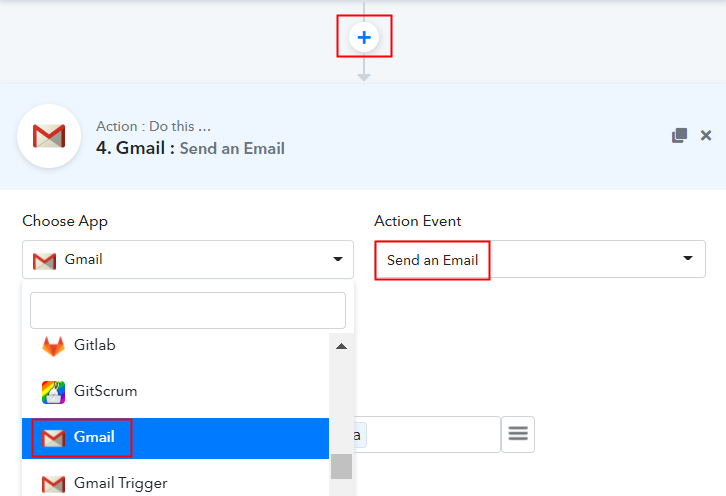
Select Gmail

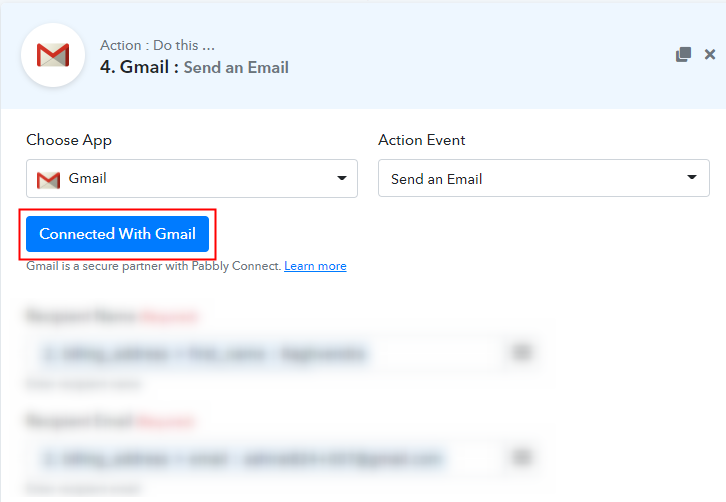
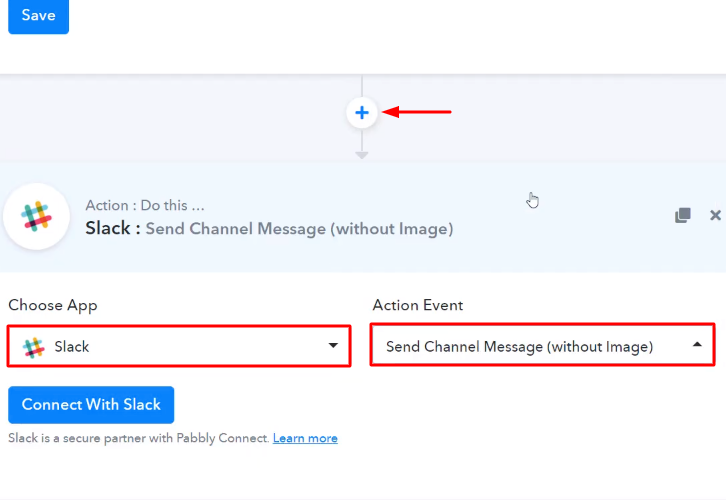
Now it’s time to integrate the second action. For that, click on the “+” button below and choose the application that you want to integrate. Here we will choose “Gmail” and in the method section select “Send an Email”.

(g) Click the Connect Button

Click the Connect Button

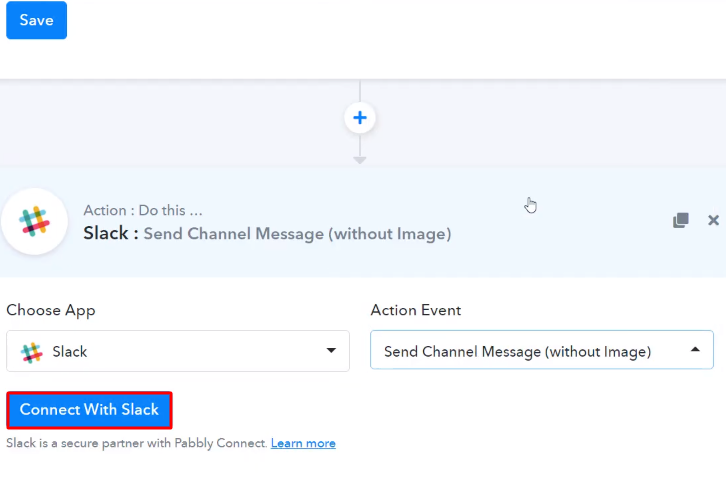
After choosing the application click on the “Connect with Gmail” button to move forward.

Step 9: Connecting Gmail to Pabbly Connect

Later, to connect Gmail with Pabbly Connect, you have to authorize the application. For this, you have to log into your Google account.

(a) Authorize Application

Authorize Application

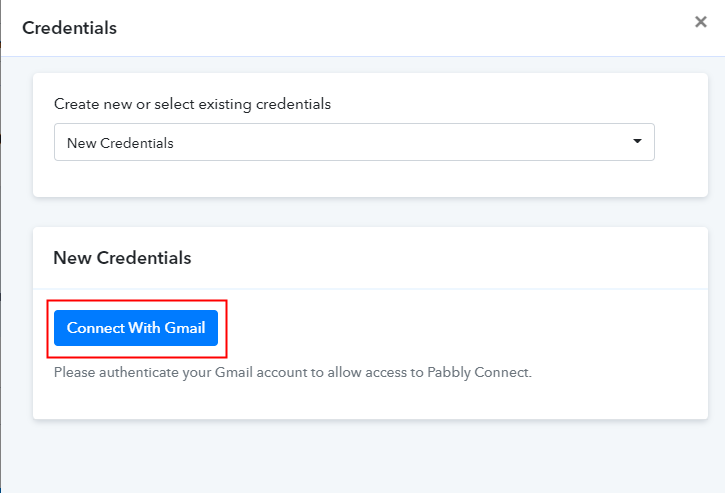
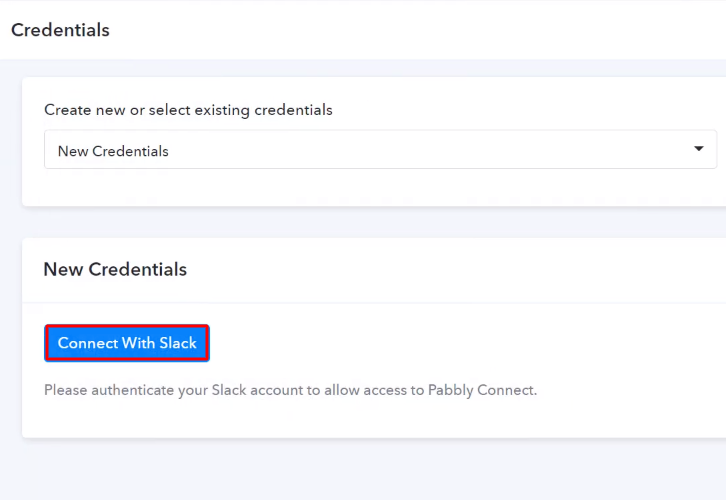
Next, to authorize Gmail, a window will slide in from the right, here you need to again click on the “Connect with Gmail” button and then allow the permission to connect Google account with Pabbly Connect.

(b) Map the Fields

Map the Fields

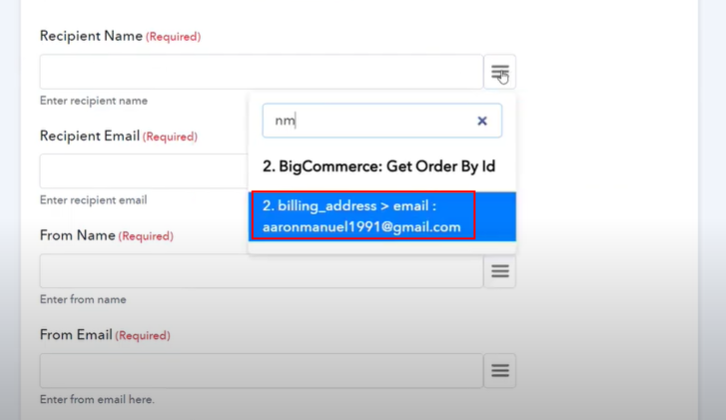
After connecting with your Gmail account, map all the fields quickly like a recipient name, recipient email, etc.

(c) Save and Send Test Request

Save and Send Test Request

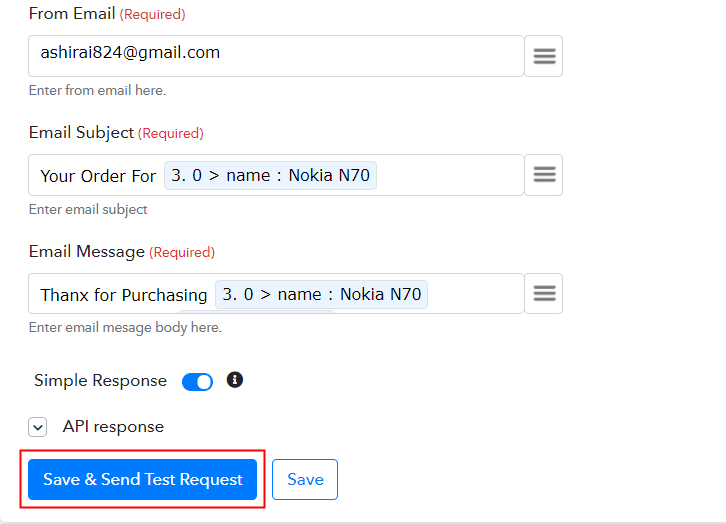
Once you are done adding up all field data click on the “Save & Send Test Request” button.

Step 10: Check Response in Gmail Dashboard
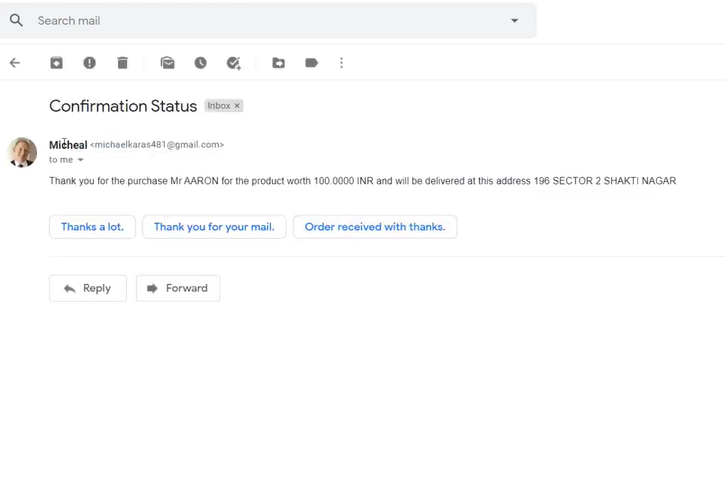
Check Response in Gmail Dashboard

Finally, when you check the Gmail dashboard, you can see that the mail has been received.

Conclusion –

Well Done! Now that you have learned “How to Send Mail via Gmail from New BigCommerce Order”, you can integrate any applications via Pabbly Connect to automate your entire workflow without any coding skills.

So what are you waiting for? Go signup for a free account now for the best automation & integration experience.

You May Also Like To Read –
How to Send Discord Channel Message from Google Sheets Rows

Send Discord Channel Message from Google Sheets Rows

Have you ever wished to directly send Discord channel message from Google Sheets rows? If yes, then follow the step by step procedure. As here, we enlighten you with an awesome tool named Pabbly Connect.

Send Discord Channel Message from Google Sheets Rows

Basically, Pabbly Connect is an integration and automation tool that lets you transfer data from one app to another automatically in real-time.

Especially, you don’t need to have any coding expertise and even a novice can use it efficiently. Additionally, this will be just a one-time setup and afterward, the workflow will handle the rest.

Why Choose This Method Of Integration?

In contrast with other integration services-

  • Pabbly Connect does not charge you for its in-built apps like filters, Iterator, Router, Data transformer, and more
  • Create “Unlimited Workflows” and smoothly define multiple tasks for each action
  • As compared to other services which offer 750 tasks at $24.99, Pabbly Connect offers 50000 tasks in the starter plan of $29 itself
  • Unlike Zapier, there’s no restriction on features. Get access to advanced features even in the basic plan
  • Try before you buy! Before spending your money, you can actually signup & try out the working of Pabbly Connect for FREE

Sign Up To Pabbly Connect 

Before starting the procedure, let’s know a whit about both the services and the need for automation. So, Google Sheets is an online spreadsheet program through which you can create multiple worksheets, and keep track of your records while collaborating with other users in real-time. On the other hand, Discord is a voice-over IP and messaging program, particularly used by gamers. It is one of the easiest ways to communicate with your friends via voice, text and video.

As we already knew that there was no direct integration between these two software. But, with the help of Pabbly Connect, we can send messages directly to Discord channel from the Google Sheets row.

Moreover, we have also annexed a video tutorial for this integration, have a look at it-

Additionally, we’ve tied up a template for this integration to assist you to get started more briskly. You can click on the ‘Use Workflow’ button below. Also, you could visit the Marketplace & scout for more apps/integrations.

Send Discord Channel Message from Google Sheets Rows Workflow

Following is the procedure, to integrate Google Sheets and Discord.

Step 1: Sign up to Pabbly Connect

Sign Up

Commence the process to send Discord channel message from Google Sheets rows by visiting the Pabbly Connect website. Now, click on the ‘Sign-Up Free‘ button and signing into Pabbly’s account by filling up your credentials.

Try Pabbly Connect for FREE

Step 2: Access Pabbly Connect

Select Connect

On signing up, an ‘All Apps’ dashboard will appear. Here, you need to select Connect by clicking on the ‘Access Now’ button.

Step 3: Workflow for Google Sheets with Discord Integration

(a) Start with a New Workflow

Create New Workflow

Start with creating a workflow for your project by clicking on the ‘Create Workflow’ button.

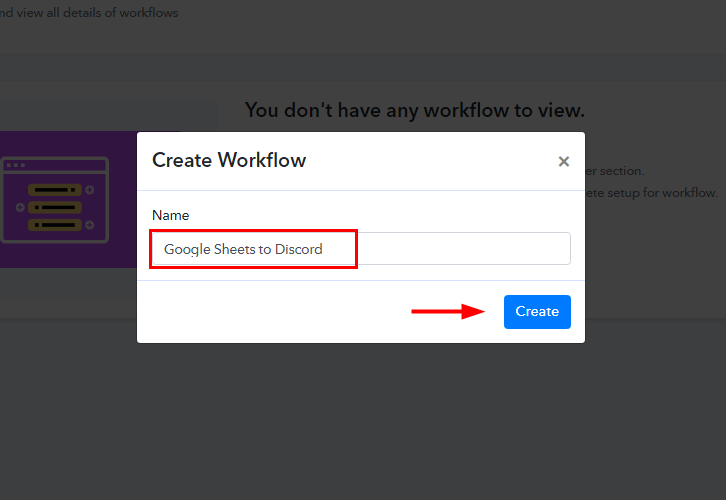
(b) Name the Workflow

Google Sheets to Discord Integration

Right away, you need to name the workflow just like in the above-shown image. I named it ‘Google Sheets to Discord’, but you can certainly give a name as per your requirements or workflow.

Step 4: Setting Trigger for Google Sheets to Discord Integration

After naming your workflow, now it’s time to select an application to send Discord channel message from Google Sheets rows. Pabbly Connect allows you to connect unlimited premium apps, so create your free account now.

(a) Select Application you Want to Integrate

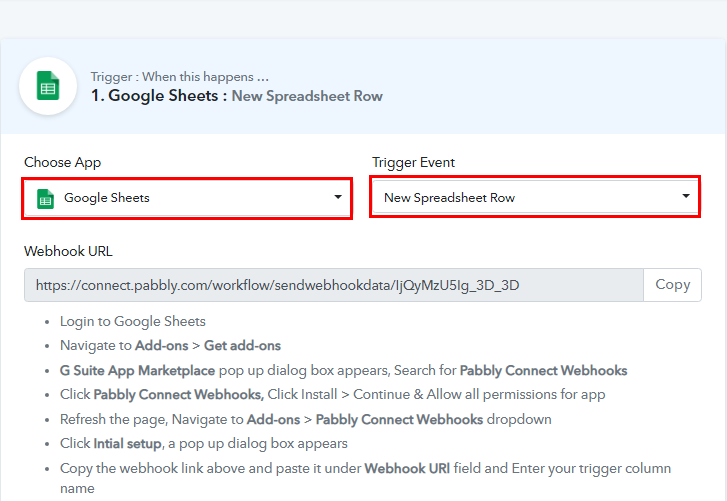
Select Google Sheets for Google Sheets to Discord Integration

After you click on the create button, a trigger window appears. From the ‘Choose App’ drop down option choose ‘Google Sheets’ and select method as ‘New Spreadsheet Row’.

(b) Copy the Webhook URL

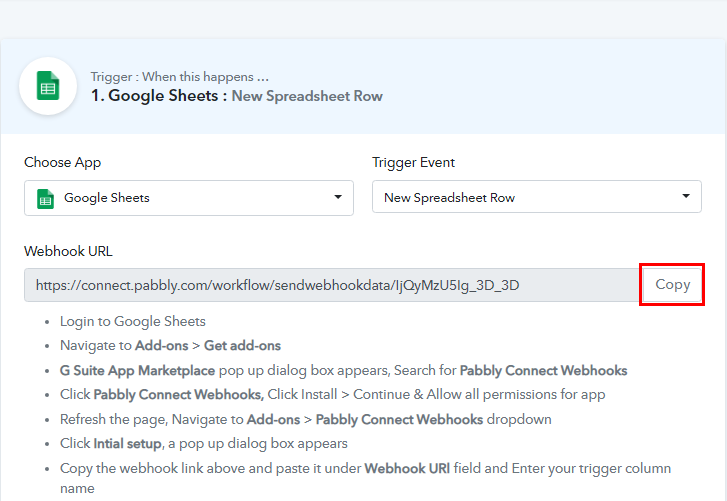
Copy Webhook URL

After selecting the application, now you have to copy the webhook URL just like in the above-shown image to take further the integration process.

Step 5: Connecting Google Sheets to Pabbly Connect

To connect Google Sheets with Pabbly Connect, you have to paste the Webhook URL in your Google Sheets Add-ons section and for that, you need to login to your Google Sheets account.

(a) Click on Add-ons

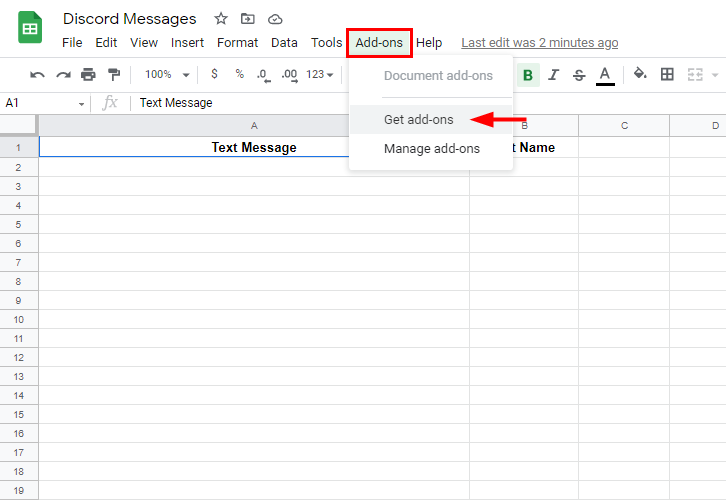
Click on Add-ons

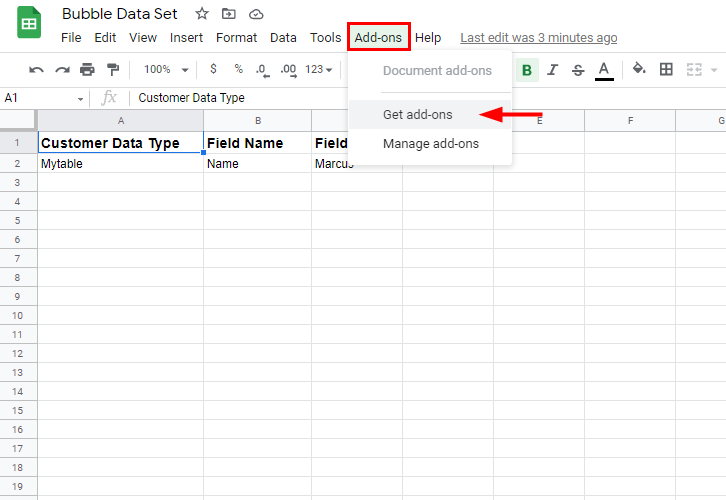
After logging to your Google Sheets account, click on ‘add-on’ menu, and then hit the ‘Get add-ons’ button to download the ‘Pabbly Connect Webhook’.

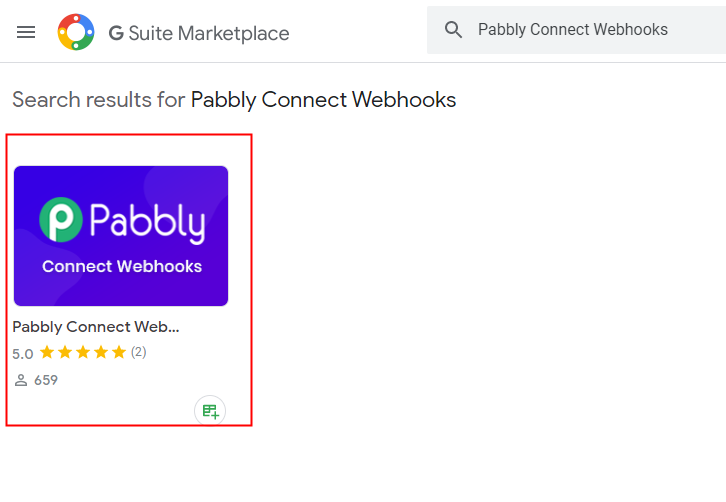
(b) Search for Pabbly Connect Webhooks

Search Pabbly Connect Webhook

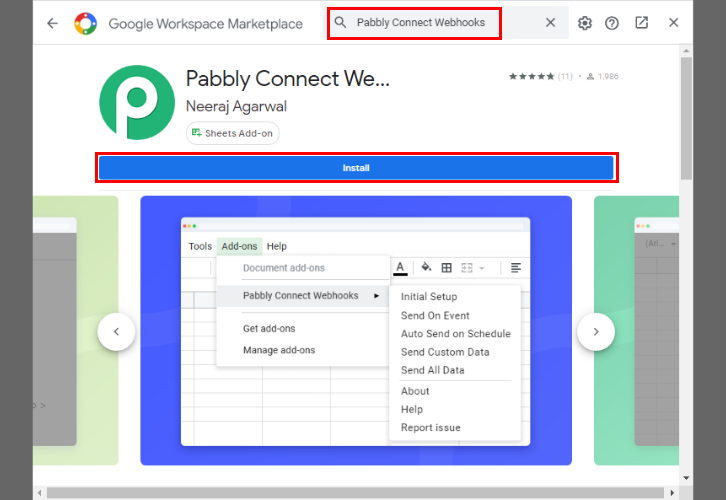
Now, on clicking ‘Get Add-ons’, a new window will pop-up. Here in the search bar type Pabbly Connect Webhooks.

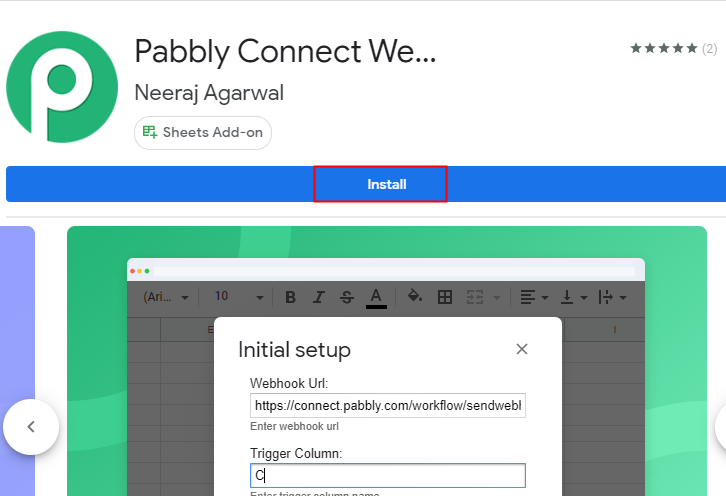
(c) Install Pabbly Connect

Install Pabbly Connect Webhook for Google Sheets to Discord Integration

Next, simply click on the install button and it will get installed into your Google Sheets.

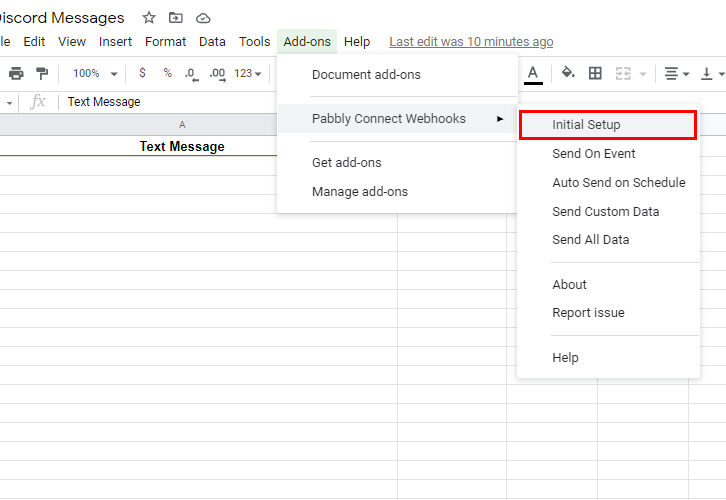
(d) Go to Initial Setup

Go to Initial Setup

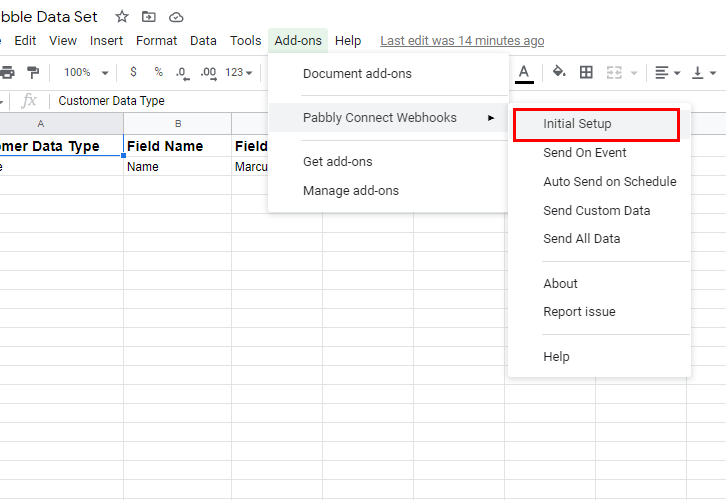
Further, refresh the tab and again go to ‘add-ons’ menu and click on ‘Pabbly Connect Webhooks’ section. After this, select ‘Initial Setup’ option to paste the webhook URL.

(e) Paste the Webhook URL

Paste Webhook URL for Google Sheets to Discord Integration

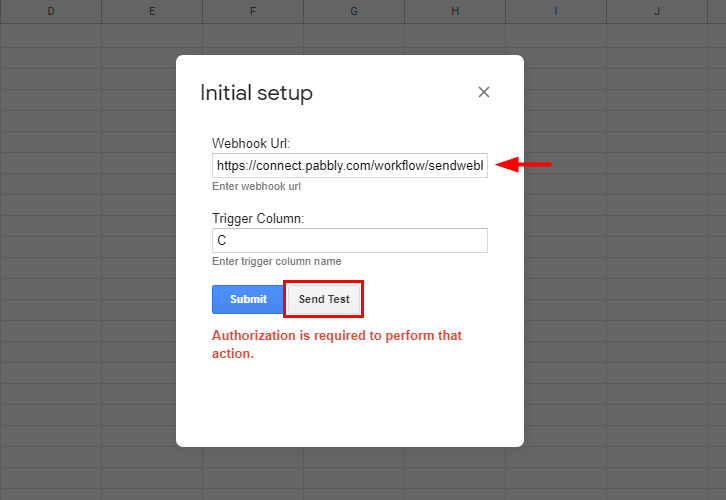
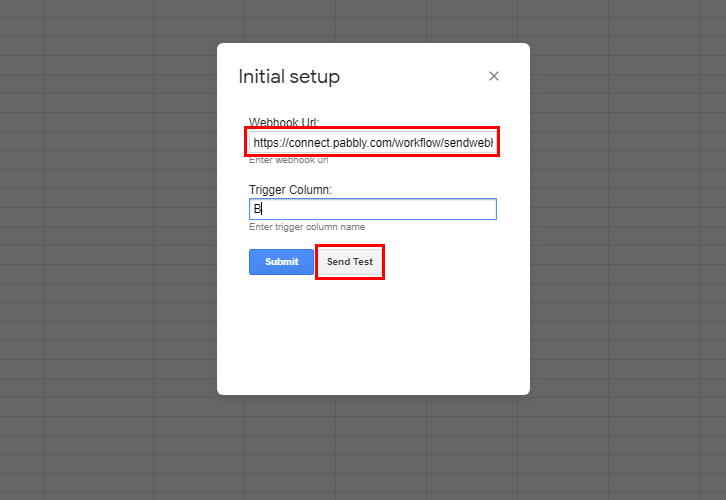
Subsequently, a window will pop-up. Here, paste the webhook URL and in the ‘Trigger Column’ enter the last column of the data (as shown in above image). At last hit the ‘Send Test’ button and then click on ‘Submit’ button.

(f) Click on Send On Event

Click on Send on Events

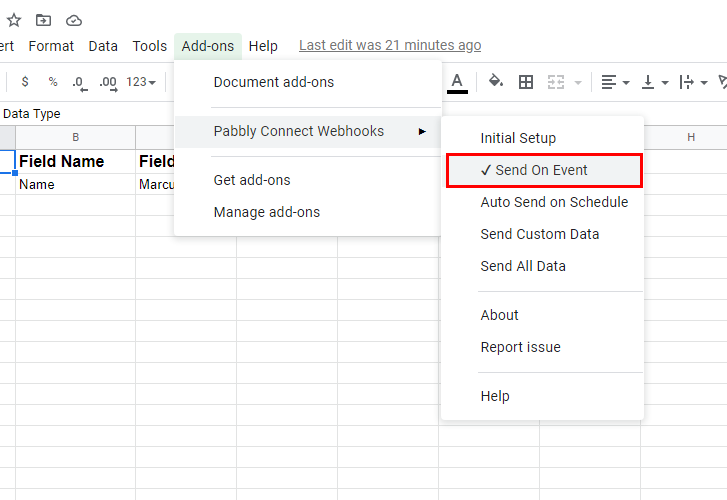
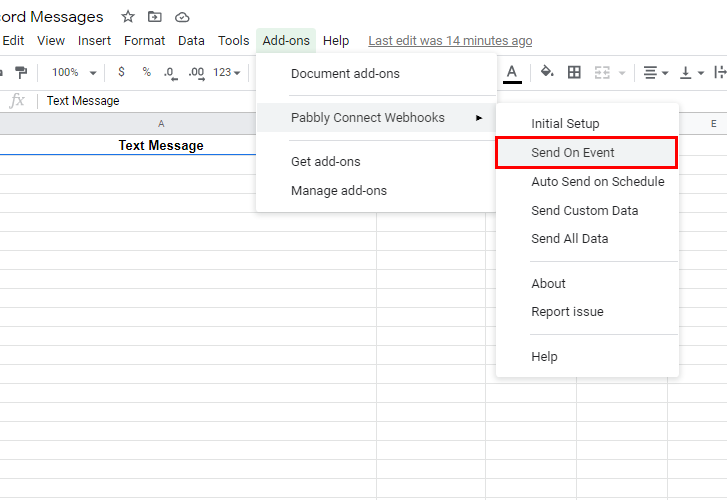
Eventually, go to add-ons menu and again select Pabbly Connect Webhooks section and then press the ‘Send on Event’ option, to make sure that data would automatically send to Pabbly Connect whenever a new row is added in Google Sheets.

Step 6: Add a New Row

To test the trigger settings we need to add a new row in Google Sheets.

(a) Capture Webhook Response

Capture Webhook Response for Google Sheets to Discord Integration

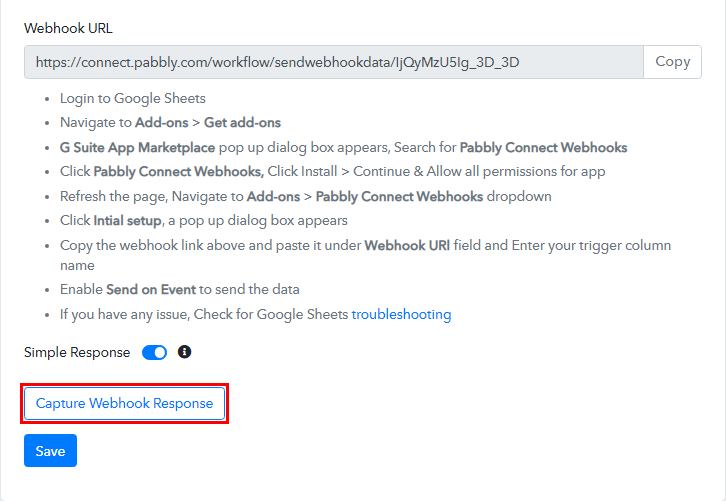
Promptly click on the ‘Capture Webhook Response’ button in the Pabbly Connect window to capture the data from Google Sheets.

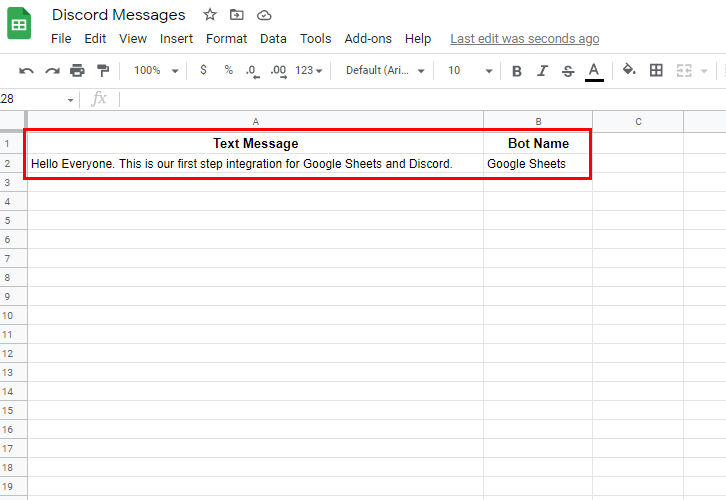
(b) Add Data to Google Sheets

Add Data to Google Sheets

Now, head back to your Google Sheets and add a new row

(c) Save the Response

Save the Response for Google Sheets to Discord Integration

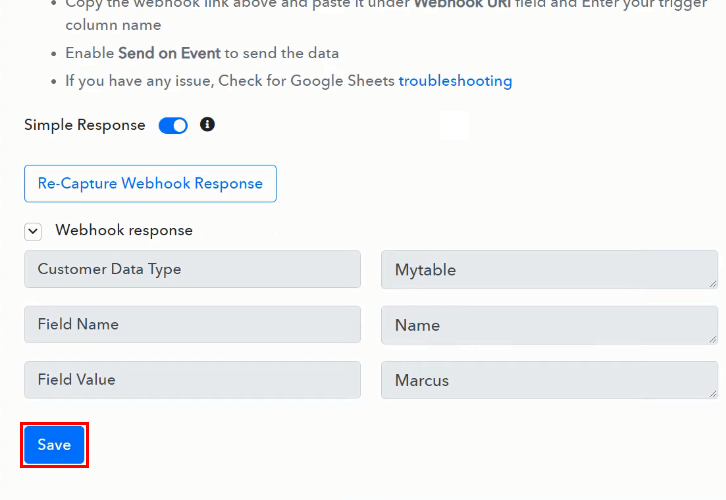
Immediately visit Pabbly Connect window and you will see that the data is captured. Last, save the response by hitting the ‘Save’ button.

Step 7: Setting Action for Webhook ID

In this step, we will be adding an action for your trigger to get the Discord webhook ID and Token for the further process.

(a) Select Application you want to Integrate

Select Discord for Google Sheets to Discord Integration

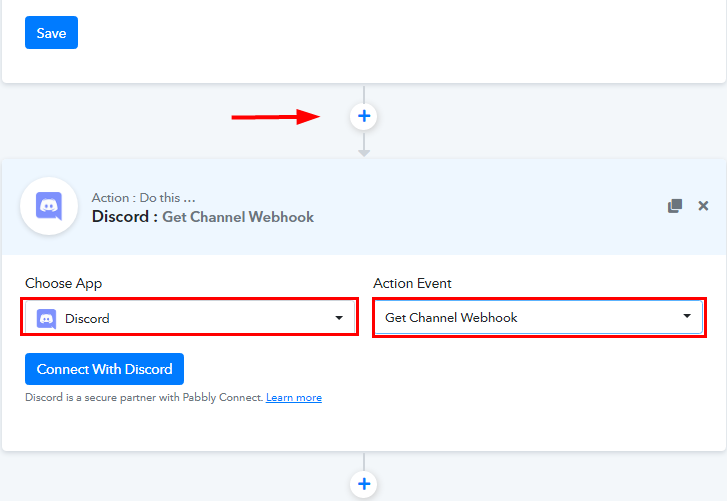
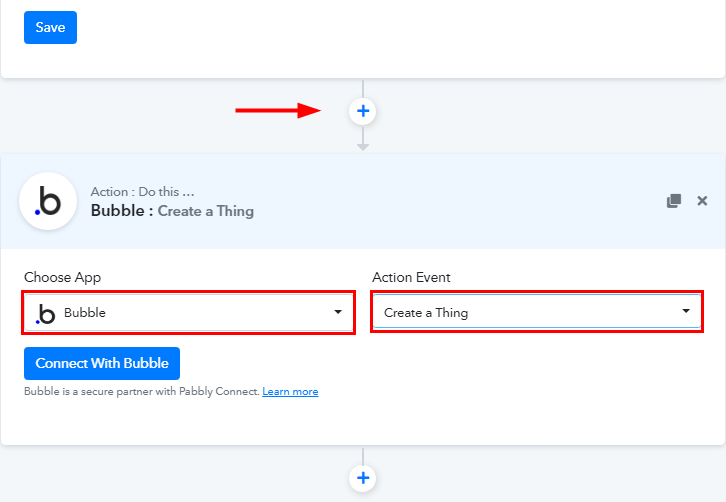
Now in this step, click on the + button below and choose ‘Discord’ and in the method section select ‘Get Channel Webhook’.

(b) Click on Connect Button

Connect with Discord

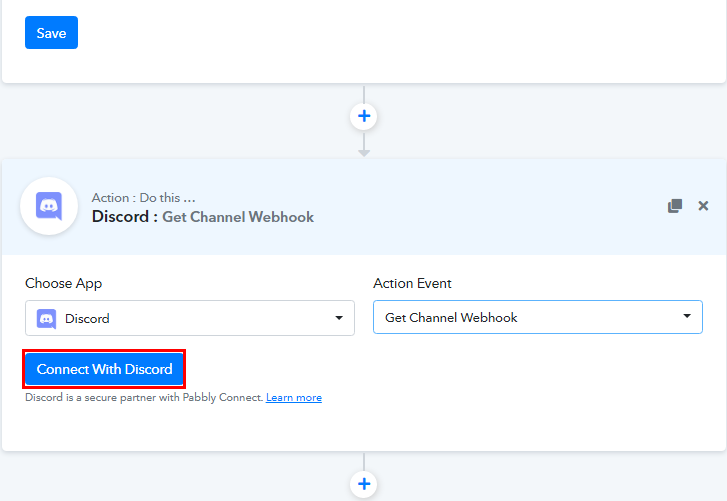
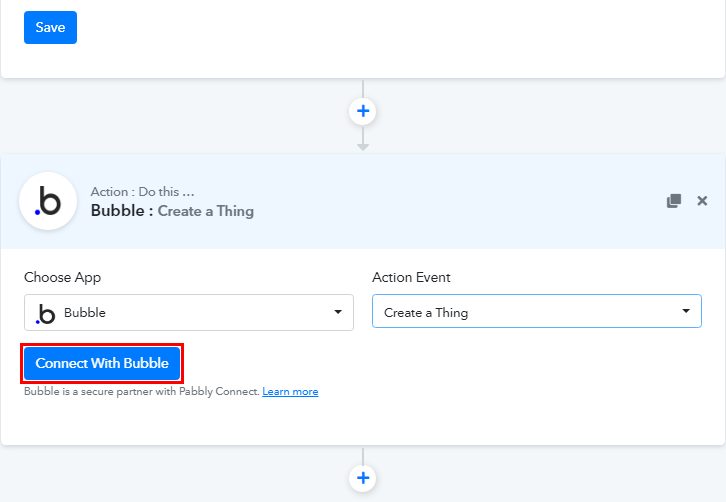
After choosing the application click on the ‘Connect with Discord’ button for next step.

(c) Authorize Application

Authorize Discord for Google Sheets to Discord Integration

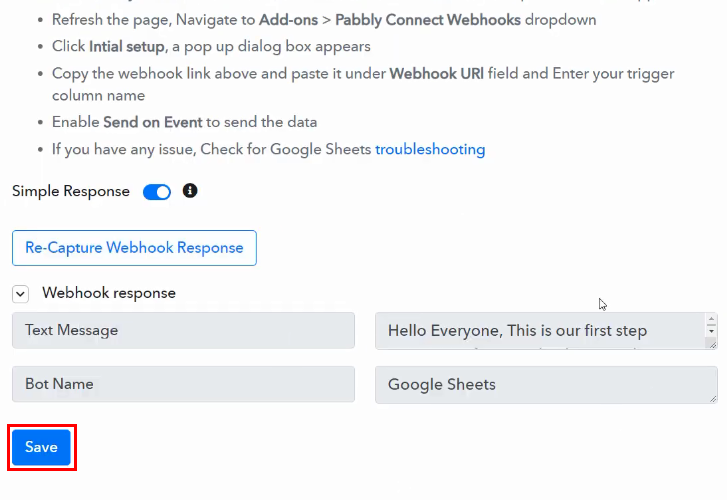
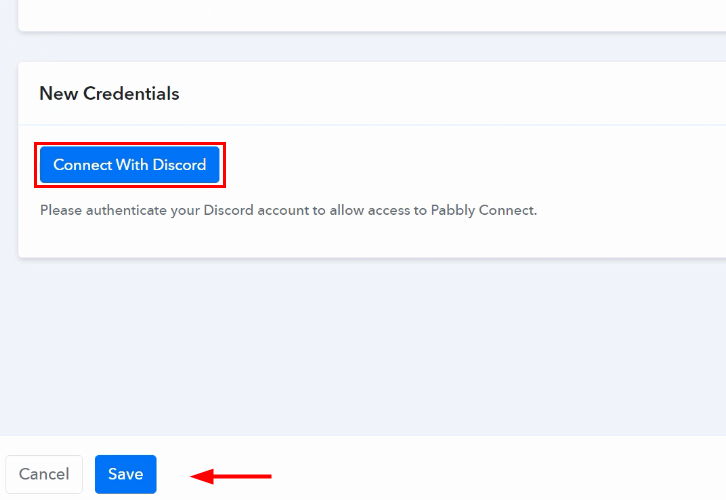
Once you click on the ‘Connect with Discord’ button, a window will slide from right. Here, you have to authorize your Discord account. At last hit the ‘Save’ button.

Step 8: Creating a New Webhook

Now, in order to create a new webhook, you have to go to your Discord dashboard.

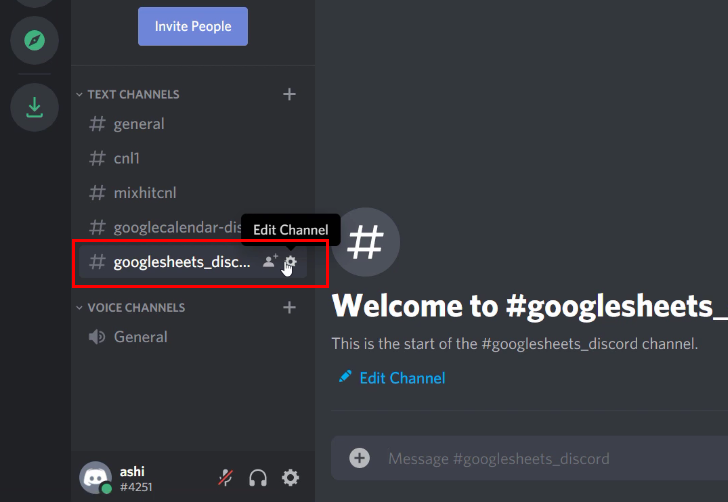
(a) Click on Edit button

Click on Edit Button

Promptly, from Discord dashboard, click on the ‘Edit’ icon of any channel to create a webhook inside it.

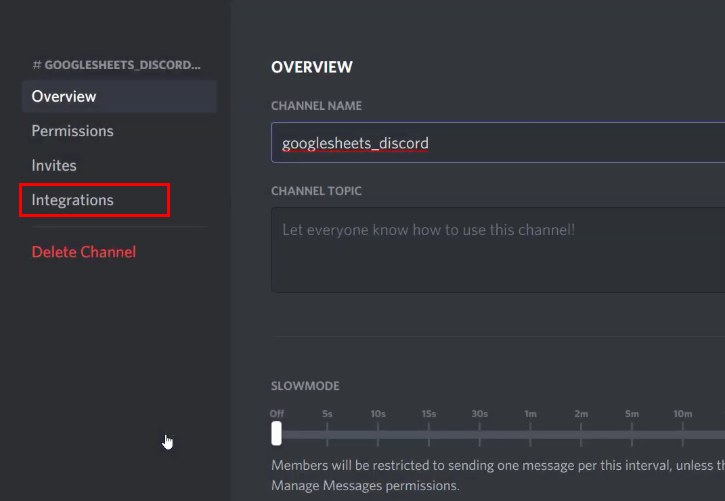
(b) Go to Integrations

Go to Integrations

Further, another window will open up. Here, go to the ‘Integrations’ option.

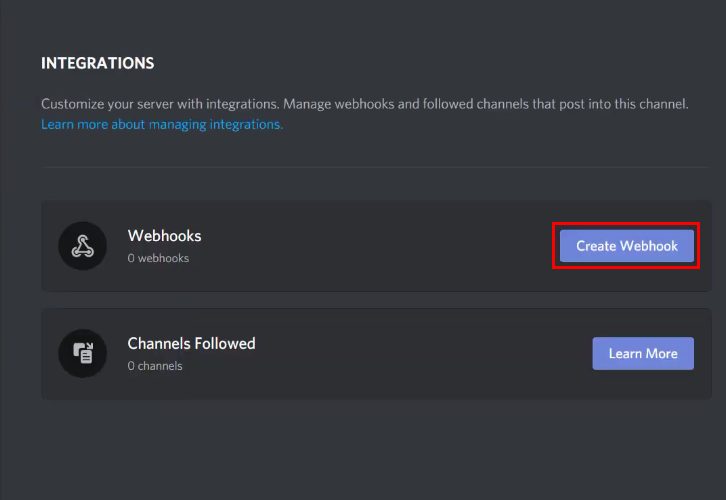
(c) Create Webhook

Create Webhook Discord for Google Sheets to Discord Integration

Next, on the integrations page, click on ‘Create Webhook’ button.

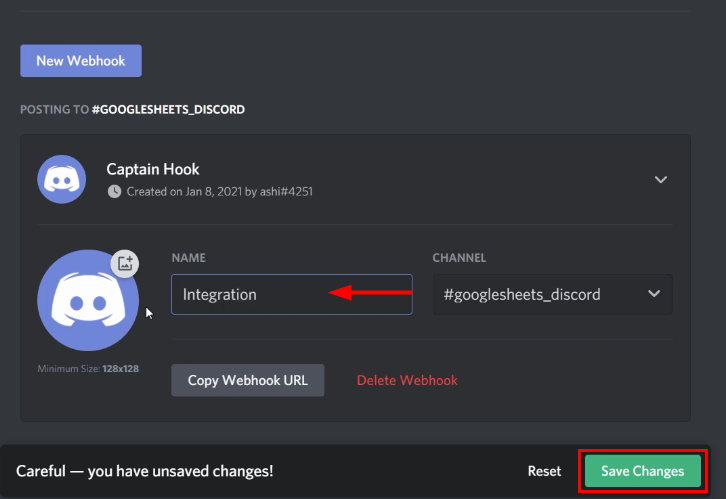
(e) Enter Webhook Details

Enter Webhook Details

Subsequently, after clicking on the create webhook button you have to enter the details for the new webhook name. Finally, click on ‘Save Changes’ button.

(f) Map the Field

Map the Fields

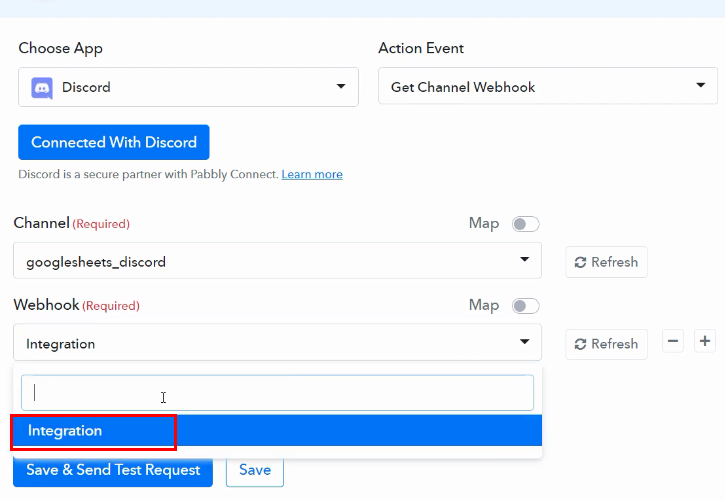
After this, visit Pabbly Connect window and map the fields such as channel and webhook.

(g) Save and Send Test Request

Save and Send Test Request for Google Sheets to Discord Integration

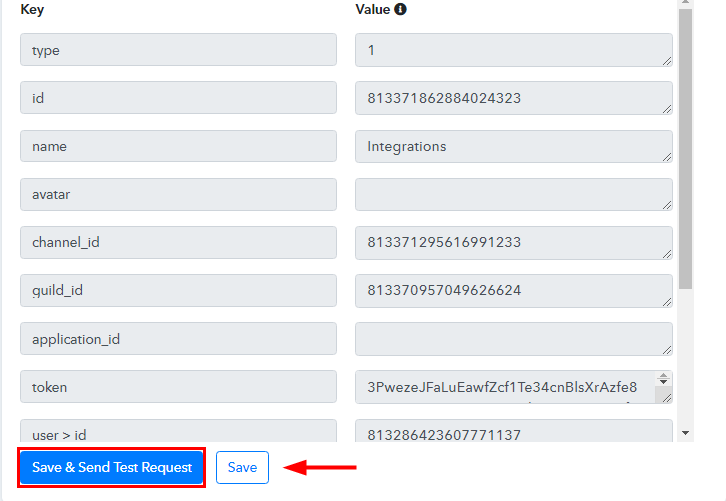
Forthwith, click on the ‘Save and Send Test Request’ button to get the response. Lastly, hit the ‘Save’ button.

Step 9: Setting Action for Google Sheets to Discord Integration

Subsequently, it’s time to set up the last action for our workflow to complete the integration process.

(a) Select Application you want to Integrate

Select Discord for Google Sheets to Discord Integration

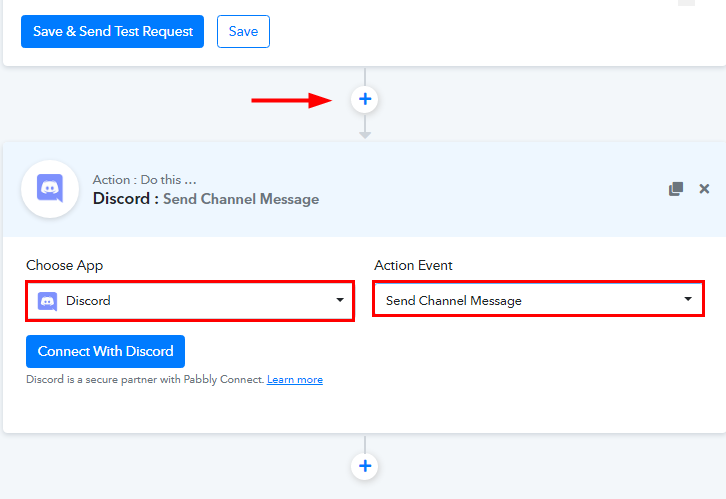
Now, click on the + button below and choose ‘Discord’ in the choose app and in the method section select ‘Send Channel Message’.

(b) Click on Connect Button

Connect with Discord

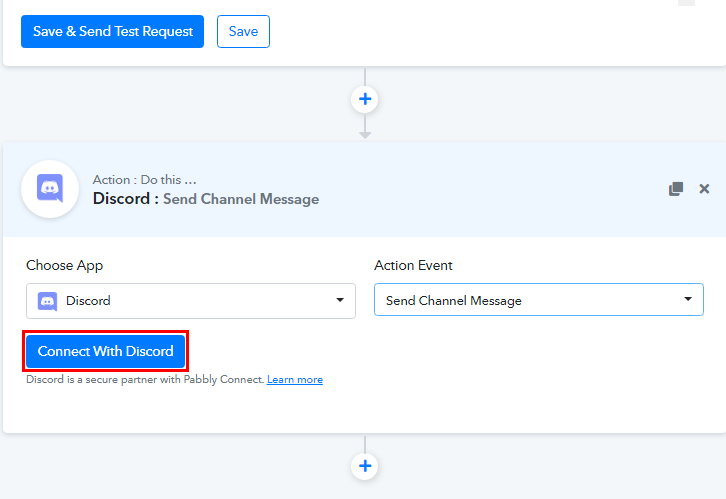
After choosing the application click on the ‘Connect with Discord’ button to move forward.

(c) Authorize Application

Authorize Discord for Google Sheets to Discord Integration

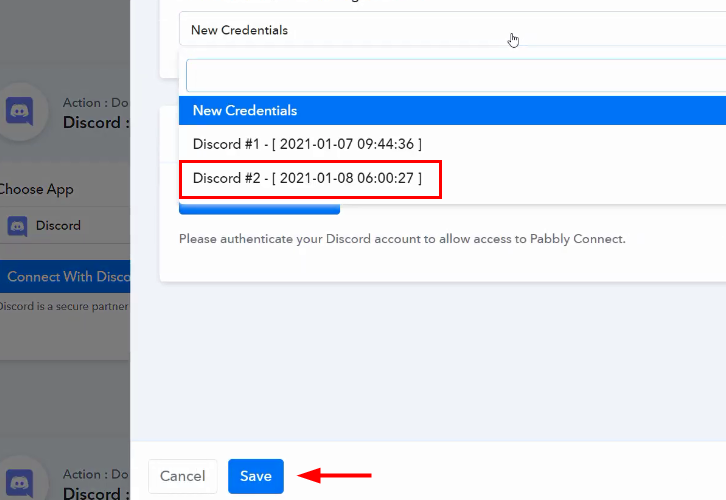
As you already connected with your Discord account earlier, just select an existing credential from the drop-down and then click on ‘Save’ button.

(d) Map the Fields

Map the Fields for Google Sheets to Discord Integration

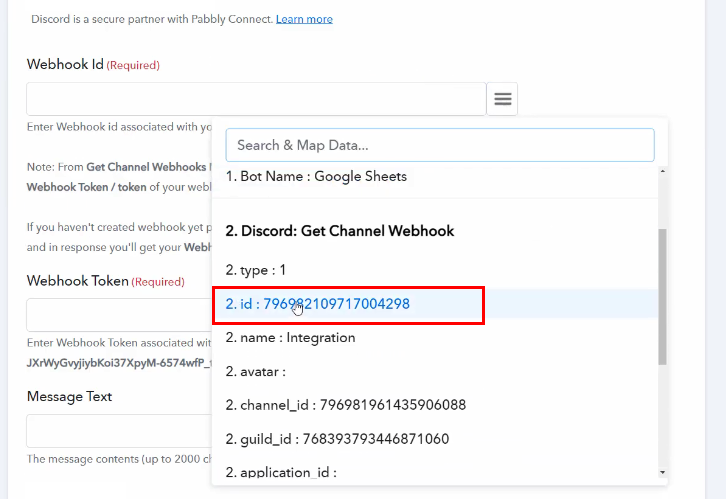
Promptly, you have to map all the field data such as Webhook ID and Token, message, and so on.

(e) Save and Send Test Request

Save and Send Test Request

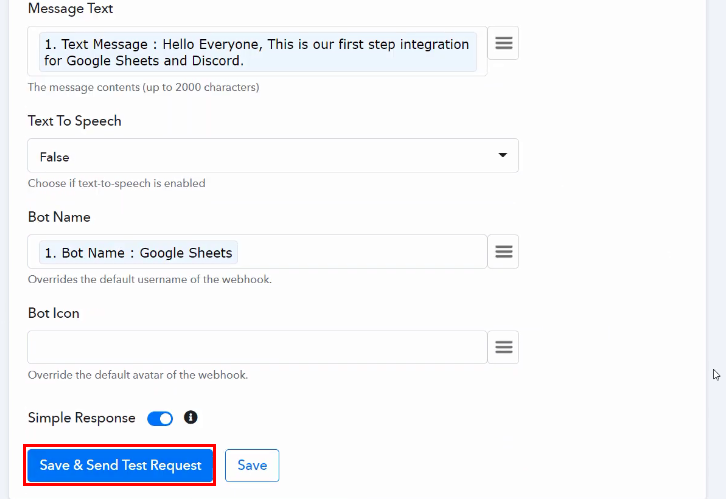
Once you are done mapping all the fields, click on ‘Save and Send Test Request’ button to get the response and send the channel message via Discord. Finally, hit the ‘Save’ button.

Step 10: Check Response in Discord Dashboard

Check Response Discord for Google Sheets to Discord Integration

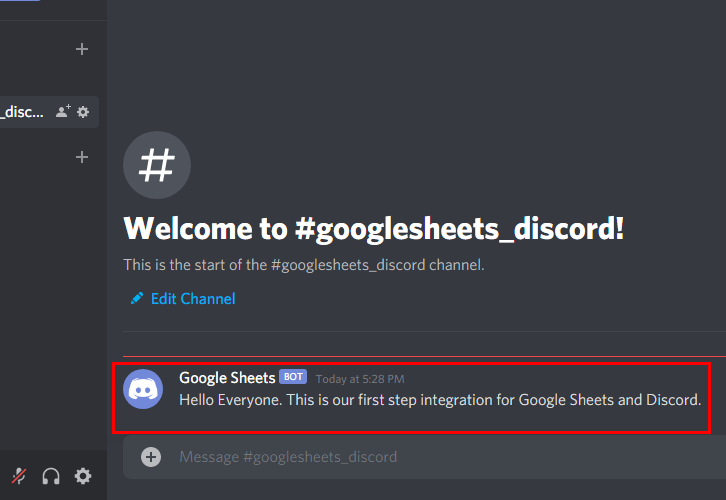
Here, you can see that our integration was successful and an entry from the Google Sheets has been sent as a channel message through Discord.

Conclusion –

We hope, now we have answered all your questions about the automation process. Here, through this blog, we have learned ‘How to Send Discord Channel Message from Google Sheets Rows’ automatically. All you have to do is follow all the above-mentioned steps & you can easily connect Google Sheets to Discord.

Using this automation, one can easily avoid monotonous work. And in such cases, software like Pabbly Connect is a real time-saver that lets you connect unlimited premium apps. So, don’t wait anymore. Go and get your access by signing up for a free account.

In case of any doubts or suggestions, please drop your comments below. We will try to get back to you as soon as possible.

You May Also Like to Read –

How to Create HubSpot CRM Contact from New BigCommerce Order

How to Create HubSpot CRM Contact from New BigCommerce Order

Are you tired of looking for a way to create HubSpot CRM contact from BigCommerce order automatically?

How to Create HubSpot CRM Contact from New BigCommerce Order

Well, don’t worry about it anymore! As here we have a perfect solution for you through which you can create HubSpot CRM contact from BigCommerce order. This magic tool is known as Pabbly Connect. Using this software, one can easily integrate two or more two applications to automate the entire mechanism. And that too without any coding skills.

Why Choose This Method Of Integration?

In contrast with other integration services-

  • Pabbly Connect does not charge you for its in-built apps like filters, Iterator, Router, Data transformer, and more
  • Create “Unlimited Workflows” and smoothly define multiple tasks for each action
  • As compared to other services which offer 750 tasks at $24.99, Pabbly Connect offers 50000 tasks in the starter plan of $29 itself
  • Unlike Zapier, there’s no restriction on features. Get access to advanced features even in the basic plan
  • Try before you buy! Before spending your money, you can actually signup & try out the working of Pabbly Connect for FREE

Sign Up To Pabbly Connect 

But before we begin the procedure, let’s know a little bit about both software. So basically, BigCommerce is an eCommerce platform that lets users 100’s of features, secure hosting, advanced SEO, and fantastic multi-channel integration. Whereas, HubSpot CRM is an inbound marketing & sales platform that helps companies to attract visitors, convert leads, and close customers.

With the help of Pabbly Connect, whenever new order will be created in BigCommerce, the contact info will be saved in HubSpot CRM automatically. We have also embedded a video tutorial for this integration, have a look at it-

Pabbly Connect enables you to integrate unlimited premium applications without any coding skills. Simply integrate it once & relax, it will handle all the workload later. Plus, you can access all the features even in its free plan.

Besides that, we have a template for this integration that can assist you to begin your integration journey in no time. Simply go to Marketplace and look for the apps you use to start integration. Just tap on the image below to get started.

How to Create HubSpot CRM Contact from New BigCommerce Order

Thus, without taking any more of your time, let’s follow the step by step procedure to integrate BigCommerce and HubSpot CRM.

Step 1: Sign up to Pabbly Connect

Sign Up

Begin the process to create new HubSpot CRM contact from the new BigCommerce order by clicking on the “Sign Up Free” icon on the Pabbly Connect home page. You can either manually fill-up all the details or sign up using your Gmail account.

Try Pabbly Connect for FREE

Step 2: Access Pabbly Connect

Select Connect

After logging into the account, press the “Access Now” button of the Connect section in the dashboard.

Step 3: Workflow for BigCommerce to HubSpot CRM Integration

(a) Start with a New Workflow

Create New Workflow

Begin with creating a workflow for your project by pressing on the ‘Create Workflow’ button.

(b) Name the Workflow

Name the Workflow

Next, name the workflow just like in the above-shown image. I named the workflow “BigCommerce to HubSpot”, you can obviously name the workflow as per your requirements.

Step 4: Setting Trigger for BigCommerce to HubSpot CRM Integration

After naming your workflow, select the application you want to integrate. Pabbly Connect enables you to integrate unlimited premium applications, so create your free account now.

(a) Select Application you Want to Integrate

Select Application you Want to Integrate

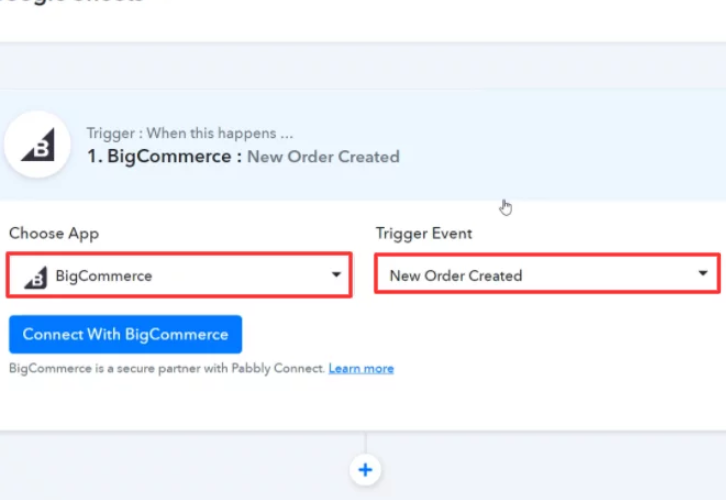
Next, select the application that you want to integrate. Here, we are choosing “BigCommerce” for integration. In the method section, select “New Order Created”.

(b) Click Connect Button

Click Connect Button

Once you select the application, click on the “Connect with BigCommerce” button to proceed further.

Step 5: Connecting BigCommerce to Pabbly Connect

Now, in order to connect BigCommerce with Pabbly Connect, you have to authorize the application. And to do so, you have to log in to your BigCommerce account.

(a) Go to Advanced Settings

Go to Advanced Settings

Primarily, go to the Bigcommece dashboard and press the “Advanced Settings” option.

(b) Click on API Accounts

Click on API Accounts

Promptly, press the “API Accounts” to move forward.

(c) Create API Account

Create API Account

Later on, hit the button named “Create API Account” and then choose the option “Create V2/V3 API Token”.

(d) Copy the API Path Key

Copy the API Path Key

Now, copy the API Path highlighted in the image and then press the “Save” button.

(e) Copy the Client ID and Access Token

Copy the Client ID and Access Token

After pressing the “Save” button, a window will pop-up with API keys. Simply copy the “Client ID & Access Token” then press the “Done” button.

(f) Paste the API Keys

Paste the API Keys

Promptly, paste the respective API keys & tokens in the mentioned columns. Then click on the “Save” button.

Step 6: Place a Dummy Order

Subsequently, to check this integration, we will capture the data from BigCommerce, and for that, we will create a dummy order in BigCommerce.

(a) Capture Webhook Response

Capture Webhook Response

After adding the webhook URL to your BigCommerce account, now we will click on the “Capture Webhook Response” button to capture the data from BigCommerce.

(b) Make a Dummy Purchase

Make a Dummy Purchase

Now, to add a new order, just go to Bigcommerce account and make a dummy purchase.

Step 7: Test the Response in Pabbly Connect Dashboard

Test the Response in Pabbly Connect Dashboard

After placing the order in BigCommerce, the order info will appear on the Pabbly Connect dashboard. Next, press the “Save” button.

Step 8: Setting Actions for BigCommerce to HubSpot CRM Integration

Consequently, in order to make this BigCommerce-HubSpot CRM integration work, you have to choose two actions for your trigger. First, BigCommerce to get the proper order info from the order ID that we got in the trigger part. Second, HubSpot CRM to update the info in the contact list.

(a) Select Application you Want to Integrate

Select Application you Want to Integrate

Next, hit the + button below & choose the application that you want to integrate. Here we will choose “BigCommerce” and in the method section select “Get Order By Id”. After choosing the application press the “Connect with BigCommerce” button.

(b) Authorize Application

Authorize Application

Promptly, choose the previously used credentials to move forward.

(c) Save & Send Test Request

Save & Send Test Request

After connecting with your BigCommerce account, map the “Order ID” & then hit the “Save & Send Test Request” button.

(e) Save the API Response

Save the API Response

Here, we can see that all the information about the new order is captured within Pabbly Connect. Hit the “Save” button to move forward.

(f) Select Application you Want to Integrate

Select Hubspot

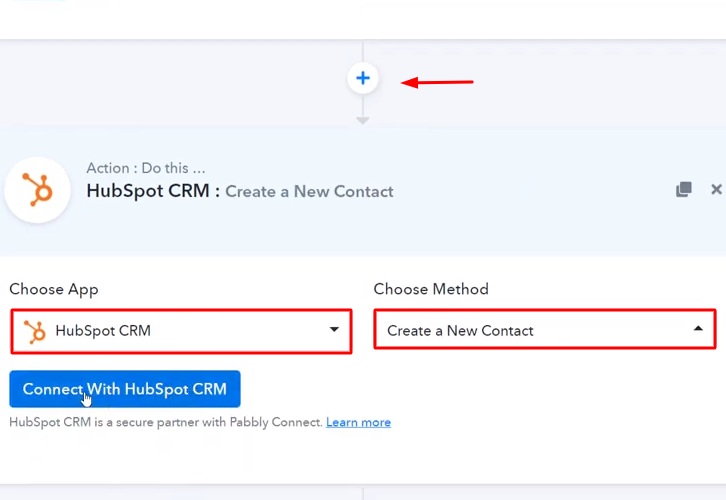
Now, press the + button below & choose the application that you want to integrate. Here we will choose “HubSpot CRM” and in the method section select “Create a New Contact”.

(g) Click the Connect Button

Click Connect Hubspot

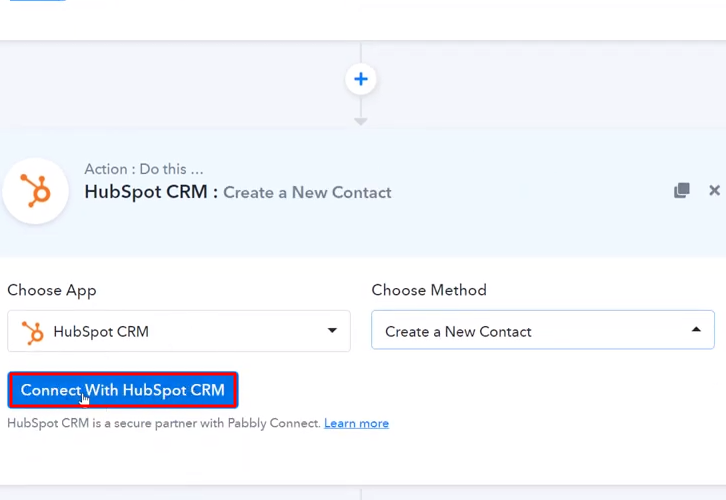
Once you choose the application press the “Connect with HubSpot CRM” button to move forward.

Step 9: Connecting HubSpot CRM to Pabbly Connect

Later, to connect HubSpot CRM with Pabbly Connect, you have to authorize the application. For this, you have to log into your Google account.

(a) Click on HubSpot Settings Icon

Click-on-Settings-Icon

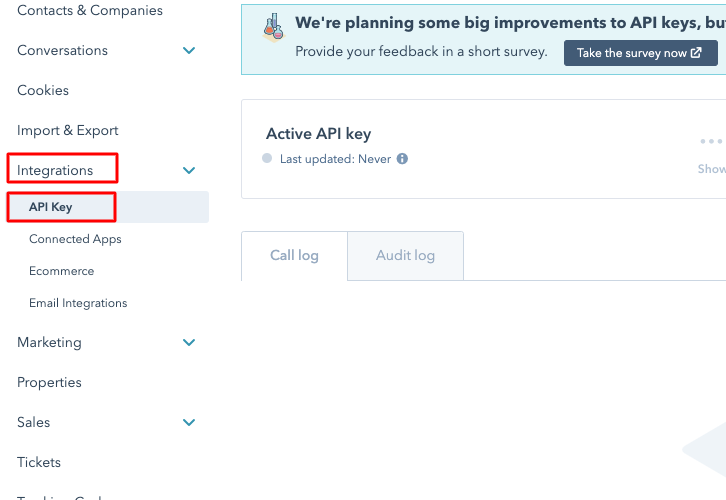
Once you press the connect button, a window will slide in from the right side asking for an “API Key”. Next, you have to hit the “Settings” icon in your HubSpot account to copy the API key.

(b) Click on Integrations

Click-on-Integrations-1 HubSpot

Afterward, press the “Integration” option & then select “API Key”.

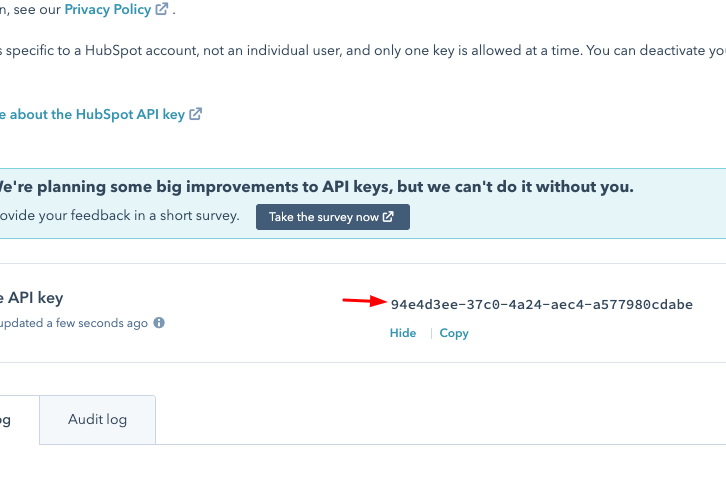
(c) Copy the API Key

Copy-the-API-Key-for-Hubspot

Furthermore, just copy the given API key to move further.

(d) Paste the API Key

Paste-the-API-Key-1_censored HubSpot

Later, simply paste the copied API key & then hit the “Save” button.

(e) Map the Fields

Map the Fields

After connecting your HubSpot account, now it’s time to add all the field data like name, email id, etc. Map up all the fields promptly.

(f) Send a Test Request

Send a Test Request

After mapping up all fields press the “Send Test Request” button.

Step 10: Check Response in HubSpot CRM

Check Response in HubSpot CRM

Ultimately, when you check your HubSpot CRM, you can see that the contact info is updated automatically for the newly created order in BigCommerce.

Conclusion –

Well Done! Now that you have learned “How to Create New HubSpot CRM Contact from New BigCommerce Order”, you can integrate any applications via Pabbly Connect to automate your entire workflow without any coding skills. Pabbly Connect is a wonderful tool that you can use to automate your projects and save a lot of time and effort.

So what are you waiting for? Go signup for a free account now for the best automation & integration experience.

You May Also Like To Read –
How to Add AWeber Subscriber from New BigCommerce Order

How to Add AWeber Subscriber from New BigCommerce Order

Looking for the easiest way to add AWeber subscriber from new BigCommerce order automatically? If yes, then this blog is for you. As, in this blog, you will get a step by step guide to integrate BigCommerce to AWeber.

How to Add AWeber Subscriber from New BigCommerce Order

But before we begin, let’s know a wee bit about the software that we are about to integrate. Primarily, BigCommerce is considered an open SaaS platform provider and a growing headless commerce provider based on the low total cost of ownership and highly flexible APIs. Whereas, AWeber is an email marketing service provider with over 100,000 small business clients worldwide.

Why Choose This Method Of Integration?

In contrast with other integration services-

  • Pabbly Connect does not charge you for its in-built apps like filters, Iterator, Router, Data transformer, and more
  • Create “Unlimited Workflows” and smoothly define multiple tasks for each action
  • As compared to other services which offer 750 tasks at $24.99, Pabbly Connect offers 50000 tasks in the starter plan of $29 itself
  • Unlike Zapier, there’s no restriction on features. Get access to advanced features even in the basic plan
  • Try before you buy! Before spending your money, you can actually signup & try out the working of Pabbly Connect for FREE

Sign Up To Pabbly Connect 

Therefore, integrating these two services can help you add subscribers in AWeber automatically for the new BigCommerce orders. We have also attached a video tutorial for this integration, have a look at it-

Now, the question is how you can integrate BigCommerce with AWeber? Well, the answer is quite simple and that is known as Pabbly Connect.

It is one of the best integration and automation tool that can help you integrate unlimited premium applications, set unlimited triggers & actions, create infinite workflows, and so much more. Besides, to do so, you don’t even need to have any coding skills. Just integrate it once and relax, it will handle all the workload afterwards.

How

Moreover, you can access all the features even in its free plan. To get started with this amazing service, you just have to go to the Marketplace and search for the apps you want to use. Also, we have created a template for this integration to help you. Click the image above to begin.

Hence, without wasting any more time, let’s begin with the steps to integrate BigCommerce to AWeber.

Step 1: Sign up to Pabbly Connect

Sign Up

We will start the process to add AWeber subscriber from new BigCommerce order by clicking on the ‘Sign Up Free’ icon on the Pabbly Connect home page. Next, either manually fill-up all the details or sign up using your Gmail account.

Try Pabbly Connect for FREE

Step 2: Access Pabbly Connect

Select Connect

Next, after logging into the account, click on the ‘Access Now’ button of the Connect section in the dashboard.

Step 3: Workflow for BigCommerce to AWeber Integration

(a) Start with a New Workflow

Create New Workflow

Start with creating a workflow for your project by clicking on the ‘Create Workflow’ button.

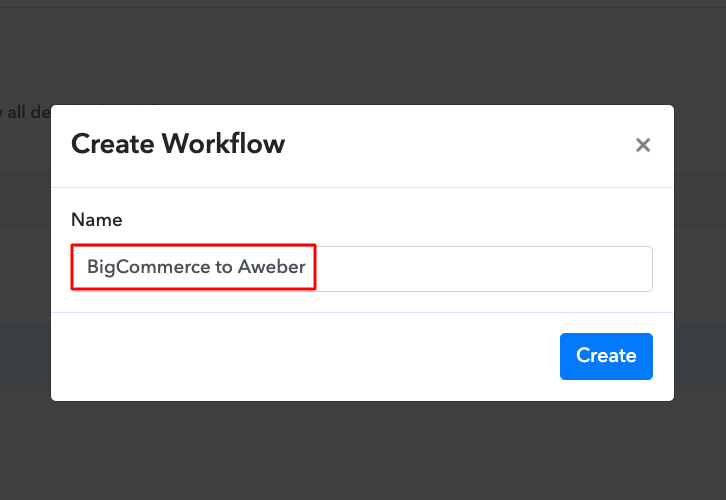
(b) Name the Workflow

Name the Workflow

Now, you need to name the workflow just like in the above-shown image. I named the workflow ‘BigCommerce to Aweber’, you can obviously name the workflow as per your requirements.

Step 4: Setting Trigger for BigCommerce to AWeber Integration

As soon as you are done naming your workflow, you will have to select the application you want to integrate. Pabbly Connect allows you to connect unlimited premium apps, create your free account now.

(a) Select Application you Want to Integrate

Select BigCommerce

Now, you have to select the application that you want to integrate. In this case, we are choosing ‘BigCommerce’ for integration. In the method section, select ‘New Order Created’.

(b) Copy the Webhook URL

Connect-with-BigCommerce_censored

The next step is to click on the ‘Connect with BigCommerce’ button on the dashboard just like in the above-shown image.

Step 5: Connecting BigCommerce to Pabbly Connect

To connect BigCommerce to Pabbly Connect, you have to add the client ID and access token from your BigCommerce account to Pabbly Connect. For that, you have to log in to your BigCommerce account.

(a) Click on Advanced Settings

Advanced Settings BigCommerce

After login into the BigCommerce account, go to the ‘Advanced Settings’ section on the bottom of the dashboard.

(b) Click on API Accounts

API Accounts BigCommerce

Next, you have to click on the ‘API Accounts’ option.

(c) Click on Create API Accounts

Create API Account BigCommerce

Now, click on the ‘Create API Accounts’ button then select the ‘Create V2/V3 API Token’ option.

(d) Name the API Account

Name the API Account BigCommecre

Name the API account according to your requirements to move forward.

(e) Save the API Account

Save the API Account BigCommerce

After making changes in all the settings, click on the ‘Save’ button.

(f) Copy the Credentials

Copy the Credentials BigCommerce

Simply copy the appearing credentials from the BigCommerce dashboard.

(g) Paste the Credentials

Paste the Credentials BigCommerce

Just paste the copied credentials in Pabbly Connect and hit the ‘Save’ button.

(h) Send Test Request

Send Test Request BigCommerce

Now, we need to set this webhook URL in your BigCommerce account and to do that, we will hit the ‘Save & Send Test Request’ button.

Step 6: Make a Test Purchase

To check this integration, we will make a sample purchase in BigCommerce to capture the data.

(a) Capture the Webhook Response

Capture Webhook Response

Now, to capture the data from BigCommerce, click on the ‘Capture Webhook Response’ button in Pabbly Connect.

(b) Add to Cart

Add to Cart BigCommerce

Next, select any of the listed products in your BigCommerce store and hit the ‘Add to Cart’ button.

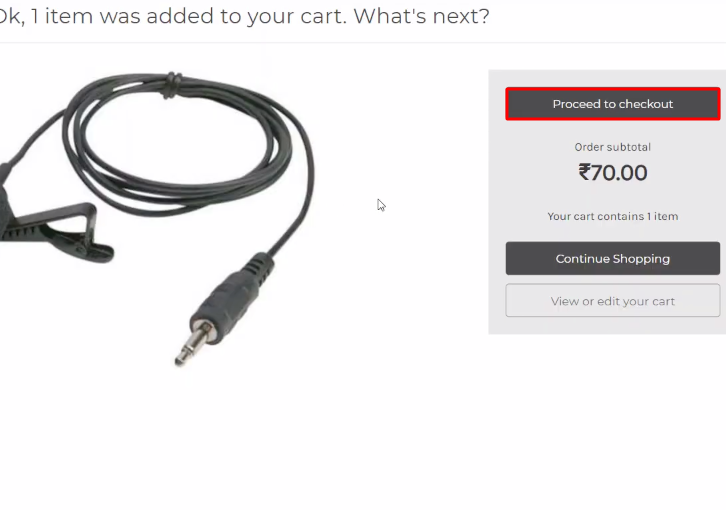
(c) Click on Proceed to Checkout

Proceed to Checkout BigCommerce

The next step is to click on the ‘Proceed to Checkout’ button.

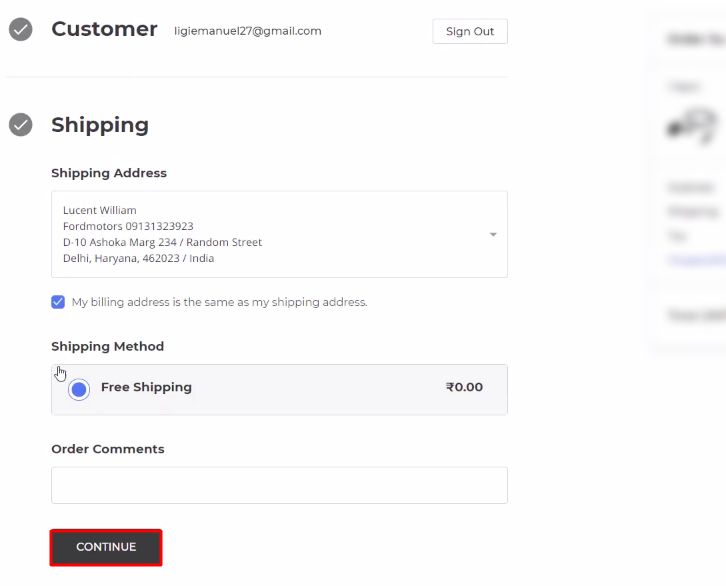
(d) Add Shipping Details

Add-Shipping-Details (1)_censored

In this step, now you have to add all the required details of the customer like email ID, address, etc and hit the ‘Continue’ button.

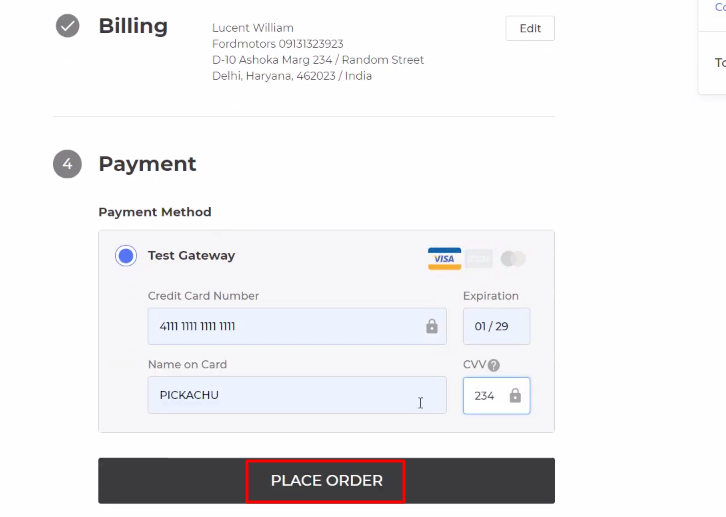
(e) Place an Order

Place Order

Now, add your credit/debit card details and hit the ‘Place Order’ button.

Step 7: Test the Response in Pabbly Connect Dashboard

Save the Webhook Response

Once you click on the ‘Place Order’ in BigCommerce, the order info will appear on the Pabbly Connect dashboard. Then, click on the ‘Save’ button.

Step 8: Setting Actions for BigCommerce to AWeber Integration

To make this BigCommerce-AWeber integration work, you have to choose two actions for your trigger. The first action is of BigCommerce to acquire the order details from the order ID, and the second action is of Aweber to add a new subscriber.

(a) Select Application you Want to Integrate

Select BigCommerce Action

Now in this step, click on the + button below and choose the application that you want to integrate. Here we will choose ‘BigCommerce’ to integrate and in the method section select ‘Get Order By ID’.

(b) Click the Connect Button

Connect with BigCommerce Action

After choosing the application click on the ‘Connect with BigCommerce’ button to move forward.

(c) Add the Credentials

Paste the Credentials BigCommerce

Thereafter clicking on the ‘Connect’ button, again we have to add the credentials that we pasted in the trigger section and hit the ‘Save’ button to connect with BigCommerce.

(d) Map the Order ID

Map the Order ID BigCommerce

Next, map the order ID that we got in the trigger section of this integration and click on the ‘Save & Send Test Request’ button.

(e) Save the API Response

Save the API Response BigCommerce

Here, we can see that the order details are fetched, now hit the ‘Save’ button to move forward.

(f) Select Application you Want to Integrate

Select Aweber

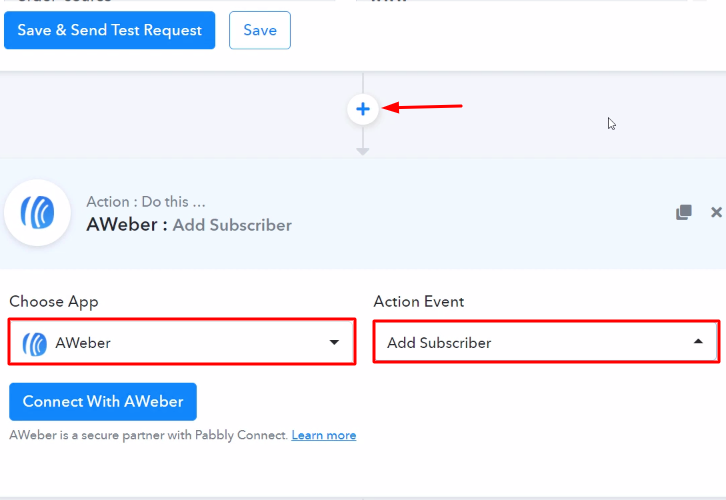
Now in this step, click on the + button below and choose the application that you want to integrate. Here we will choose ‘AWeber’ to integrate and in the method section select ‘Add Subscriber’.

(g) Click the Connect Button

Connect with Aweber

After choosing the application subsequently, click on the ‘Connect with AWeber’ button to move forward.

Step 9: Connecting AWeber to Pabbly Connect

To connect AWeber with Pabbly Connect, you have to authorize the application. For that, you need to login to your AWeber account.

(a) Authorize the Application

Authorize Application Aweber

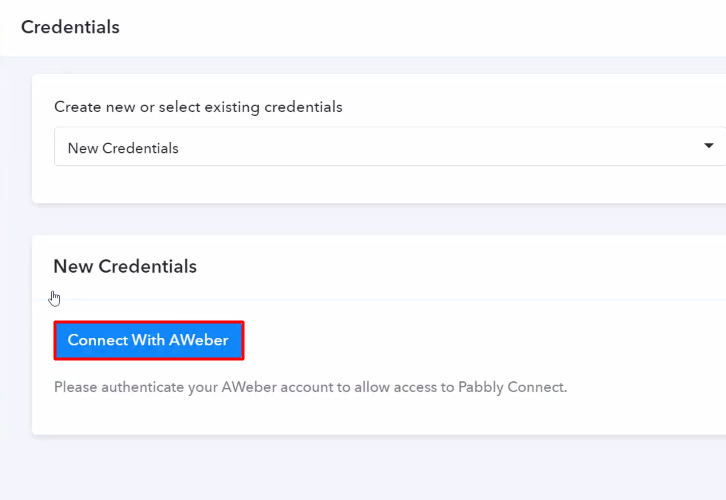
When you click on the connect button, consequently a window will slide in from the right, here again, we will click on the ‘Connect with AWeber’ button and grant the permission to connect AWeber with Pabbly Connect.

(b) Map the Fields

Map the Fields

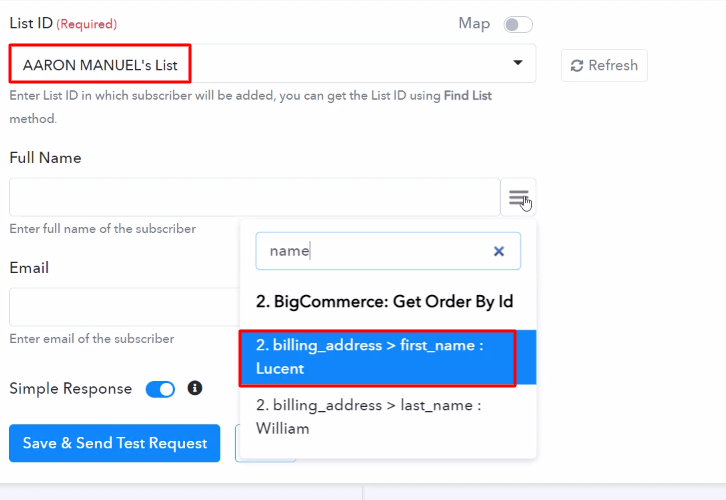
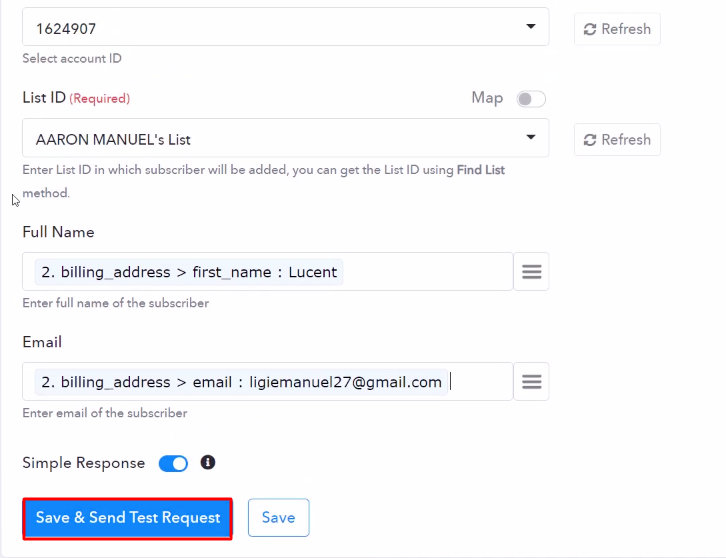
After connecting with your AWeber account, map all the fields quickly like name, email, etc.

(c) Save and Send Test Request

Send Test Request

Once you are done adding up all field data click on the ‘Save & Send Test Request’ button.

Step 10: Check Response in AWeber Dashboard

Check Response

Finally, you can see that the subscriber is added automatically in AWeber for the new order in BigCommerce.

Conclusion –

At last, this was our take on ‘How to Add AWeber Subscriber from New BigCommerce Order’. Now you have understood how Pabbly Connect works and how it can help you in saving a lot of time and effort by allowing you to integrate any applications easily.

You just have to follow these simple steps and once the integration is done, then Pabbly Connect will do the rest for you. Thus, go ahead and signup for free to enjoy this amazing automation and integration service.

For further queries, please drop your comments below. We will get back to you as soon as possible.

You May Also Like to Read –

How to Create ClickUp Task from New Google Calendar Event

Create ClickUp Task from New Google Calendar Event

Are you eagerly want to find a way to create ClickUp task from new Google Calendar event automatically? In this case, we have a perfect tool namely Pabbly Connect to automate this task in real-time.

Create ClickUp Task from New Google Calendar Event

Basically, Pabbly Connect is an automation and integration software that lets you transfer data between two software applications without the need for any coding language or technical expertise.

With the assistance of Pabbly Connect, you can effortlessly integrate Google Calendar and ClickUp, in such a manner that whenever a new event is created in Google Calendar then it will automatically create a task in ClickUp

Why Choose This Method Of Integration?

In contrast with other integration services-

  • Pabbly Connect does not charge you for its in-built apps like filters, Iterator, Router, Data transformer, and more
  • Create “Unlimited Workflows” and smoothly define multiple tasks for each action
  • As compared to other services which offer 750 tasks at $24.99, Pabbly Connect offers 50000 tasks in the starter plan of $29 itself
  • Unlike Zapier, there’s no restriction on features. Get access to advanced features even in the basic plan
  • Try before you buy! Before spending your money, you can actually signup & try out the working of Pabbly Connect for FREE

Sign Up To Pabbly Connect

But before getting into the whole procedure let’s first understand a bit about the services that are involved in the workflow. Google Calendar is a time-management and scheduling calendar service developed by Google. Whereas, ClickUp is an all-in-one cloud-based project management tool that offers features like reminders, goals, chat, scheduling, assigned comments, custom views, & more.

Since, there is no way possible to integrate both this software so far. But, with the help of Pabbly Connect, you have the advantage to automate or integrate not only these but plenty of applications. And the best part of using Pabbly Connect is that you can even try out this integration for free as well by creating your free account.

We’ve also attached a video below to help you know about this integration process in a simple manner.

Besides, we have also added the template for this integration to help you get started more quickly. You can strike the ‘Use Workflow’ button given below to begin. Additionally, you can also visit the Marketplace & look for more integrations and apps.

Create ClickUp Task from New Google Calendar Event Workflow

So, buckle up as we’re going to discover the Google Calendar and ClickUp integration.

Step 1: Sign up to Pabbly Connect

Sign Up

Start the procedure to create ClickUp task from new Google Calendar event by visiting the Pabbly Connect website. Then, hit the ‘Sign-Up Free‘ button available on the home page. Next, either use your existing Google account or manually fill in the registration form to signup.

Try Pabbly Connect for FREE

Step 2: Access Pabbly Connect

Select Connect

After that, strike the ‘Access Now’ button of the software ‘Connect’ amongst the Pabbly applications.

Step 3: Workflow for Google Calendar with ClickUp Integration

(a) Start with a New Workflow

Create New Workflow

Start with building a workflow to create ClickUp task from new Google Calendar event by pushing the ‘Create Workflow’ button on the Pabbly Connect dashboard.

(b) Name the Workflow

Google Calendar to ClickUp Integration

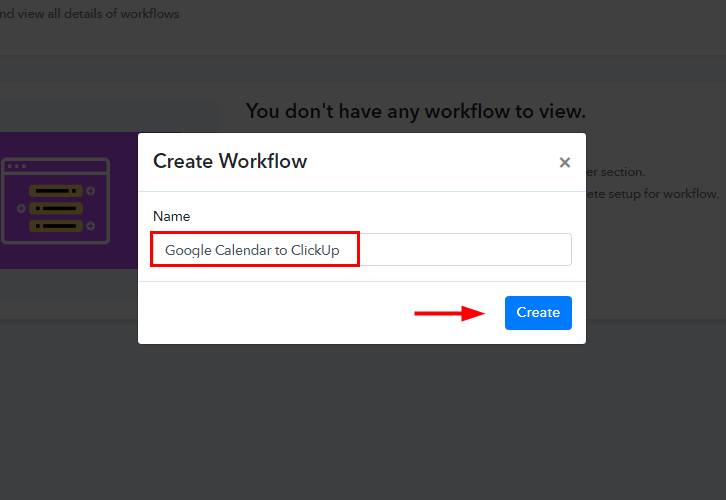
Now, name the workflow as per your need (for instance: Google Calendar to ClickUp) and push the ‘Create’ button.

Step 4: Setting Trigger for Google Calendar to ClickUp Integration

To automatically add a Google Calendar event as a task in ClickUp, you’ll need to set-up a trigger by selecting an application.

(a) Select Application you want to integrate

Select Google Calendar for Google Calendar to ClickUp Integration

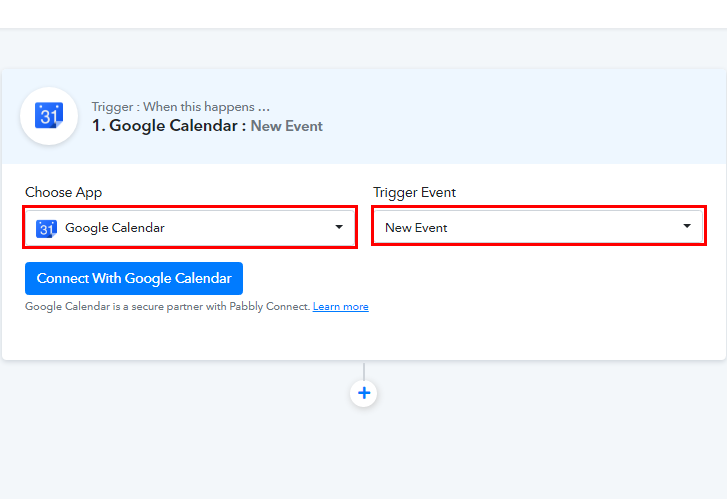
When you click on the create button, a page containing the trigger window will open next. Select the ‘Google Calendar’ from the ‘Choose App’ field option and in the ‘Trigger Event’ section choose ‘New Event’.

(b) Click the Connect Button

Connect with Google Calendar

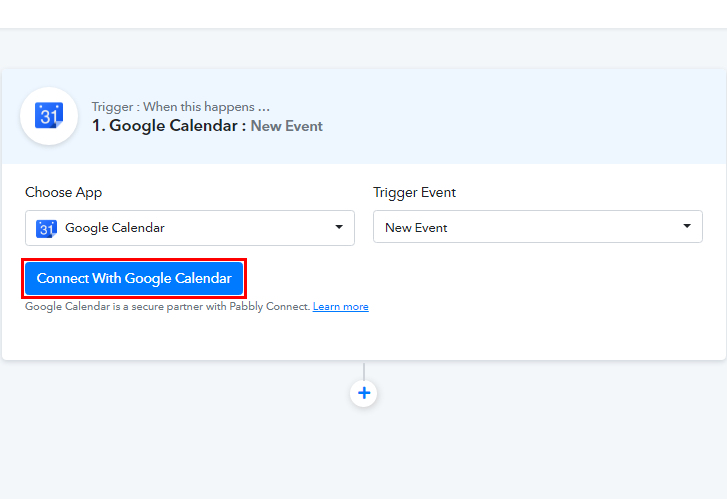
After choosing the application click on the ‘Connect with Google Calendar’ button to move forward.

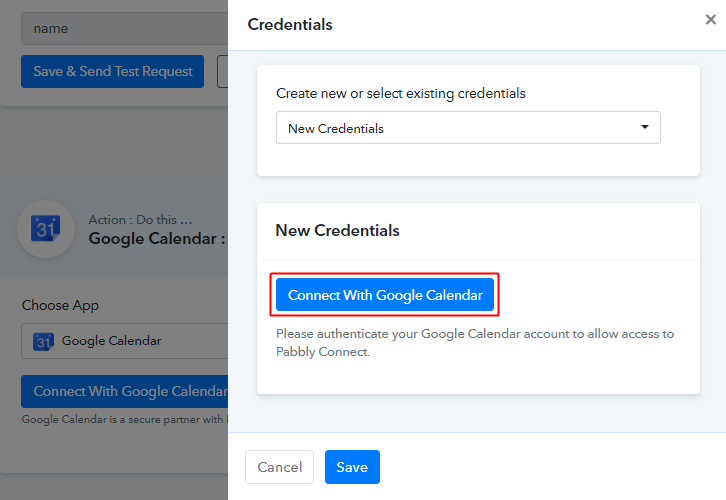
(c) Authorize Application

Authorize Google Account for Google Calendar to ClickUp Integration

Now, you have to authorize your Google account by clicking on ‘Connect with Google Calendar’ again and then click on ‘Save’ button.

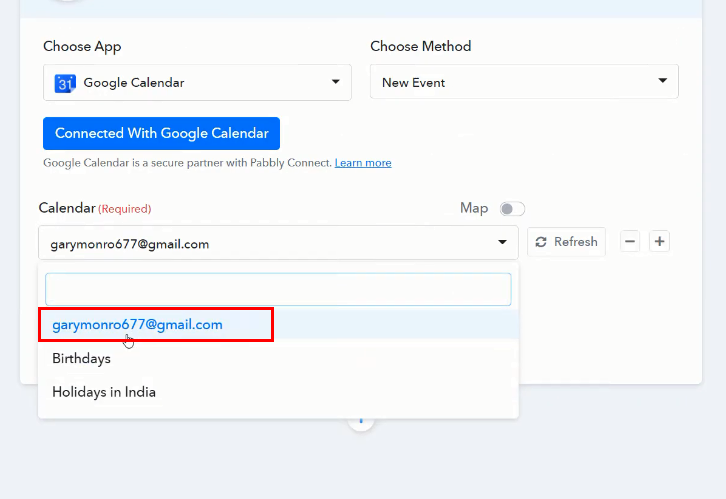
(d) Choose Calendar

Choose Calendar for Google Calendar to ClickUp

Once you have authorized your Google account, promptly select the calendar in which you want to create an event.

Step 5: Create a New Event

To test the trigger settings, you have to visit Google Calendar window and start creating a new event.

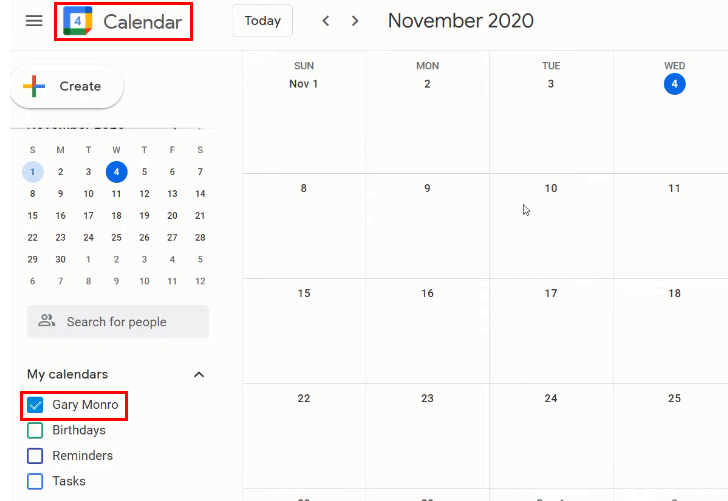
(a) Go to Google Calendar

Go to Google Calendar

Go to the Google Calendar and select the same calendar from ‘My Calendar’ section which you have selected above.

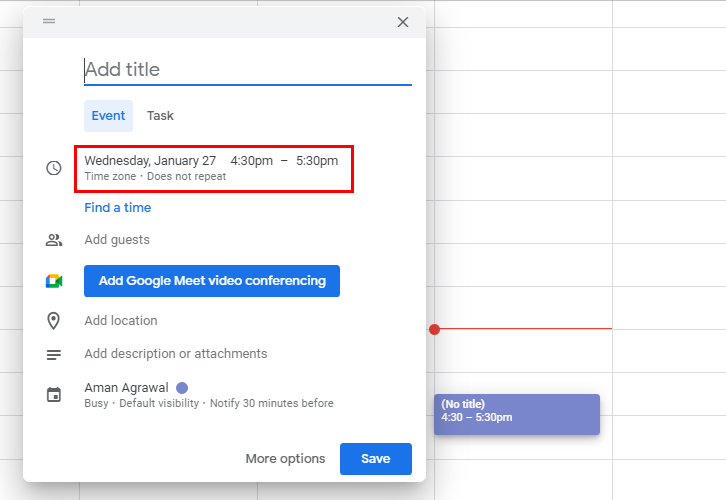
(b) Create an Event

Create an Event for Google Calendar to ClickUp Integration

Select any of the desired date, and then a pop-up window will open.

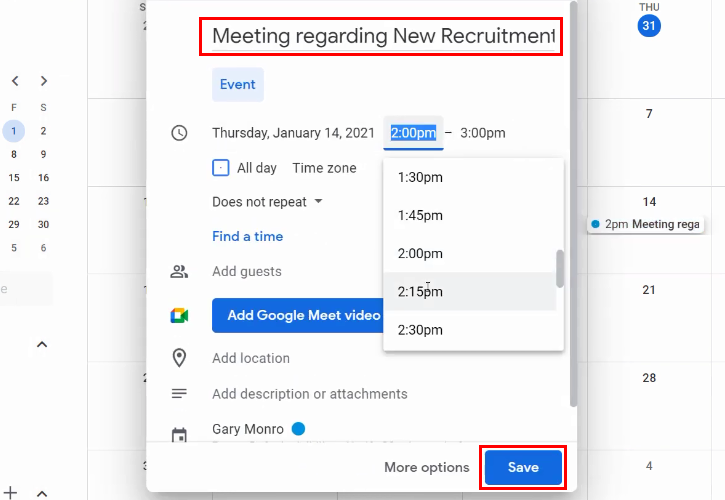
(c) Add Event Details

Add Event Details

Promptly, add event details like title, add time, guest, etc and in the end, hit the ‘Save’ button.

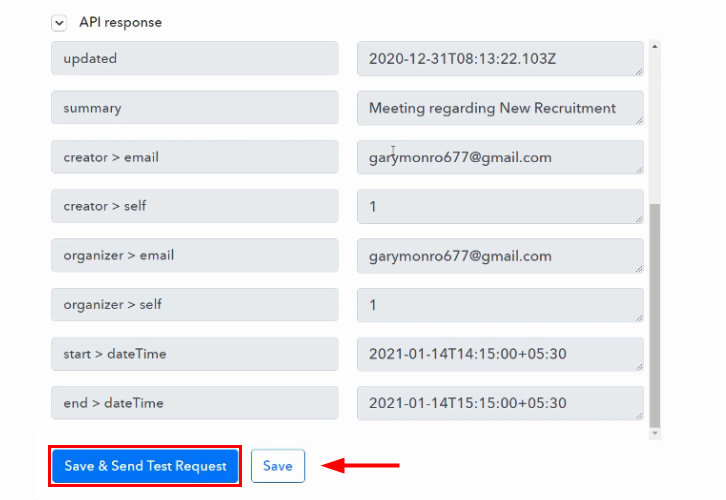
(d) Save and Send Test Request

Save and Send Test Request for Google Calendar to ClickUp Integration

Next, head back to Pabbly Connect window and click on ‘Save and Send Test Request’ button to capture the response. At last, click on the ‘Save’ button to save the response.

Step 6: Setting Date/Time Formatter for Google Calendar to ClickUp Integration

As we can see that the start and end date is not in the correct format. So, to change the format of date in timestamp we need to integrate Date/Time Formatter as an action step.

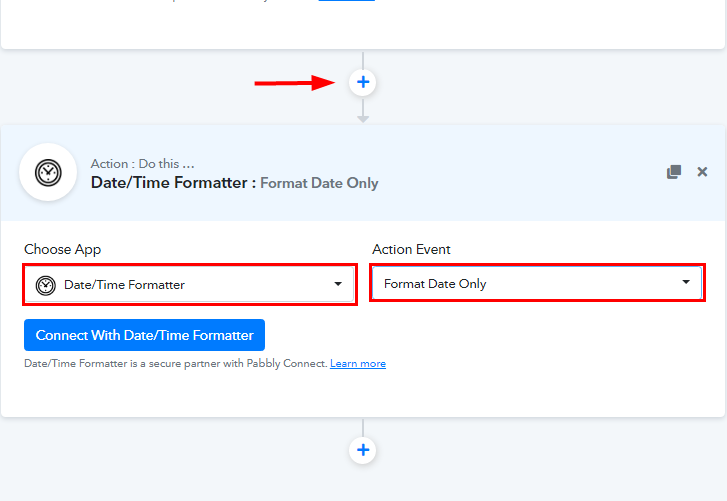
(a) Select Application to Format Date

Select Date/Time Formatter for Google Calendar to ClickUp Integration

Next, in order to format the date, simply tap on the (+) button and then, select Date/Time Formatter’ in choose app, and in the action event choose ‘Format Date Only’.

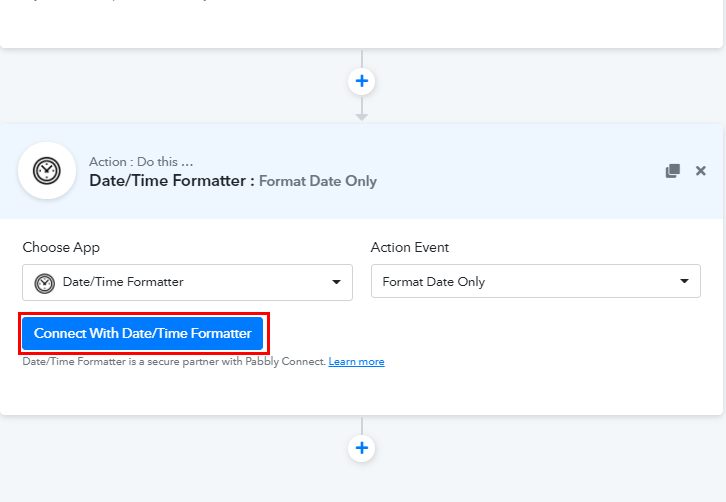
(b) Connect with Date/Time Formatter

Connect Date/Time Formatter for Google Calendar to ClickUp Integration

Promptly, click on the ‘Connect With Date/Time Formatter’ button.

(c) Map the Fields

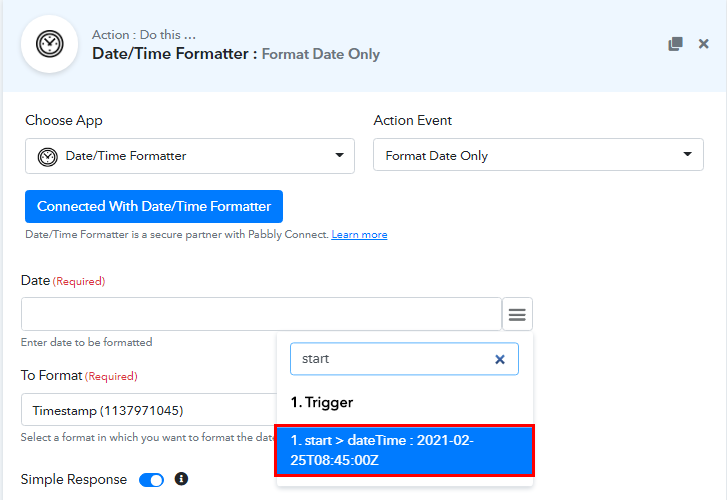
Map the Fields

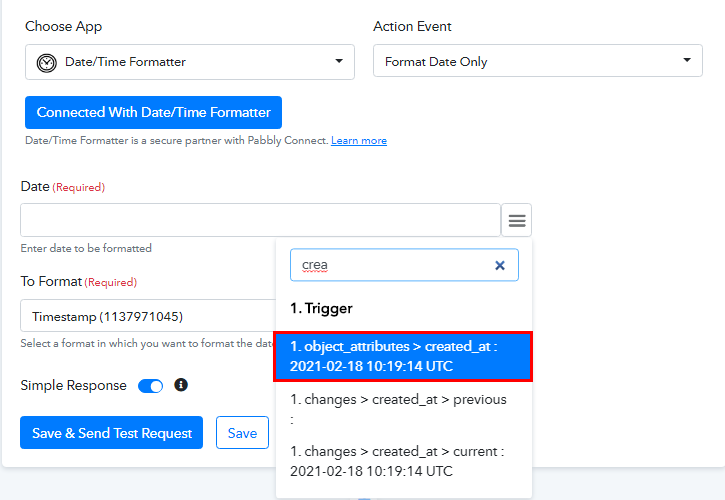
Now, you have to map the field to make the date in a proper format like map ‘start date’ in the Date field, and choose ‘Timestamp’ in To Format field.

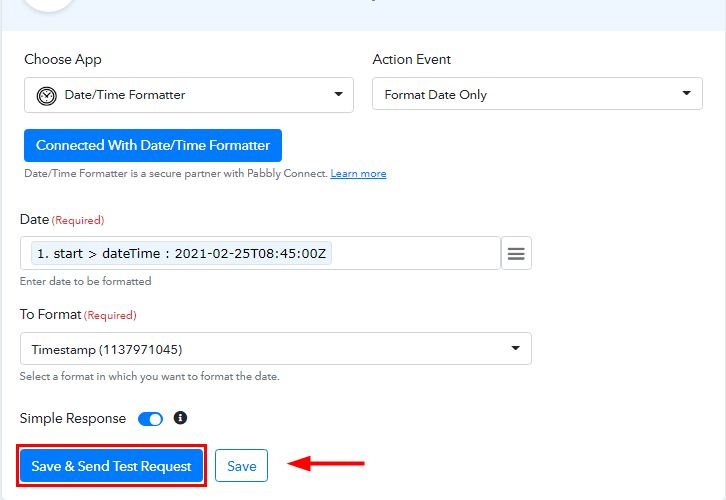
(d) Save and Sent Test Request

Save and Send Test Request for Google Calendar to ClickUp Integration

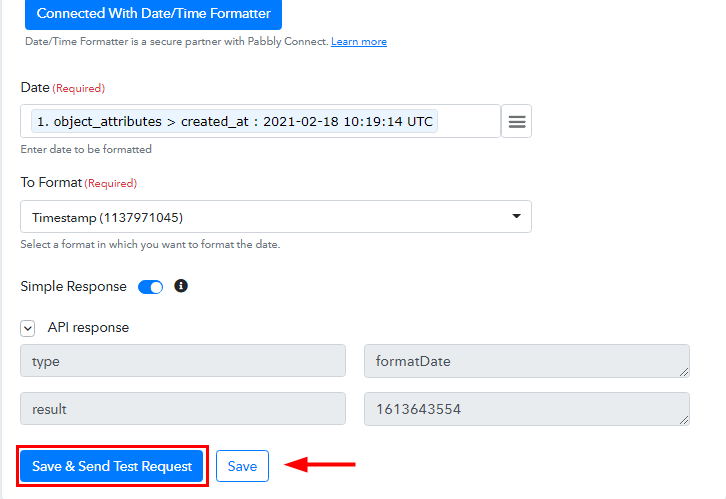
Once you are done mapping all the fields, click on ‘Save and Sent Request’ to get the API response. Finally, hit the ‘Save’ button.

Step 7: Setting Number Formatter for Google Calendar to ClickUp Integration

Now to change the date in millisecond format we have to integrate ‘Number Formatter’ in the next action step.

(a) Select Application to Format Number

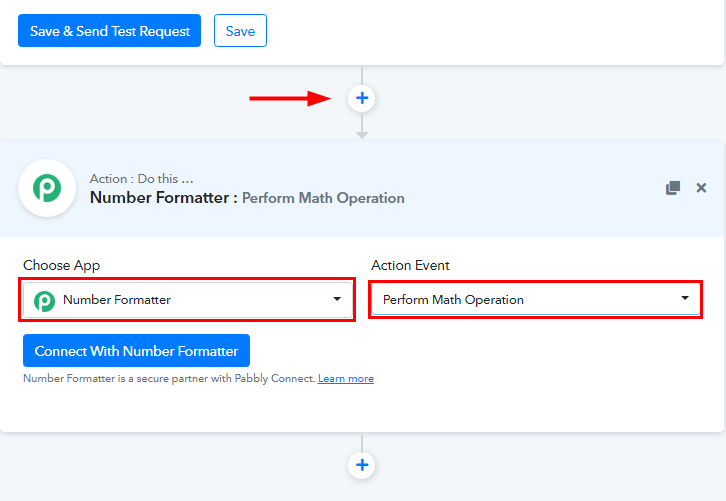
Select Number Formatter for Google Calendar to ClickUp Integration

Now, to format the date, just hit the (+) button and then, select Number Formatter’ in choose app, and in the action event select ‘Perform Math Operation’.

(b) Connect with Number Formatter

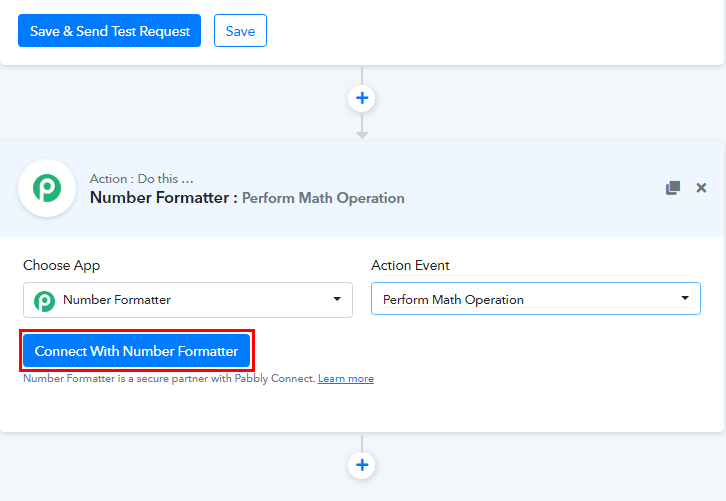
Connect with Number Formatter

After selecting the application, click on ‘Connect with Number Formatter’ button.

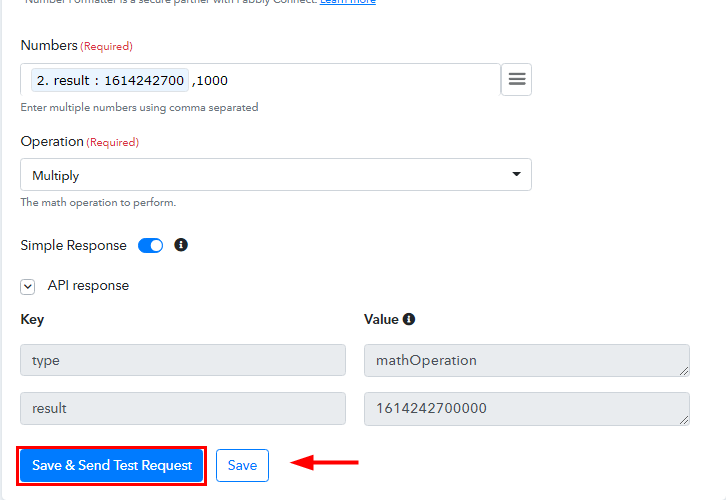
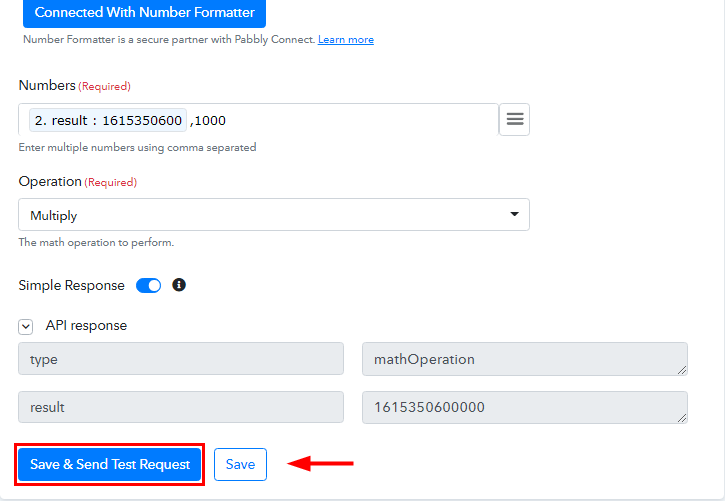
(c) Map the Fields

Map the Field

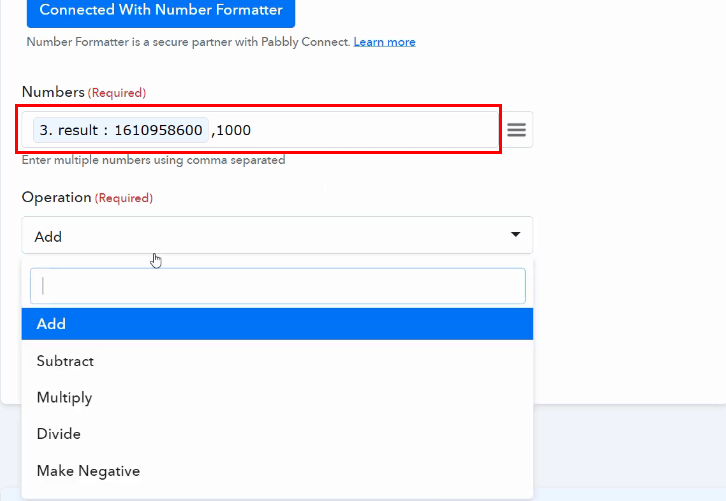
Next, map the timestamp formatted date in ‘Number’ field and choose ‘Operation’ as ‘Multiple’ as shown in above image.

(d) Save and Sent Test Request

Save and Send Test Request for Google Calendar to ClickUp Integration

Once you are done mapping all the details, hit the ‘Save and Sent Test Request’. Soon, you will get the API response and the date is in milliseconds now. Finally, hit the ‘Save’ button.

Since, we have changed the format of start date successfully. Simply follow the above-mentioned steps to change the format of end date in timestamp format (milliseconds).

Step 8: Setting Action for Google Calendar to ClickUp Integration

To make Google Calendar and ClickUp integration work, you have to choose the action for your trigger.

(a) Select Application you Want to Integrate

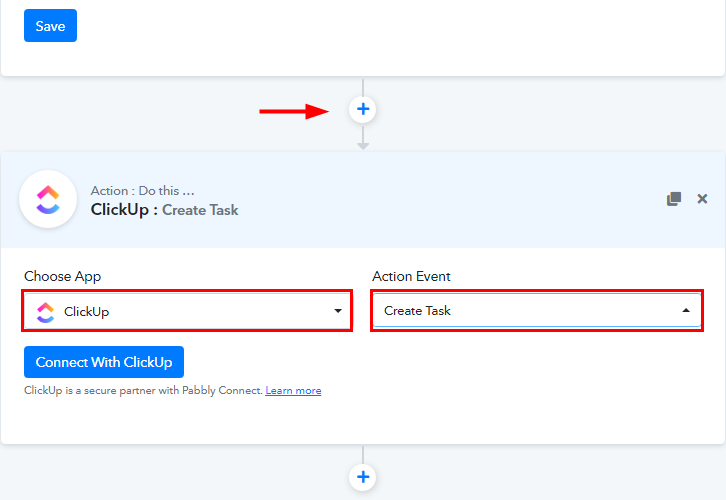
Select ClickUp for Google Calendar to ClickUp Integration

In addition, press the + icon to add an action to the trigger. Here we can select ‘ClickUp’ from the ‘Choose App’ drop-down and choose the method ‘Create Task’.

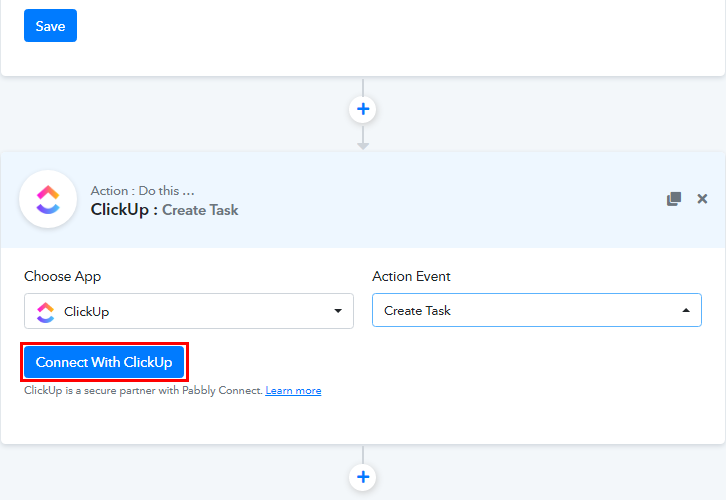
(b) Click on Connect Button

Connect with ClickUp for Acuity Scheduling to ClickUp Integration

Now, click on the ‘Connect with ClickUp’ button.

Step 9: Connecting ClickUp to Pabbly Connect

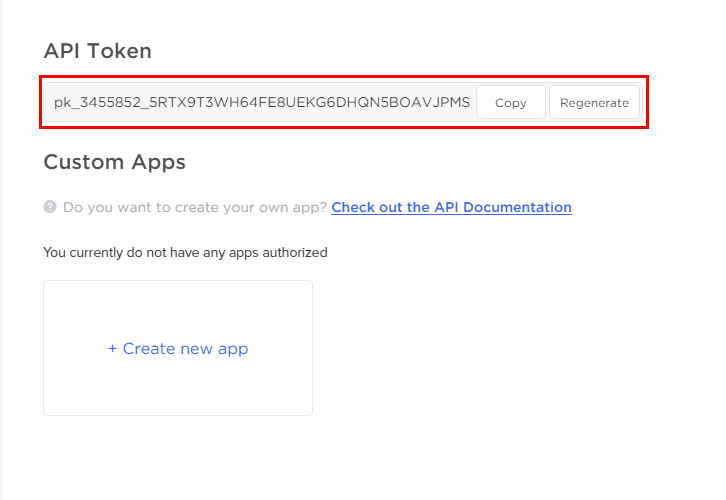
Eventually, when you click on the ‘Connect with ClickUp’ button, it will ask you to enter the ‘API Token’ and for that, you need to log in to your ClickUp account.

(a) Click on ClickUp Profile Icon

Click on ClickUp Profile Icon for Google Calendar to ClickUp Integration

Go to your ClickUp dashboard and then click on your profile icon present at the bottom left corner.

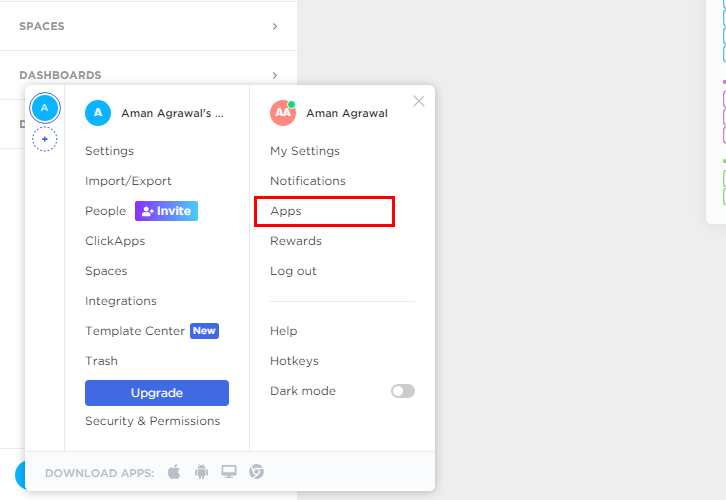
(b) Go to Apps Option

Go to Apps Options

Promptly, you will see many options, simply click on the ‘Apps’ from it.

(c) Copy the API Token

Copy API Token for Google Calendar to ClickUp Integration

Next, copy the given API token.

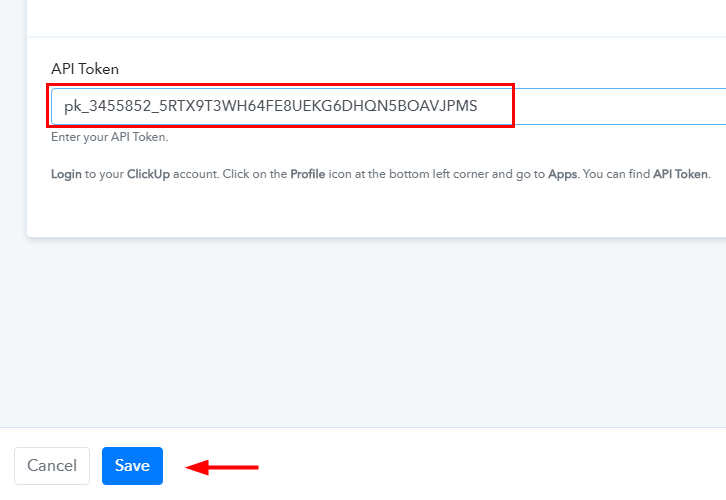
(d) Paste the API Token

Paste API Token

Further, paste the copied API Token in Pabbly Connect window, and hit the ‘Save’ button.

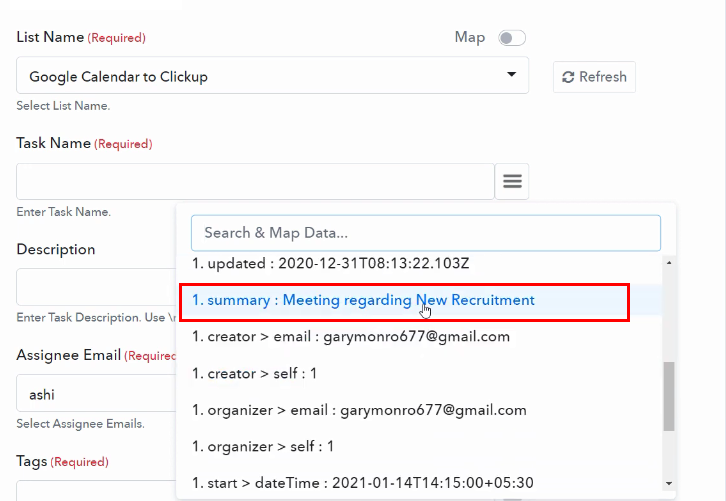
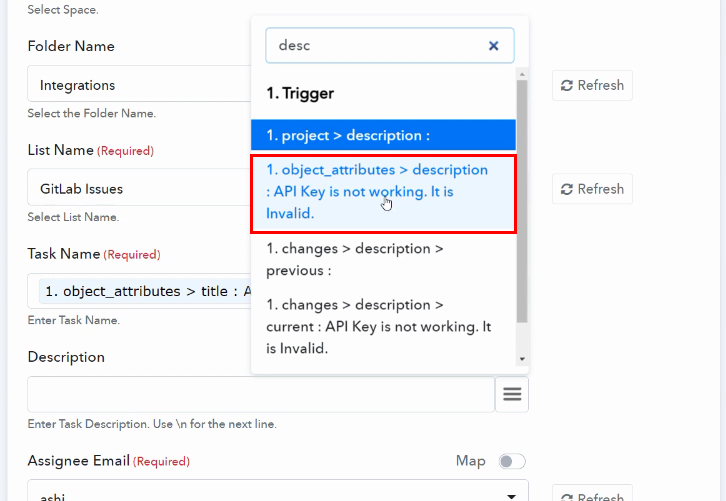
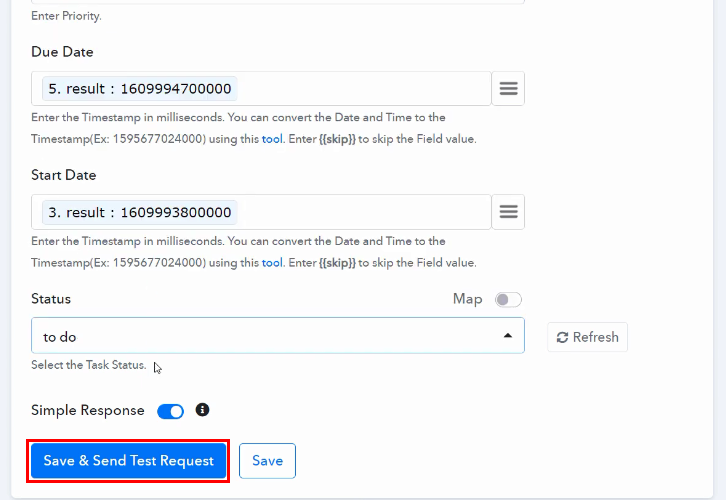
(e) Map the Fields

Map the Fields

After this, map all the respective field data like task name, description, and so on.

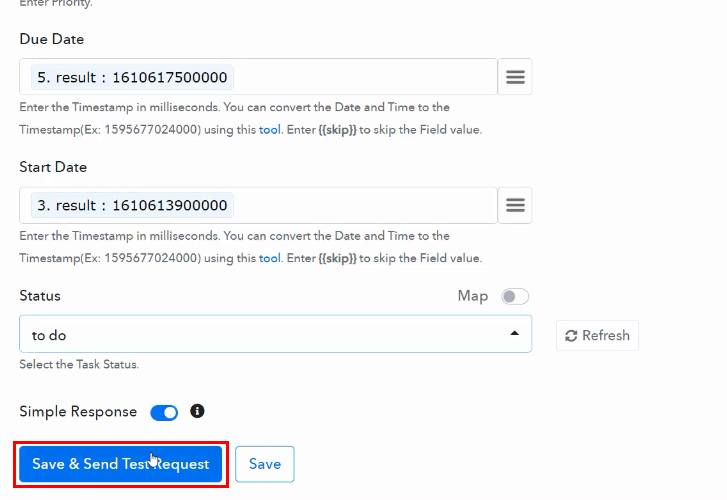
(f) Save and Send Test Request

Save and Send Test Request for Google Calendar to ClickUp Integration

Once you are done mapping all the fields, click on the ‘Save and Send Test Request’ button to get the API response.

Step 10: Check Response in ClickUp Dashboard

Check Response for Google Calendar to ClickUp Integration

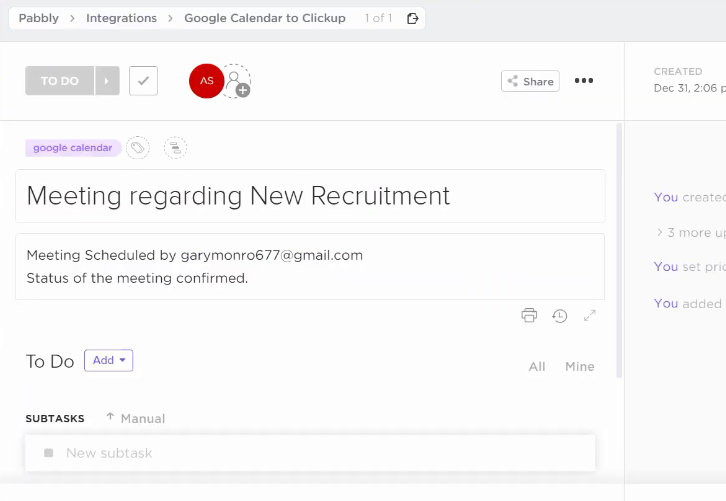
Ultimately, when you check your ClickUp dashboard, a new task has been created successfully.

Conclusion –

There you have it! Here we have successfully mentioned all the crucial steps to create ClickUp task from new Google Calendar event using Pabbly Connect. You can blindly rely on Pabbly Connect for your all automation tasks it is just like a boon in the automation industry. Not only this, one can use this software to connect unlimited apps within minutes.

So, what’s stopping you now! Go and catch your deal by signing up for a free account.

In case of any doubts or suggestions, please leave your comments below.

You May Also Like to Read –

How to Add Google Sheets Rows from BigCommerce Order

How to Add Google Sheets Rows from BigCommerce Order

Have you ever thought about a way through which you can add Google Sheets rows from BigCommerce order automatically?

How to Add Google Sheets Rows from BigCommerce Order

Well, don’t be surprised, as we have found a way through which you can add Google Sheets rows from BigCommerce order automatically. We have a magic tool for all your projects called Pabbly Connect. This software allows you to integrate two or more two applications to automate the entire mechanism without any coding skills.

Why Choose This Method Of Integration?

In contrast with other integration services-

  • Pabbly Connect does not charge you for its in-built apps like filters, Iterator, Router, Data transformer, and more
  • Create “Unlimited Workflows” and smoothly define multiple tasks for each action
  • As compared to other services which offer 750 tasks at $24.99, Pabbly Connect offers 50000 tasks in the starter plan of $29 itself
  • Unlike Zapier, there’s no restriction on features. Get access to advanced features even in the basic plan
  • Try before you buy! Before spending your money, you can actually signup & try out the working of Pabbly Connect for FREE

Sign Up To Pabbly Connect 

Before getting started, let’s know a little bit about both software.  Primarily, BigCommerce is an eCommerce platform that lets users 100’s of features, secure hosting, advanced SEO, and fantastic multi-channel integration. On the other hand, Google Sheets is an online spreadsheet app that lets users create and format spreadsheets and simultaneously work with other people.

Using Pabbly Connect, whenever new order will be created in BigCommerce, the order info will be saved in Google Sheets automatically. We have also embedded a video tutorial for this integration, have a look at it-

Pabbly Connect allows you to integrate unlimited premium applications without any coding skills. Just integrate it once & relax, it will handle all the workload later. Additionally, you can access all the features even in its free plan.

Furthermore, we have a template for this integration that can assist you to begin your integration journey in no time. Simply go to Marketplace and look for the apps you use to start integration. Just tap on the image below to get started.

How to Add Google Sheets Rows from BigCommerce Order

So, without taking any more of your time, let’s follow the step by step procedure to integrate BigCommerce and Google Sheets.

Step 1: Sign up to Pabbly Connect

Sign Up

Start the process to add new Google Sheets rows from the new BigCommerce order by clicking on the “Sign Up Free” icon on the Pabbly Connect home page. You can either manually fill-up all the details or sign up using your Gmail account.

Try Pabbly Connect for FREE

Step 2: Access Pabbly Connect

Select Connect

Next, after logging into the account, click on the “Access Now” button of the Connect section in the dashboard.

Step 3: Workflow for BigCommerce to Google Sheets Integration

(a) Start with a New Workflow

Create New Workflow

Start with creating a workflow for your project by clicking on the ‘Create Workflow’ button.

(b) Name the Workflow

Name the Workflow

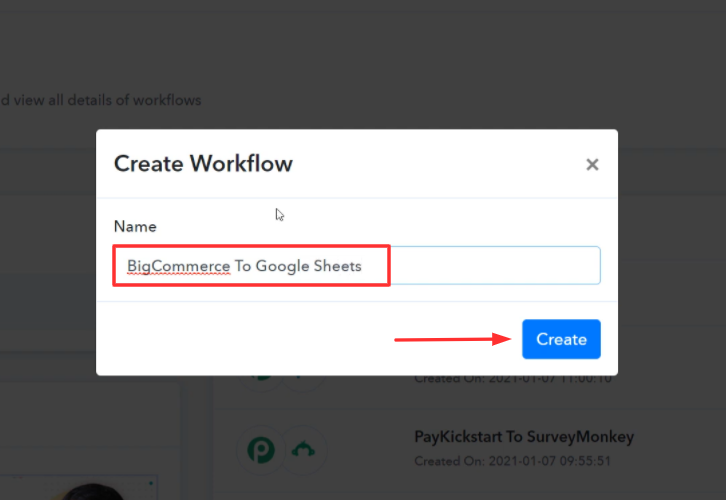
Now, you need to name the workflow just like in the above-shown image. I named the workflow “BigCommerce to Google Sheets”, you can obviously name the workflow as per your requirements.

Step 4: Setting Trigger for BigCommerce to Google Sheets Integration

As soon as you are done naming your workflow, you will have to select the application you want to integrate. Pabbly Connect allows you to integrate unlimited premium applications, create your free account now.

(a) Select Application you Want to Integrate

Select Application you Want to Integrate

Now, you have to select the application that you want to integrate. In this case, we are choosing “BigCommerce” for integration. In the method section, select “New Order Created”.

(b) Click Connect Button

Click Connect Button

After selecting the application, you have to click on the “Connect with BigCommerce” button just like in the above-shown image to take further the integration process.

Step 5: Connecting BigCommerce to Pabbly Connect

Next, to connect BigCommerce with Pabbly Connect, you have to authorize the application. For that, you have to log in to your BigCommerce account.

(a) Go to Advanced Settings

Go to Advanced Settings

First of all, go to the Bigcommece dashboard and click on “Advanced Settings”.

(b) Click on API Accounts

Click on API Accounts

Now, click on the “API Accounts” to proceed further.

(c) Create API Account

Create API Account

Next, press the button named “Create API Account” and then choose the option “Create V2/V3 API Token”.

(d) Copy the API Path Key

Copy the API Path Key

Furthermore, copy the API Path highlighted in the image and then click on the “Save” button to proceed further.

(e) Copy the Client ID and Access Token

Copy the Client ID and Access Token

As soon as you click on the “Save” button, a window will pop-up with API keys. Just copy the “Client ID and Access Token” then click on the “Done” button.

(f) Paste the API Keys

Paste the API Keys

Now, simply paste the respective API keys and tokens in the mentioned columns. Then press the “Save” button.

Step 6: Place a Dummy Order

Now, in order to check this integration, we will capture the data from BigCommerce, and for that, we will create a dummy order in BigCommerce.

(a) Capture Webhook Response

Capture Webhook Response

After adding the webhook URL to your BigCommerce account, now we will click on the “Capture Webhook Response” button to capture the data from BigCommerce.

(b) Make a Dummy Purchase

Make a Dummy Purchase

In order to add a new order, simply go to Bigcommerce account and make a dummy purchase.

Step 7: Test the Response in Pabbly Connect Dashboard

Test the Response in Pabbly Connect Dashboard

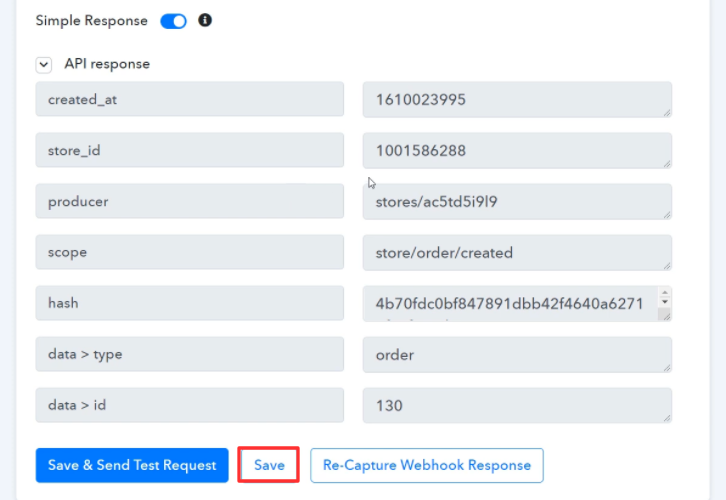
Once you are done placing the order in BigCommerce, the order info will appear on the Pabbly Connect dashboard. Then, click on the “Save” button.

Step 8: Setting Actions for BigCommerce to Google Sheets Integration

To make this BigCommerce-Google Sheets integration work, you have to choose two actions for your trigger. First, BigCommerce to get the proper order info from the order ID that we got in the trigger part. Second, Google Sheets to update the info in the sheet.

(a) Select Application you Want to Integrate

Select Application you Want to Integrate

Now in this step, click on the + button below and choose the application that you want to integrate. Here we will choose “BigCommerce” and in the method section select “Get Order By Id”. After choosing the application click on the “Connect with BigCommerce” button.

(b) Authorize Application

Authorize Application

Now, choose the previously used credentials to move forward.

(c) Save & Send Test Request

Save & Send Test Request

Now, after connecting with your BigCommerce account, map the “Order ID” and then hit the “Save & Send Test Request” button.

(e) Save the API Response

Save the API Response

Here, we can see that all the information about the new order is captured within Pabbly Connect. Hit the “Save” button to move forward.

(f) Select Application you Want to Integrate

Select Application you Want to Integrate

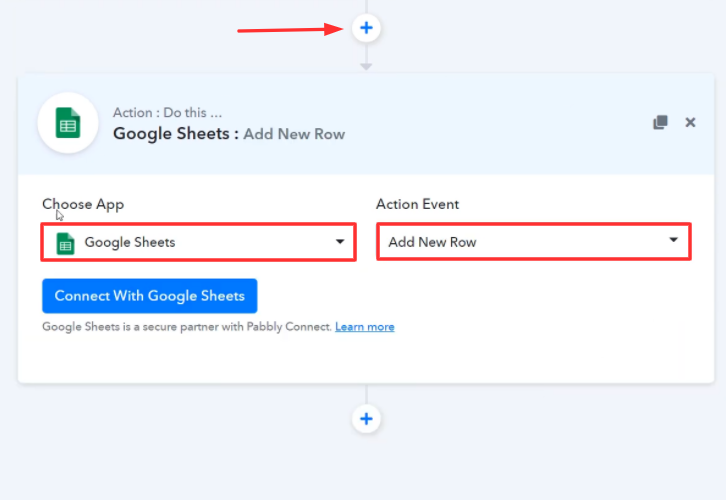
Now in this step, click on the + button below and choose the application that you want to integrate. Here we will choose “Google Sheets” and in the method section select “Add New Row”.

(g) Click the Connect Button

Click the Connect Button

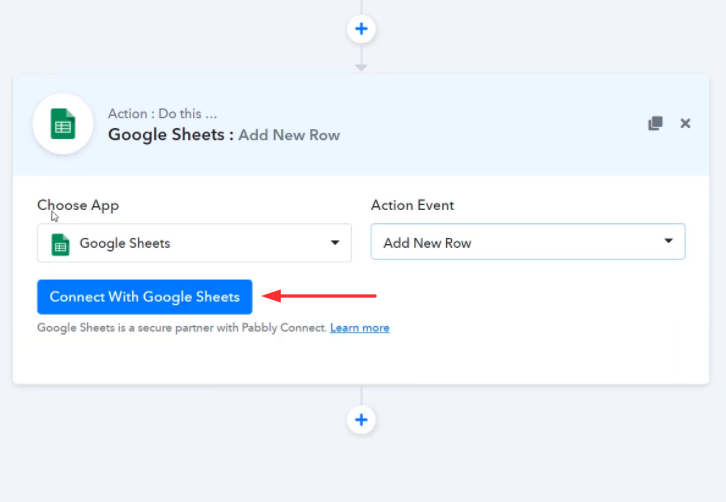
After choosing the application click on the “Connect with Google Sheets” button to move forward.

Step 9: Connecting Google Sheets to Pabbly Connect

Later, to connect Google Sheets with Pabbly Connect, you have to authorize the application. For this, you have to log into your Google account.

(a) Authorize Application

Authorize Application Google Sheets

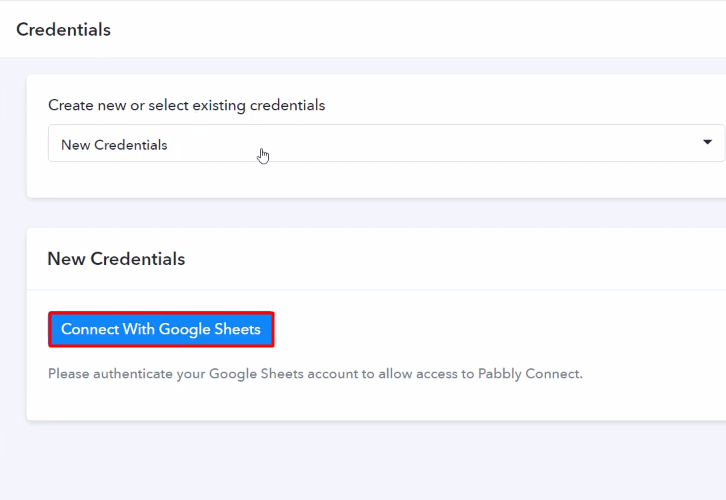
Next, to authorize Google Sheets, a window will slide in from the right, here you need to again click on the “Connect with Google Sheets” button and then allow the permission to connect Google account with Pabbly Connect.

(b) Map the Fields

Map the Fields

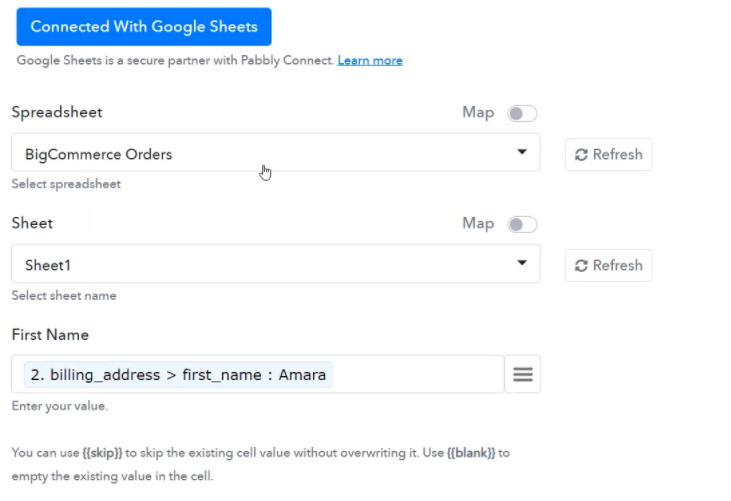
After connecting with your Google account, map all the fields quickly like spreadsheet, name, etc.

(c) Save and Send Test Request

Save and Send Test Request

Once you are done adding up all field data click on the “Save & Send Test Request” button.

Step 10: Check Response in Google Sheets

Check Response in Google Sheets

Finally, when you check your Google Sheets, you can see that the info is updated automatically for the newly created order in BigCommerce.

Conclusion –

Well Done! Now that you have learned “How to Add New Google Sheets Rows from New BigCommerce Order”, you can integrate any applications via Pabbly Connect to automate your entire workflow without any coding skills. Pabbly Connect is a wonderful tool that you can use to automate your projects and save a lot of time and effort.

So what are you waiting for? Go signup for a free account now for the best automation & integration experience.

You May Also Like To Read –
How to Add MailChimp Member by Verifying WooCommerce Order Email

How to Add MailChimp Member by Verifying WooCommerce Order Email

Wouldn’t it be easy if we know a way to add MailChimp member by verifying WooCommerce order email without any manual effort?

Definitely Yes! We all look for an easy approach that can reduce all redundant work. Well! You can do that with the help of Pabbly Connect.

How to Add MailChimp Member by Verifying WooCommerce Order Email

Pabbly Connect is an integration and automation software that lets you transfer data between multiple applications in a couple of minutes with zero coding skills.

Why Choose This Method Of Integration?

In contrast with other integration services-

  • Pabbly Connect does not charge you for its in-built apps like filters, Iterator, Router, Data transformer, and more
  • Create “Unlimited Workflows” and smoothly define multiple tasks for each action
  • As compared to other services which offer 750 tasks at $24.99, Pabbly Connect offers 50000 tasks in the starter plan of $29 itself
  • Unlike Zapier, there’s no restriction on features. Get access to advanced features even in the basic plan
  • Try before you buy! Before spending your money, you can actually signup & try out the working of Pabbly Connect for FREE

Sign Up To Pabbly Connect  

Though the question must be popping in your head about the need for this integration. As we all know WooCommerce is an open-source e-commerce plugin for WordPress. It is designed for small to large-sized online merchants using WordPress. On the other hand, Mailchimp is an all-in-one marketing platform that helps you manage and talk to your clients, customers, and other interested parties.

However, we are also using EmailListVerify that performs a variety of various inspections to pinpoint and remove wrong email addresses from your list.

By integrating these services via Pabbly Connect, one can easily verify WooCommerce’s order email address and save it as a subscriber in MailChimp. The process would be fully automated. We have also attached a video for you, have a look at it.

Further, we have also added a template for the same to get you started quickly. Just click on the image and you’re good to go. In case, of any other service integration, you can check Marketplace.

Clone Template for WooCommerce and MailChimp

Here, in this article, we will understand how to integrate WooCommerce with MailChimp.

So, let’s begin the process.

Step 1: Sign up to Pabbly Connect

Sign Up

Initiate the process to add MailChimp member by verifying WooCommerce order email by clicking on the “Sign Up Free” icon on the Pabbly Connect dashboard. Afterward, either fill-up the details manually or sign up using Gmail credentials.

Try Pabbly Connect for FREE

Step 2: Access Pabbly Connect

Select Connect

Moreover, after logging into the account, click on the “Access Now” button as shown in the above image.

Step 3: Workflow for WooCommerce to MailChimp Integration

(a) Start with a New Workflow

Create New Workflow

Commence the process of creating a workflow for integration by clicking on the “Create Workflow” button.

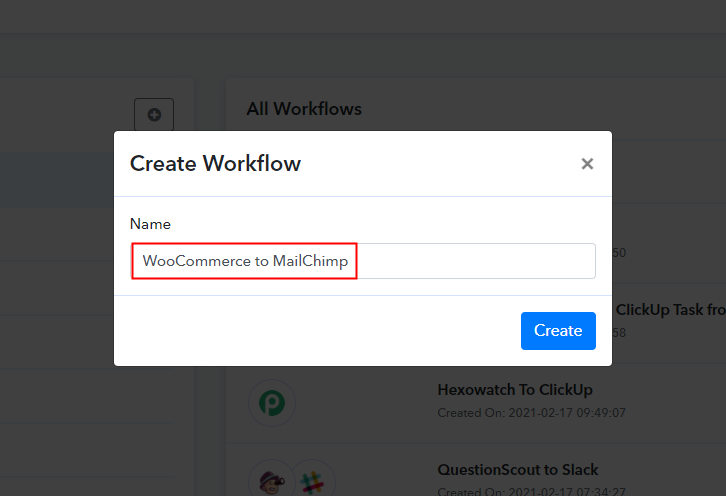
(b) Name the Workflow

Name the Workflow

Moreover, add the name of workflow which in our case is “WooCommerce to MailChimp”. Although, you can always name the workflow according to your necessities.

Step 4: Setting Trigger for WooCommerce to MailChimp Integration

Next, after creating a workflow, you have to choose the integration app to verify the WooCommerce order email address. Pabbly Connect lets you build unlimited workflows within minutes, click here to sign up for unlimited integrations for free.

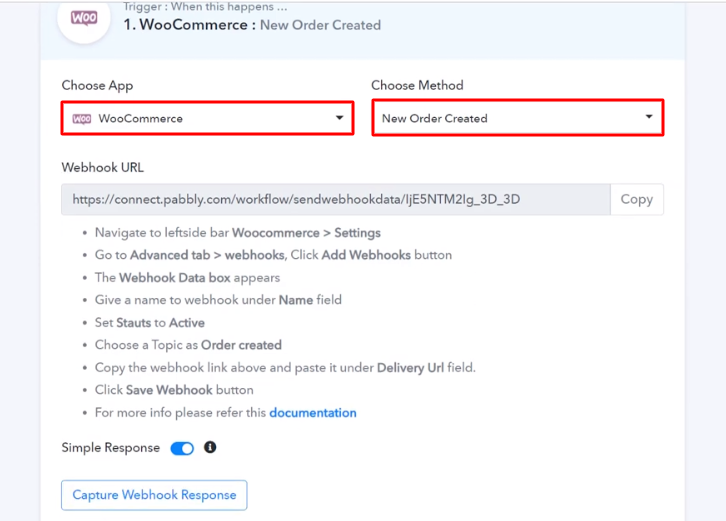
(a) Select Application you Want to Integrate

Select WooCommerce

The following step is to select “WooCommerce” from the dropdown, then choose the “New Order Created” option to append data from WooCommerce to MailChimp.

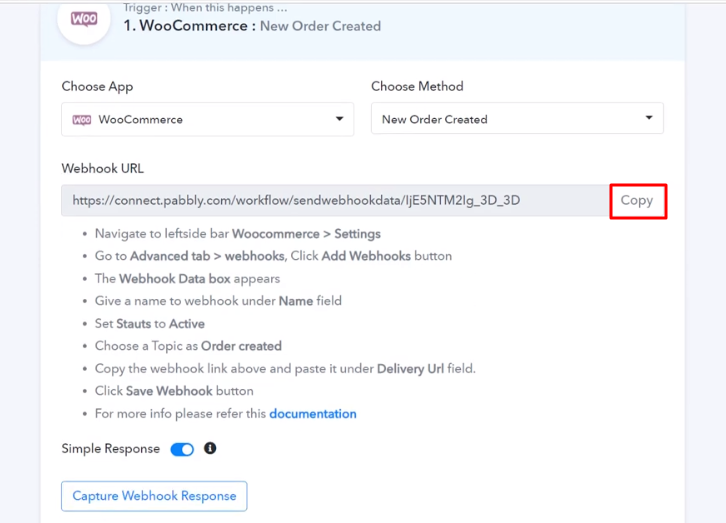
(b) Copy the Webhook URL

Copy the Webhook URL

The next step is to copy the webhook URL which is appearing on the dashboard.

Step 5: Connecting WooCommerce to Pabbly Connect

Now in order to add customer details as subscribers in MailChimp, you need to paste the webhook URL in WooCommerce. Proceed with the integration process by login into your WooCommerce account.

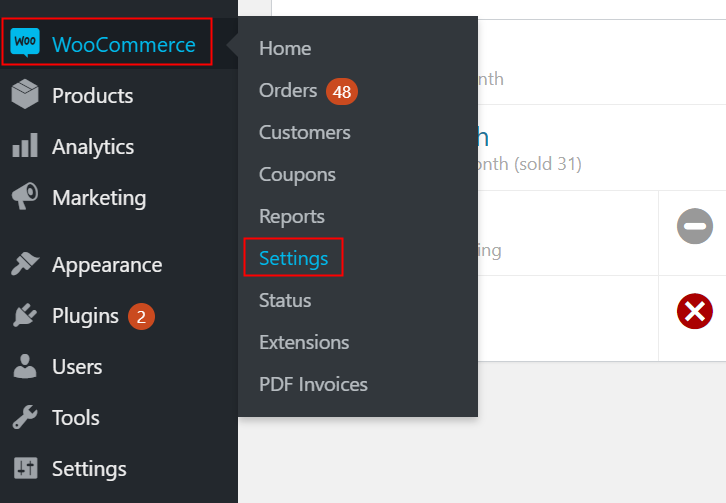
(a) Go to WooCommerce Settings

Go-to-WooCommerce-Settings-1

Once you have signed in to your WordPress account successfully, simply go to the “WooCommerce” section and tap the “Settings” option.

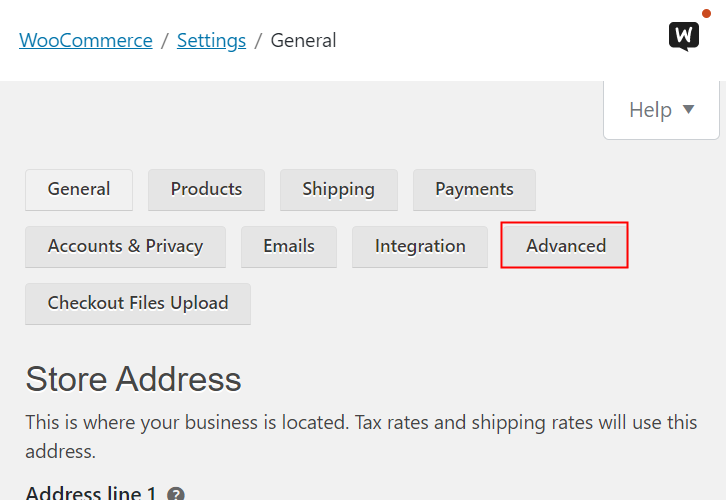
(b) Click on Advanced Option

Click on Advanced Option

Next, when you click on “Settings”, a tab with various options will open, where you need to choose the “Advanced” option.

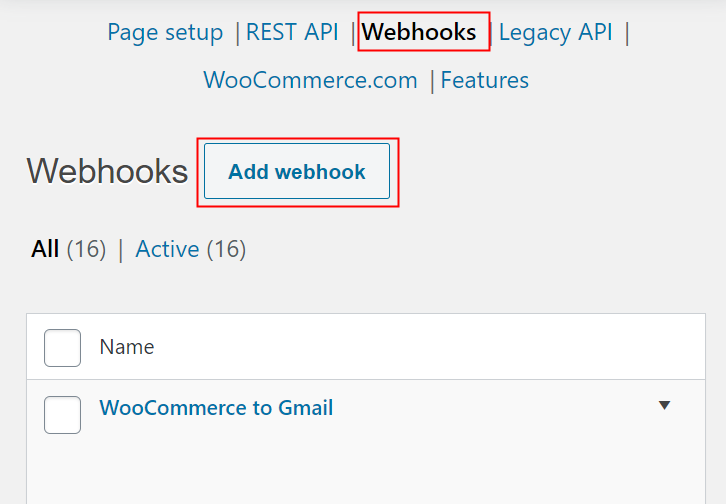
(c) Click on Webhooks Option

Click-on-Webhooks-Option

Subsequently, when you click on the “Webhooks” button, a new tab with a certain option will open. To paste the Webhook URL, simply tap on the ‘Add Webhook’ option.

(d) Add Webhook

Add Webhook

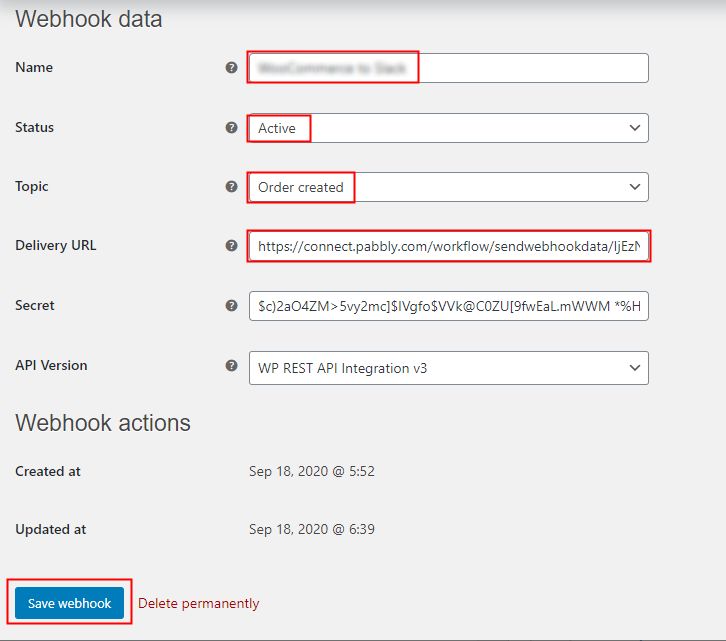
Now, name the Webhook as per your requirement and change the status to “Active”. Also, in the topic section, select “Order Created” and paste the URL copied from Pabbly Connect in the delivery URL. Once you are done making all changes, just hit the “Save Webhook” button.

Step 6: Make a Test Purchase

To check this integration, we will capture the order from WooCommerce, and for that, we will make a test purchase on WooCommerce.

(a) Capture the Webhook Response

Capture the Webhook Response

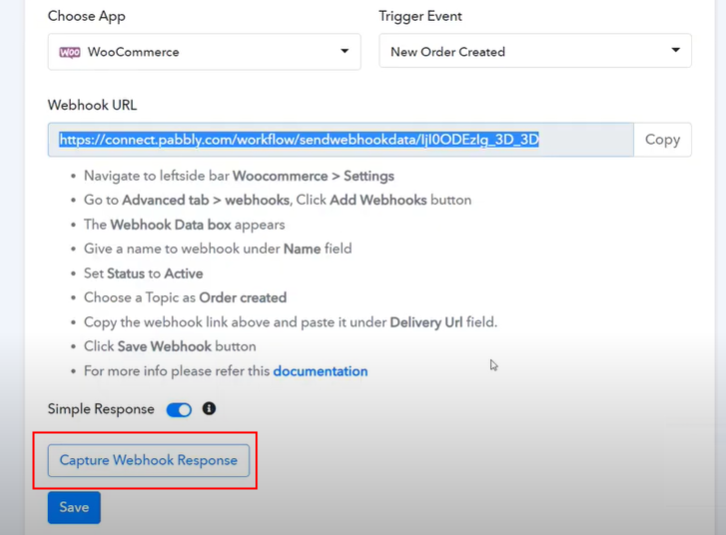
Now, to capture the data from WooCommerce, click on the “Capture Webhook Response” button in Pabbly Connect.

(b) Click on Add to Cart

Click on Add to Cart

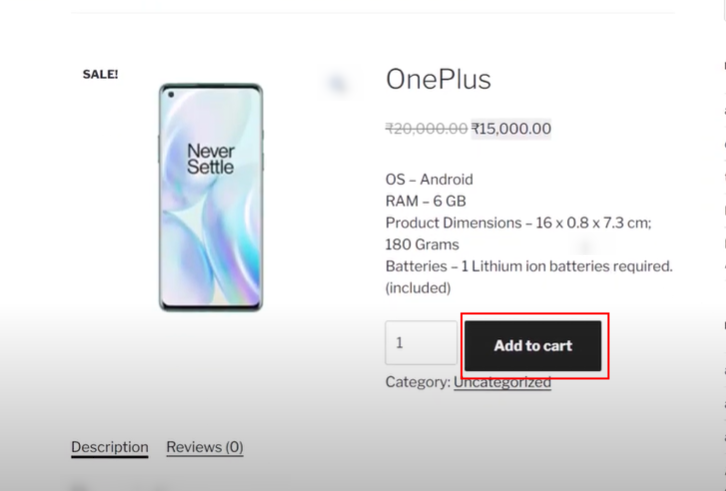
Next, select any product that you are interested in and then click on the “Add to Cart” button.

(c) Add Customer Details

Add Customer Details

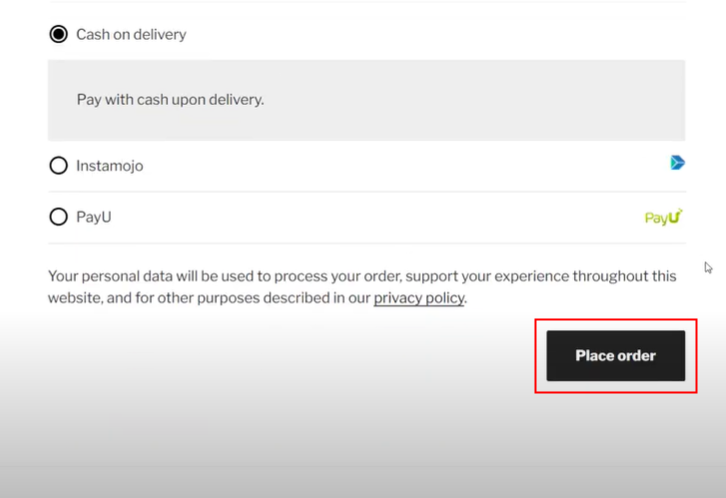
Open the product checkout in a new tab and make a dummy purchase. Just fill up all the details, hit the “Place Order” button.

Step 7: Test the Response in Pabbly Connect Dashboard

Test the Response in Pabbly Connect Dashboard

As soon as you click the “Place Order” button, the entry will appear on the “Pabbly Connect” dashboard. Just click on the “Save” option.

Step 8: Setting Actions for WooCommerce to MailChimp Integration

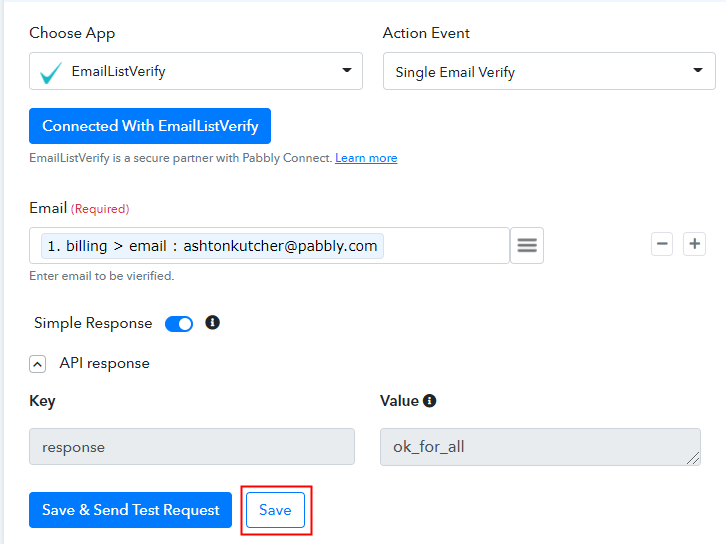
To make this WooCommerce – MailChimp integration work, we have to choose multiple actions for our trigger. The first action would be to verify the email via EmailListVerify and then using a filter to check if the condition is true and lastly adding the customer details as a subscriber in MailChimp.

(a) Select Application you Want to Integrate

Select EmailListVerify

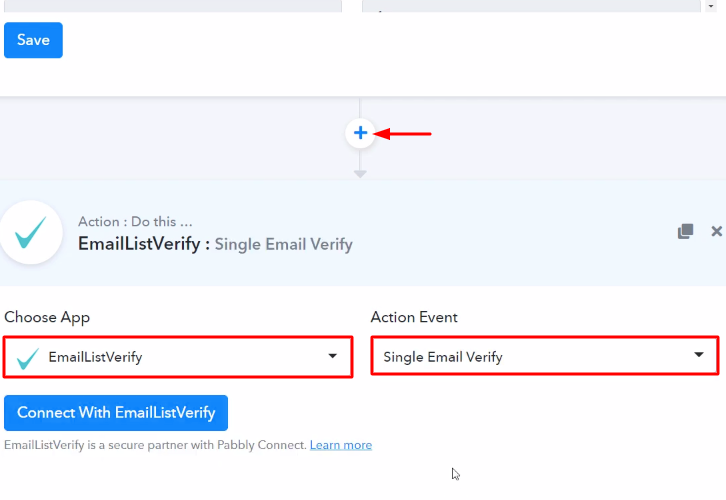
Now in this step, click on the + button below and choose the application that you want to integrate. Here we will choose “EmailListVerify” to integrate and in the method section select “Single Email Verify”.

(b) Click the Connect Button

Connect with EmailListVerify

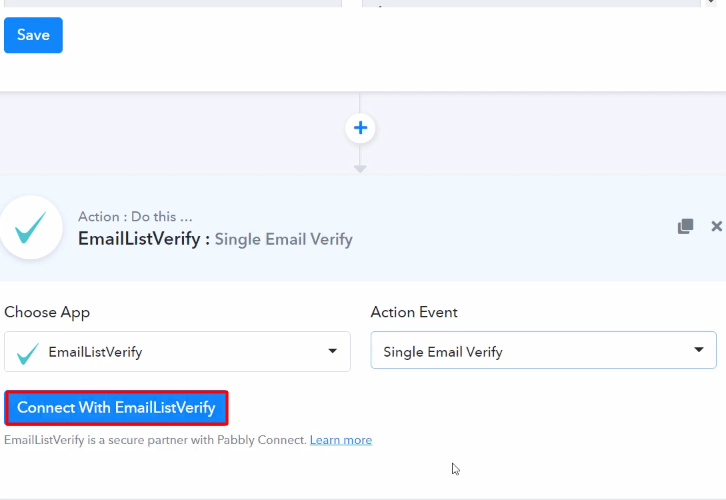
After choosing the application click on the “Connect with EmailListVerify” button to move forward.

(c) Click on the API

Click on API EmailListVerify

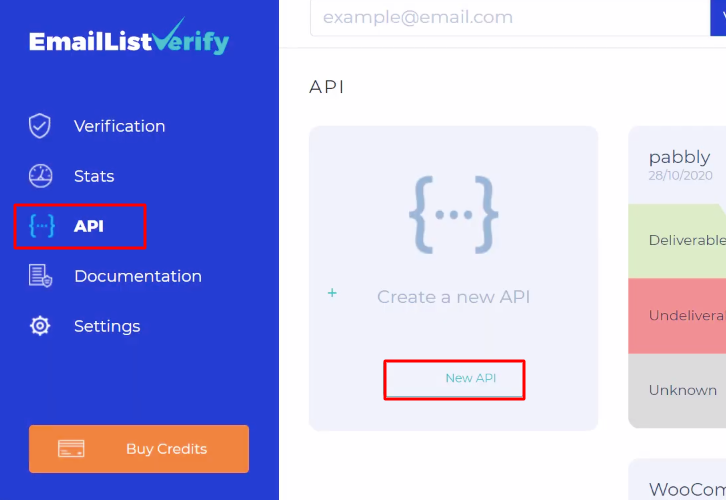
To connect EmailListVerify with Pabbly Connect, you have to paste the API key in the software. To get the API key, log in to your EmailListVerify account then click on the “API” option in your EmailListVerify dashboard then hit the “New API” button.

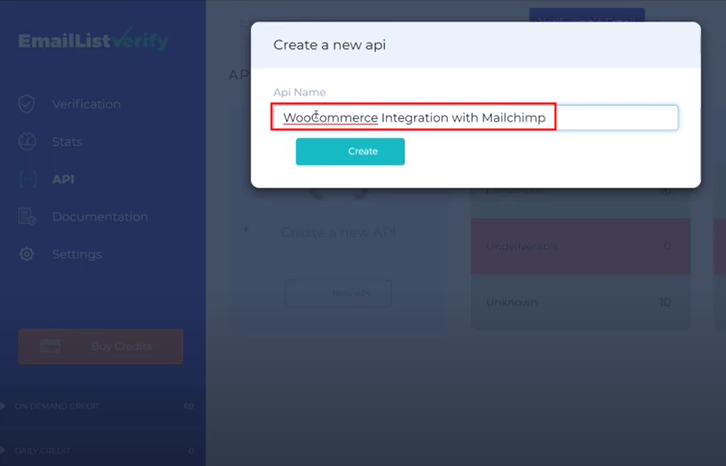
(d) Name the API

Name the API

Now, name your API key according to your needs, and then click on the “Create” button.

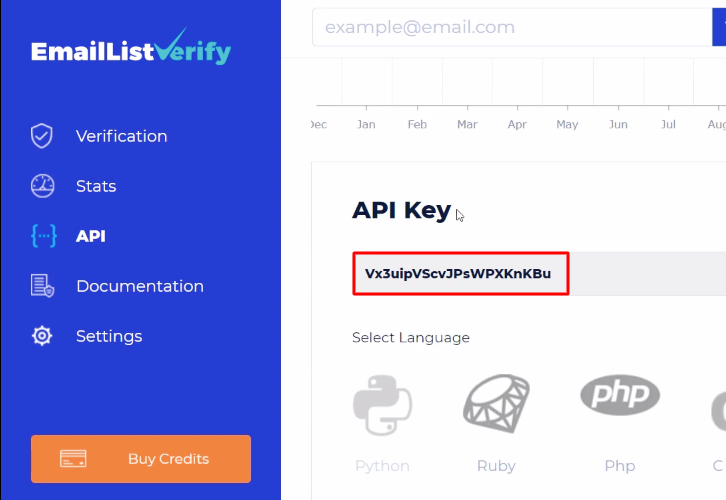
(e) Copy the API Key

Copy API Key EmailListVerify

Simply copy the given API key to move forward.

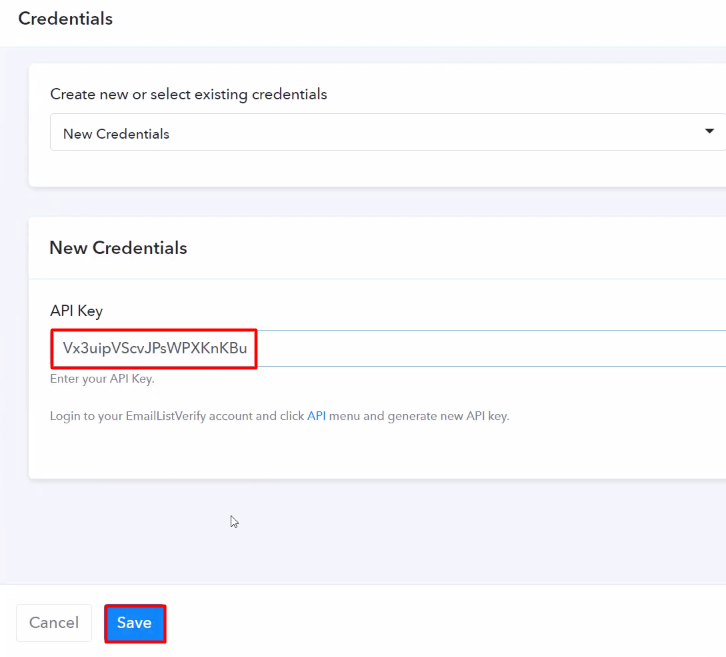
(f) Paste the API Key

Paste the API Key EmailListVerify

Next, paste the copied API key in the Pabbly Connect dashboard and then hit the “Save” button.

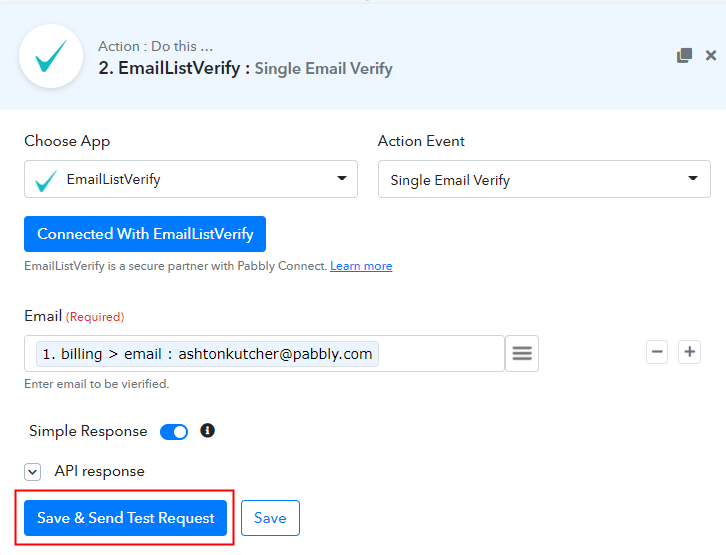
(g) Save & Send Test Request

Save & Send Test Request

After connecting with your EmailListVerify account, now map the customer’s email address and hit the “Save & Send Test Request” button to verify the email ID.

(h) Save the API Response

Save the API Response

Here, you can see that the email address is valid, so hit the “Save” button to save the response.

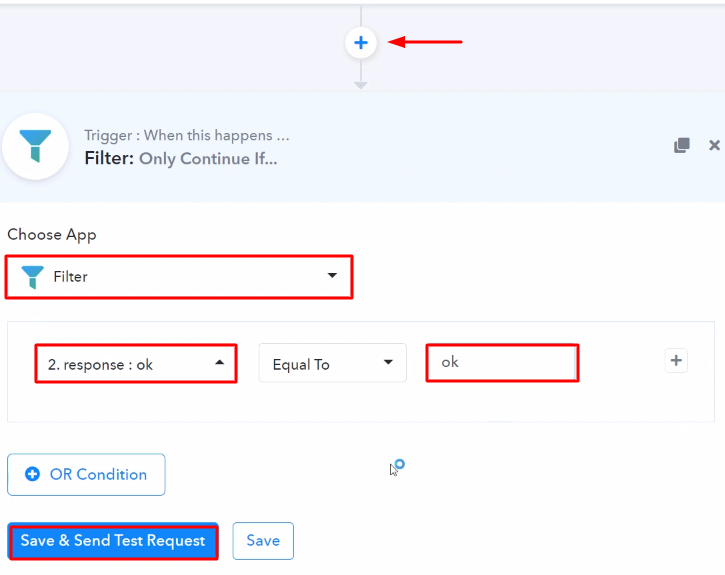
(i) Set the Filter

Add Filter

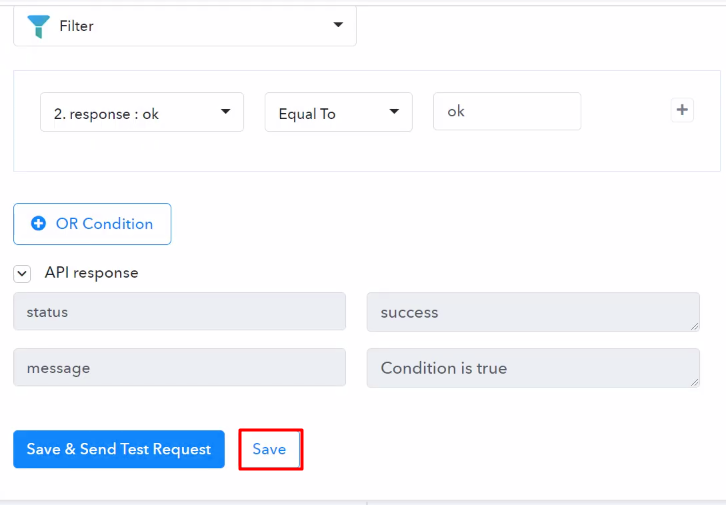
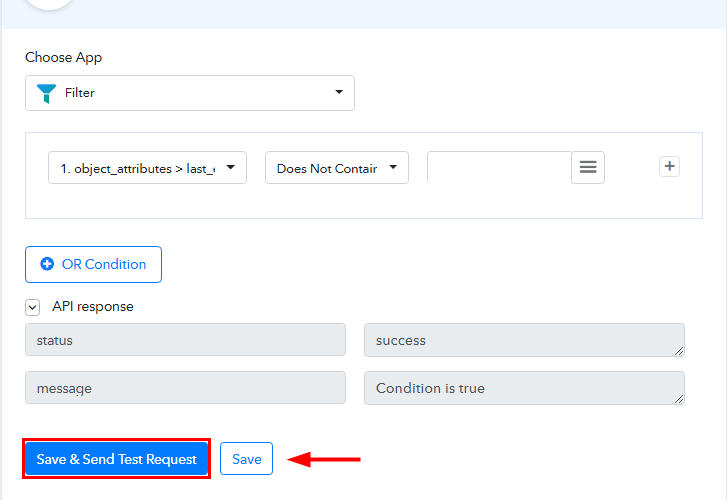
Next, we will add the “Filter” to check if this email ID is working or not. Click on the “+” button, select the “Filter” then select “Response: ok”. After making all these changes, hit the “Save & Send Test Request” button.

(j) Save the API Response

Save the API Response

Here, we can see that the email ID is valid and in working condition. Click the “Save” button.

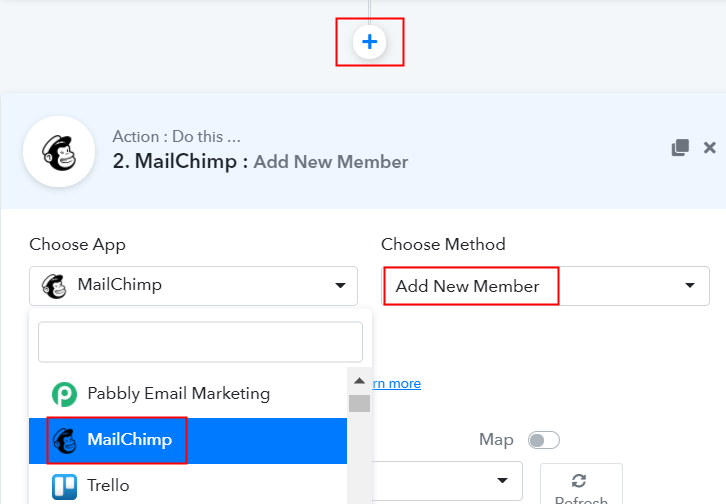
(k) Select Application you Want to Integrate

Select MailChimp

In addition, press the + icon to add an action to the trigger. Here we can pick “MailChimp” from the drop-down. Then choose the method “Add New Member”.

(l) Click the Connect Button

Click the Connect Button

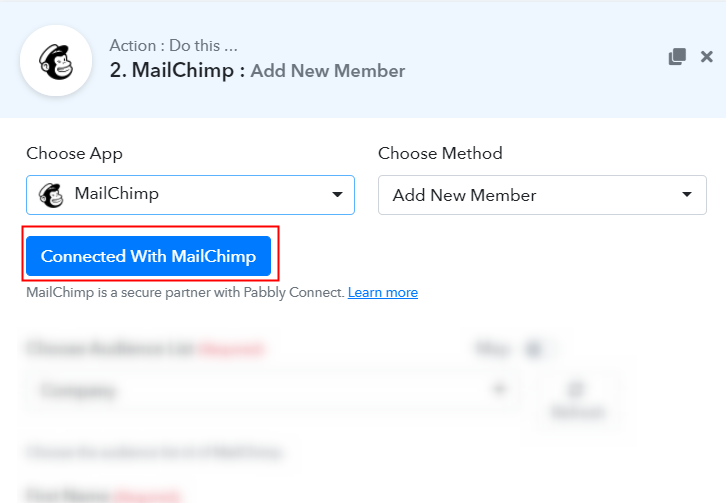
Tap on the “Connected with MailChimp” button after making all the necessary adjustments. In addition, the permission window will open for which you have to log in to your MailChimp account.

Step 9: Connecting MailChimp to Pabbly Connect

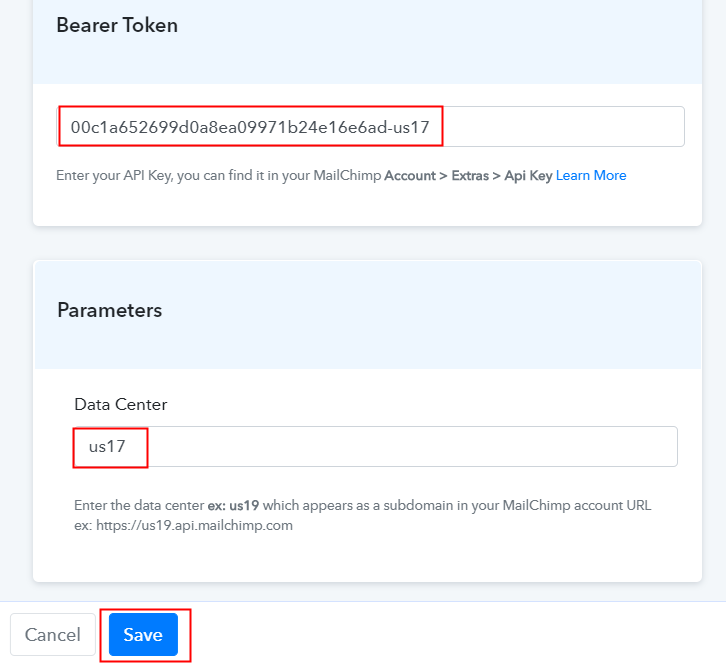
To connect WooCommerce to MailChimp, you need to paste the “Bearer Token” for which you have to log in to your MailChimp account.

(a) Click on MailChimp Account Settings

Click on MailChimp Account Settings

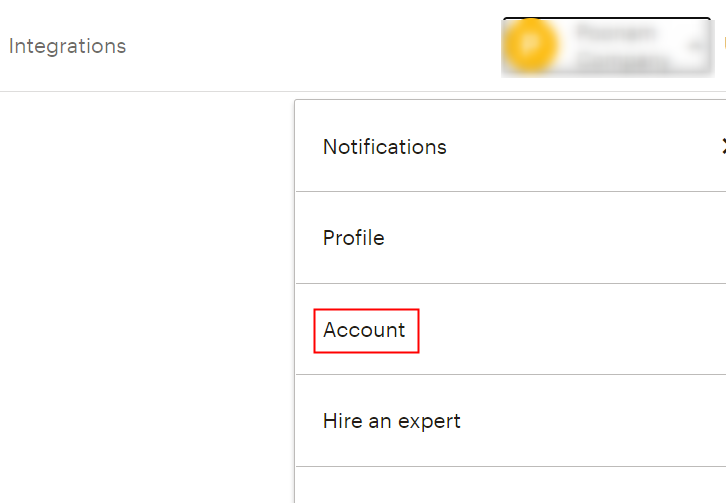
After logging in, press the ‘Account’ button on the bottom of the dashboard.

(b) Move to Extras

Move to Extras

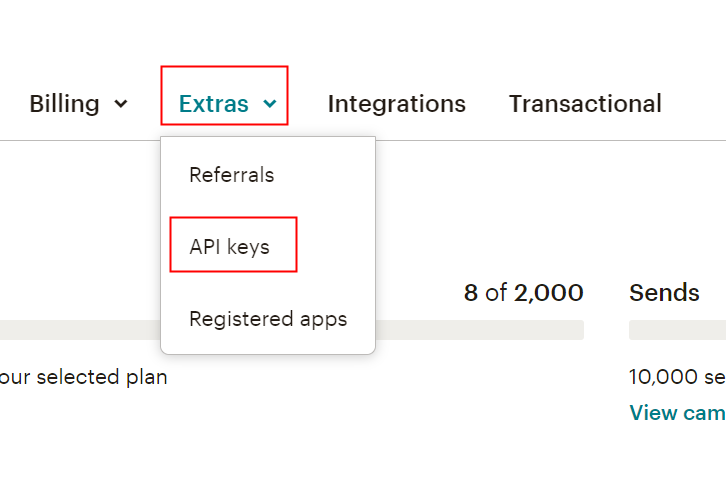
The new window will open when you click on ‘Account’. You’ll see an “Extras” option there, just click on it. Then, click on the option for “API Keys”.

(c) Create a Key

Create a Key

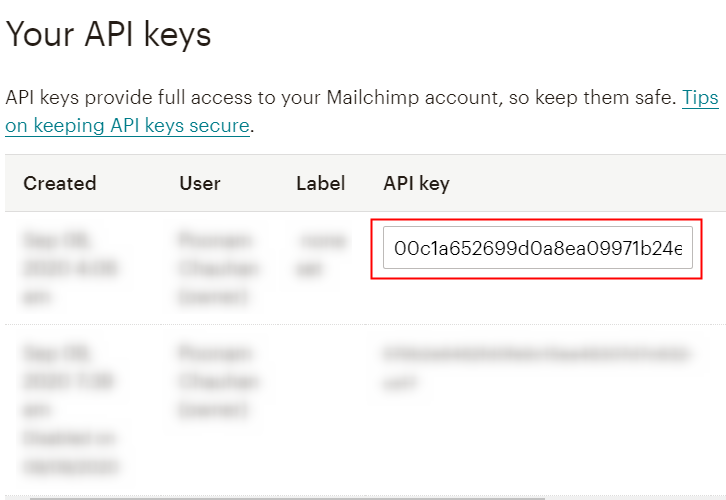
It will generate a key as soon as you press the “Create a Key” button. Just copy it.

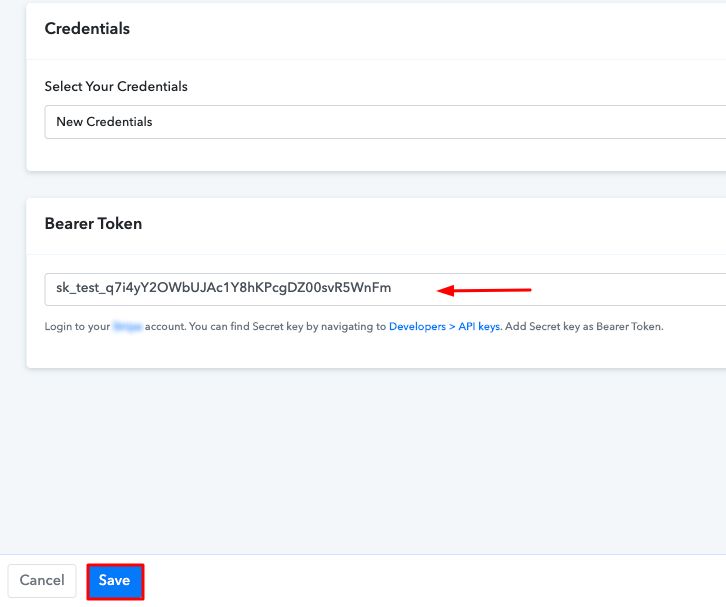
(d) Fill API Key

Fill API Key

In the bearer token option, just paste the API Key and define the MailChimp Id that appears in the Data Center section at the beginning of your MailChimp URL. After all, this is assured, press the “Save” button.

(e) Map Field Data

Map Field Data

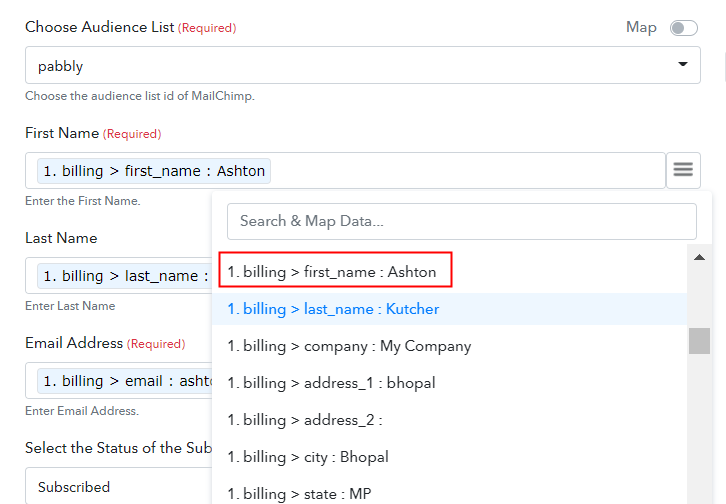
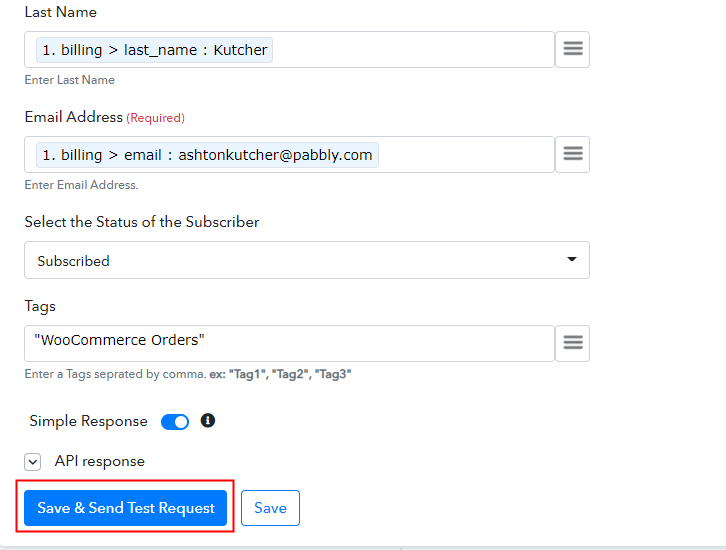
Now the app has already fetched the audience list as you see it. Just map the appropriate field from the drop-down region, such as the email field, select the email option, and select the name option for the name field. Add tags too.

(f) Save and Send Test Request

Save and Send Test Request

Subsequently, after filling in all the details, save the setting and then “Send Test Request” to test the WooCommerce and MailChimp integration.

Step 10: Check Response in MailChimp Dashboard

Check Response in MailChimp Dashboard

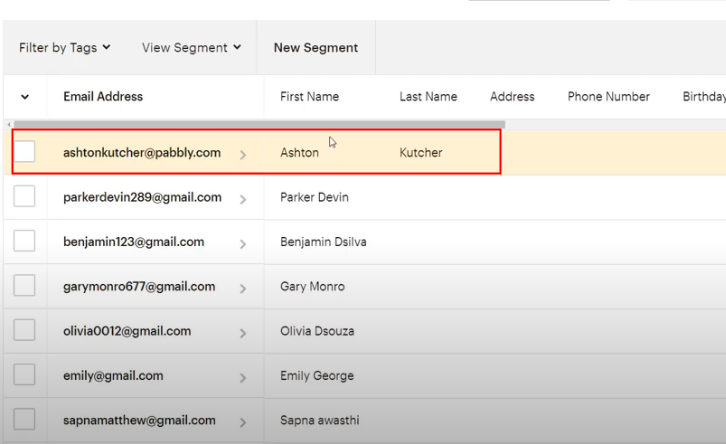
Finally, when you check the  Audience segment of MailChimp, your response will appear there.

Conclusion –

This is it! Here we have explained the step-by-step procedure of “How to Add MailChimp Member by Verifying WooCommerce Order Email”. We know how daunting a method of integrating two apps can be. This is why people are looking for sources that will support them. And, believe us, Pabbly Connect, which doesn’t put a hole in your wallet, is one of the best Zapier alternatives available on the market. Even in its free trial, you will get access to everything.

All right, what’s stopping you now! Go and catch your deal by signing up for a free account.

You May Also Like to Read –
How to Create ClickUp Task from New GitLab Issue

Create ClickUp Task from New GitLab Issue

Are you still looking for a way to create ClickUp task from new GitLab issue automatically? If yes, then follow this blog as here we will provide you to the step-by-step procedure to integrate GitLab and ClickUp using Pabbly Connect.

Create ClickUp Task from New GitLab Issue

Basically, Pabbly Connect is an integration & automation tool that lets you share data from one application to another in real-time.

The plus point is, you don’t need to have any coding skills & even beginners can use it efficiently. Besides, this will be merely a one-time set-up and after that Pabbly Connect will take care of the rest.

Why Choose This Method Of Integration?

In contrast with other integration services-

  • Pabbly Connect does not charge you for its in-built apps like filters, Iterator, Router, Data transformer, and more
  • Create “Unlimited Workflows” and smoothly define multiple tasks for each action
  • As compared to other services which offer 750 tasks at $24.99, Pabbly Connect offers 50000 tasks in the starter plan of $29 itself
  • Unlike Zapier, there’s no restriction on features. Get access to advanced features even in the basic plan
  • Try before you buy! Before spending your money, you can actually signup & try out the working of Pabbly Connect for FREE

Sign Up To Pabbly Connect  

Although, before integration, let’s learn a little about the services. So, GitLab is an open-source code repository and collaborative software development platform for large DevOps and DevSecOps projects and it is free for individuals also. On the other hand, ClickUp is a cloud-based collaboration and project management tool that allows you to manage your projects, people, etc in one place.

Consequently, there is no direct integration between GitLab and ClickUp. Therefore, to create an integration between both of this software we will be going to use Pabbly Connect.

Once, you set-up this workflow, whenever a new issue is created in GitLab then automatically create a task in ClickUp. Moreover, we have also linked a video for you to know more about this integration.

Additionally, you can visit Marketplace for more workflows and apps. And, if you want to get started with this integration instantly then simply click on the ‘Use Workflow’ button below.

Create ClickUp Task from New GitLab Issue Workflow

So, buckle up as we’re going to discover the GitLab and ClickUp integration.

Step 1: Sign up to Pabbly Connect

Sign Up

Visit the official website of Pabbly Connect to initiate the procedure to create ClickUp task from new GitLab issue automatically. Then, hit the ‘Sign-Up Free‘ button available. Either use your existing Gmail account or manually fill the registration form to signup.

Try Pabbly Connect for FREE

Step 2: Access Pabbly Connect

Select Connect

After that, strike the ‘Access Now’ button of the software ‘Connect’ within the Pabbly Connect applications.

Step 3: Workflow for GitLab with ClickUp Integration

(a) Start with a New Workflow

Create New Workflow

Start with creating a workflow for your project by clicking on the ‘Create Workflow’ button.

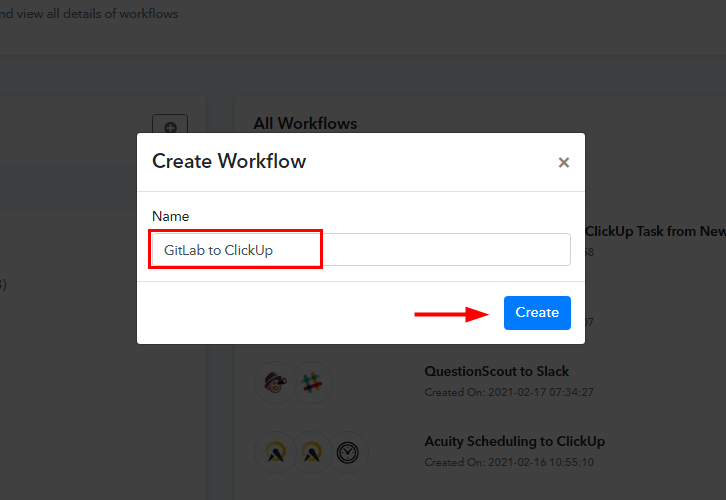
(b) Name the Workflow

GitLab to ClickUp Integrations

Now, you need to name the workflow just like in the above-shown image. I named the workflow ‘GitLab to ClickUp’, you can obviously name the workflow as per your requirements and needs.

Step 4: Setting Triggers for GitLab to ClickUp Integrations

After creating a workflow, you will have to select the application you want to integrate. With Pabbly Connect, you can integrate numerous applications for free, so rush and sign up for your free account now.

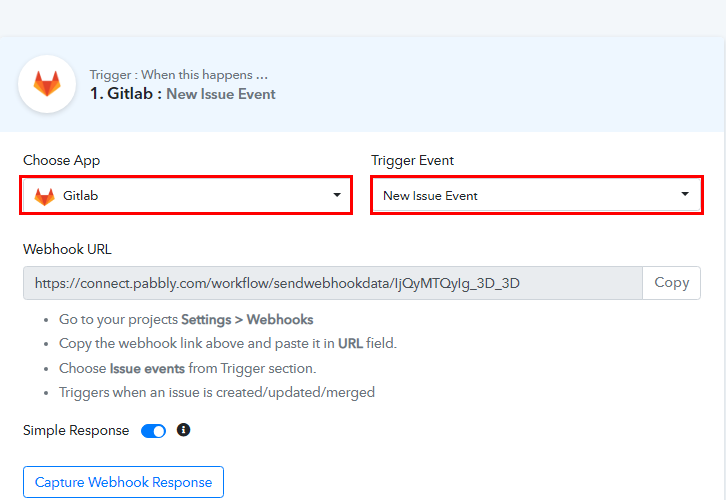
(a) Select Application you want to Integrate

Select GitLab for GitLab to ClickUp Integrations

Now, you have to select the application that you want to integrate. In this case, we are choosing ‘GitLab’ for integration and select ‘New Issue Event’ in the method section.

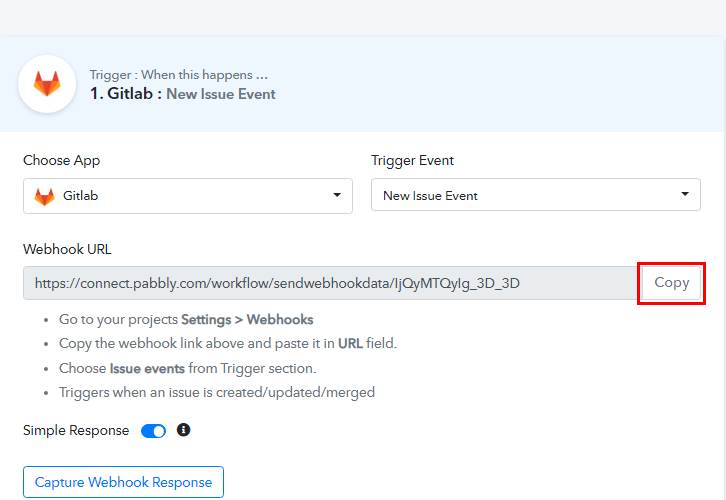
(b) Copy the Webhook URL

Copy Webhook URL

After selecting the application, you have to copy the webhook URL and paste it inside GitLab. For that, you have to log in to your GitLab account. Also, read the instructions below to easily connect GitLab to Pabbly Connect.

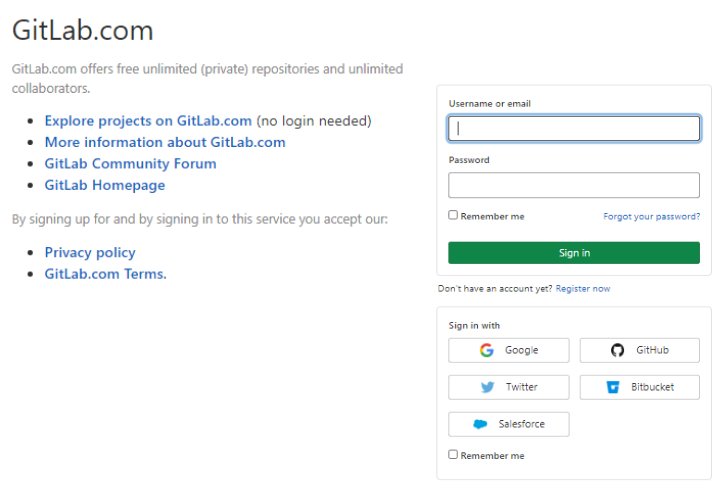
(c) Login to GitLab

Login to GitLab for GitLab to ClickUp Integrations

Further, login to your GitLab account by filling up your credentials or you can sign in with your other accounts also.

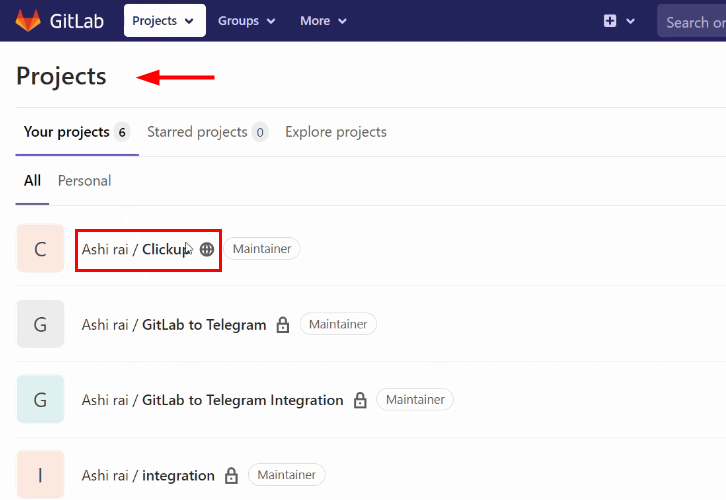
(d) Create/Select a Project

Select a Project

Next, once you are logging to your GitLab account, select one of your existing projects. If you want, you can create a new one. Here, we are choosing one of our existing projects.

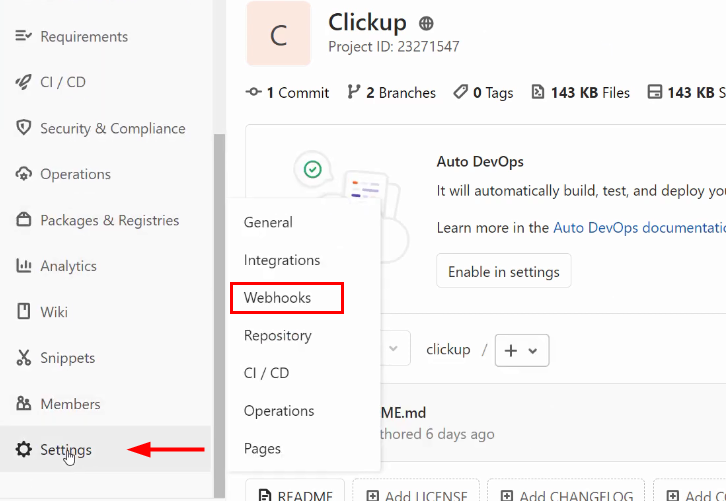
(e) Go to Settings

Go to Settings GitLab

Promptly, in your project from the left-sidebar click on the ‘Settings’ menu and then select ‘Webhook’ section.

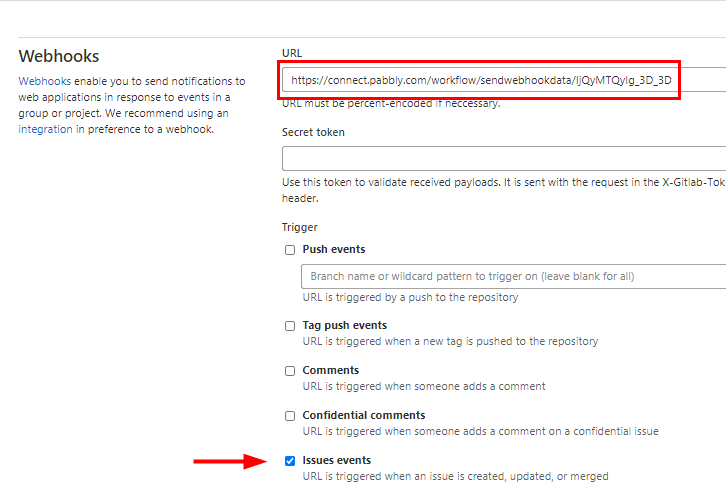
(f) Paste the Webhook URL

Paste Webhook URL

Now, paste the copied ‘Webhook URL’ in the URL section and select Trigger as ‘Issues Events’ only.

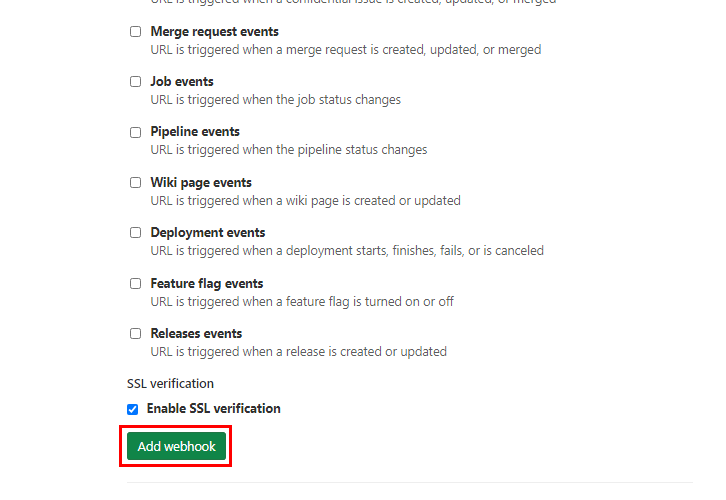
(g) Click on Add Webhook

Click on Add Webhook

After this, hit the ‘Add Webhook’ button to save the settings for webhook.

Step 5: Create a New Issue

To check if this integration works or not, we have to create an issue for our project.

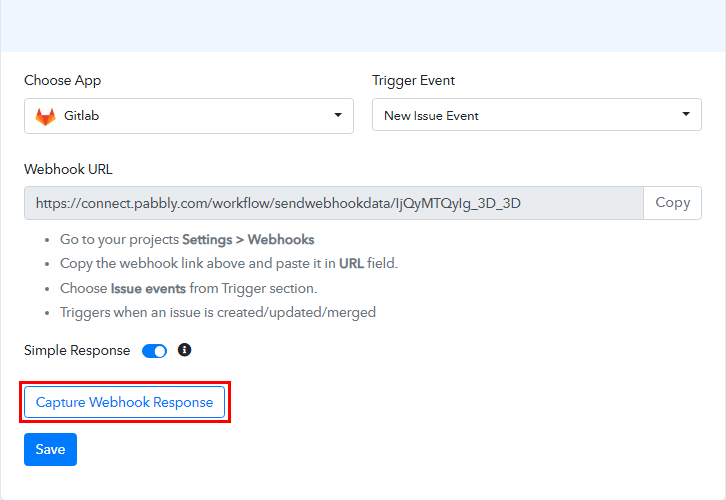
(a) Capture Webhook Response

Capture Webhook Response for GitLab to ClickUp Integrations

Return to Pabbly Connect window and click on ‘Capture Webhook Response’ button to get the webhook response.

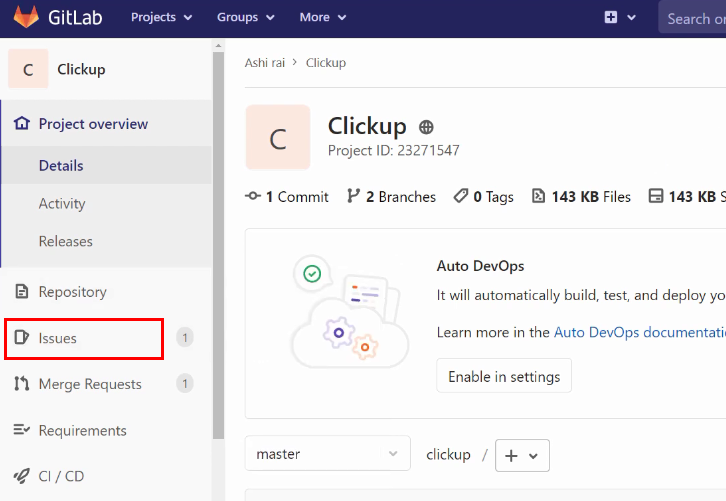
(b) Go to Issues

Go to Issues GitLab

Once you click on the ‘Capture Webhook Response’ button, head back to your GitLab project page and click on ‘Issues’ menu from left-sidebar.

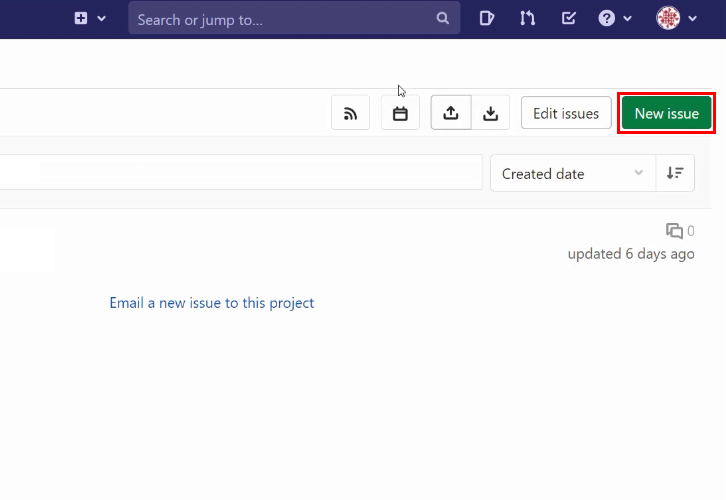
(c) Click on New Issue

Click on New Issue

Now, click on the ‘New Issue’ button.

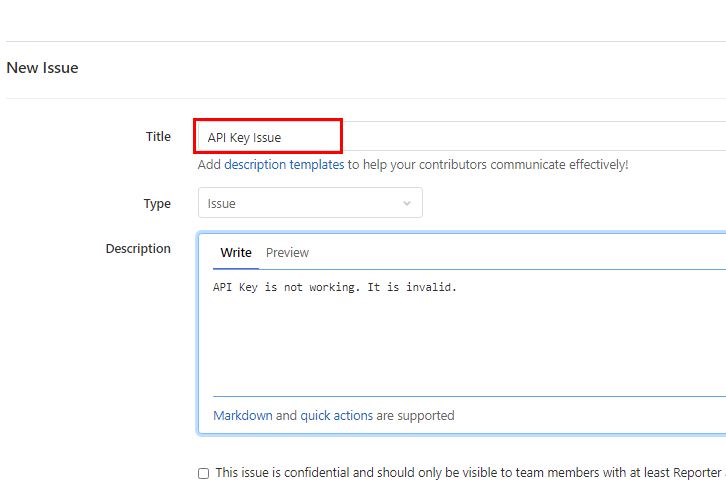
(d) Enter Issue Details

Enter Issue Details for GitLab to ClickUp Integrations

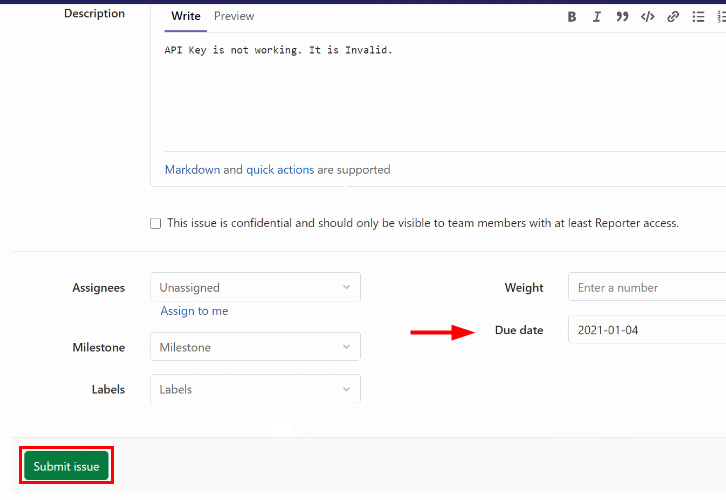
Next, enter the issue details like title, type, description, etc.

(e) Submit Issue

Submit Issue for GitLab to ClickUp Integrations

Further, mention a due date and at last click on ‘Submit Issue’ button.

(f) Test the Response

Test the Response for GitLab to ClickUp Integrations

Go back to the Pabbly Connect dashboard to see the webhook response for the new issue. Then, click on the ‘Save’ button.

Step 6: Setting Filters for GitLab to ClickUp Integrations

As, we already read the instructions underneath webhook URL that trigger get the response for three conditions i.e. created/updated/merged of an issue but we want the response only when the new issue is created. Therefore, we need to integrate ‘Filter’ in action step.

(a) Select Application you Want to Integrate

Select Filter for GitLab to ClickUp Integrations

Now, click on the plus (+) button and from the choose app select ‘Filter’.

(b) Setting Conditions

Setting Conditions for GitLab to ClickUp Integrations

Promptly, set the condition for filter. Select ‘last_edited_at’ in the first column and make condition ‘Does Not Contain String’.

(c) Save and Send Test Request

Save and Send Test Request

Once you are done setting the conditions, click on the ‘Save and Send Test Request’ button and you will get the API response, i.e. the condition is true. At last, click on the ‘Save’ button.

Step 7: Setting Date/Time Formatter for GitLab to ClickUp Integrations

Since, the start date is not in the correct format. So, we need to integrate Date/Time Formatter in the workflow.

(a) Select Application to Format Date

Select Date/Time Formatter for GitLab to ClickUp Integrations

Next, in order to format the date, simply tap on the (+) button and then, select Date/Time Formatter’ in choose app, and in the action event select ‘Format Date Only’.

(b) Connect with Date/Time Formatter

Connect Date/Time Formatter

Promptly, click on the ‘Connect With Date/Time Formatter’ button.

(c) Map the Fields

Map the Fields

Now, you have to map the field to make the date in a proper format. In the Date field, map ‘created_at’ (i.e. start date), and from ‘To Format’ field choose ‘Timestamp’.

(d) Save and Sent Test Request

Save and Send Test Request for GitLab to ClickUp Integrations

Once you are done mapping all the details, hit the ‘Save and Sent Request’ to get the API response. Finally, ‘Save’ the response.

Step 8: Setting Number Formatter for GitLab to ClickUp Integrations

Subsequently, as we can see in the above response, that the start date is still not in the correct format (milliseconds). Therefore, we have to add ‘Number Formatter’ in the workflow.

(a) Select Application to Format Number

Select Number Formatter for GitLab to ClickUp Integrations

Now, to format the date, just hit the (+) button and then, select Number Formatter’ in choose app, and in the action event select ‘Perform Math Operation’.

(b) Connect with Number Formatter

Connect with Number Formatter

Once you select the application, press the ‘Connect With Number Formatter’ button.

(c) Map the Fields

Map the Fields

Later on, in the ‘Numbers’ field map the result which you got from Date/Time Formatter response (along with this enter ‘1000’ with a comma) and select Operation as ‘Multiply’.

(d) Save and Sent Test Request

Save and Send Test Request for GitLab to ClickUp Integrations

Once you are done mapping all the details, hit the ‘Save and Sent Test Request’. Soon, you will get the API response and the start date is in the proper format now. Lastly, hit the ‘Save’ button.

Since, we have corrected the start date format for the integration. Now, for the due date, just follow the above same steps, but simply map the ‘due_date’ in place of ‘created_at’ in Date/Time Formatter and in the Number Formatter select the result correspondingly.

Step 9: Setting Action for GitLab to ClickUp Integrations

Promptly, in order to create a task in the ClickUp account, you have to choose an action for your integration.

(a) Select Application you Want to Integrate

Select ClickUp for GitLab to ClickUp Integrations

Next, click on the ‘+’ icon to add an action for your trigger. Here we are going to select ‘ClickUp’ from the drop-down and choose method as ‘Create Task’.

(b) Click on Connect Button

Connect with ClickUp for Acuity Scheduling to ClickUp Integration

Further, click on the ‘Connect with ClickUp’ button to connect ClickUp to Pabbly Connect.

(c) Login to ClickUp Account

Login to ClickUp for GitLab to ClickUp Integrations

Now, login to your ClickUp account by filling in your credentials.

(d) Click on ClickUp Profile Icon

Click on ClickUp Profile Icon

Once you are logging to your ClickUp account, at the bottom of the ClickUp dashboard, you will see the Profile option, just tap on it.

(e) Click on Apps

Go to Apps Options

After pressing the profile option, it will open up different options, choose ‘Apps’ from it.

(f) Copy the API Token

Copy API Token

After that, copy the ‘API Token’ as shown in above image.

(g) Paste the API Key

Paste API Token for GitLab to ClickUp Integrations

Promptly, paste the copied API Token in Pabbly Connect window, and hit the ‘Save’ button.

(h) Map the Fields

Map the Fields

Subsequently, map all the data in their respective fields such as task name, description, tags, etc.

(i) Save and Send Test Request

Save and Send Test Request for GitLab to ClickUp Integrations

Once you are done mapping all the fields, click on the ‘Save and Send Test Request’ button to get the API response. Finally, click on ‘Save’ button.

Step 10: Check Response in ClickUp Dashboard

Check Response for GitLab to ClickUp Integrations

Eventually, when you check your ClickUp dashboard, a new task has been created automatically for the newly created issue in GitLab. This is a one-time setup, to integrate GitLab and ClickUp.

Conclusion –
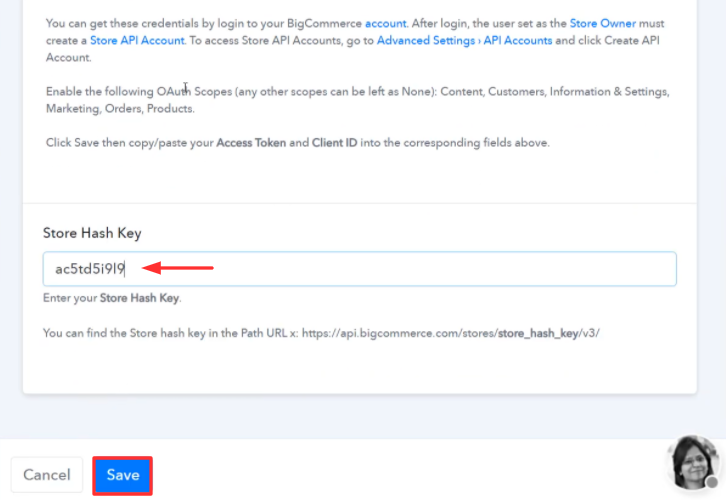
To sum up, this was all about ‘How to Create ClickUp Task from New GitLab Issue’. Consequently, after completing the step by step procedure, you will end up auto-creating ClickUp task for every new issue created for any project in GitLab.

However, now you can grab Pabbly Connect for FREE with all its premium features.

Also, do comment us your queries in the section given below.

You May Also Like to Read:

How to Connect Google Sheets to Bubble Apps

Connect Google Sheets to Bubble Apps

Are you stressing yourself to find a way to connect Google Sheets to Bubble apps automatically? If yes, then in this blog we will guide you to a step by step procedure to easily transfer data from Google Sheets to Bubble for free.

Connect Google Sheets to Bubble Apps

Pabbly Connect is an amazing integration and automation software, which allows you to integrate two or more applications to automate all the projects. You just have to do the integration once and then everything will be automatically managed by Pabbly Connect.

Why Choose This Method Of Integration?

In contrast with other integration services-

  • Pabbly Connect does not charge you for its in-built apps like filters, Iterator, Router, Data transformer, and more
  • Create “Unlimited Workflows” and smoothly define multiple tasks for each action
  • As compared to other services which offer 750 tasks at $24.99, Pabbly Connect offers 50000 tasks in the starter plan of $29 itself
  • Unlike Zapier, there’s no restriction on features. Get access to advanced features even in the basic plan
  • Try before you buy! Before spending your money, you can actually signup & try out the working of Pabbly Connect for FREE

Sign Up To Pabbly Connect

Before we bounce straight into the integration process, let us get a smidgen of information about both services. Well, Google Sheets is a free web-based tool that allows users to create and format spreadsheets while collaborating with other users in real-time. Whereas, Bubble is a no-code app building platform, designed to help you build software and applications without programming.

Although, there is some kind of native integration between Google Sheets and Bubble but that is limited. Hence, we will be going to use Pabbly Connect to integrate Google Sheets and Bubble.

By integrating Google Sheets and Bubble, whenever a new row is added in Google Sheets subsequently creates a data thing in Bubble. Additionally, we have attached a video tutorial of this integration so that you can use the workflow more effectively.

Moreover, you will be able to try out the workflow of this integration for free as well, simply hit the ‘Use Workflow’ button to start with a ready-made template. Plus, you can visit Marketplace to discover more integrations and workflows.

Connect Google Sheets to Bubble Apps Workflow

Now, let’s dig into the step-by-step procedure to integrate Google Sheets and Bubble automatically.

Step 1: Sign up to Pabbly Connect

Sign Up

Kick-off the process to connect Google Sheets to Bubble apps by clicking on the ‘Sign Up Free’ icon on the Pabbly Connect dashboard. Subsequently, either fill-up the details manually or sign up using Gmail credentials.

Try Pabbly Connect for FREE

Step 2: Access Pabbly Connect

Select Connect

After signing up successfully, click the ‘Access Now’ button of the software ‘Connect’ within Pabbly application.

Step 3: Workflow for Google Sheets with Bubble Integration

(a) Start with a New Workflow

Create New Workflow

Start with creating a workflow to connect Google Sheets to Bubble apps by striking the ‘Create Workflow’ button.

(b) Name the Workflow

Google Sheets to Bubble.io Integration

Continue the process by naming the workflow according to the use case. For this integration, we named the workflow ‘Google Sheets to Bubble’. Finally, press the ‘Create’ button.

Step 4: Setting Triggers for Google Sheets to Bubble Integration

After naming your workflow, you have to select the application you want to integrate. Sign up for a free account now to integrate thousands of apps.

(a) Select Application you want to Integrate

Select Google Sheets for Google Sheets to Bubble Integration

In this case, we are choosing ‘Google Sheets’ for integration and select ‘New Spreadsheet Row’ in the choose method section.

(b) Copy the Webhook URL

Copy Webhook URL

After selecting the application, now you have to copy the webhook URL just like in the above-shown image to take further the integration process.

Step 5: Connecting Google Sheets to Pabbly Connect

To connect with Google Sheets, you have to paste the copied Webhook URL in your Google Sheets add-ons section.

(a) Capture Webhook Response

Capture Webhook Response for Google Sheets to Bubble Integration

Promptly, first you have to click on the ‘Capture Webhook Response’ button to capture the data from Google Sheets.

(b) Add Data to Google Sheets

Add Data to Google Sheets

Next, go to your Google Sheets and start adding the data in row that you want to transfer to Bubble.

(c) Click on Add-ons

Click on Add-ons

After adding the data in row, click on the ‘Add-ons’ menu, and then click on the ‘Get add-ons’ button. Promptly, ‘Google Workspace Marketplace’ will open up.

(d) Install Pabbly Connect Webhook

Install Pabbly Connect Webhook

Here search for ‘Pabbly Connect Webhook’ from the search bar and then simply click on ‘Install’ button to install the add-on to your Google Sheets.

(e) Go to Initial Setup

Go to Initial Setup

As soon as you install the add-on, refresh the tab. After that, click on ‘Add-ons’ menu and ‘Pabbly Connect Webhook’ will appear there. Simply, click on it and then select ‘Initial Setup’ to paste the Webhook URL.

(f) Paste the Webhook URL

Paste Webhook URL

Subsequently, a window will pop-up, here paste the Webhook URL and mention the last data entry column in ‘Trigger Column’ field. In the end, hit the ‘Send Test’ button and then click on ‘Submit’ button.

(g) Click on Send On Event

Click Send on Event

This is an additional step, to ensure that every time a new data is added to the sheet then it will automatically trigger the webhook. For this, you have to again go to ‘Pabbly Connect Webhook’ section from ‘Add-ons’ menu and then click on ‘Send on Event’ tab.

Step 6: Test the Response in Pabbly Connect Dashboard

Test the Response for Google Sheets to Bubble Integration

Forthwith, as you click on the ‘Send Test’ in Google Sheet, the entry will appear on the Pabbly Connect dashboard. Then, click on the ‘Save’ button.

Step 7: Setting Action for Google Sheets to Bubble Integration

In this step, we will be adding an action for our trigger to complete the integration process.

(a) Select Application you want to Integrate

Select Bubble for Google Sheets to Bubble Integration

Now, click on the + button below and choose ‘Bubble’ and in the method section select ‘Create a Thing’.

(b) Click on Connect Button

Connect with Bubble for Google Sheets to Bubble Integration

After choosing the application click on the ‘Connect with Bubble’ button to move forward.

Step 8: Connecting Bubble to Pabbly Connect

To connect Bubble with Pabbly Connect, you need to paste the Token and enter Application Name in the software. For that, you need to log into your Bubble account.

(a) Select an App

Select an App for Google Sheets to Bubble Integration

Once you logging to your Bubble account, you will see all your apps in the dashboard. Select any one of them.

(b) Go to Settings

Go to Settings

Next, from the left sidebar click on the ‘Settings’ option and then click on ‘API’ section.

(c) Generate New API Token

Generate New API Token

In the API section, tick mark all the checkboxes under ‘Public API endpoints’ and also click on the ‘Generate a new API Token’ button.

(d) Copy the API Token

Copy API Token Bubble

After that, a new ‘API Token’ has been generated. Assign a name to it and copy the ‘Private Key’.

(e) Paste the API Token

Paste API Token for Google Sheets to Bubble Integration

Subsequently, paste the copied private key in ‘API Token’ section in Pabbly Connect window and also add ‘Application Name’ from ‘Workflow API root URL’ section. At last, click on the ‘Save’ button.

(f) Map the Fields

Map the Fields for Google Sheets to Bubble Integration

Now, you have to map the data to their respective fields such as data type, field name and field value.

(g) Save and Send Test Request

Save and Send Test Request

Once you are done mapping all the field data, click on ‘Save and Send Test Request’ button.

(h) Check and Save Response

Check and Save Response

Promptly, you will get the API response and the integration of Google Sheets and Bubble is successfully set-up.

Step 9: Check Response in Bubble Dashboard

Check Response in Bubble for Google Sheets to Bubble Integration

Eventually, when you check your Bubble dashboard a new data thing has been created from the Google Sheets row.

Conclusion –

Hence, now you know the entire approach on ‘How to Connect Google Sheets to Bubble Apps’ using Pabbly Connect. All you have to do is follow the above-mentioned steps & you can easily integrate Google Sheets to Bubble.

With the help of Pabbly Connect, you can easily connect unlimited premium apps. So, don’t wait anymore. Go and get your access by signing up for a free account.

In case of any doubts or suggestions, please drop your comments below.

You May Also Like to Read:

How to Send Notification to Team for New Instagram Post

How to Send Notification to Team for New Instagram Post

Looking for the free and rapid way to send notification to team for new Instagram post automatically? If yes, then we have the best solution for you named Pabbly Connect. And, in this blog, we will be integrating Instagram with Slack via Pabbly Connect to send the media.

Primarily, Pabbly Connect is an integration and automation software that lets you migrate data from one app to another automatically in real-time.

How to Send Notification to Team for New Instagram Post

Sometimes we want to send messages to our teams about the new posts on Instagram automatically, and to make this wish come true Pabbly Connect is here.

But let’s not jump straight to the integration process, let’s discuss a tiny bit about both the services. So, Instagram is a social media platform that emphasizes photo and video sharing via its mobile app. Whereas, Slack is a chatroom application for your whole team to communicate both as a group and in personal one-on-one discussions.

Why Choose This Method Of Integration?

In contrast with other integration services-

  • Pabbly Connect does not charge you for its in-built apps like filters, Iterator, Router, Data transformer, and more
  • Create “Unlimited Workflows” and smoothly define multiple tasks for each action
  • As compared to other services which offer 750 tasks at $24.99, Pabbly Connect offers 50000 tasks in the starter plan of $29 itself
  • Unlike Zapier, there’s no restriction on features. Get access to advanced features even in the basic plan
  • Try before you buy! Before spending your money, you can actually signup & try out the working of Pabbly Connect for FREE

Sign Up To Pabbly Connect 

After integrating these applications, whenever there will be any new image posted on your Instagram account, the message will be automatically delivered about the post in the Slack channel in real-time. You can also refer to the below video to understand the usage of Pabbly Connect-

However, there is no direct integration possible for these two services yet. So, we are going to use Pabbly Connect to make this integration possible.

Using this software, you can effortlessly share data within multiple premium services easily. More importantly, it won’t need any coding skills & even a novice can use it effectively. Moreover, this would be just a one-time setup. After that, the data will automatically be transferred in real-time.

Furthermore, we’ve attached a template for this integration to help you get started more quickly. You can tap the image below to begin your automation journey. Also, you can go to the Marketplace & look for more apps/integrations.

How

Now, without further ado, let’s move according to plan & follow the step by step procedure to integrate Instagram and Slack.

Step 1: Sign up to Pabbly Connect

Sign Up

Kick-off the process to send notification to team for new Instagram post by clicking on the ‘Sign Up Free’ button on the Pabbly Connect dashboard. Subsequently, either fill-up all the details manually or sign up using Gmail credentials.

Try Pabbly Connect for FREE

Step 2: Access Pabbly Connect

Select Connect

Next, after logging into the account, click on the ‘Access Now’ button as shown in the above image.

Step 3: Workflow for Instagram to Slack Integration

(a) Start with a New Workflow

Create New Workflow

Start with creating a workflow for your project by clicking on the ‘Create Workflow’ button.

(b) Name the Workflow

Name the Workflow

Now, you need to name the workflow just like in the above-shown image. I named the workflow ‘Instagram to Slack’, you can obviously name the workflow as per your requirements.

Step 4: Setting Trigger for Instagram to Slack Integration

As soon as you are done naming your workflow, you will have to select the application you want to integrate. Pabbly Connect allows you to connect unlimited premium apps, create your free account now.

(a) Select Application you Want to Integrate

Select Instagram

Now, you have to select the application that you want to integrate. In this case, we are choosing ‘Instagram’ for integration. In the method section, select ‘New Media Posted in My Account’.

(b) Click Connect Button

Connect with Instagram

The next step is to click on the ‘Connect with Instagram’ button on the dashboard just like in the above-shown image.

Step 5: Connecting Instagram to Pabbly Connect

Authorize Application Instagram

To connect Instagram with Pabbly Connect, you have to authorize the application. For that, you need to log in to your Instagram account.

When you click on the connect button, a window will slide in from the right, here again, you have to click on the ‘Connect with Instagram’ button and grant the permission to integrate Instagram with Pabbly Connect.

Step 6: Post an Image

To check if the integration is capturing data or not, we will post an image in Instagram.

(a) Publish a Sample Image

Post Image Instagram

Here, we have posted a random image of a watch on our Instagram account. You can post anything according to your needs.

(b) Save & Send Test Request

Send Test Request Instagram

Now, after posting the image, click the ‘Save & Send Test Request’ button in Pabbly Connect to capture the data.

Step 7: Test the Response in Pabbly Connect Dashboard

Save API Response Instagram

Once you click on the ‘Save & Send Test Request’ in Pabbly Connect, the post info will appear on the Pabbly Connect dashboard. Then, click on the ‘Save’ button.

Step 8: Setting Action for Instagram to Slack Integration

To make this Instagram-Slack integration work, you have to choose an action for your trigger.

(a) Select Application you Want to Integrate

Select Slack

Now in this step, click on the ‘+’ button below and choose the application that you want to integrate. Here we will choose ‘Slack’ to integrate and in the method section select ‘Send Channel Message (Without Image)’.

(b) Click the Connect Button

Connect with Slack

After choosing the application click on the ‘Connect with Slack’ button to move forward.

Step 9: Connecting Slack to Pabbly Connect

To connect Slack to Pabbly Connect, you have to authenticate the application. For this, you have to log in to your Slack account.

(a) Authorize Application

Authorize Application Slack

Next, to authenticate your Slack account, you need to again click on the ‘Connect with Slack’ button and then grant the permission to connect Pabbly Connect and Slack.

(b) Map the Fields

Map the Fields

After connecting with your Slack account, map all the fields quickly like the channel, message, etc.

(c) Save and Send Test Request

Send Test Request Slack

Once you are done adding up all field data click on the ‘Save & Send Test Request’ button.

Step 10: Check Response in Slack Dashboard

Check Response

Eventually, when you check your Slack dashboard, the message is delivered in the channel about the new Instagram post automatically.

Conclusion –
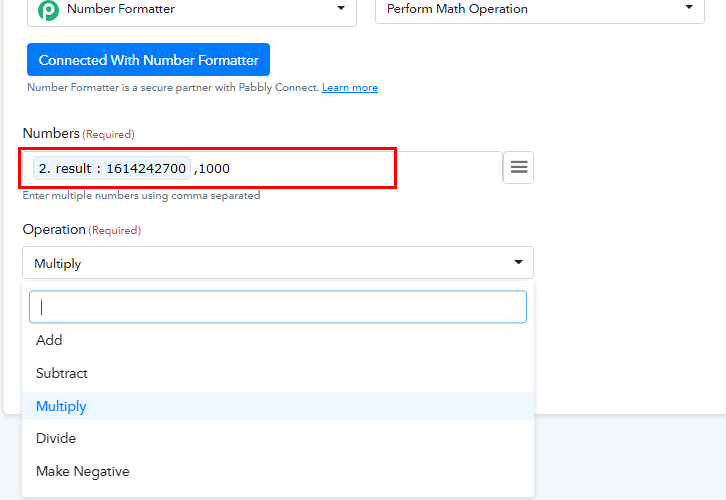
Winding up, now you know how to send notification to team for new Instagram post in real-time. This is a one-time process, which will liberate you from the physical work and everything will be managed by the online business automation tool i.e Pabbly Connect. Just follow the step by step procedure mentioned above and your Instagram to Slack integration is set. So, what’s stopping you now! Go and catch your deal by signing up for a free account.

You May Also Like To Read –