How to Create ActiveCampaign Contact from New BigCommerce Order

How to Create ActiveCampaign Contact from New BigCommerce Order

Are you aware that it is very easy to create ActiveCampaign contact from new BigCommerce order?  You must be doubting that. Well! It is like a walk in a park using Pabbly Connect.
How to Create ActiveCampaign Contact from New BigCommerce Order

Pabbly Connect is an integration and automation software that lets you connect countless premium applications for easy data transmission. The best thing about using the application is it requires zero coding skill to operate. Even in its free plan, you will get access to gifted features like path routers, filters, etc.

Why Choose This Method Of Integration?

In contrast with other integration services-

  • Pabbly Connect does not charge you for its in-built apps like filters, Iterator, Router, Data transformer, and more
  • Create “Unlimited Workflows” and smoothly define multiple tasks for each action
  • As compared to other services which offer 750 tasks at $24.99, Pabbly Connect offers 50000 tasks in the starter plan of $29 itself
  • Unlike Zapier, there’s no restriction on features. Get access to advanced features even in the basic plan
  • Try before you buy! Before spending your money, you can actually signup & try out the working of Pabbly Connect for FREE

Sign Up To Pabbly Connect 

Before jumping on to the integration process, let’s know a wee bit about the services used in this integration. BigCommerce is a leading eCommerce builder, providing extreme scalability for online stores. On the other hand, ActiveCampaign is a CRM tool that helps customers by automating marketing, sales, and support processes.

By connecting BigCommerce and Active Campaign, one can easily save order details as a subscriber in the Active Campaign. We have also attached a video for the same. Have a look at it.

Additionally, we have a template for this integration that can help you to commence your integration course in no time. Also, if you require support with any other integration, just go to Marketplace and look for the apps you use to start integration immediately. For now, tap on the image below to get started.

Clone Template BigCommerce and ActiveCampaign

Here in this article, we will learn the step-by-step procedure to integrate BigCommerce and ActiveCampaign.

So, let’s begin the process.

Step 1: Sign up to Pabbly Connect

Sign Up

Begin the process to create ActiveCampaign contact for the new BigCommerce order by pressing on the “Sign Up Free” icon on the Pabbly Connect home page. You can either manually fill-up all the details or sign up using your Gmail account.

Try Pabbly Connect for FREE

Step 2: Access Pabbly Connect

Select Connect

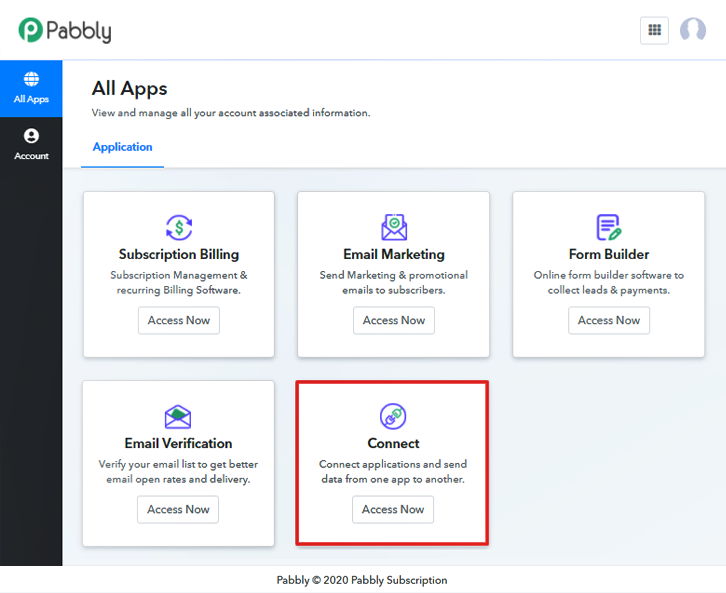
After logging into the account, press the “Access Now” button of the Connect section in the dashboard.

Step 3: Workflow for BigCommerce to ActiveCampaign Integration

(a) Start with a New Workflow
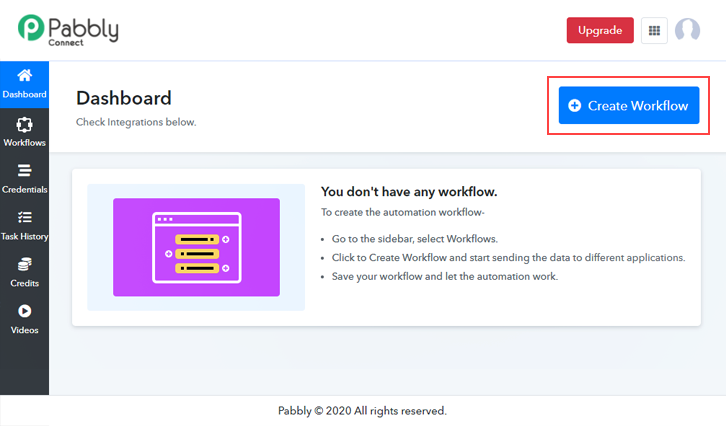
Create New Workflow

Begin with creating a workflow for your project by pressing the ‘Create Workflow’ button.

(b) Name the Workflow

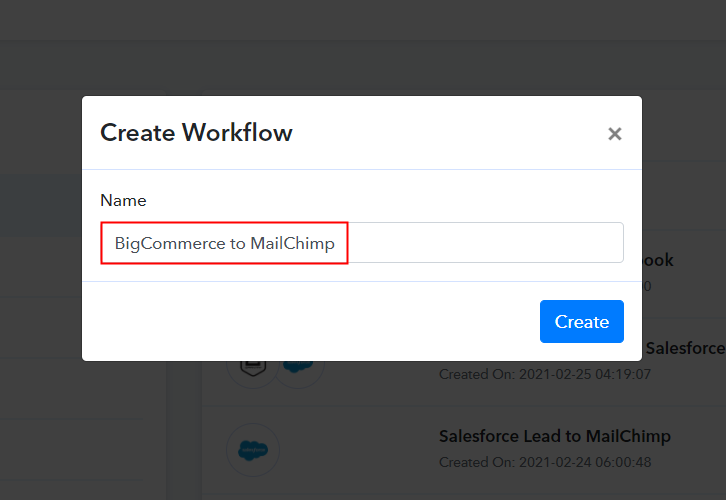
Name the Workflow

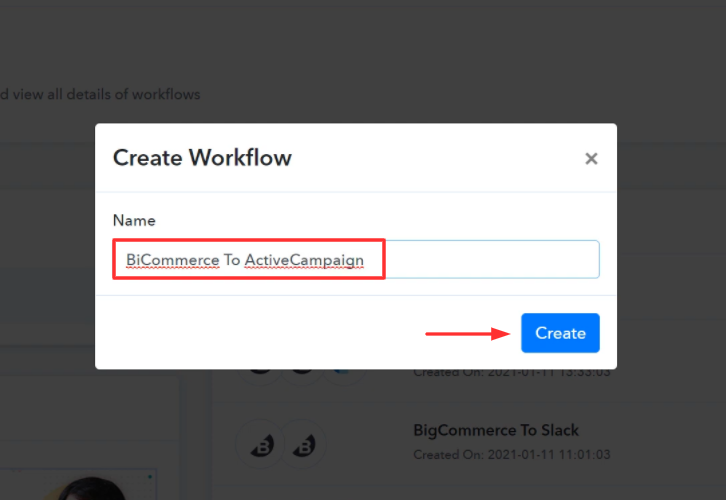
Now, name the workflow just like in the above-shown image. As here I named the workflow as “BigCommerce to ActiveCampaign”, you can obviously change it as per your requirements.

Step 4: Setting Trigger for BigCommerce to ActiveCampaign Integration

After naming the workflow, select the application you want to integrate. Pabbly Connect enables you to integrate unlimited premium applications, create your free account now.

(a) Select Application you Want to Integrate
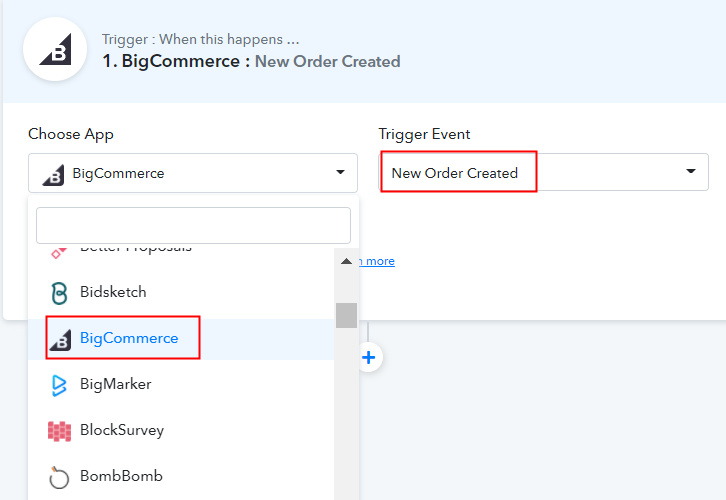
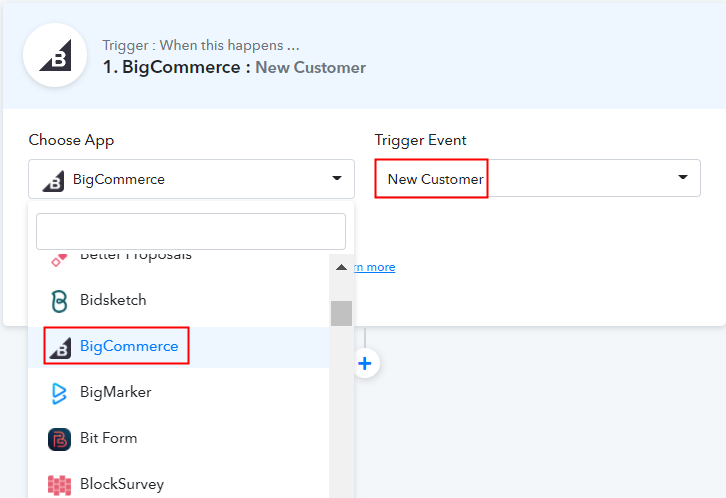
Select BigCommerce

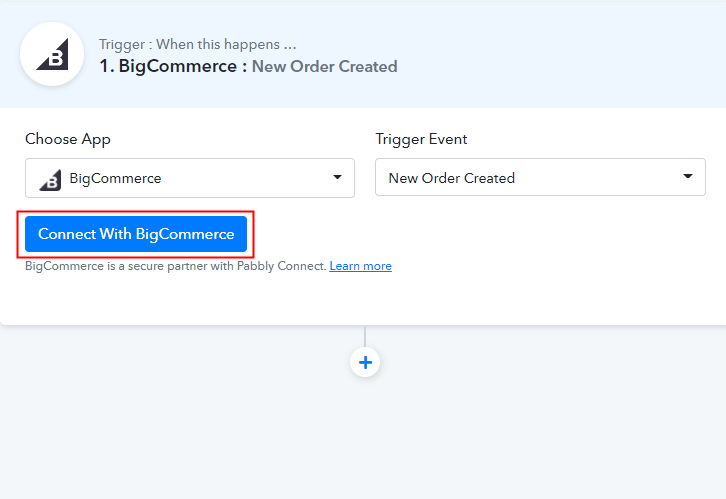
Now, select the application that you want to integrate. In this case, we are choosing “BigCommerce” for integration, and in the method section, select “New Customer”.

(b) Click Connect Button

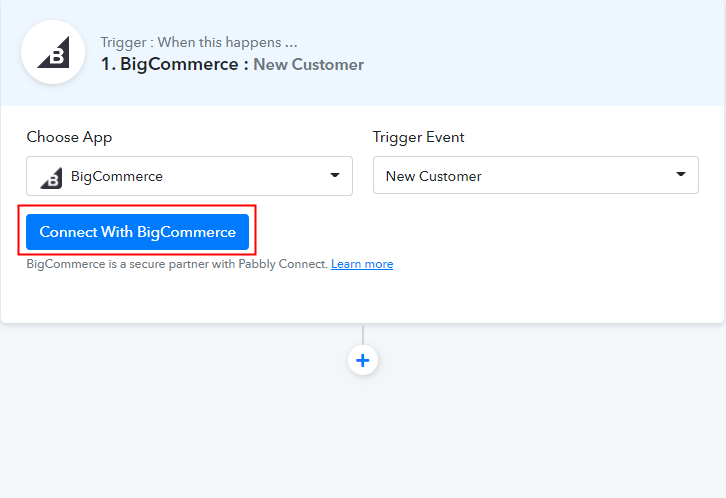
Click on Connect Button

Next, press the “Connect with BigCommerce” button.

Step 5: Connecting BigCommerce to Pabbly Connect

Afterward, to connect BigCommerce with Pabbly Connect, you have to authorize the application. Thus, you have to log in to your BigCommerce account.

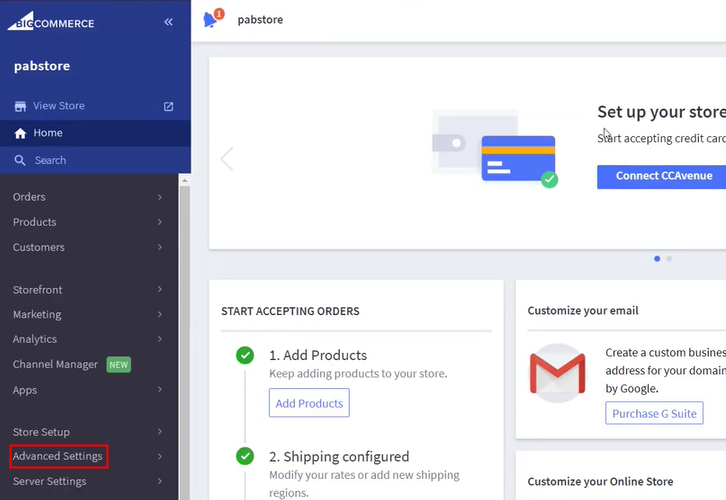
(a) Go to Advanced Settings

Go to Advanced Settings

Now, go to the Bigcommece dashboard & hit “Advanced Settings”.

(b) Click on API Accounts

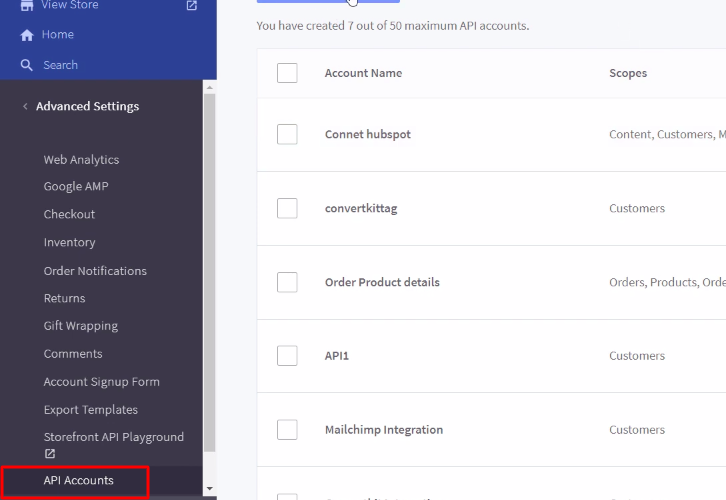
Click on API Accounts

Later, press the “API Accounts”.

(c) Create API Account

Create API Account

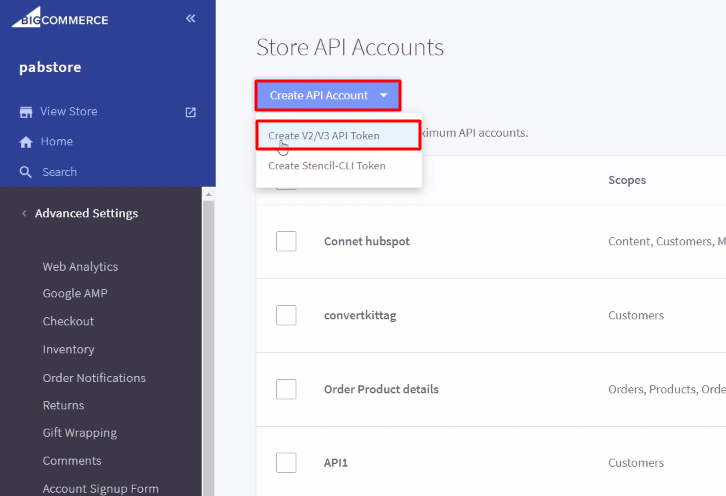
Now, hit the button named “Create API Account” & then choose the option “Create V2/V3 API Token”.

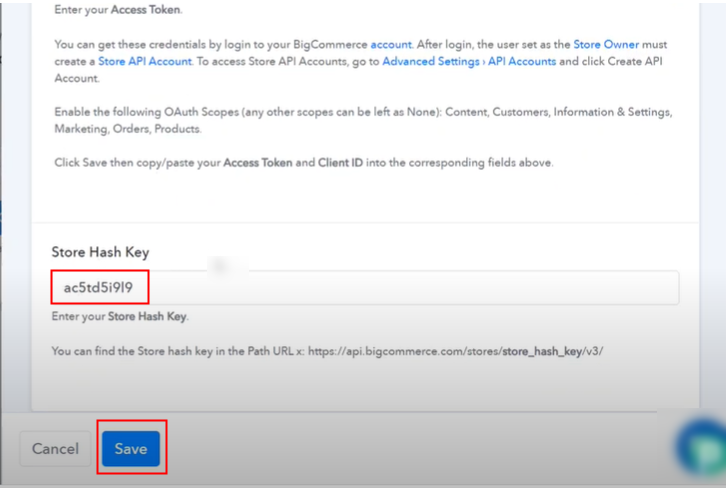
(d) Copy the API Path Key

Copy the API Path Key

Furthermore, copy the API Path highlighted in the image & then hit the “Save” button.

(e) Copy the Client ID and Access Token

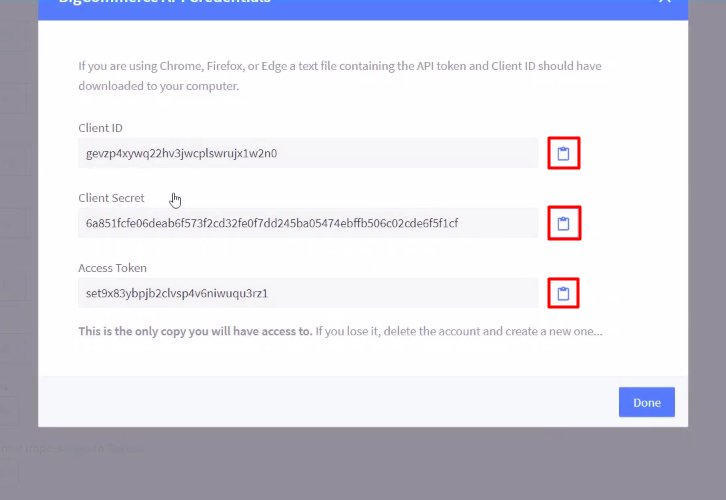
Copy the Client ID and Access Token

Ultimately, a window will pop-up with API keys. Just copy the “Client ID & Access Token” then hit the “Done” button.

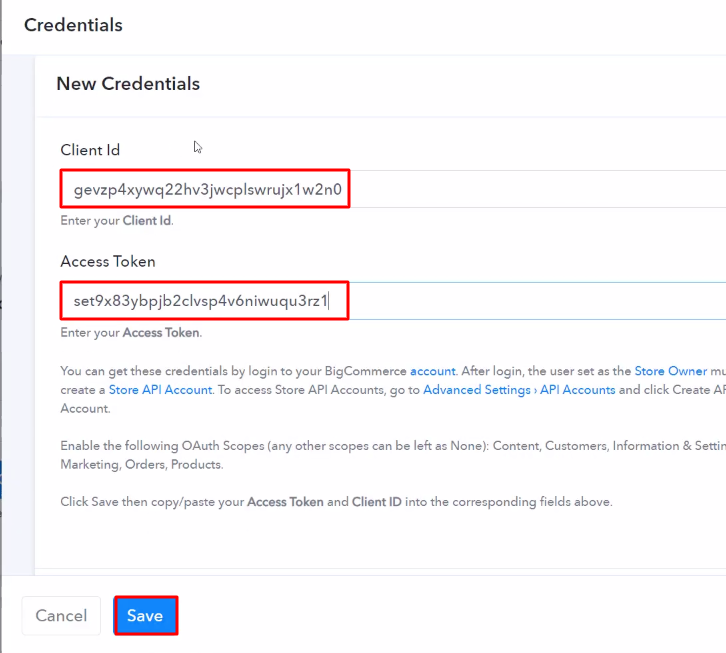
(f) Paste the API Keys

Paste the API Keys

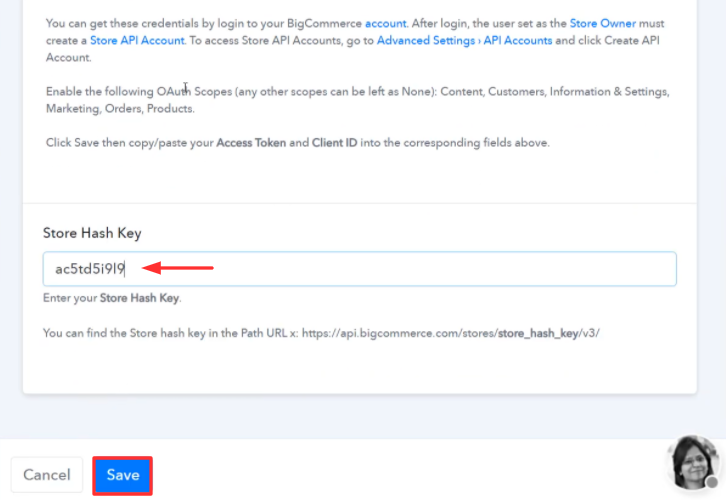
Promptly, paste the respective API keys & tokens in the mentioned columns. Then tap on the “Save” button.

Step 6: Make a Dummy Purchase

Now, to check this integration, we will capture the data from BigCommerce, and for that, we will create an order in BigCommerce

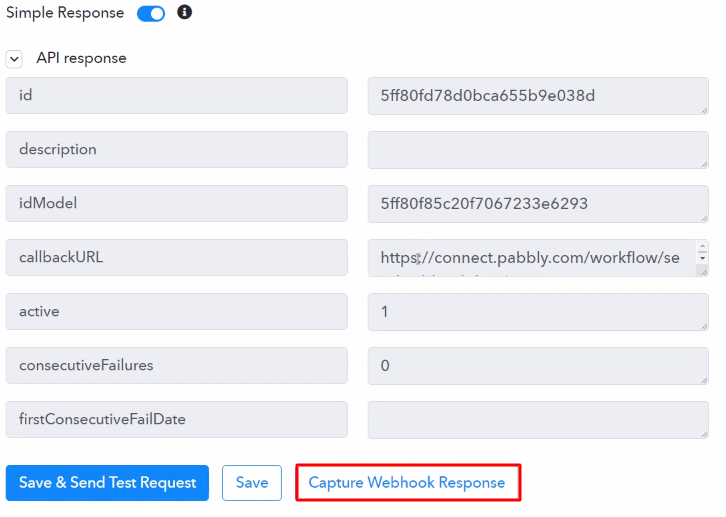
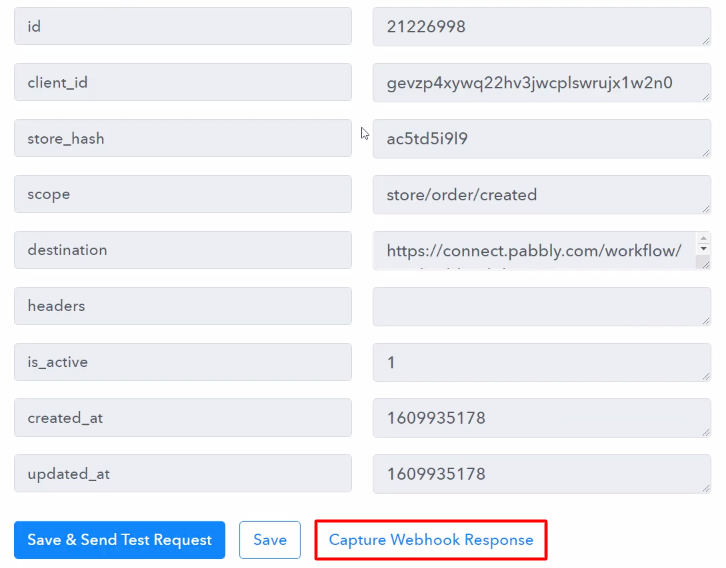
(a) Capture Webhook Response

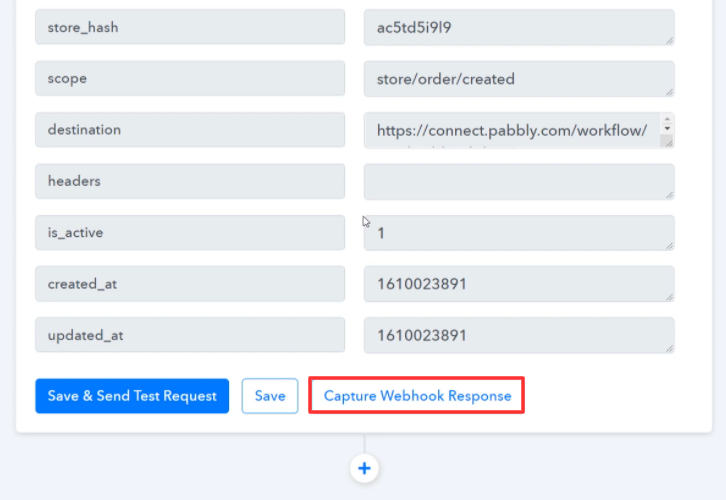
Capture Webhook Response

Once you add the webhook URL to your BigCommerce account, just press the “Capture Webhook Response” button to capture the data from BigCommerce.

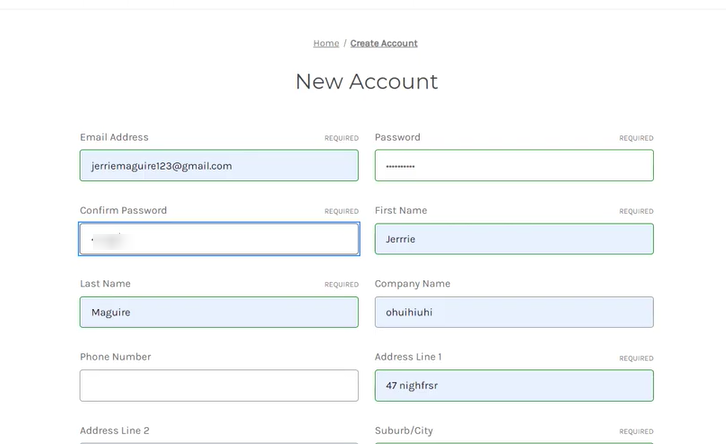
(b) Place an Order

Place an Order

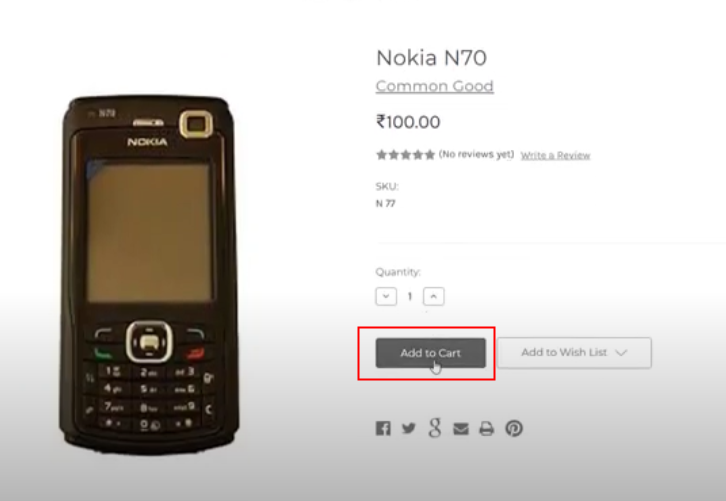
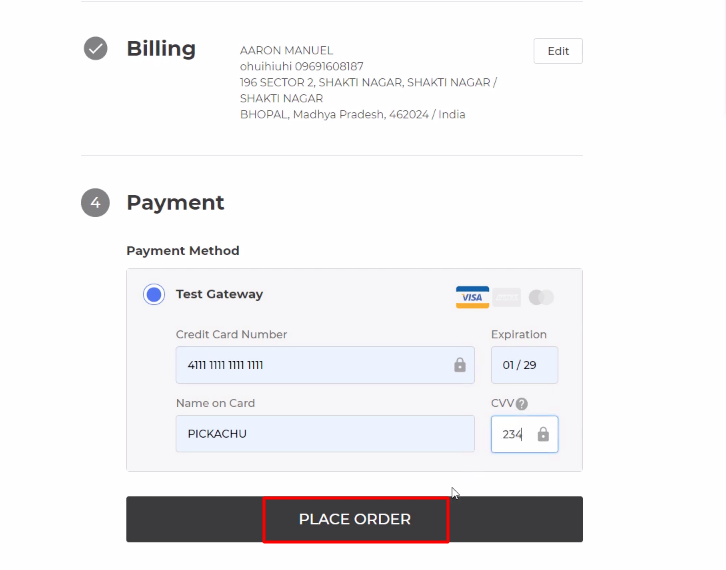
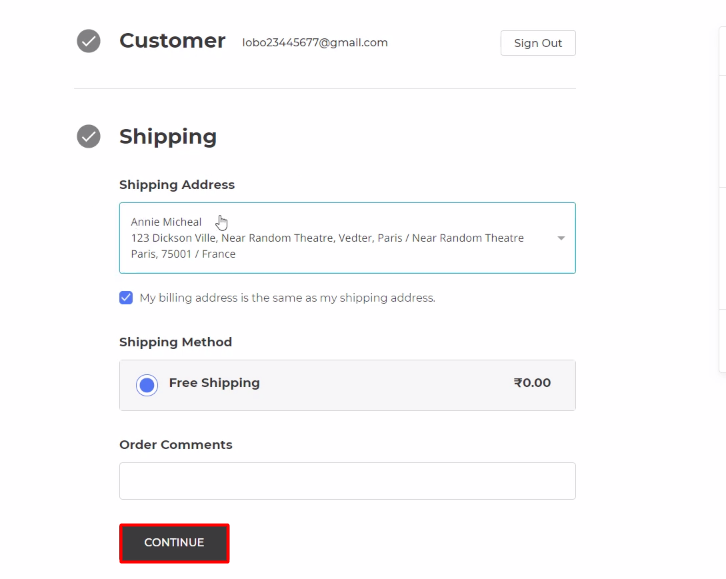
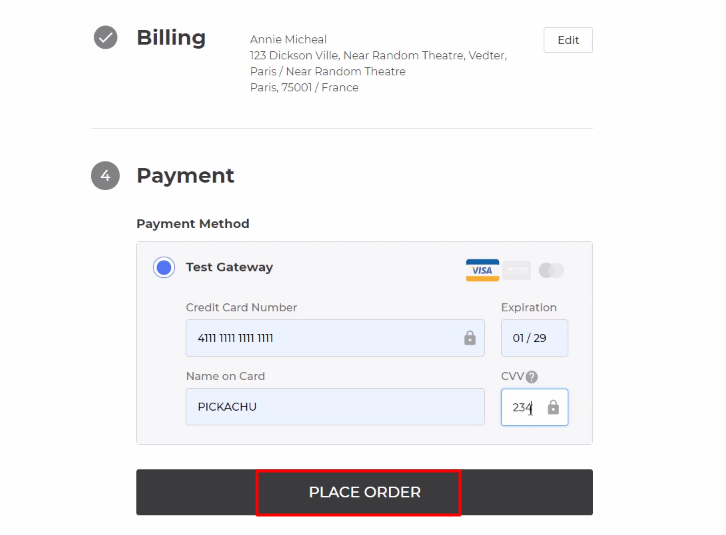
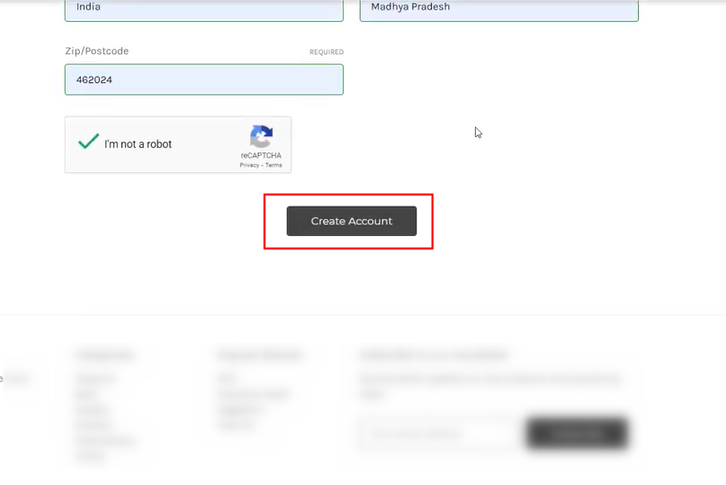
Afterwards, click on add to cart then simply fill-up all the details and place an order.

Step 7: Test the Response in Pabbly Connect Dashboard
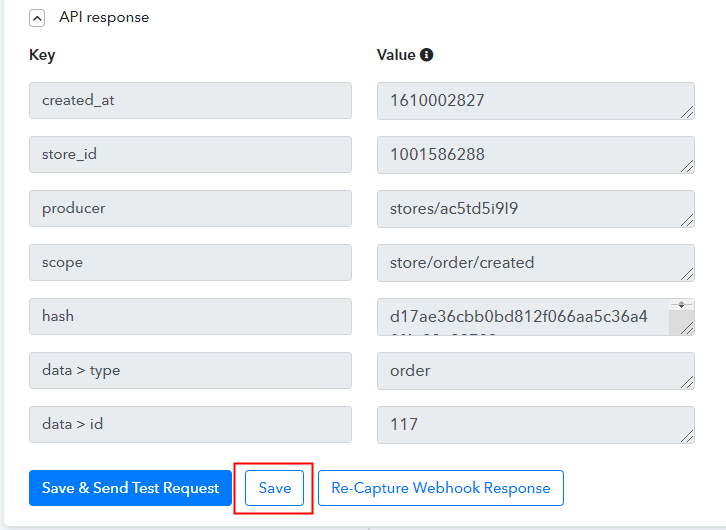
Test the Response in Pabbly Connect Dashboard

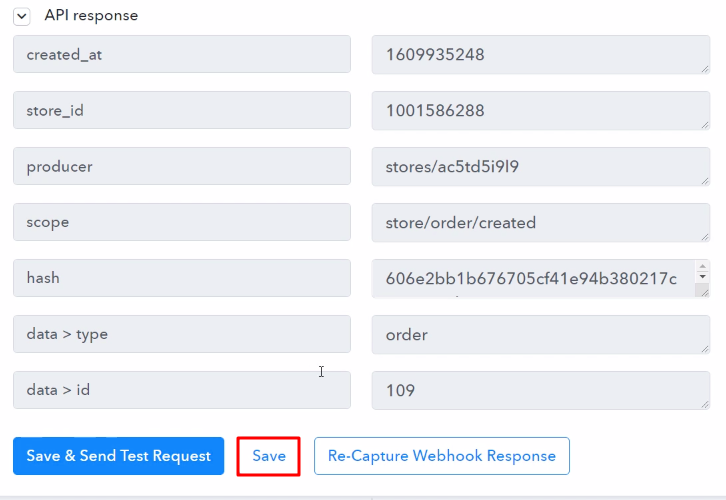
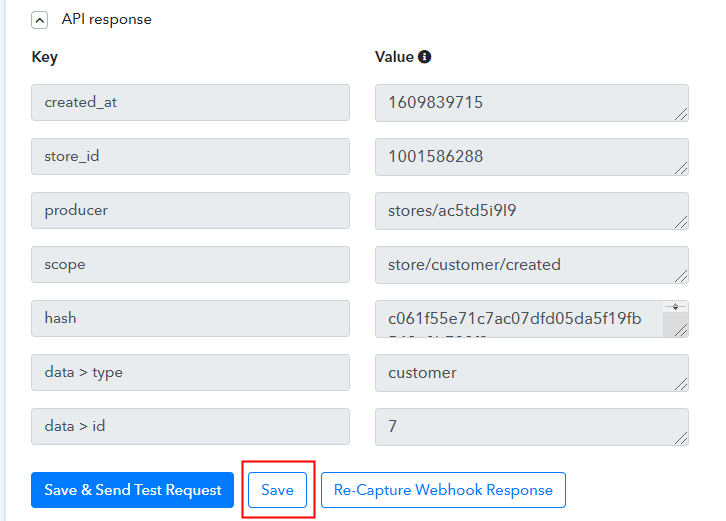
After creating the customer in BigCommerce, the customer’s info will appear on the Pabbly Connect dashboard. Next, tap on the “Save” button.

Step 8: Setting Actions for BigCommerce to ActiveCampaign Integration

Later, to make this BigCommerce-ActiveCampaign integration work, choose two actions for your trigger. Primary, BigCommerce to get the proper order info from the ID that we got in the trigger part. Secondary, to create a contact in ActiveCampaign.

(a) Select Application you Want to Integrate
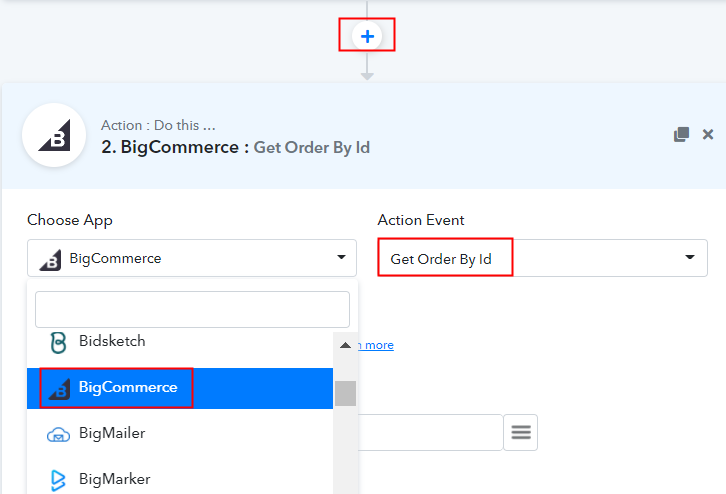
Select BigCommerce

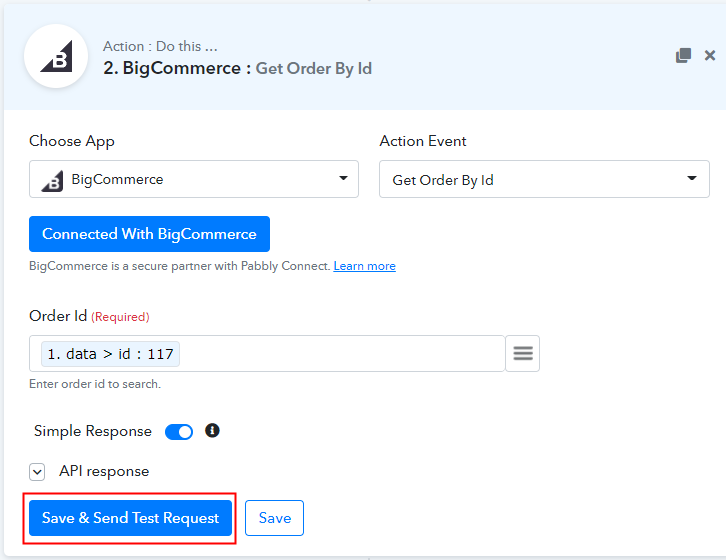
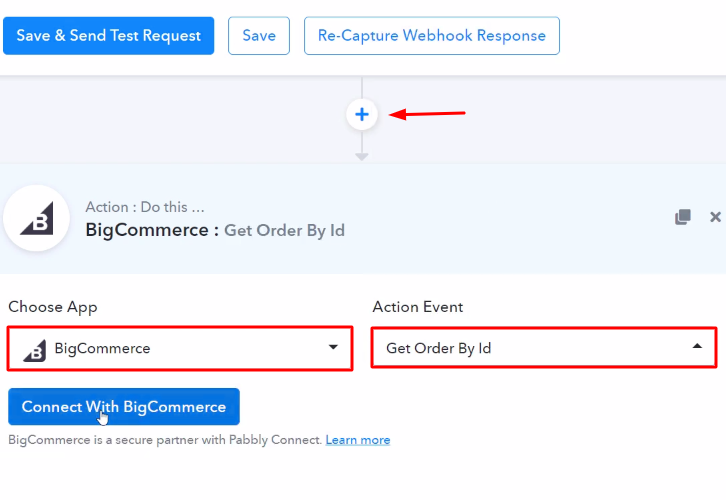
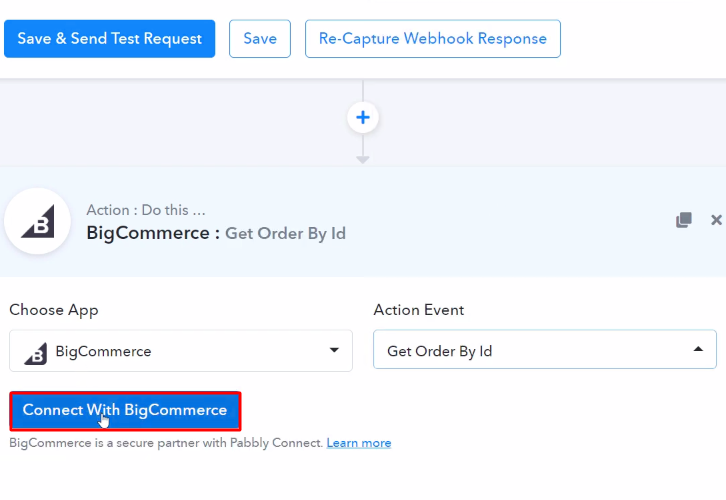
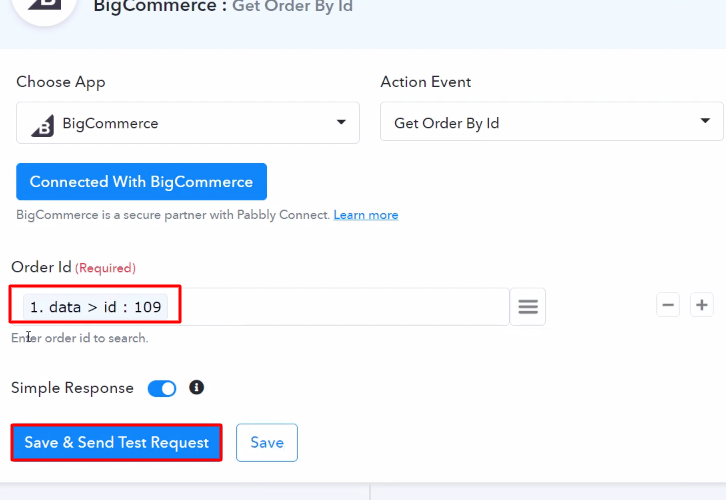
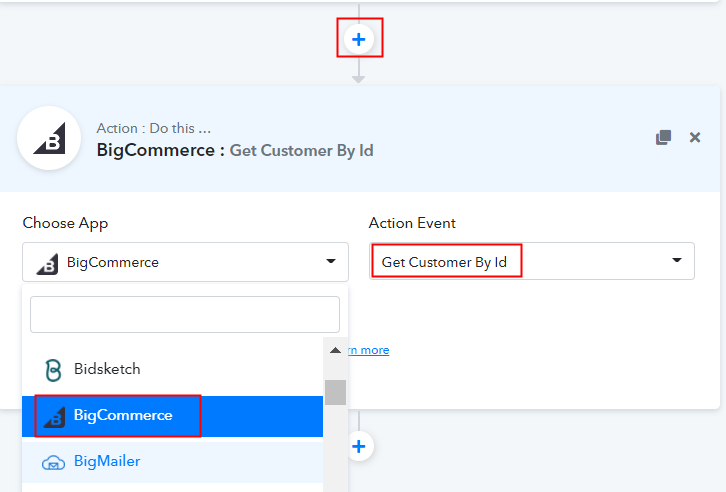
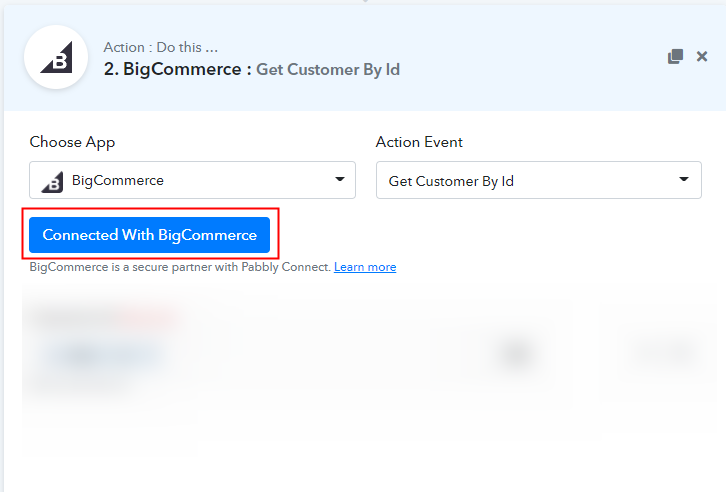
Subsequently, press the + button below & choose the application that you want to integrate. Here we will choose “BigCommerce” and in the method, section select “Get Order By Id”. After choosing the application click on the “Connect with BigCommerce” button.

(b) Authorize Application

Authorize Application

Next, choose the previously used credentials to move forward.

(c) Save & Send Test Request

Save & Send Test Request

Now, map the “Order ID” and then hit the “Save & Send Test Request” button.

(e) Save the API Response

Save the API Response

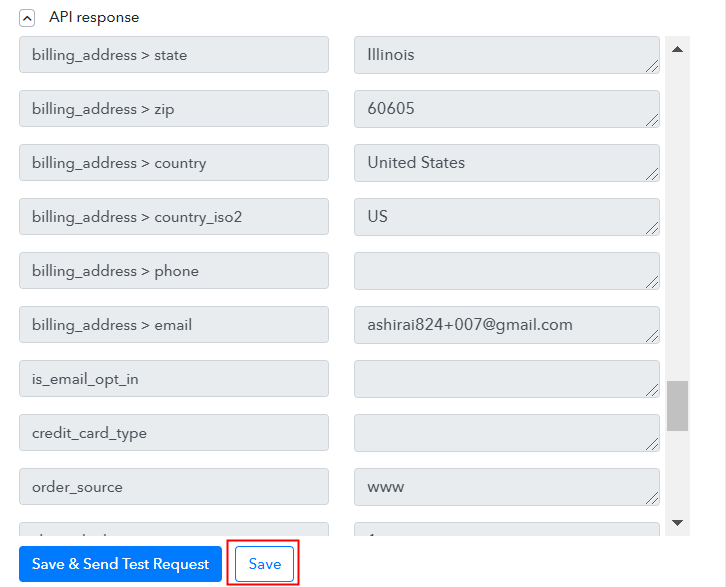
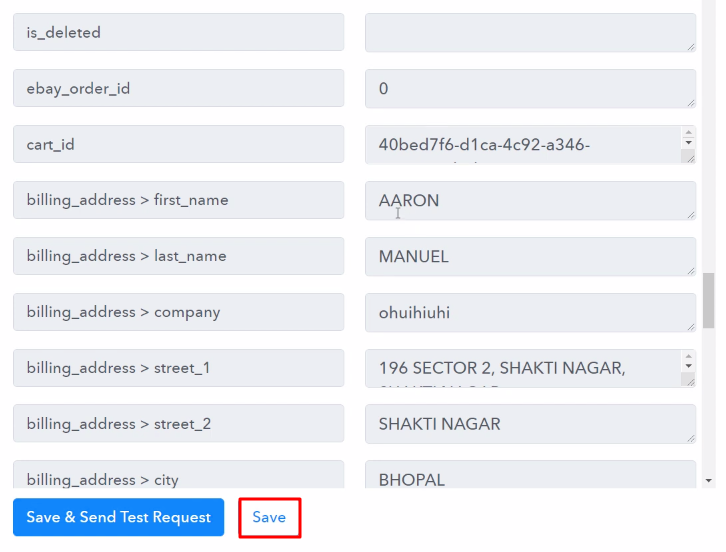
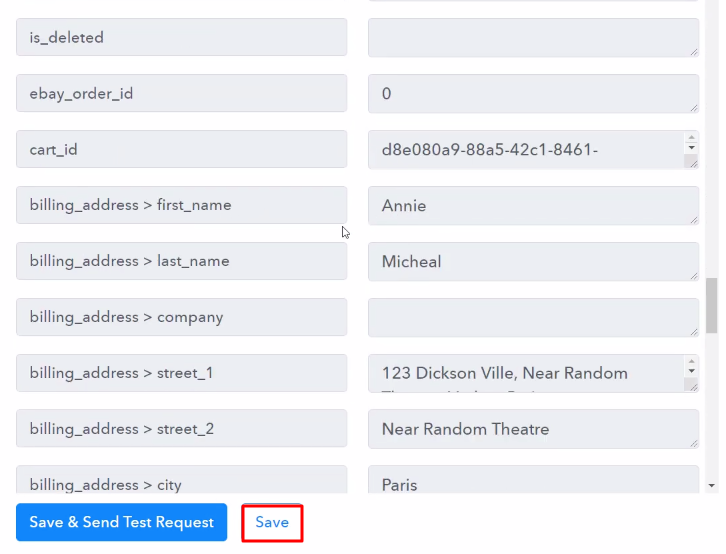
As we can see that all the information about the order is captured within Pabbly Connect. Now, press the “Save” button.

(f) Select Application you Want to Integrate
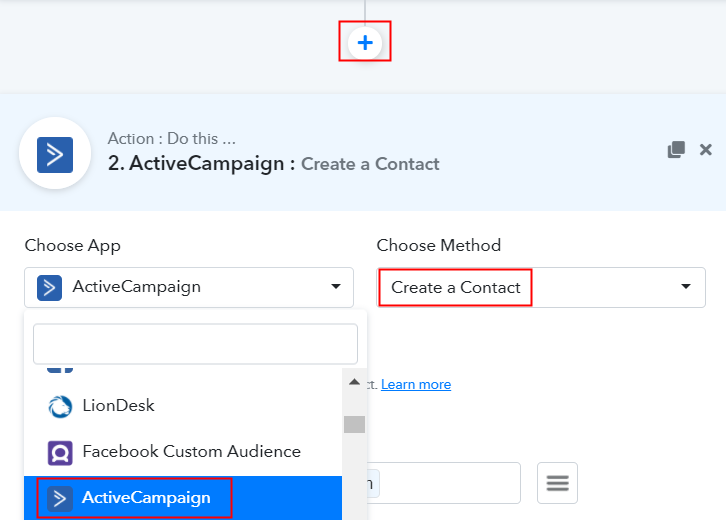
Select ActiveCampaign

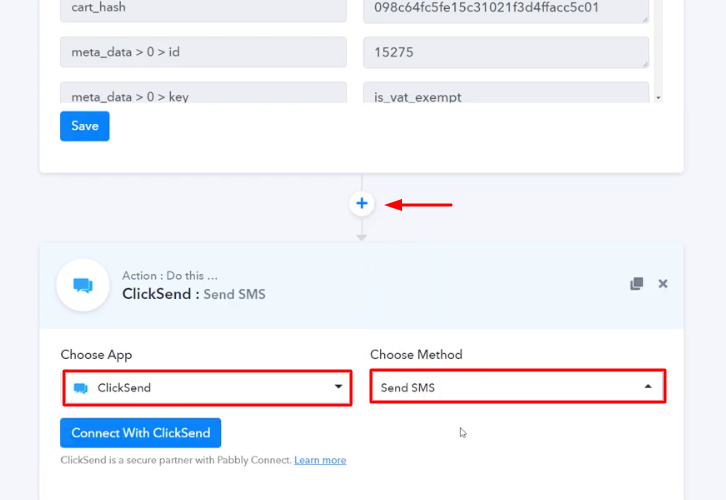
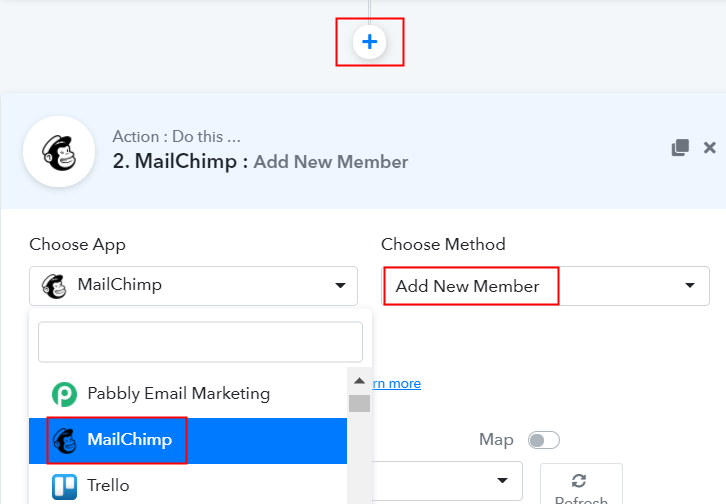
The following step is to hit the “+” icon then select “ActiveCampaign” & in the choose method option, select ”Create a Contact”.

(g) Click the Connect Button

Click the Connect Button

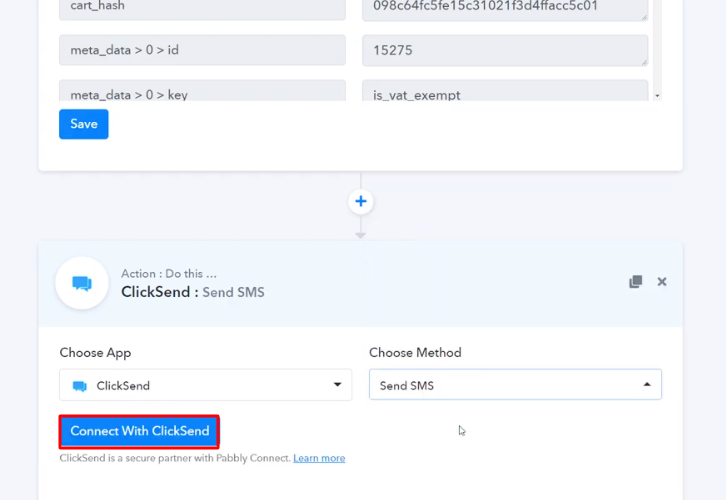
Forthwith, press the “Connect With ActiveCampaign” button after making all the necessary changes. After that, the authentication window will open that will ask for API Key & URL for which you have to log-in to your ActiveCampaign account.

Step 9: Connecting ActiveCampaign to Pabbly Connect

Subsequently, to connect ActiveCampaign with Pabbly Connect, log in to your ActiveCampaign account for the API keys.

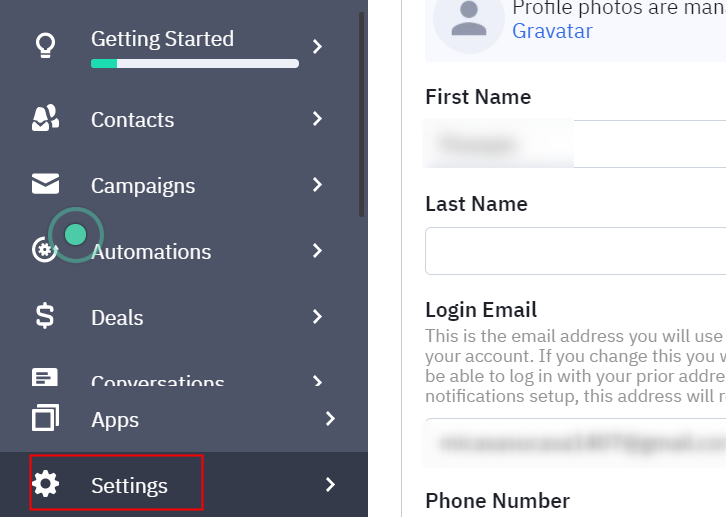
(a) Click on ActiveCampaign Settings

Click on ActiveCampaign Settings

After login, go to the “Settings” option on the left side of the bottom section of the dashboard.

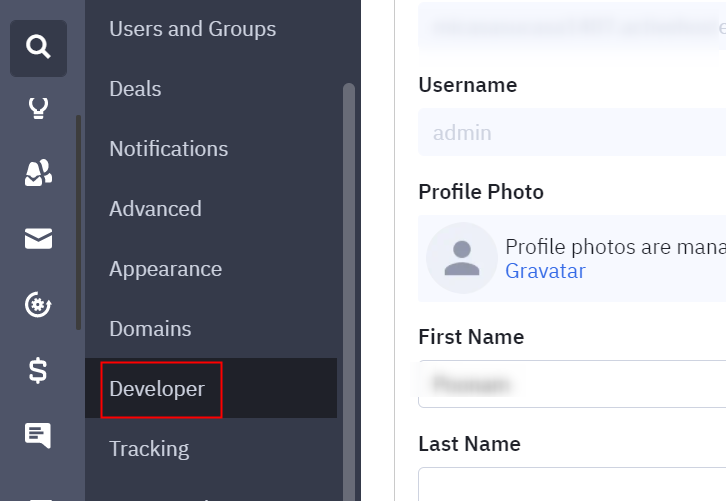
(b) Go to Developer Section

Go to Developer Section to Add New Stripe customers to ActiveCampaign as Contact

Once you go to “Settings”, a tab will open up, where you can see the “Developer” option, just click on it.

(c) Copy the API Key and URL

Copy the API Key and URL

Quickly, copy the API & URL appearing on the dashboard.

(d) Fill API Key

Fill API Key

Following that, paste API Key, and in the “URL” column, mention URL. After ensuring all this, hit the “Save” button.

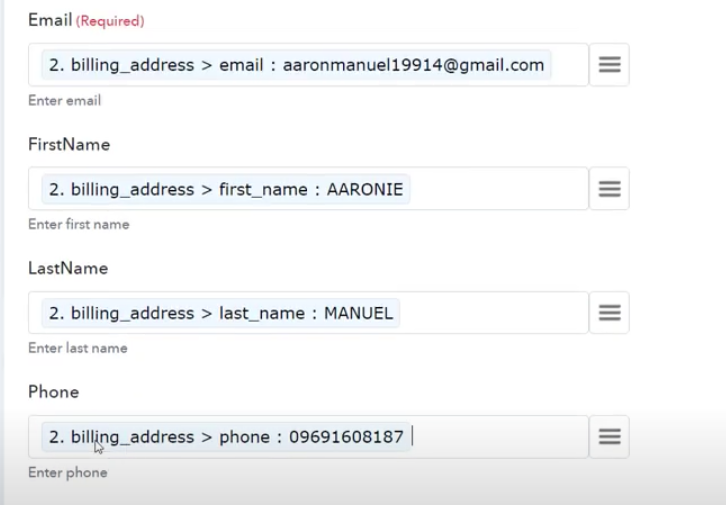
(e) Map Field Data

Map Field Data

Next, map the required field from the drop-down such as for the email field, select the email option, and for the name field select the name option. Next, after entering all the details, hit the “Send Test Request” button to test the BigCommerce and ActiveCampaign integration.

Step 10: Check Response in ActiveCampaign Dashboard
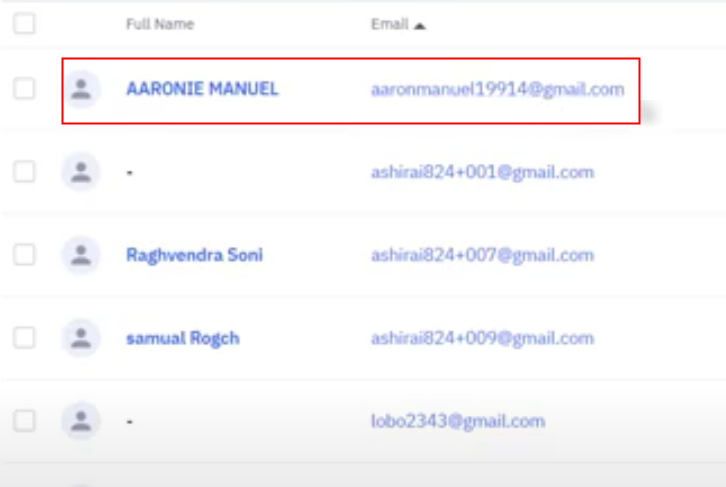
Check Response in ActiveCampaign Dashboard

Lastly, when you check your ActiveCampaign, you can see that the contact info is updated automatically for the newly created customer in BigCommerce.

Conclusion –

Well! Here we have mentioned in detail “How to Create ActiveCampaign Contact from New BigCommerce Order” using Pabbly Connect. We know the process of integrating two applications can be daunting but it can be done easily with the help of Pabbly Connect.

Just follow the above procedure and you don’t need to worry about anything.

So, what’s stopping you now? Go and grab your deal by signing up for Pabbly Connect for free.

You May Also Like to Read –
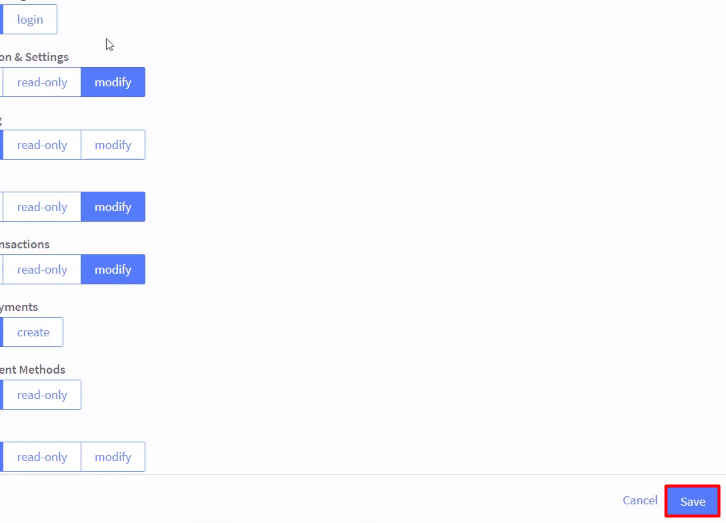
How to Send ClickSend SMS from New BigCommerce Order

How to Send ClickSend SMS from New BigCommerce Order

Do you want to know how to send ClickSend SMS from new BigCommerce order automatically? If yes, then you are in the right place. Here, we will tell you how you can easily sync these two services via a magic tool called Pabbly Connect.

So, basically, Pabbly Connect is integration & automation software that lets you transfer data among multiple applications in real-time.

How to Send ClickSend SMS from New BigCommerce Order

Most importantly, you don’t have to do any hard coding & even a fresher can use it efficiently. Also, this procedure will be just a one-time setup & after that, the workflow will take care of the rest.

But before starting with the integration process, let’s know a bit about the software that we are about to integrate. Basically, BigCommerce is considered an open SaaS platform provider and a growing headless commerce provider based on the low total cost of ownership and highly flexible APIs.

Whereas, ClickSend is a cloud-based gateway service for your business that lets you send bulk SMS, email, fax & letters worldwide – at the click of your mouse!

Why Choose This Method Of Integration?

In contrast with other integration services-

  • Pabbly Connect does not charge you for its in-built apps like filters, Iterator, Router, Data transformer, and more
  • Create “Unlimited Workflows” and smoothly define multiple tasks for each action
  • As compared to other services which offer 750 tasks at $24.99, Pabbly Connect offers 50000 tasks in the starter plan of $29 itself
  • Unlike Zapier, there’s no restriction on features. Get access to advanced features even in the basic plan
  • Try before you buy! Before spending your money, you can actually signup & try out the working of Pabbly Connect for FREE

Sign Up To Pabbly Connect 

Through Pabbly Connect when you will sync these two services, then whenever there will be a new purchase on your BigCommerce account, the SMS will be automatically delivered to the buyer informing about the purchase via ClickSend.

We have also attached a video tutorial for this integration, have a look at it-

Moreover, we have added the template for this integration to help you get started more quickly. You can click on the image given below to begin. Additionally, you can also visit the Marketplace & look for more integrations and apps.

How

Hence, get ready as we’re going to discover the BigCommerce and ClickSend integration.

Step 1: Sign up to Pabbly Connect

Sign Up

We will start the process to send ClickSend SMS from new BigCommerce order by clicking on the ‘Sign Up Free’ icon on the Pabbly Connect home page. Next, either manually fill-up all the details or sign up using your Gmail account.

Try Pabbly Connect for FREE

Step 2: Access Pabbly Connect

Select Connect

Subsequently, after logging into the account, click on the ‘Access Now’ button of the Connect section in the dashboard.

Step 3: Workflow for BigCommerce to ClickSend Integration

(a) Start with a New Workflow

Create New Workflow

Start with creating a workflow for your project by clicking on the ‘Create Workflow’ button.

(b) Name the Workflow

Name the Workflow

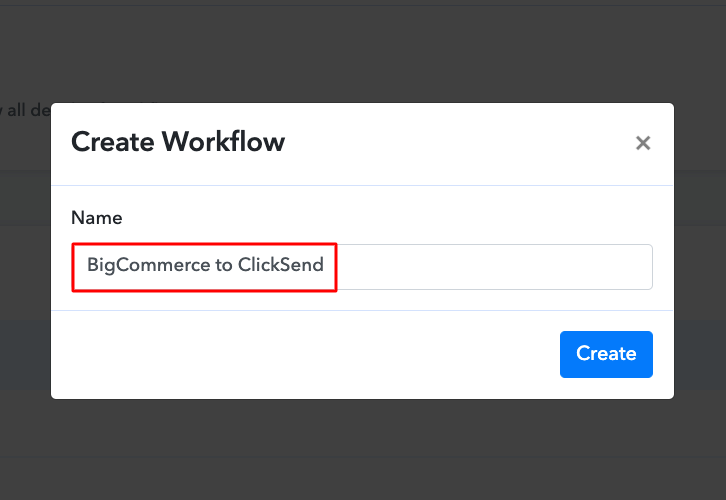
Now, you need to name the workflow just like in the above-shown image. I named the workflow ‘BigCommerce to ClickSend’, you can obviously name the workflow as per your requirements.

Step 4: Setting Trigger for BigCommerce to ClickSend Integration

As soon as you are done naming your workflow, you will have to select the application you want to integrate. Pabbly Connect allows you to connect unlimited premium apps, create your free account now.

(a) Select Application you Want to Integrate

Select-BigCommerce_censored

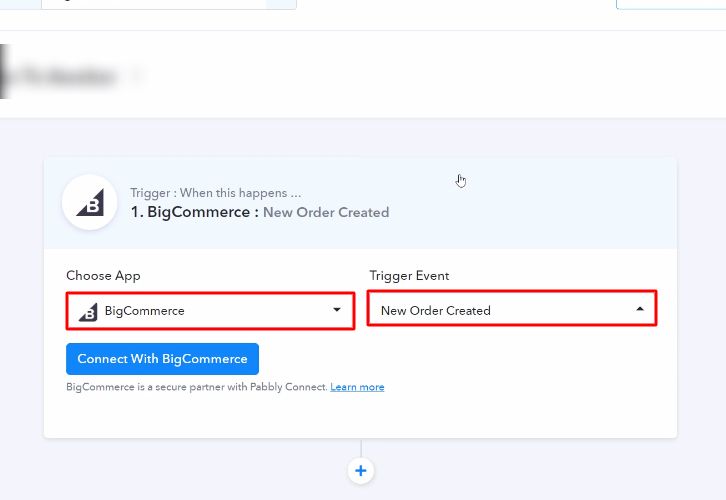
Now, you have to select the application that you want to integrate. In this case, we are choosing ‘BigCommerce’ for integration. In the method section, select ‘New Order Created’.

(b) Click the Connect Button

Connect-with-BigCommerce_censored_censored

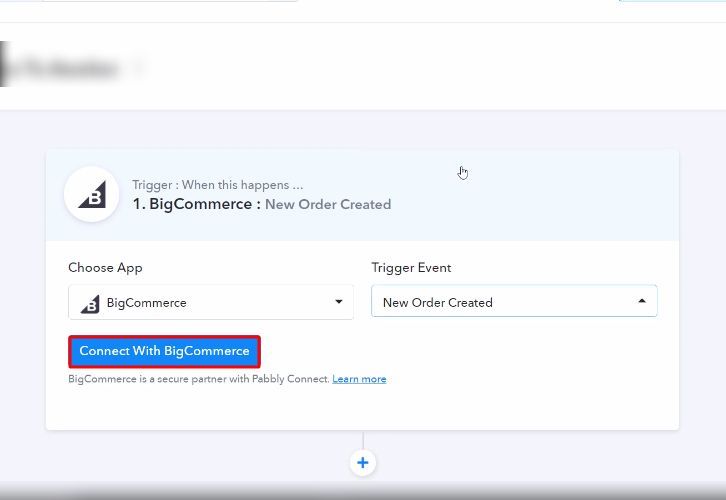
The next step is to click on the ‘Connect with BigCommerce’ button on the dashboard just like in the above-shown image.

Step 5: Connecting BigCommerce to Pabbly Connect

To connect BigCommerce to Pabbly Connect, you have to add the client ID and access token from your BigCommerce account to Pabbly Connect. For that, you have to log in to your BigCommerce account.

(a) Click on Advanced Settings

Advanced Settings BigCommerce

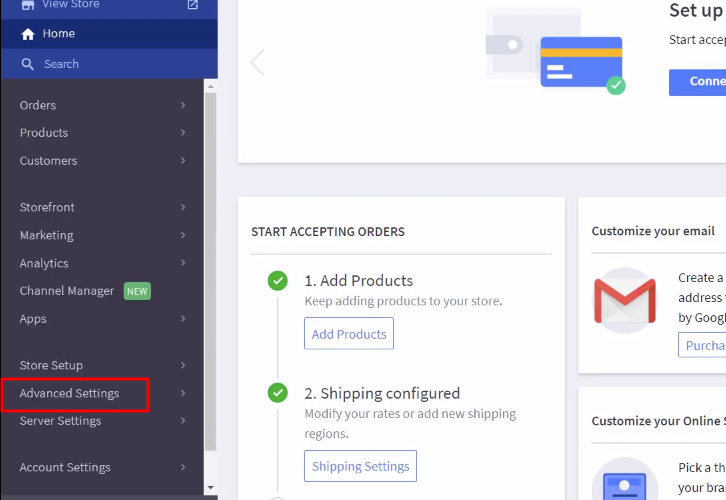
After login into the BigCommerce account, go to the ‘Advanced Settings’ section on the bottom of the dashboard.

(b) Click on API Accounts

API Accounts BigCommerce

Next, you have to click on the ‘API Accounts’ option.

(c) Click on Create API Accounts

Create API Account BigCommerce

Now, click on the ‘Create API Accounts’ button then select the ‘Create V2/V3 API Token’ option.

(d) Name the API Account

Name the API Account BigCommerce

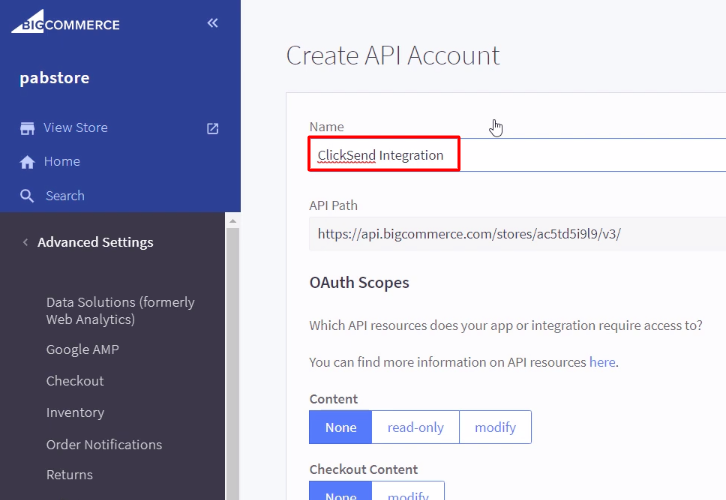
Name the API account according to your requirements to move forward.

(e) Save the API Account

Save the API Account BigCommerce

After making changes in all the settings, click on the ‘Save’ button.

(f) Copy the Credentials

Copy the Credentials BigCommerce

Simply copy the appearing credentials from the BigCommerce dashboard.

(g) Paste the Credentials

Paste the Credentials BigCommerce

Just paste the copied credentials in Pabbly Connect and hit the ‘Save’ button.

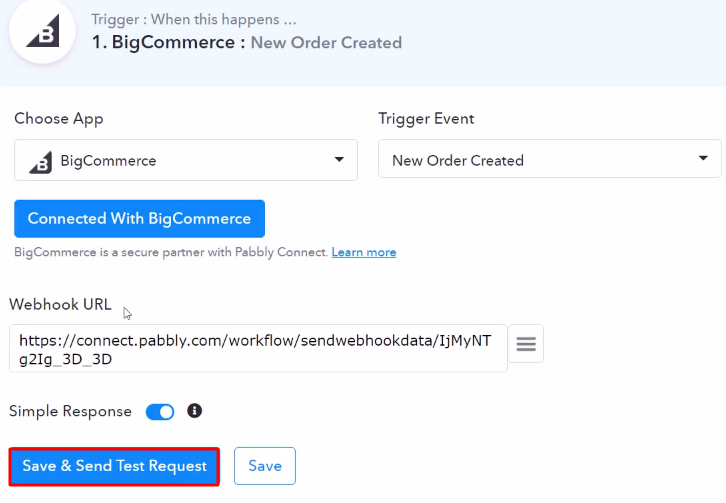
(h) Send Test Request

Send Test Request BigCommerce

Now, we need to set this webhook URL in your BigCommerce account and to do that, we will hit the ‘Save & Send Test Request’ button.

Step 6: Make a Test Purchase

To check this integration, we will make a sample purchase in BigCommerce to capture the data.

(a) Capture the Webhook Response

Capture Webhook Response

Now, to capture the data from BigCommerce, click on the ‘Capture Webhook Response’ button in Pabbly Connect.

(b) Add to Cart

Add to Cart BigCommerce

Next, select any of the listed products in your BigCommerce store and hit the ‘Add to Cart’ button.

(c) Click on Proceed to Checkout

Proceed to Checkout

The next step is to click on the ‘Proceed to Checkout’ button.

(d) Add Shipping Details

Add Shipping Details BigCommerce

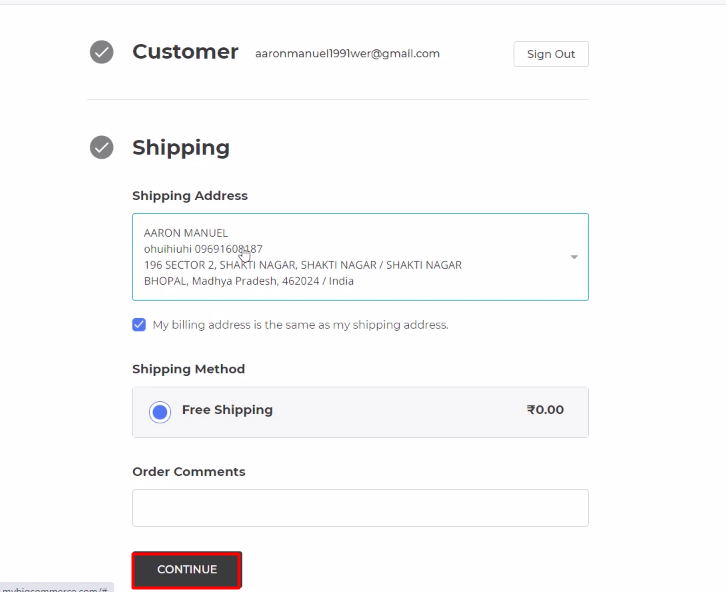
In this step, now you have to add all the required details of the customer like email ID, address, etc and hit the ‘Continue’ button.

(e) Place an Order

Place Order

Now, add your credit/debit card details and hit the ‘Place Order’ button.

Step 7: Test the Response in Pabbly Connect Dashboard

Save the Webhook Response

Once you click on the ‘Place Order’ in BigCommerce, the order info will appear on the Pabbly Connect dashboard. Then, click on the ‘Save’ button.

Step 8: Setting Actions for BigCommerce to ClickSend Integration

To make this BigCommerce-ClickSend integration work, you have to choose two actions for your trigger. The first action is of BigCommerce to acquire the order details from the order ID, and the second action is of ClickSend to send the message.

(a) Select Application you Want to Integrate

Select BigCommerce Action

Now in this step, click on the + button below and choose the application that you want to integrate. Here we will choose ‘BigCommerce’ to integrate and in the method section select ‘Get Order By ID’.

(b) Click the Connect Button

Connect with BigCommerce Action

After choosing the application click on the ‘Connect with BigCommerce’ button to move forward.

(c) Add the Credentials

Paste the Credentials BigCommerce

Thereafter clicking on the ‘Connect’ button, again we have to add the credentials that we pasted in the trigger section and hit the ‘Save’ button to connect with BigCommerce.

(d) Map the Order ID

Map the Order ID BigCommerce

Next, map the order ID that we got in the trigger section of this integration and click on the ‘Save & Send Test Request’ button.

(e) Save the API Response

Save the API Response BigCommerce

Here, we can see that the order details are fetched, now hit the ‘Save’ button to move forward.

(f) Select Application you Want to Integrate

Select ClickSend Send ClickSend SMS for Every New WooCommerce Order

Now in this step, click on the + button below and choose the application that you want to integrate. Here we will choose ‘ClickSend’ to integrate and in the method section select ‘Send SMS’.

(g) Click the Connect Button

Click Connect ClickSend Send ClickSend SMS for Every New WooCommerce Order

After choosing the application click on the ‘Connect with ClickSend’ button to move forward.

Step 9: Connecting ClickSend to Pabbly Connect

To connect ClickSend to Pabbly Connect, you have to paste the API key into the Pabbly Connect dashboard from your ClickSend account. For this, you have to log in to your ClickSend account.

(a) Click on Developers

Click on Developers Send ClickSend SMS for Every New WooCommerce Order

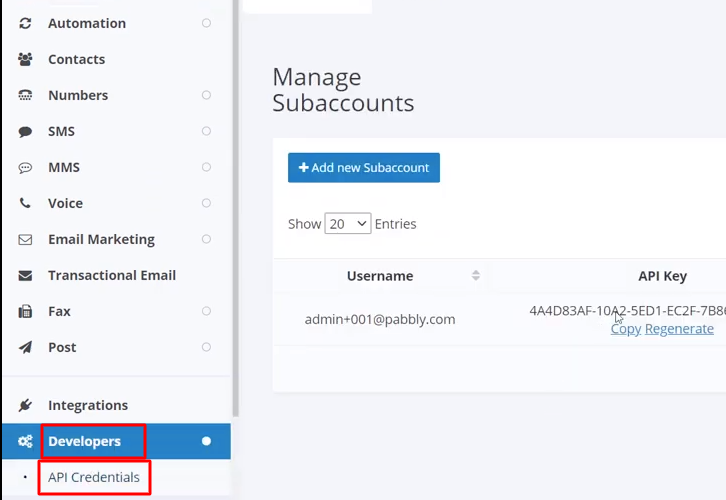
Once you click on the ‘Connect’ button, a pop-up will slide in from the right side asking for the API key of your ClickSend account. Simply click on the ‘Developers’ option in your ClickSend dashboard then click on the ‘API Credentials’ option.

(b) Copy the API Key

Copy API ClickSend

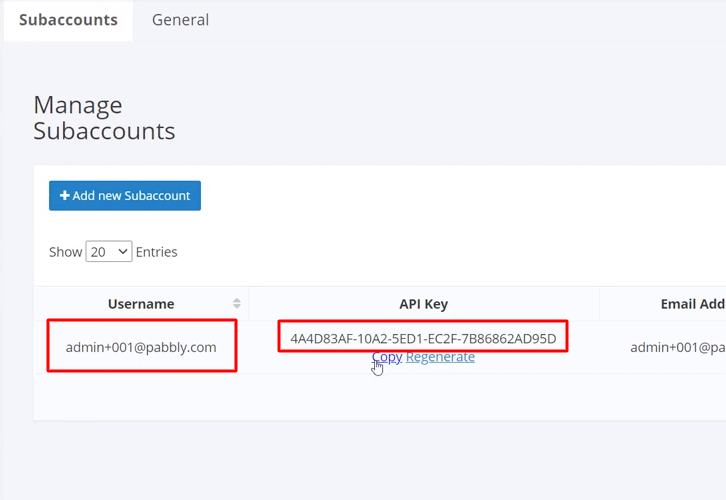
After reaching the API key page of your ClickSend account. Just copy the given API key and username to proceed further.

(c) Paste the API Key

Paste API Key Send ClickSend SMS for Every New WooCommerce Order

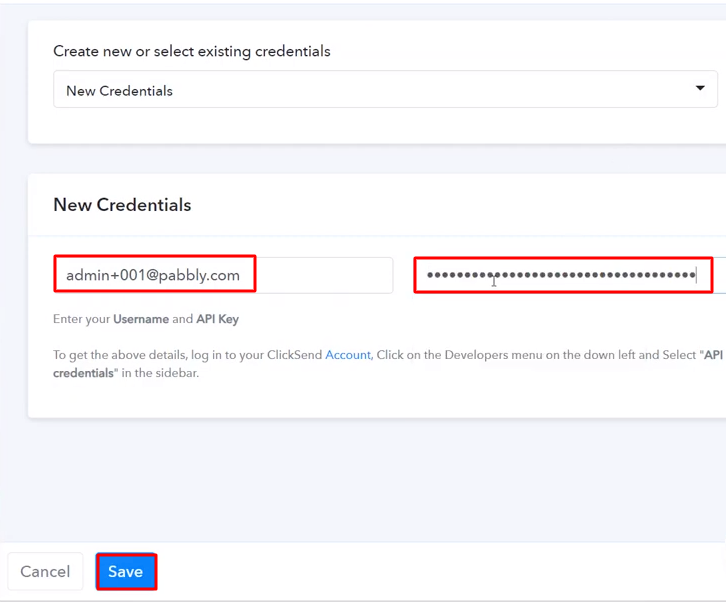
Next, paste the copied API key and username into the Pabbly Connect dashboard and then hit the ‘Save’ button.

(d) Map the Fields

Map the Fields

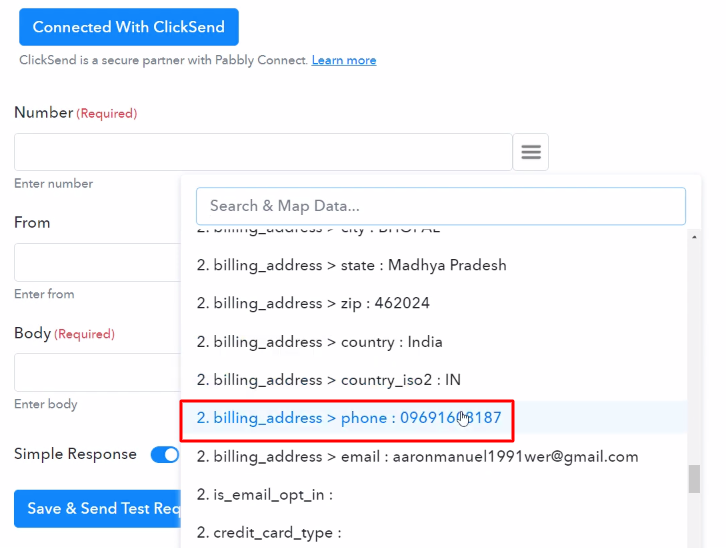
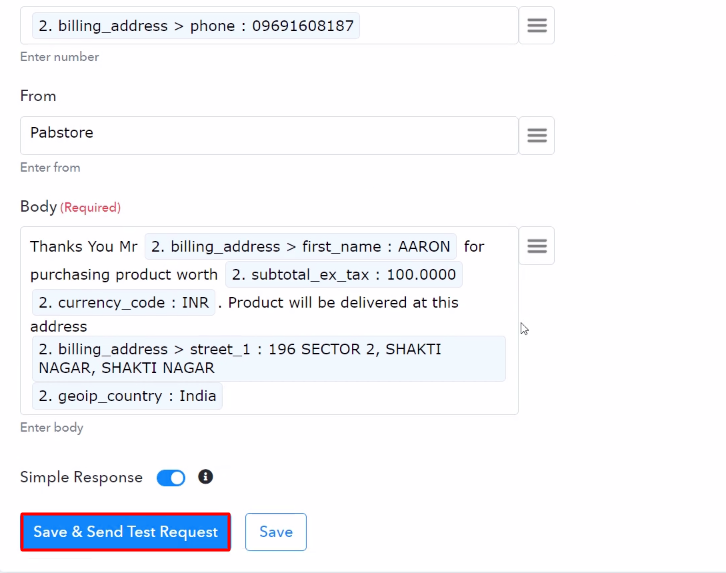
After connecting with your ClickSend account, map all the fields quickly like the number, the body of the message, etc.

(e) Save and Send Test Request

Send Test Request

Once you are done adding up all field data click on the ‘Save & Send Test Request’ button.

Step 10: Check Response in ClickSend Dashboard

Check Response

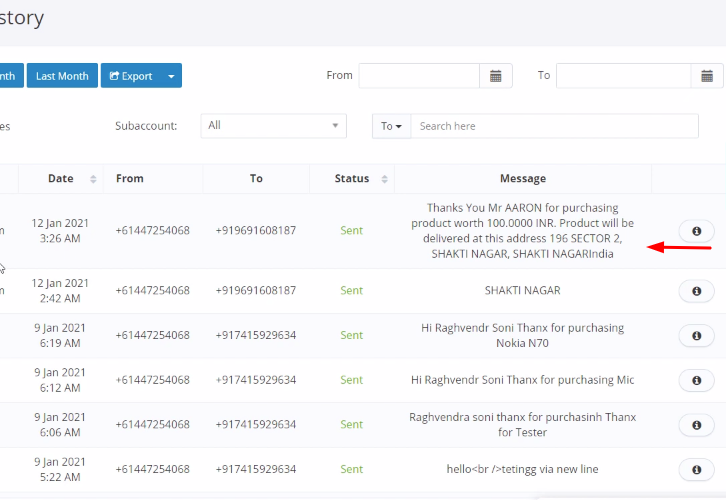
Here, you can see that our integration was successful. The message has been delivered to the BigCommerce customer via ClickSend informing about the purchase automatically.

Conclusion –

At last, this is the most effective and time-saving way to send ClickSend SMS from new BigCommerce order. Now whenever there will be any sales in BigCommerce, the SMS will be delivered to the buyer via ClickSend automatically after this integration. Pabbly Connect is the answer to all your integration needs, as you just have to make a few clicks and you are good to go.

Therefore, signup for free today and explore the world of hassle-free integrations. In case of any doubts or suggestions, please leave your comments down below.

You May Also Like to Read –
How to Send WhatsApp Notifications for WooCommerce Orders

Send WhatsApp Notifications for WooCommerce Orders

Are you are looking for some way by which you can easily send WhatsApp notifications for WooCommerce orders automatically? If yes, then here we are going to explain you WooCommerce – WhatsApp integration using Pabbly Connect.

Send WhatsApp Notifications for WooCommerce Orders

Pabbly Connect is an affordable option to connect multiple services for sharing information in real-time. Moreover, it will only take a minute interval to automate your repetitive tasks.

Also, you can use routers, formatters, instant triggers, multi-step calls & many premium features of Pabbly Connect for workflows without any restriction even in the free plan.

Let’s learn a little bit about the services, before getting started with the workflow. WooCommerce is an e-commerce WordPress plugin that enables big & small business owners to sell goods online. Whereas, WhatsApp is a free, multiplatform messaging app that lets you make video and voice calls, send text messages, and more.

Why Choose This Method Of Integration?

In contrast with other integration services-

  • Pabbly Connect does not charge you for its in-built apps like filters, Iterator, Router, Data transformer, and more
  • Create “Unlimited Workflows” and smoothly define multiple tasks for each action
  • As compared to other services which offer 750 tasks at $24.99, Pabbly Connect offers 50000 tasks in the starter plan of $29 itself
  • Unlike Zapier, there’s no restriction on features. Get access to advanced features even in the basic plan
  • Try before you buy! Before spending your money, you can actually signup & try out the working of Pabbly Connect for FREE

Sign Up To Pabbly Connect  

As we are all aware that WhatsApp is an ever-increasing tool for communication and being a WooCommerce seller, you should consider sending order confirmation notifications via WhatsApp instantly. It sounds impracticable to you as there is no way possible to integrate WooCommerce-WhatsApp thus far.

Therefore, we will use Pabbly Connect to automate this task such that when an order is purchased through WooCommerce then automatically send a notification to customer via WhatsApp in real-time.

We have also inserted a video to facilitate the workflow for you-

We have also provided a link of a ready-made template to launch this workflow instantly, simply click on the ‘Use Workflow’ button. Moreover, in search of more premium integrations just visit Marketplace and get the template according to your requirement.

Send WhatsApp Notifications for WooCommerce Orders Workflow

Hence, without taking any more of your time, let’s begin the procedure to integrate WooCommerce – WhatsApp integration.

Step 1: Sign up to Pabbly Connect

Sign Up

Get going through the process to send WhatsApp notifications for WooCommerce orders by visiting the website of Pabbly Connect and then click on the ‘Sign-Up Free‘ button. Next, either signup using an existing Gmail account or manually fill out the form.

Try Pabbly Connect for FREE

Step 2: Access Pabbly Connect

Select Connect

After logging to your account, click on the Connect section in the dashboard to access Pabbly Connect.

Step 3: Workflow for WooCommerce to WhatsApp Integration

(a) Create New Workflow

Create New Workflow

Start with creating a workflow for your project by clicking on the ‘Create Workflow’ button.

(b) Name the Workflow

WooCommerce - WhatsApp Integration

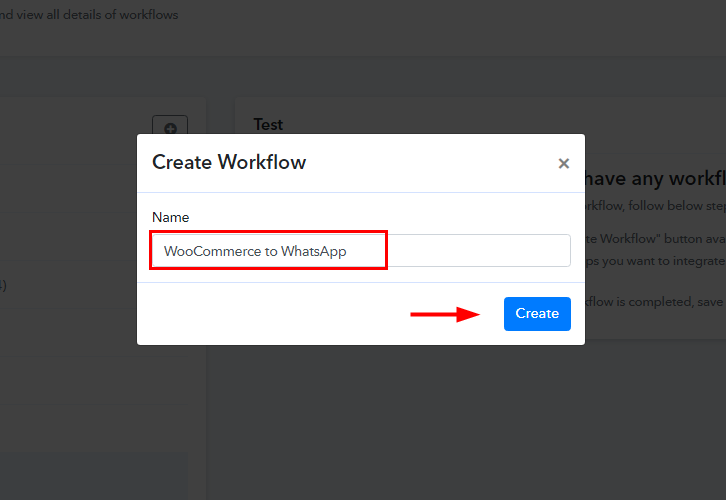
Now, you need to name the workflow just like in the above-shown image. I named the workflow ‘WooCommerce to WhatsApp’, you can obviously name the workflow as per your requirements and needs.

Step 4: Setting Trigger for WooCommerce to WhatsApp Integration

After naming your workflow, you have to select the application to send WhatsApp notifications for WooCommerce orders. Pabbly Connect allows you to integrate unlimited premium applications, try Pabbly Connect for free now.

(a) Select Application you want to Integrate

Select WooCommerce for WooCommerce to WhatsApp Integration

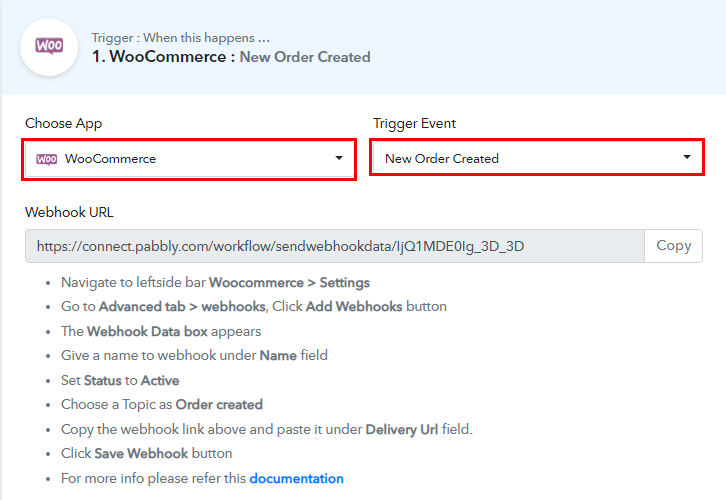
Now, you have to select the application that you want to integrate. In this case, we are choosing ‘WooCommerce’ for integration and then select ‘New Order Created’ in the choose method section.

(b) Copy the Webhook URL

Copy Webhook URL

After selecting the application, now you have to copy the webhook URL just like in the above-shown image to take further the integration process.

Step 5: Connecting WooCommerce to Pabbly Connect

To connect WooCommerce with Pabbly Connect, you have to paste the copied webhook URL in the software, for that, you need to log in to your WordPress account.

(a) Go to WooCommerce Settings

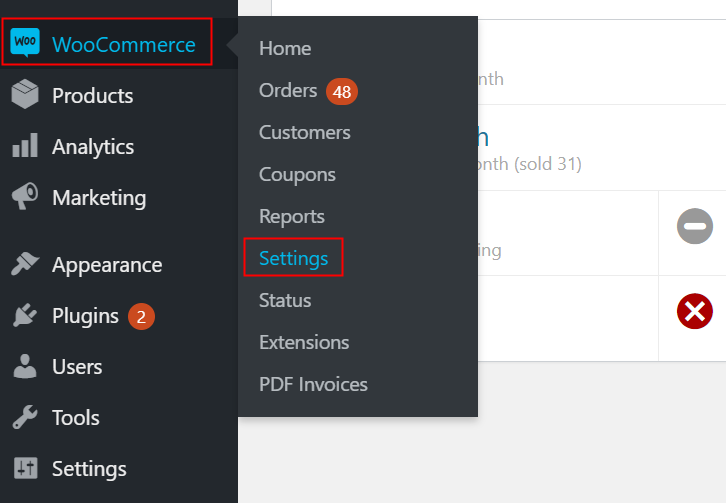
Go to WooCommerce Settings for WooCommerce to WhatsApp Integration

Once you have logged into your WordPress account, now click on ‘WooCommerce’ then select ‘Settings’ option.

(b) Click on Advanced Option

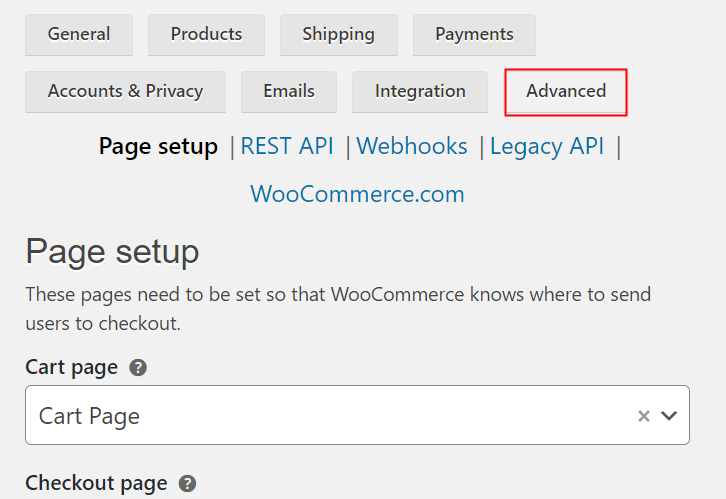
Click on Advanced Option

Furthermore, when you hit ‘Settings’, it will open a tab with multiple options. Simply select the ‘Advanced’ option.

(c) Click on Webhooks Option

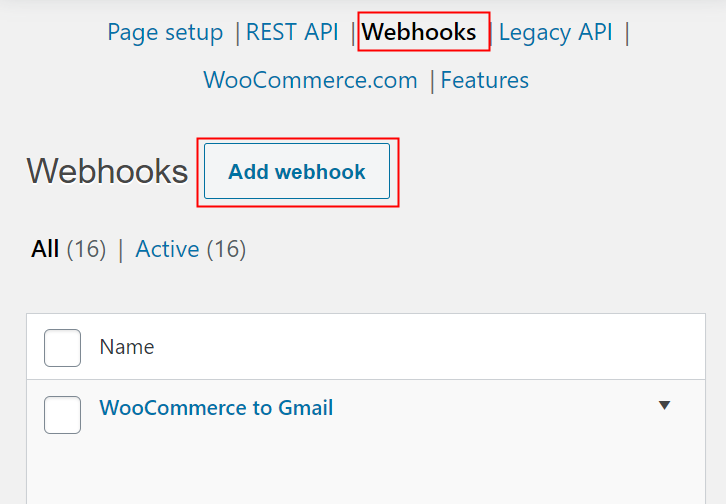
Click on Webhooks Option for WooCommerce to WhatsApp Integration

Afterward, when you hit the ‘Webhooks’ button, a new tab with many options will open up. To paste the Webhook URL, just click on the ‘Add Webhook’ option.

(d) Add Webhook URL

Add Webhook URL for WooCommerce to WhatsApp Integration

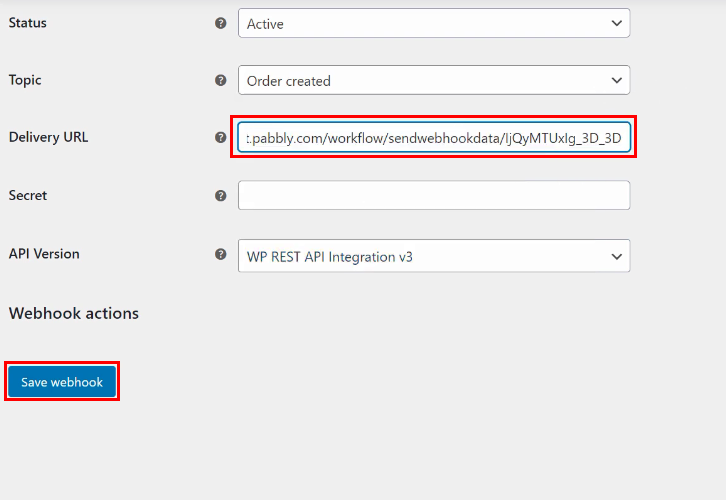
Subsequently, you will have to enter the Webhook Data in the mentioned fields like webhook name, topic, along with this paste the above copied Webhook URL in ‘Delivery URL’ section, and make sure to change the status to ‘Active’. At last, press the ‘Save Webhook’ button.

Step 6: Make a Test Purchase

To check this integration, we will capture the order from WooCommerce, and for that, we will make a test purchase on WooCommerce.

(a) Capture the Webhook Response

Capture the Webhook Response for WooCommerce to WhatsApp Integration

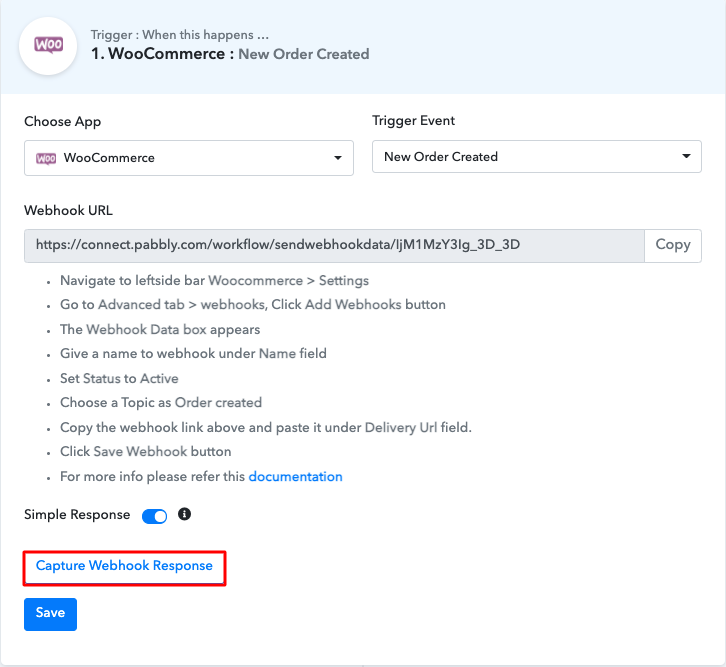
Now, to capture the data from WooCommerce, click on the ‘Capture Webhook Response’ button in Pabbly Connect.

(b) Select any Product

Select any Product

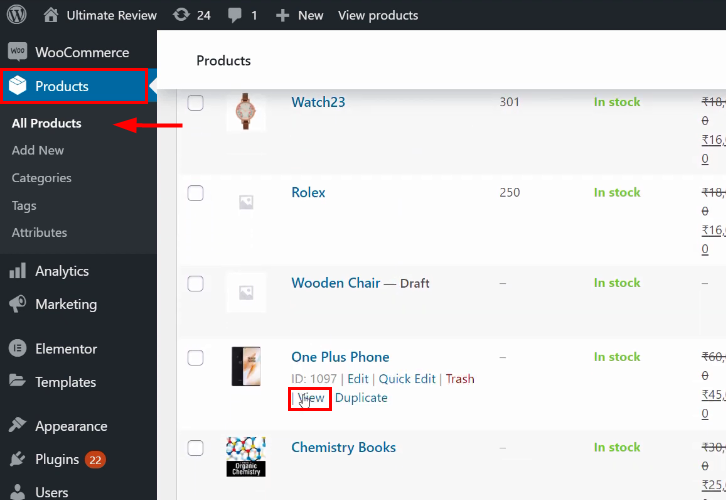
After this, again visit your WooCommerce window. Click on ‘Products’ option, then press ‘All Product’ tab and select any product by clicking on ‘View’ button.

(c) Click on Add to Cart

Click on Add to Cart for WooCommerce to WhatsApp Integration

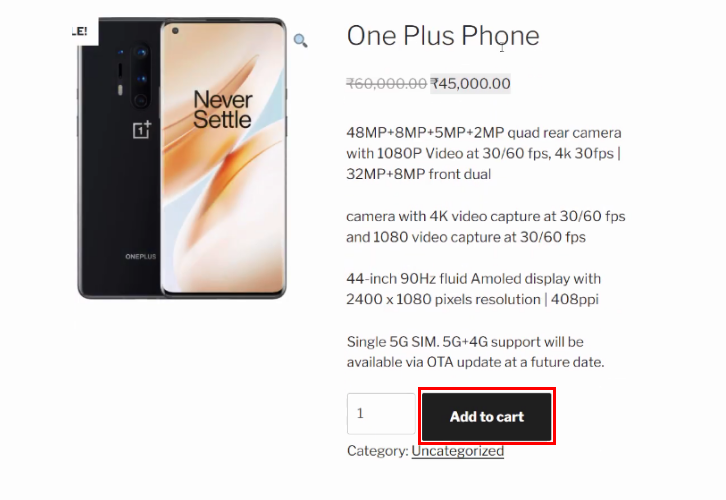
Next, you will be redirected to a new page, here click on ‘Add to Cart’ button and then tap ‘Proceed to Checkout’ button.

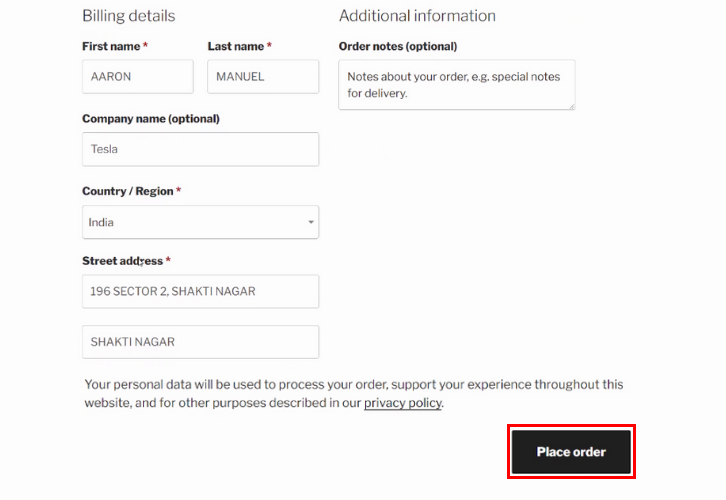
(d) Fill the Customer Details

Fill the Customer Details

Subsequently, place an order by filling up customer details and after that click on ‘Place Order’ button.

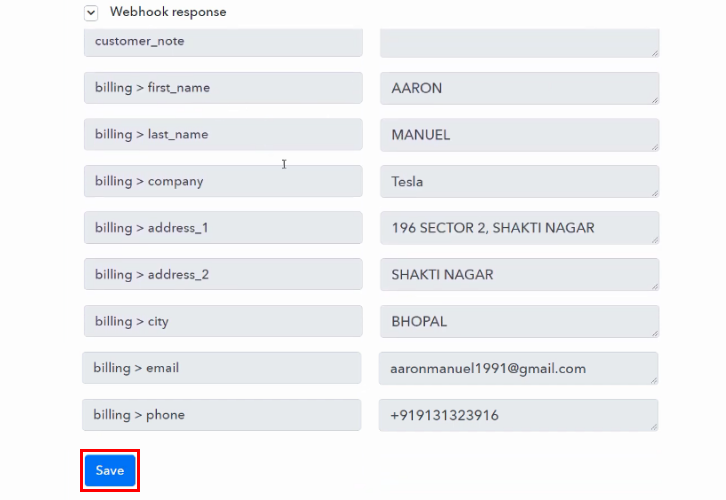
(e) Save the Response

Save the Response for WooCommerce to WhatsApp Integration

As soon as you click on the ‘Place Order’ button in WooCommerce, the entry will appear on the ‘Pabbly Connect’ dashboard. Just click on the ‘Save’ button.

Step 7: Setting Action for Text Formatter

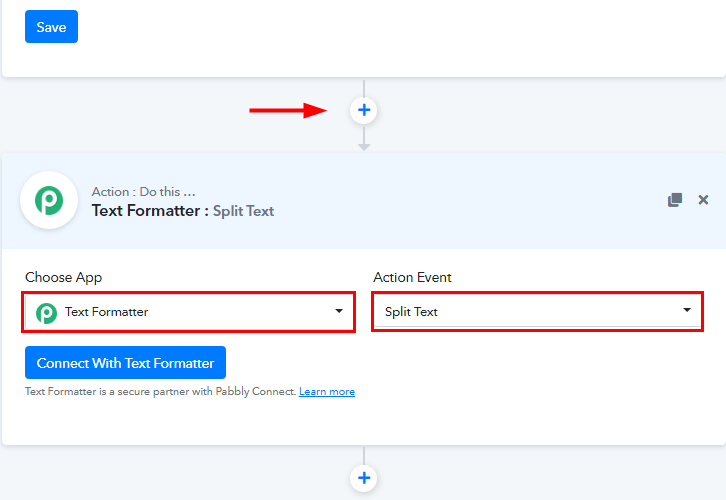
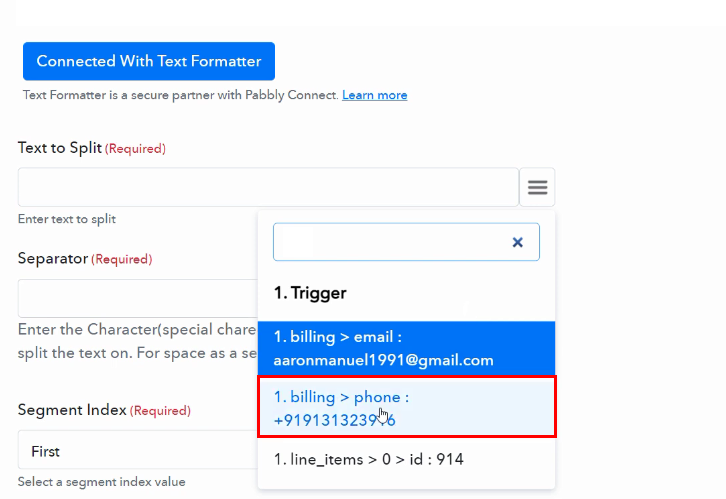
From the above webhook response, we have got the mobile phone number with a (+) prefix and to remove that we have to add ‘Text Formatter’ in the action step.

(a) Select Application you Want to Integrate

Select Text Formatter for WooCommerce to WhatsApp Integration

Now, click on the plus (+) button and from the choose app select ‘Text Formatter’ and choose method as ‘Split Text’.

(b) Connect with Text Formatter

Connect with Text Formatter

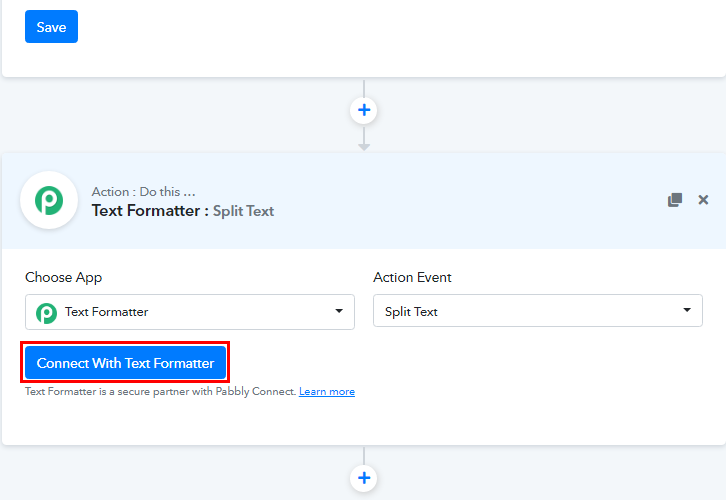
Promptly, click on the ‘Connect With Text Formatter’ button to connect it.

(c) Map the Field

Map the Fields

Following that, map the field to remove the (+) sign from phone number as shown in above image.

(d) Save and Send Test Request

Save and Send Test Request for WooCommerce to WhatsApp Integration

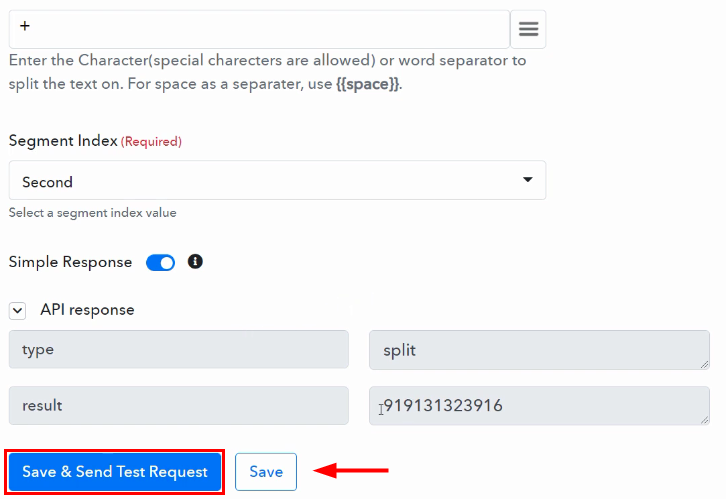
Once you are done mapping the fields, click on the ‘Save and Send Test Request’ button and you will see that the (+) sign is now removed from the phone number. After that, click on the ‘Save’ button.

Step 8: Setting Action for WooCommerce to WhatsApp Integration

Subsequently, to make this WooCommerce – WhatsApp integration work, we have to set up the last action for our workflow.

(a) Select Application you want to Integrate

Select Chat API for WooCommerce to WhatsApp Integration

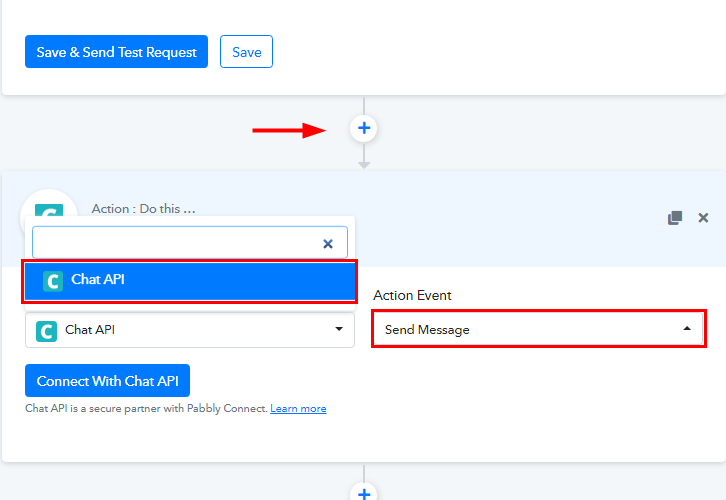
Now, click on the + button below and choose ‘Chat API’ in the choose app and in the method section select ‘Send Message’.

(b) Click on Connect Button

Connect Chat API

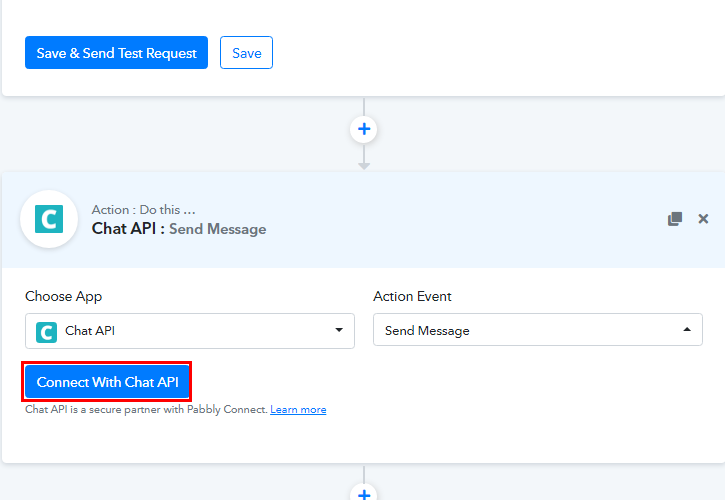
After choosing the application click on the ‘Connect with Chat API’ button to move forward.

Step 9: Connecting Chat API to Pabbly Connect

Next, in order to connect Chat API with Pabbly Connect, you need to paste the ‘API URL’ and ‘Token’ from your Chat API account. For that, you have to log in to your Chat API account.

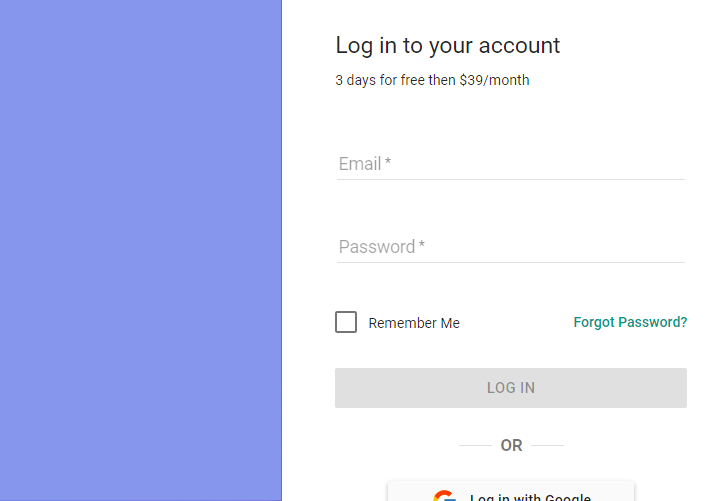
(a) Login to Chat API

Login to Chat API for WooCommerce to WhatsApp Integration

Now, login to your ‘Chat API’ account by filling up your credentials or log in with Google.

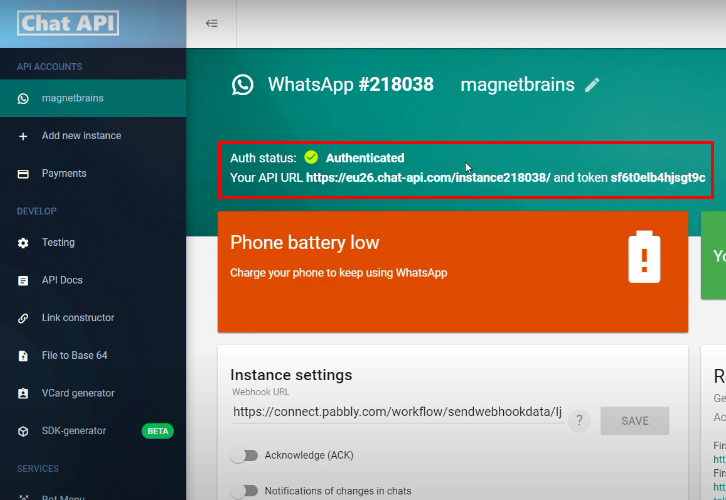
(b) Copy API URL and Token

Copy API URL and Token

Further, you will be redirected to the dashboard of Chat API. From here, copy the ‘API URL’ and ‘Token’ as shown in above image.

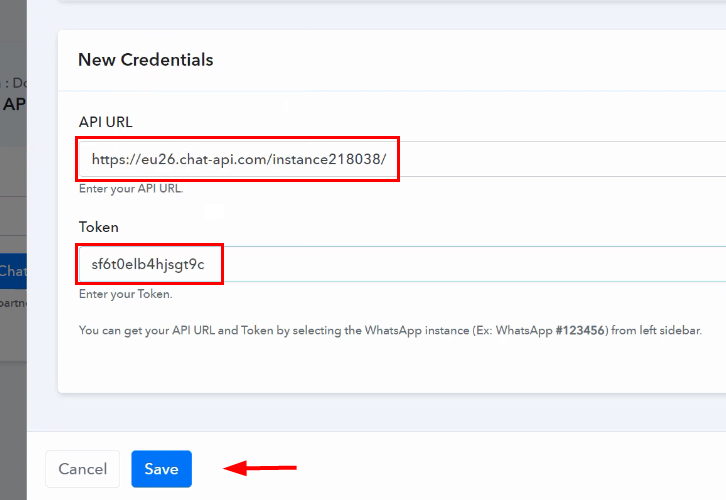
(c) Paste API URL and Token

Paste API URL and Token for WooCommerce to WhatsApp Integration

Promptly, paste the copied ‘API URL’ and ‘Token’ in the Pabbly Connect window. At last, hit the ‘Save’ button.

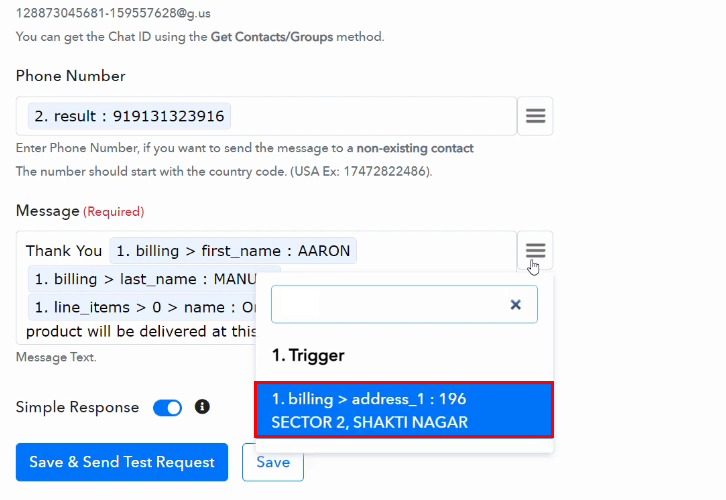
(d) Map the Fields

Map the Fields

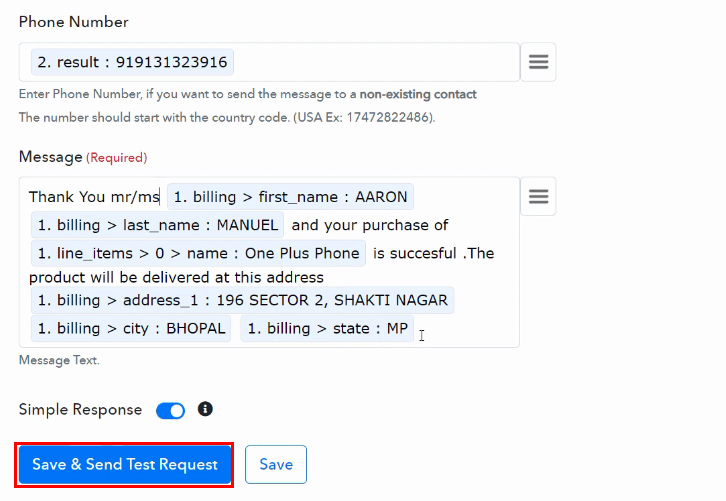
After this, map all the fields like ‘Phone Number’ and ‘Message’.

(e) Save & Send Test Request

Save and Send Test Request for WooCommerce to WhatsApp Integration

Once you are done mapping all the fields, click on the ‘Save and Send Test Request’ button.

Step 10: Check Response in WhatsApp Dashboard

Check the Response for WooCommerce to WhatsApp Integration

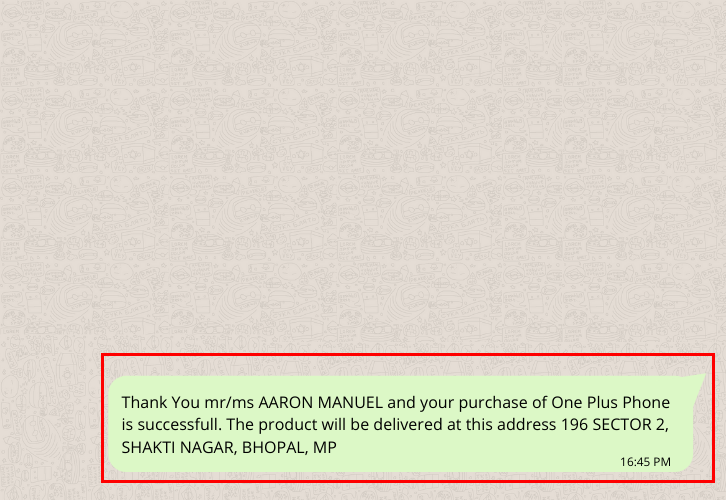
Lastly, when you check your WhatsApp account, notification of a newly purchased order has been sent successfully.

Conclusion –

In a nutshell, this was all about ‘How to Send WhatsApp Notifications for WooCommerce Orders’. Consequently, after completing the step-by-step procedure, you will end up sending a notification message via WhatsApp for every WooCommerce order automatically.

Meanwhile, you can grab Pabbly Connect for FREE with all its premium features.

Also, comment below your queries and suggestions.

You May Also Like to Read –
How to Add WordPress Post to Google Sheets as Row

How to Add WordPress Post to Google Sheets as Row

Do you often wonder about the easiest way to add WordPress post to Google Sheets as row?

How to Add WordPress Post to Google Sheets as Row

If so, then here in this blog we will discuss the easiest way to do that using automation software named Pabbly Connect.

Basically, Pabbly Connect is an integration and automation tool that helps connected unlimited premium applications. The best part about the tool, it doesn’t require any kind of coding skill.

Why Choose This Method Of Integration?

In contrast with other integration services-

  • Pabbly Connect does not charge you for its in-built apps like filters, Iterator, Router, Data transformer, and more
  • Create “Unlimited Workflows” and smoothly define multiple tasks for each action
  • As compared to other services which offer 750 tasks at $24.99, Pabbly Connect offers 50000 tasks in the starter plan of $29 itself
  • Unlike Zapier, there’s no restriction on features. Get access to advanced features even in the basic plan
  • Try before you buy! Before spending your money, you can actually signup & try out the working of Pabbly Connect for FREE

Sign Up To Pabbly Connect  

But before jumping on to the integration process, let’s know about the services and the need for integration. WordPress is a web publishing software you can use to create a beautiful website or blog. It just may be the easiest and most flexible blogging and website content management system (CMS) for beginners.

On the other hand, Google Sheets allows users to edit, organize, and analyze different types of information. It allows collaborations, and multiple users can edit and format files in real-time, and any changes made to the spreadsheet can be tracked by a revision history.

By connecting WordPress and Google Sheets via Pabbly Connect, one can easily auto-populate the published post into Google Sheets without any manual work. All you have to do is set a workflow then Pabbly Connect will take care of the rest.

We have also an enclosed video. have a look at it.

Further, we have also attached a template for this integration to get you started more quickly. Also, for more apps and integrations, you can simply visit Marketplace.

Clone Template - WordPress and Google Sheets

Here in this blog, we will connect WordPress and Google Sheets.

So, let’s get started.

Step 1: Sign up to Pabbly Connect

Sign Up

Begin the process to add WordPress post to Google Sheets as row by clicking on the “Sign Up Free” icon on the Pabbly Connect dashboard. Afterward, either fill-up the details manually or sign up using Gmail credentials.

Try Pabbly Connect for FREE

Step 2: Access Pabbly Connect

Select Connect

Furthermore, after logging into the account, click on the “Access Now” button as shown in the above image.

Step 3: Workflow for WordPress to Google Sheets Integration

(a) Start with a New Workflow

Create New Workflow

Start the process of creating a workflow for integration by clicking on the “Create Workflow” button.

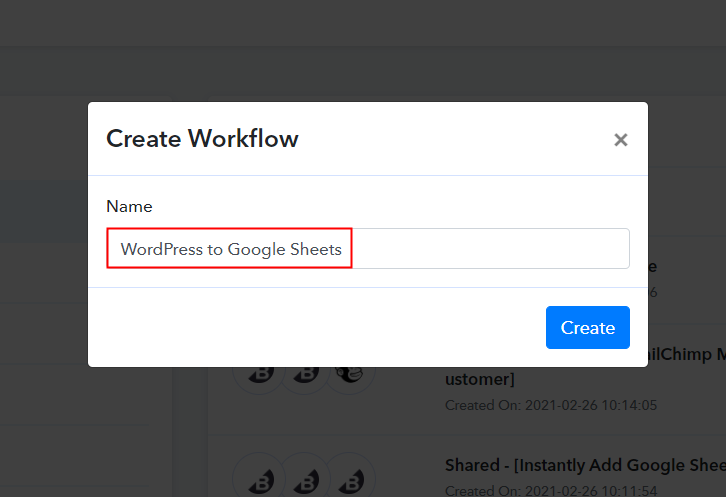
(b) Name the Workflow

Name the Workflow

Moreover, add the name of workflow which in our case is “WordPress to Google Sheets”. Although, you can always name the workflow according to your necessities.

Step 4: Setting Trigger for WordPress to Google Sheets Integration

Following, after creating a workflow, you have to choose the integration app to add WordPress post to Google Sheets as row. Pabbly Connect allows you to build innumerable workflows within minutes, click here to sign up for unlimited integrations for free.

(a) Select Application you Want to Integrate

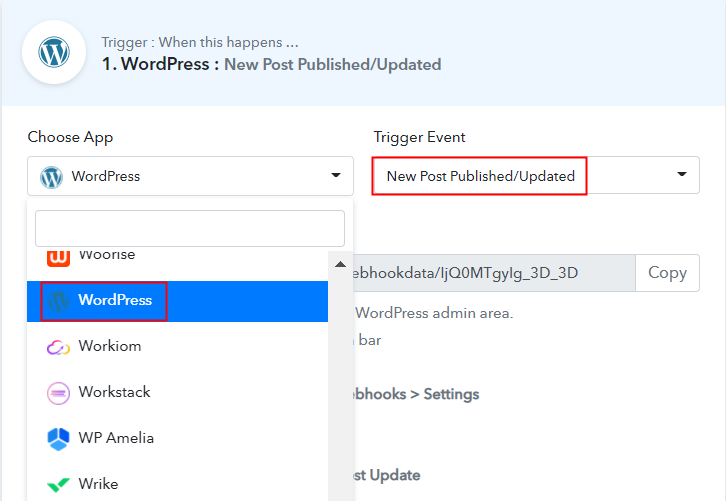
Select WordPress

The following step is to select “WordPress” from the dropdown, then choose the “New Post Published/Updated” option to add WordPress posts to Google Sheets as a row.

(b) Copy the Webhook URL

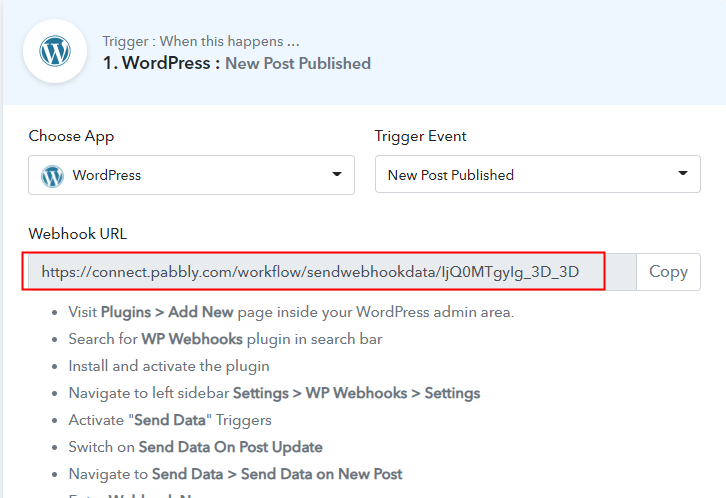
Copy the Webhook URL

The following step is to copy the Webhook URL.

Step 5: Connecting WordPress to Pabbly Connect

Next, to integrate WordPress with Pabbly Connect, you have to paste the copied Webhook URL into the account. For that, you must log in to your WordPress account.

(a) Head to WordPress Plugins Option

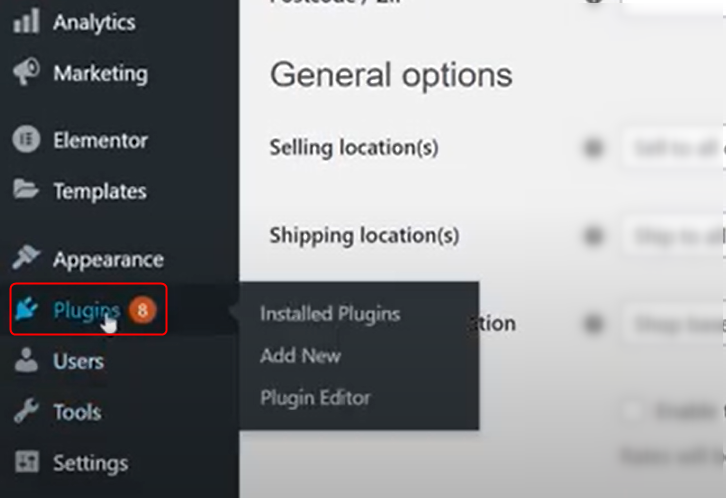
Head to WordPress Plugins Option

After logging into your WordPress account, go to the dashboard and click on “Plugins”.

(b) Search for WP Webhooks

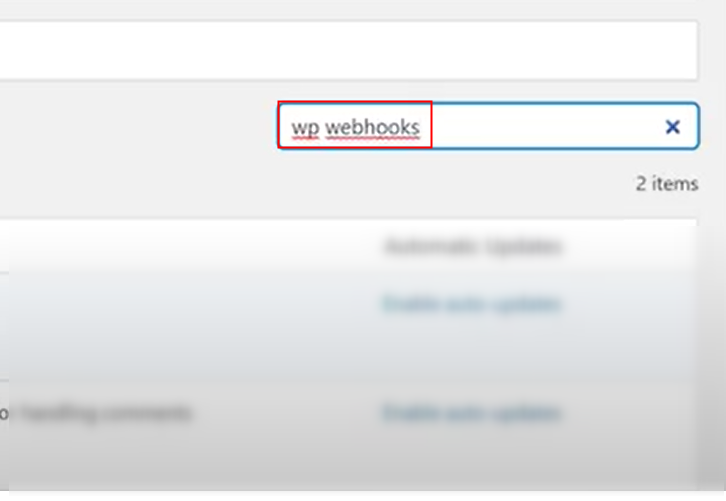
Search for WP Webhooks

Immediately look for WP Webhooks in the plugins section.

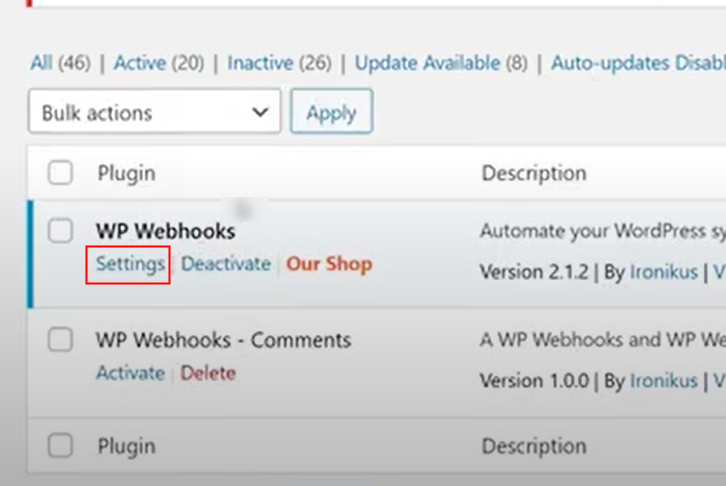
(c) Click on WP Webhooks Settings

Click on WP Webhooks Settings

Now, click on the “Settings” to move further.

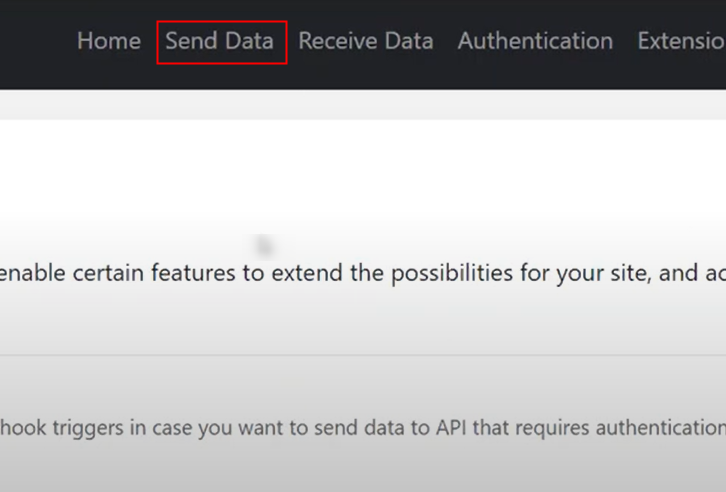
(d) Click on Send Data Option

Click on Send Data Option

As soon as you click on the settings option. Then a window will open there click on”Setting” again and then, click on the “Send Data” option.

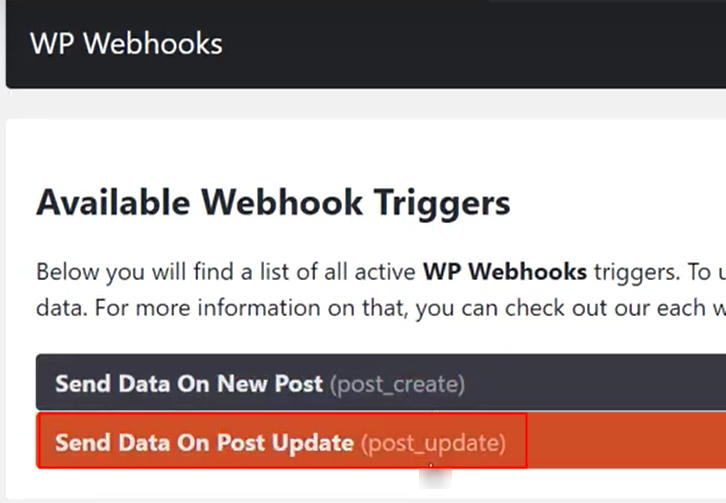
(e) Choose Send Data on Post Update

Choose Send Data on Post Update

As soon as you click on the “Send Data” option, it will show two options. Select the “Send Data on Post Update” option.

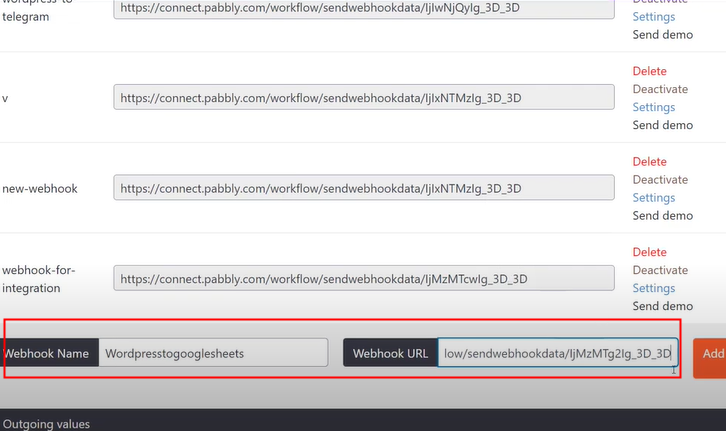
(f) Add Webhook URL

Add Webhook URL

Simply scroll down, add the webhook name and URL and then click on the “Add” button.

Step 6: Publish a Post in WordPress

Now, in order to check this WordPress and Google Sheets integration, we will capture the data from WordPress, and for that, we will create a dummy post in WordPress.

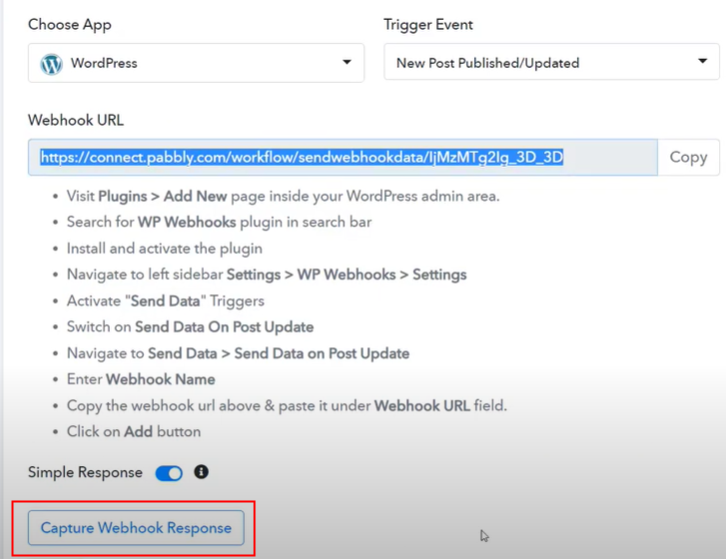
(a) Capture Webhook Response

Capture Webhook Response

After adding the webhook URL to your WordPress account, now we will click on the “Capture Webhook Response” button to capture the data from WordPress.

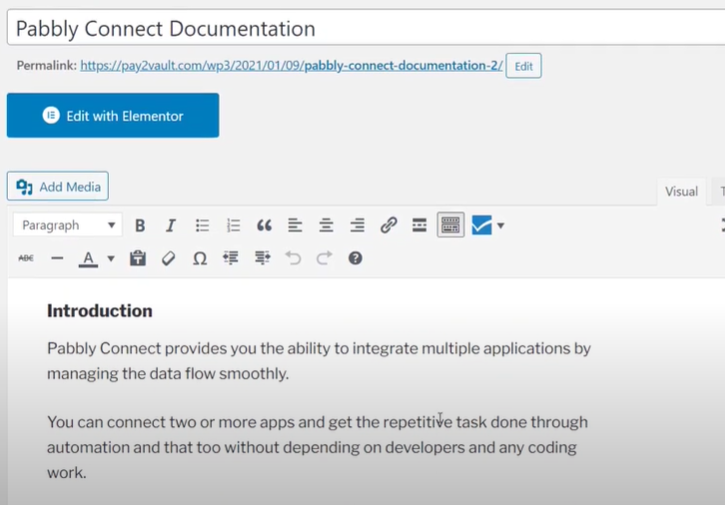
(b) Add New Post

Add New Post

Simply add the title of the post and attach the category as well which in our case is “Automation & Integration”.

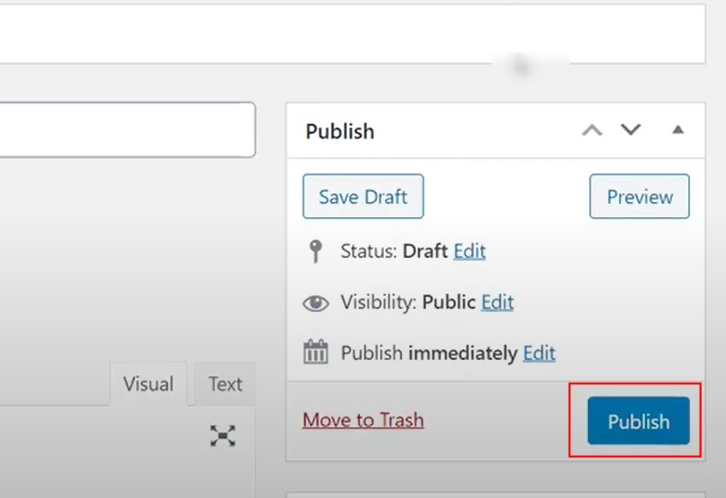
(c)  Publish Post

Publish Post

After doing all the changes, hit the “Publish” button.

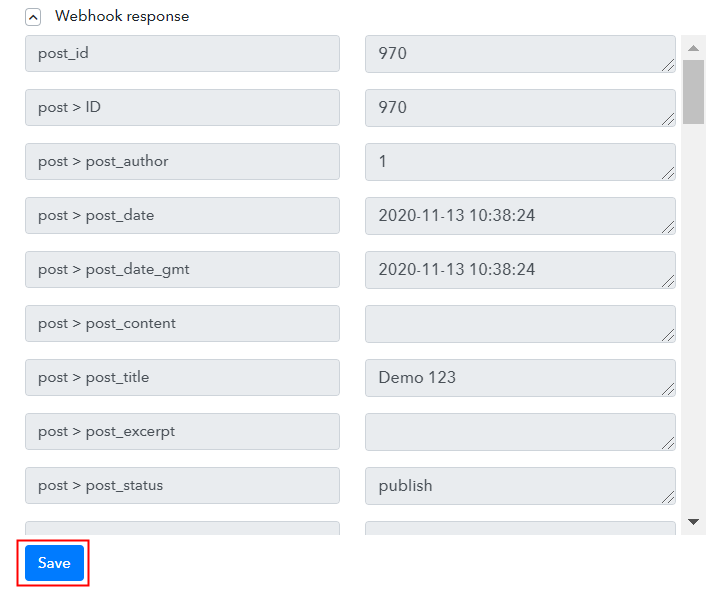
Step 7: Test the Response in Pabbly Connect Dashboard

Test the Response in Pabbly Connect Dashboard

After hitting the “Publish” button, the info will appear on the Pabbly Connect dashboard. Then, click on the “Save” button.

Step 8: Setting Actions for WordPress to Google Sheets Integration

To make this WordPress- Google Sheets integration work, you have to choose two actions for your trigger. The first action is to set the filters and the next is to add post details in Google Sheets.

(a) Select Application you Want to Integrate

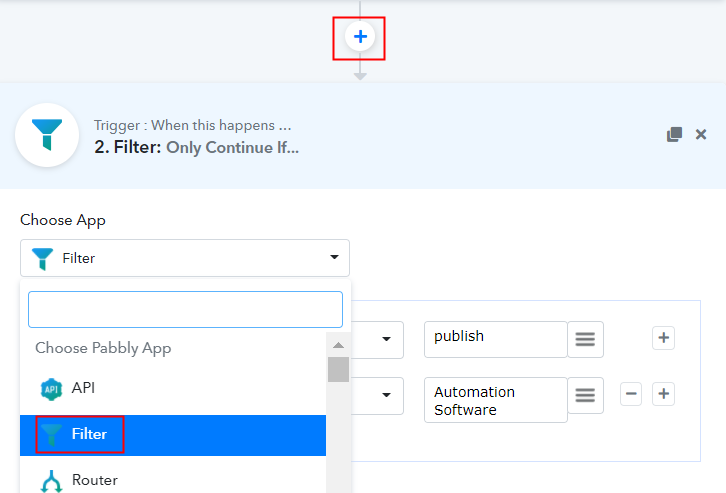
Select Filter

Next, we will add the “Filter” to set the conditions for WordPress posts. Select on the “+” icon and then select “Filter”.

(b) Map the Fields

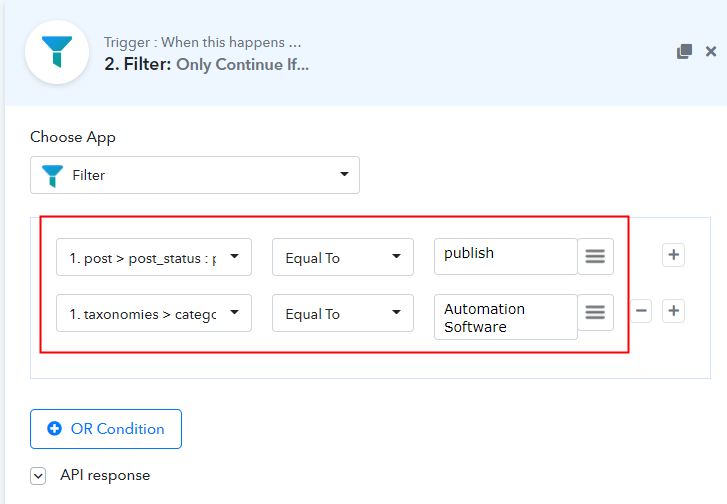
Map the Fields

Now, map “Post status” Equal to “Publish” and category Equal to “Automation Software”.

(c) Save & Send Test Request

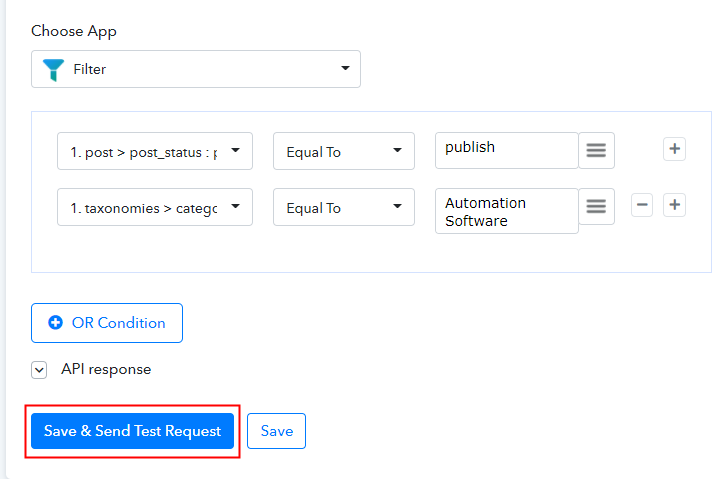
Save & Send Test Request

Simply click on the “Save & Send Test Request” button.

(d) Save the API Response

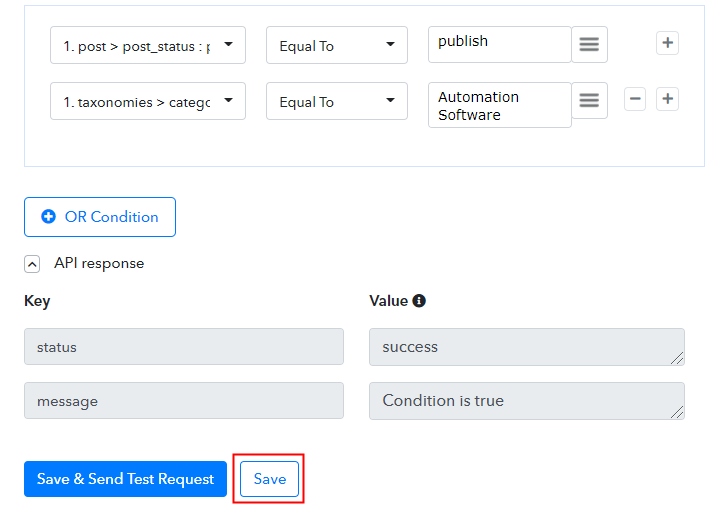
Save the API Response

As you can see we got the API response. Click the “Save” button.

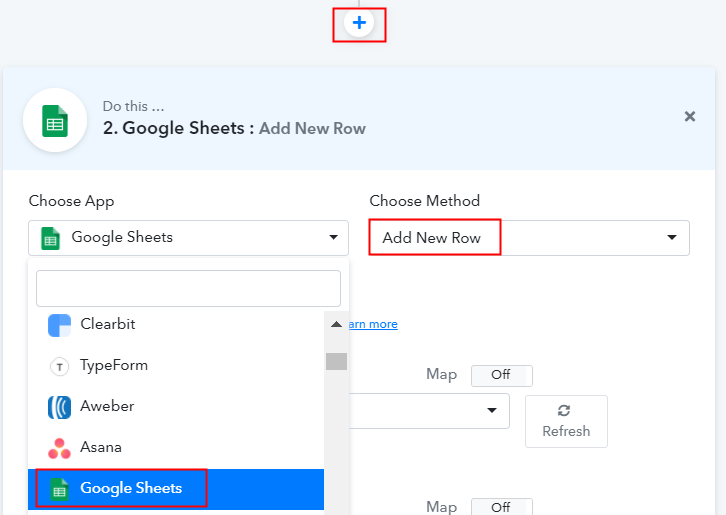
(e) Select Application you Want to Integrate

Select Google Sheets

Further, click on the “+” icon then select “Google Sheets” and in the choose method option, select ” Add New Row”.

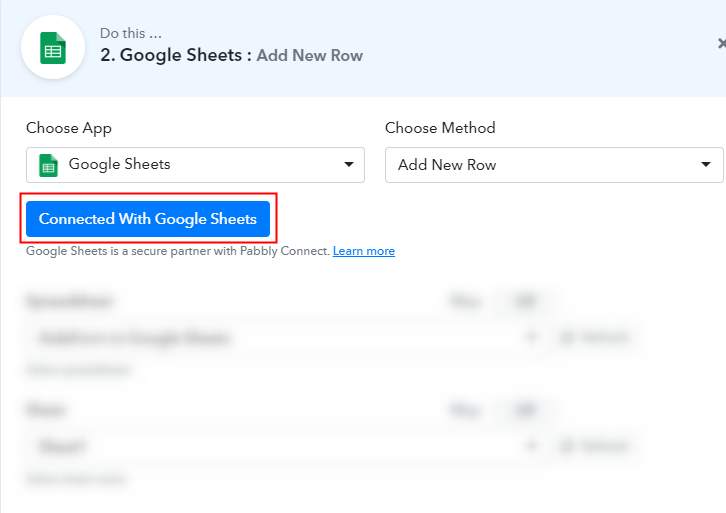
(f) Click the Connect Button

Connected with Google Sheets

After making all the necessary changes, click on the “Connected with Google Sheets” button. Further, it will open the authorization window, for which you have to log in to your Google account.

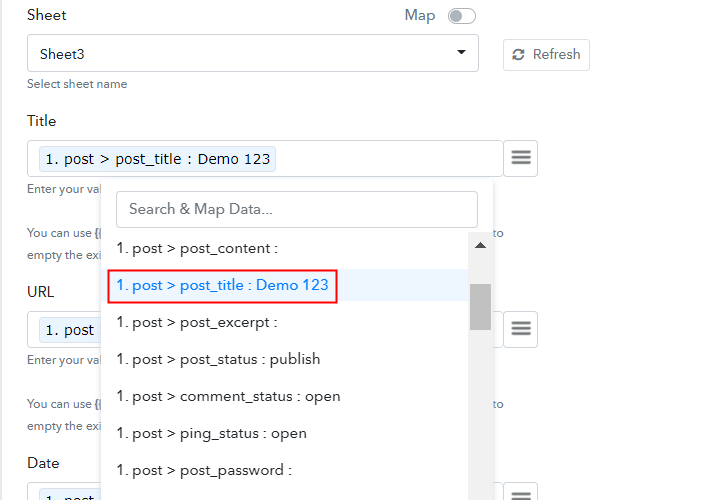
(g) Map Field Data

Map Field Data

All the sheets in your account will appear on the dropdown. Simply select the sheet, which in our case is “Cognito Forms Entries”. Now, all you have to do is add the necessary field from the drop-down such as for the name, select the name option, and for the email field select the email.

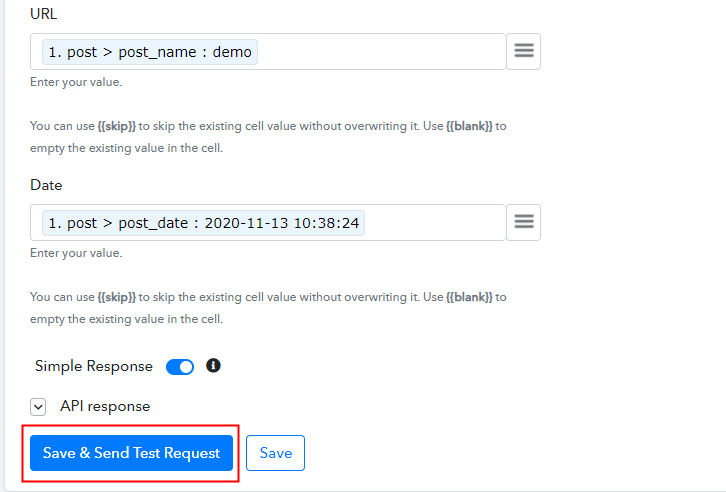
(h) Save and Send Test Request

Save and Send Test Request

Subsequently, after filling in all the details, save the setting and then “Send Test Request” to test the WordPress and Google Sheets integration.

Step 9: Check Response in Google Sheets

Check Response in Google Sheets

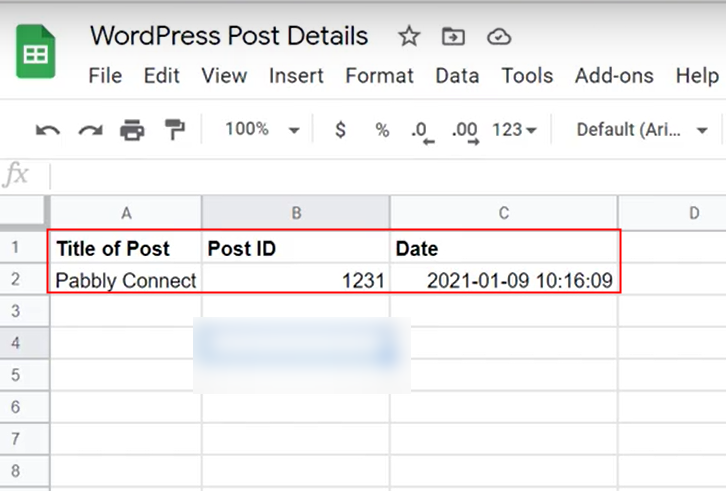
Lastly, when you check the Google Sheets, the entered details gets auto-populated in a sheet.

Conclusion –

Hopefully, now we have cleared all the uncertainty about the automation process. Here, in this post, we learned how to save WordPress post to Google Sheets as row in real-time. All you have to do is follow all the steps listed above and you can connect WordPress to Google Sheets quickly. One can easily avoid repetitive work with the help of automation. And in those situations, software like Pabbly Connect is true salvation that allows unlimited premium applications.

So, wait no longer. Go and get your access by signing up for a free account.

You May Also Like to Read –
How to Send Payment Reminder Emails from Google Sheets

Send Payment Reminder Emails from Google Sheets

Have you ever wondered if there is a way to send payment reminder emails from Google Sheets via Gmail automatically? If yes, then you don’t have to stress about it anymore as we have the best solution for all your problems called Pabbly Connect.

Send Payment Reminder Emails from Google Sheets

So, basically, Pabbly Connect is integration & automation software that lets you transfer data among multiple applications in real-time.

Most importantly, you don’t have to do any hard coding & even a fresher can use it efficiently. Also, this procedure will be just a one-time setup & after that, the workflow will take care of rest.

Why Choose This Method Of Integration?

In contrast with other integration services-

  • Pabbly Connect does not charge you for its in-built apps like filters, Iterator, Router, Data transformer, and more
  • Create “Unlimited Workflows” and smoothly define multiple tasks for each action
  • As compared to other services which offer 750 tasks at $24.99, Pabbly Connect offers 50000 tasks in the starter plan of $29 itself
  • Unlike Zapier, there’s no restriction on features. Get access to advanced features even in the basic plan
  • Try before you buy! Before spending your money, you can actually signup & try out the working of Pabbly Connect for FREE

Sign Up To Pabbly Connect 

But, before jumping directly on the procedure first, let’s learn a bit about the services. As you are aware, that Google Sheets is an online spreadsheet app and Gmail is a free email service. Both are powered by Google but still, they don’t have any kind of integration between them. So, to set up an integration for Google Sheets to Gmail we will be going to use Pabbly Connect.

After setting up an integration, whenever a record is added in Google Sheets then automatically send payment reminder emails via Gmail in real-time.

Additionally, we’ve embedded a video tutorial for this integration. So, have a look at it by yourself –

Apart from that, we also have a template for this integration that can assist you further. Simply tap on the ‘Use Workflow’ button below to get started. Moreover, you can visit Marketplace to look for more ready-made template of the workflow.

Send Payment Reminder Emails from Google Sheets Workflow

So, get ready as we’re going to discover the Google Sheets to Gmail integration.

Step 1: Sign up to Pabbly Connect

Sign Up

To send payment reminder emails from Google Sheets via Gmail, visit the Pabbly Connect website & hit the ‘Sign-Up Free‘ button. Next on the registration page that opens subsequently either use your existing Gmail account or manually fill the registration form to signup.

Try Pabbly Connect for FREE

Step 2: Access Pabbly Connect

Select Connect

Next, after logging into the account, click on the ‘Access Now’ button as shown in the above image.

Step 3: Workflow for Google Sheets to Gmail Integration

(a) Start with a New Workflow

Create New Workflow

Start the process of creating a workflow for integration by clicking on the ‘Create Workflow’ button.

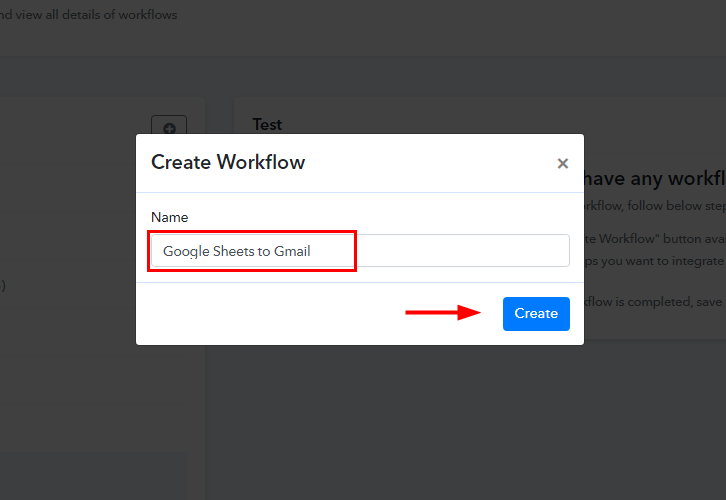
(b) Name the Workflow

Google Sheets to Gmail Integration

Moreover, add the name of workflow which in our case is ‘Google Sheets to Gmail’. Although, you can always name the workflow according to your necessities.

Step 4: Setting Schedule for Google Sheets to Gmail Integration

Following, after creating a workflow, you have to choose the integration app to set a time for sending an email via Gmail.

(a) Select Application you Want to Integrate

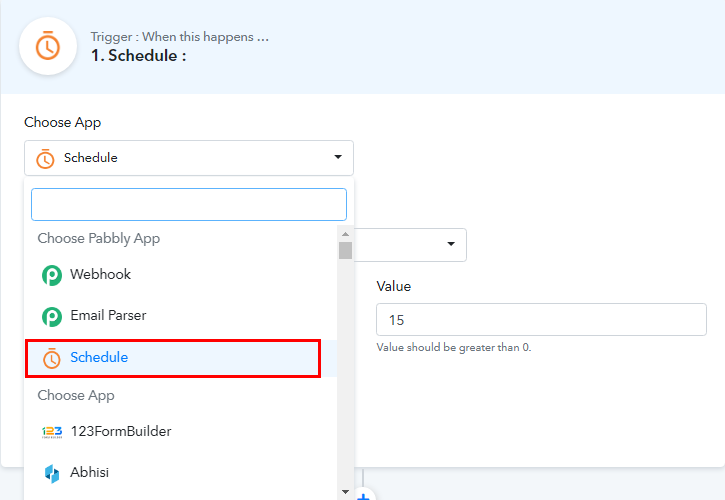
Select Schedule for Google Sheets to Gmail Integration

When you click on the create button to generate the workflow, a page containing the trigger window will open next. Select ‘Schedule’ from the choose app drop-down.

(b) Select Run Scenario

Select Run Scenario for Google Sheets to Gmail Integration

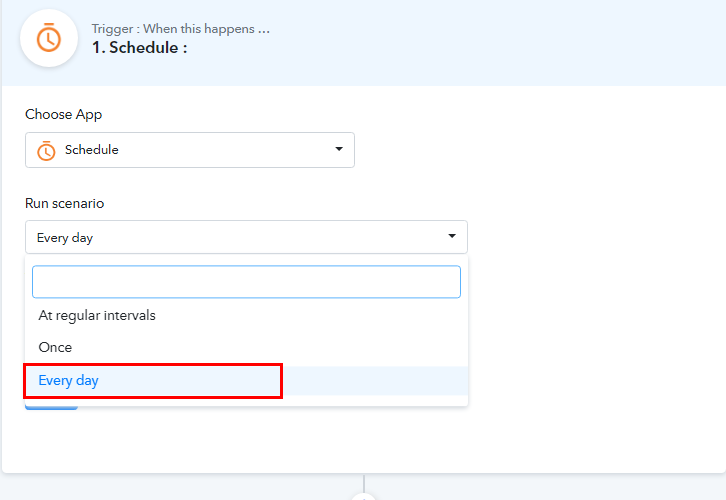
After this, you have to select a duration for sending a payment reminder emails via Gmail. We are selecting ’Every day’.

(c) Set the Time

Set the Time

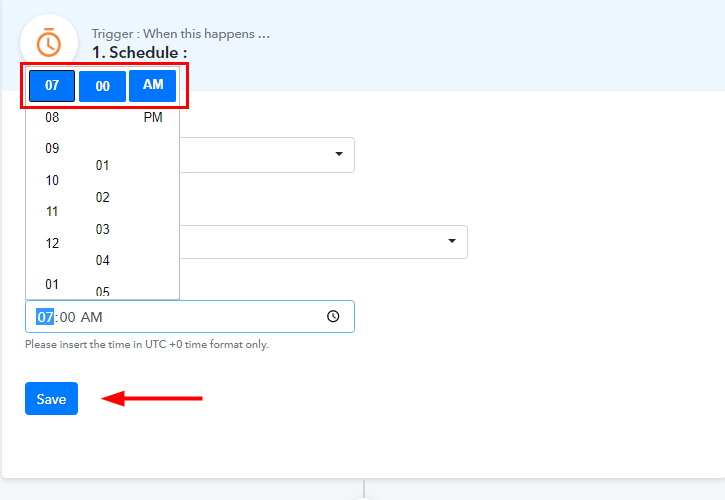
Now, set the time at which you want the email to be forwarded. Make sure to set the time in UTC format. At last, hit the ‘Save’ button.

Step 5: Setting Google Sheets for the Integration

Subsequently, to get the data for the further integration process, we are going to integrate Google Sheets in next step.

(a) Select Application you Want to Integrate

Select Google Sheets for Google Sheets to Gmail Integration

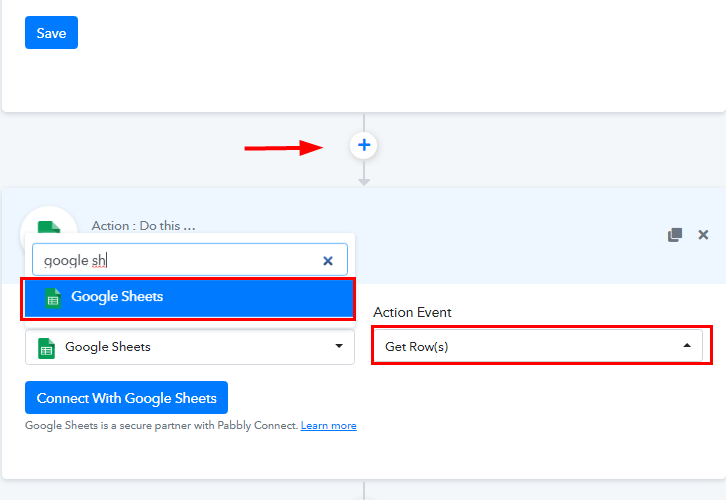
Next, click on the ‘+’ button below and choose the application that you want to integrate. Here we will choose ‘Google Sheets’ and in the method section select ‘Get Rows’.

(b) Click on Connect Button

Connect Google Sheets

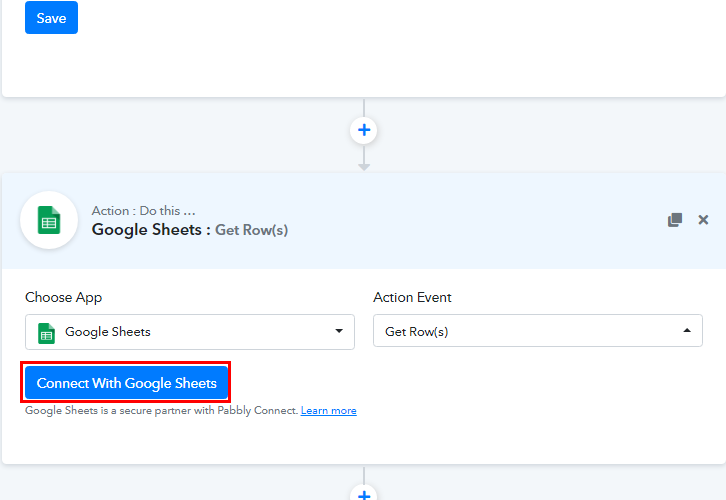
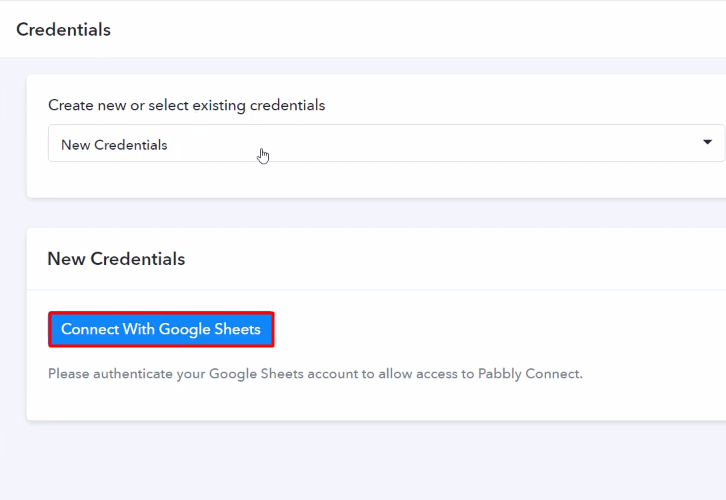
After choosing the application click on the ‘Connect with Google Sheets’ button to move forward.

(c) Authorize Application

Authorize Application Google Sheets for Google Sheets to Gmail Integration

Promptly, a window will slide from right. Here, again click on ‘Connect with Google Sheets’ button and authorize your Google account from which you want the data. Click on ‘Save’ button.

(d) Map the Fields

Map the Fields

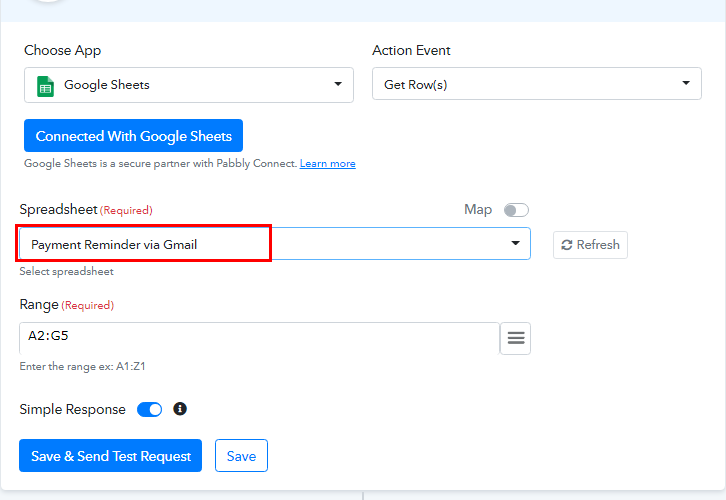
Next, choose your spreadsheet and enter the range of the data.

(e) Save and Send Test Request

Save and Send Test Request

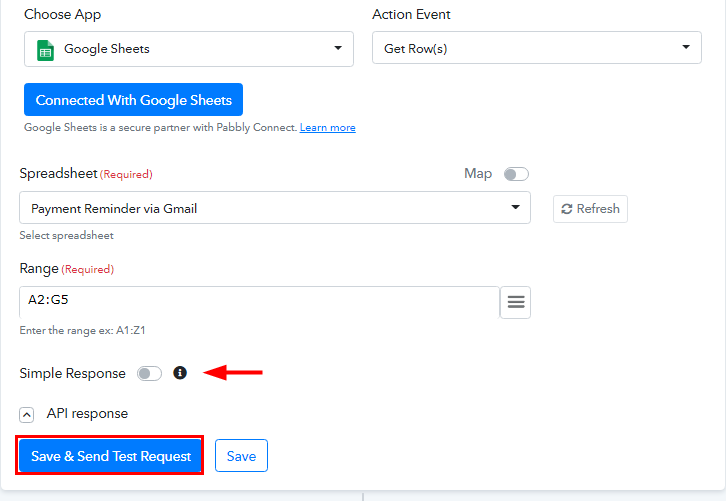
Once, you are done selecting spreadsheets, click on ‘Save and Send Test Request’ button. But make sure to toggle off the ‘Simple Response’ section (to get the data of each individual row).

(f) Save the Response

Save the Response for Google Sheets to Gmail Integration

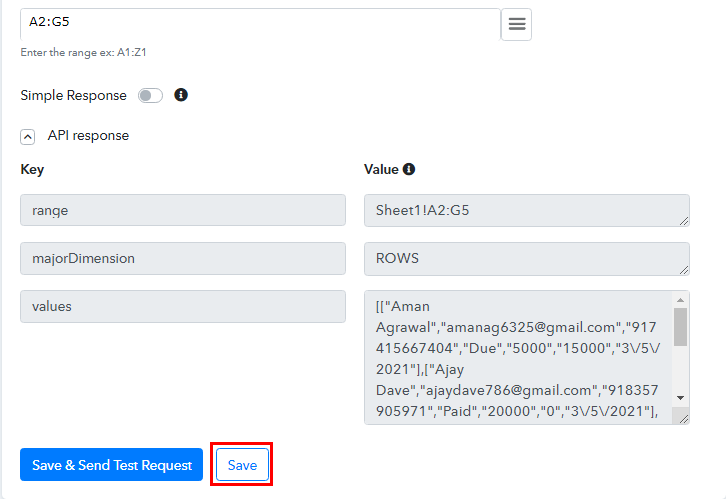
Further, you will get the response of each individual row. Finally, click on ‘Save’ button.

Step 6: Setting Action for Iterator

Subsequently, to sort out each data row from the above response, we have to add ‘Iterator’ in the action step.

(a) Select Application you Want to Integrate

Select Iterator for Google Sheets to Gmail Integration

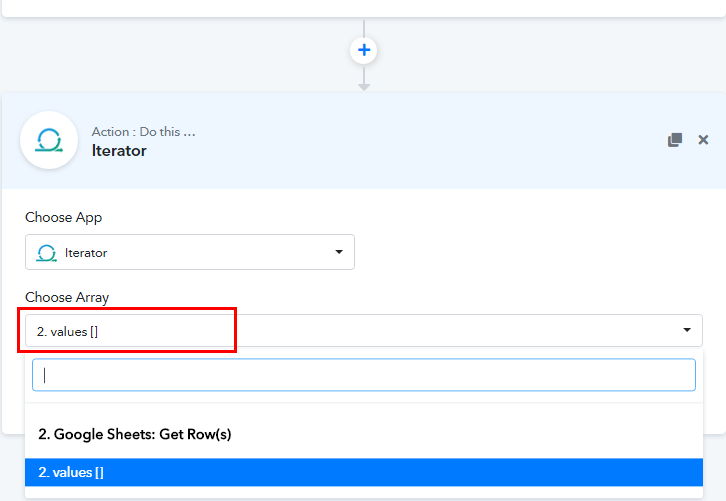
Now, click on the + button below and select ‘Iterator’ in the choose app.

(b) Choose Array

Choose Array

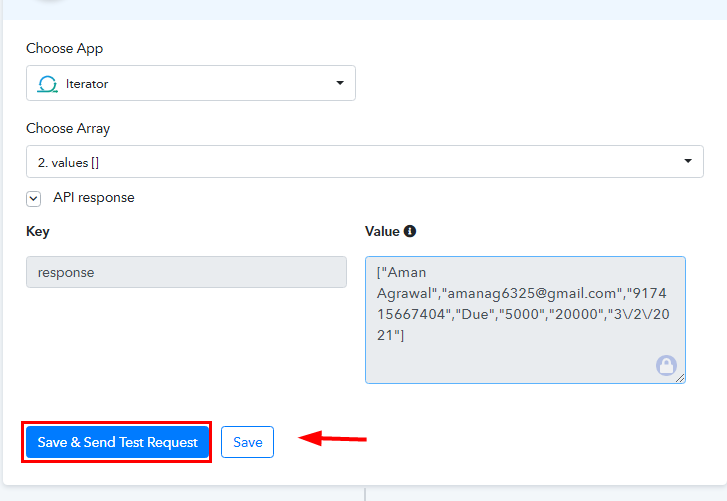
Next, you have to choose an array and then click on ‘Save and Send Test Request’ button.

(c) Save the Response

Save the Response for Google Sheets to Gmail Integration

Once you click on the ‘Save and Send Test Request’ button, soon you will get the response, click on ‘Save’ button.

Step 7: Setting Action for JSON Extractor

Promptly, to split the data into individual fields, we need to select ‘JSON Extractor’ in the next action step.

(a) Select Application you want to Integrate

Select JSON Extractor for Google Sheets to Gmail Integration

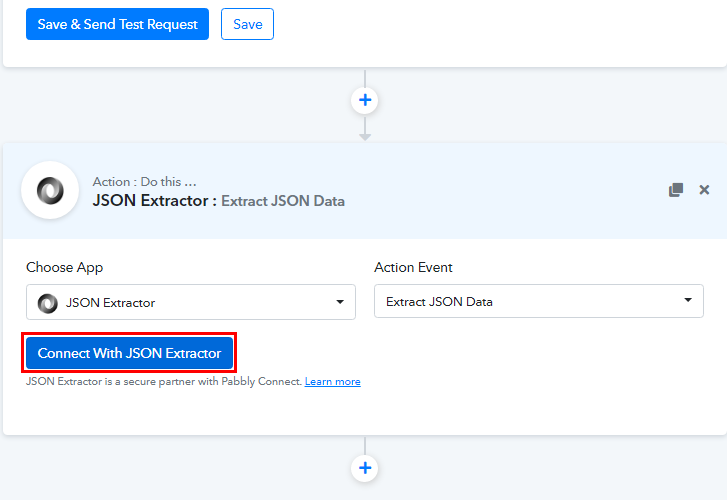
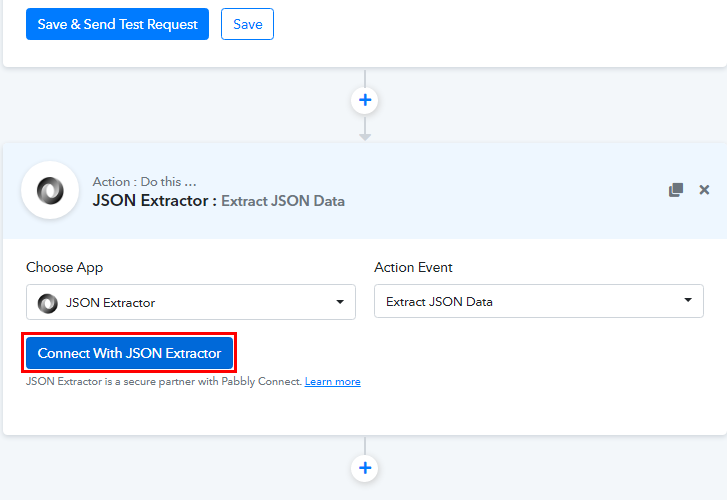
Next, click on the (+) button and select the app as ‘JSON Extractor’ and method as ‘Extract JSON Data’.

(b) Click on Connect Button

Connect JSON Extractor

After choosing the application click on the ‘Connect with JSON Extractor’ button to move forward.

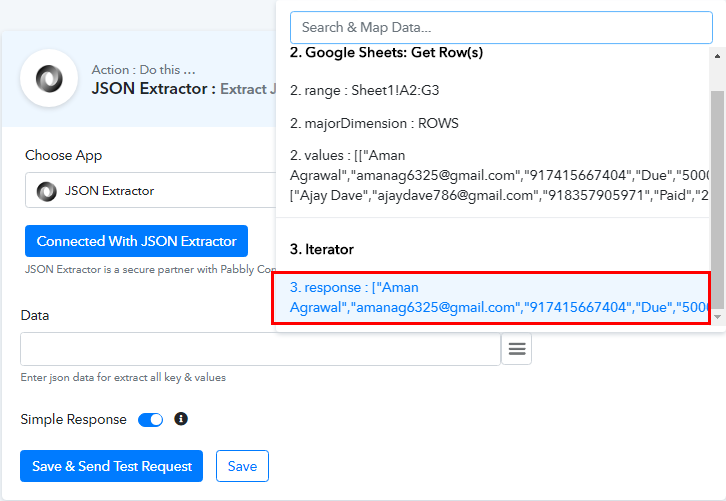
(c) Map the Field

Map the Field

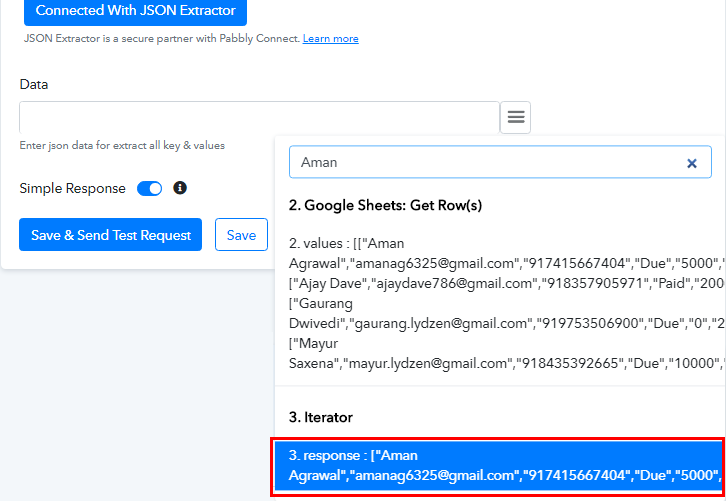
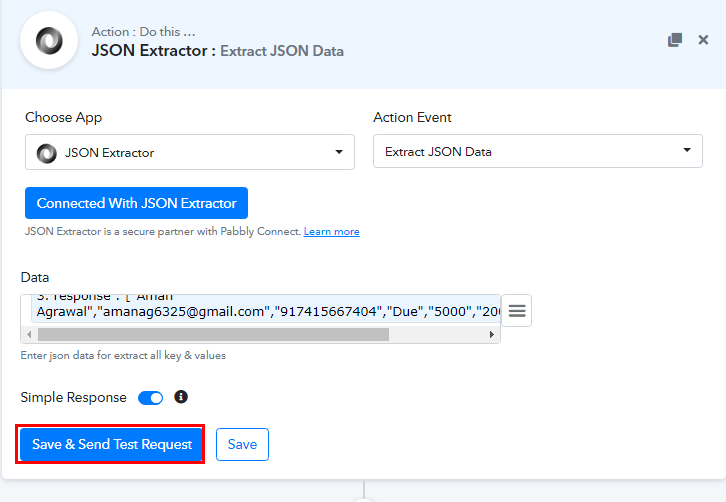
Now, to separate the data into individual fields you have to map the ‘Data’ field.

(d) Check and Save the Response

Save the Response for Google Sheets to Gmail Integration

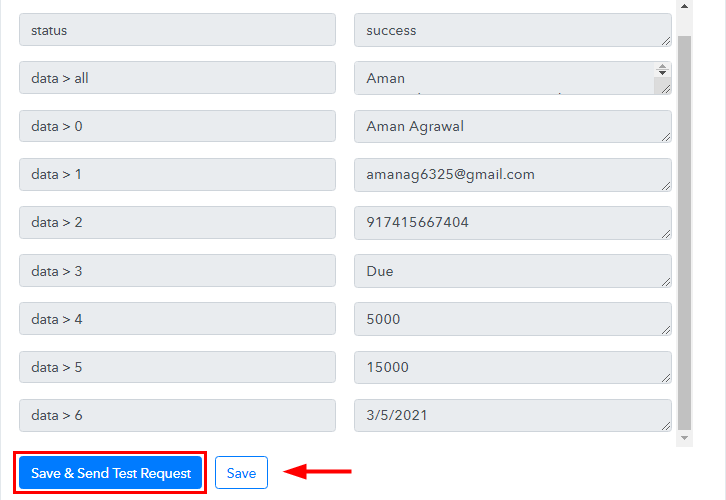
Further, click on ‘Save and Send Test Request’ button and you will the API response. Now, the data is extracted in individual fields.

Step 8: Setting Date/Time Formatter for Current Date

As we want to send the payment reminder emails every day. So, we need to insert current date in the application and for that, we have to integrate ‘Date/Time Formatter’.

(a) Select Application you want to Integrate

Select Date/Time Formatter for Google Sheets to Gmail Integration

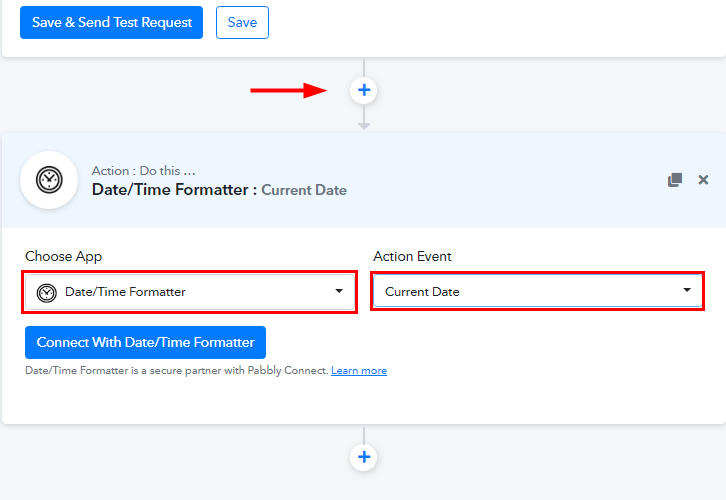
Next, click on the (+) button and select the app as ‘Date/Time Formatter’ and method as ‘Current Date’.

(b) Connect with Date/Time Formatter

Connect Date/Time Formatter

Promptly, click on the ‘Connect With Date/Time Formatter’ button.

(c) Map the Fields

Map the Fields for Google Sheets to Gmail Integration

Now, choose the format of date from ‘Basic Format’ drop-down.

(d) Save and Send Test Request

Save and Send Test Request for Google Sheets to Gmail Integration

Once you are done mapping the field data, click on the ‘Save and Send Test Request’ button and then click on ‘Save’ button.

Step 9: Setting Date/Time Formatter to Format Date

Further, to change the format of current and due date in ‘Timestamp’ format, we need to introduce ‘Date/Time Formatter’ again in the action step.

(a) Select Application you want to Integrate

Select Date/Time Formatter for Google Sheets to Gmail Integration

Next, click on the (+) button and select the app as ‘Date/Time Formatter’ and method as ‘Format Date Only’.

(b) Connect with Data/Time Formatter

Connect Date/Time Formatter

Now, click on the ‘Connect’ button.

(c) Map the Fields

Map the Fields for Google Sheets to Gmail Integration

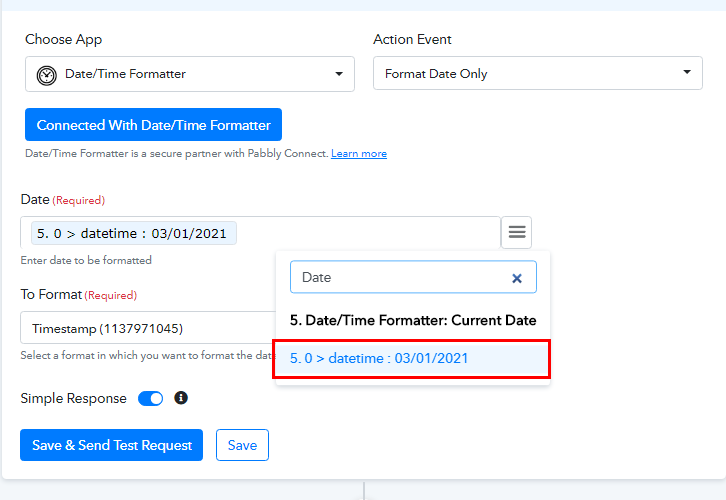
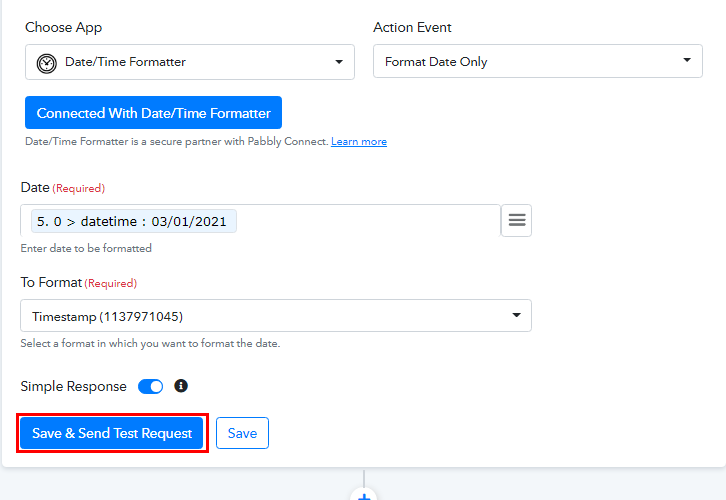
Promptly, map the current date in the ‘Date’ field and in the ‘To Format’ drop-down select ‘Timestamp’ option.

(d) Save and Send Test Request

Save and Send Test Request for Google Sheets to Gmail Integration

Once you are done mapping the field data, click on the ‘Save and Send Test Request’ button and the format of current date is changed into timestamp format.

Similarly, to change the format of due date, simply follow the above same steps, just map the due date in place of current date in the ‘Date’ field.

Step 10: Setting Action for Filters

Now, we have to set up two conditions to send an email via Gmail and for that, we will integrate ‘Filter’ in the next action step.

(a) Select Application you Want to Integrate

Select Filter for Google Sheets to Gmail Integration

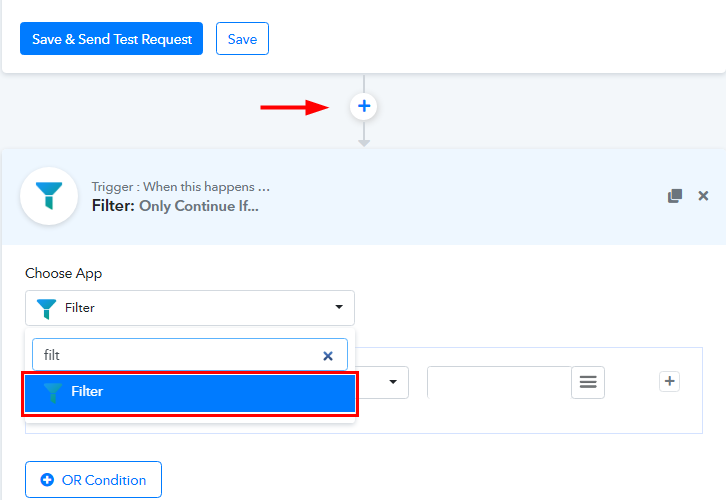
Now, click on the plus (+) button and from the choose app select ‘Filter’.

(b) Setting First Condition

Setting First Condition

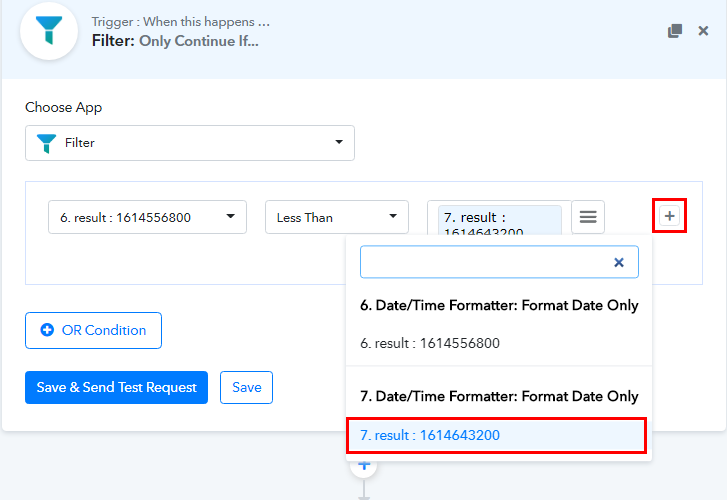
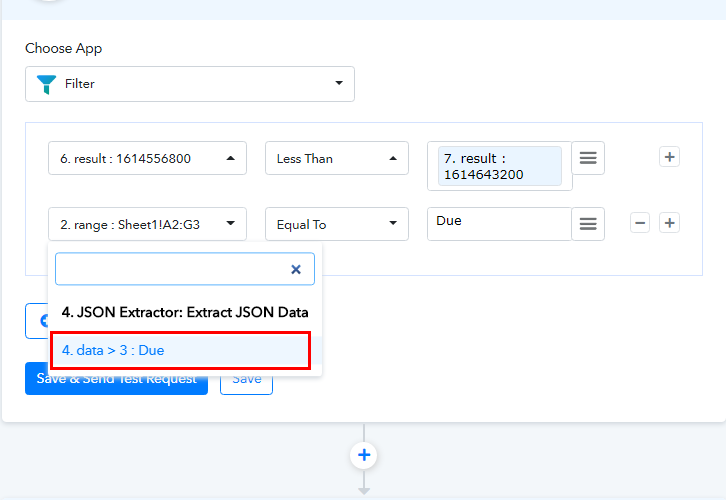
The first condition is to send an email only when the current date is less than due date. To do so, map the formatted current date in the first field, then map the formatted due date in the second field and set the condition as ‘Less than’. After this, hit the (+) icon to setup another condition.

(c) Setting Second Condition

Setting Second Condition

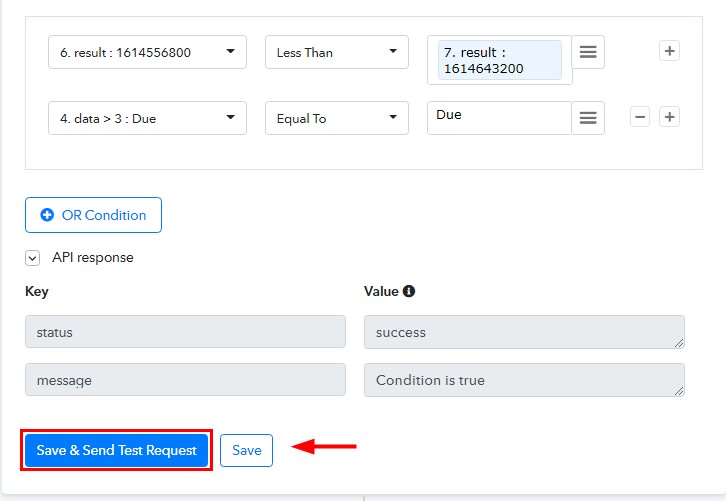
The second condition is to send an email only when the person hasn’t paid the fees yet or has payment status due. In this case, map the fees status (due) in the first fields, enter ‘Due’ in the second field and then set the condition as ‘Equal to’, (as shown in above image).

(d) Save and Send Test Request

Save and Send Test Request for Google Sheets to Gmail Integration

After this, click on the ‘Save and Send Test Request’ to get the response of filters. Finally, click on ‘Save’ button.

Step 11: Setting Action for Google Sheets to Gmail Integration

Now, it’s time to integrate the last action step of our workflow to complete the integration process, i.e, to send an email via Gmail.

(a) Select Application you want to Integrate

Select Gmail for Google Sheets to Gmail Integration

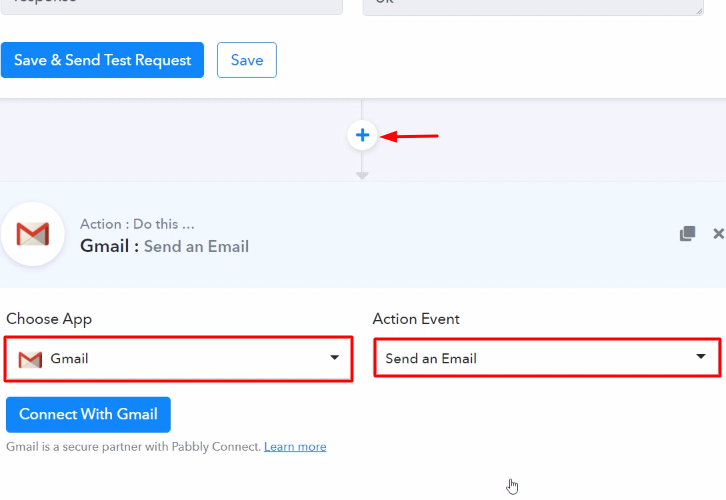
Now in this step, click on the + button below and choose the application that you want to integrate. Here we will choose ‘Gmail’ to integrate and in the method section select ‘Send an Email’.

(b) Click the Connect Button

Connect with Gmail

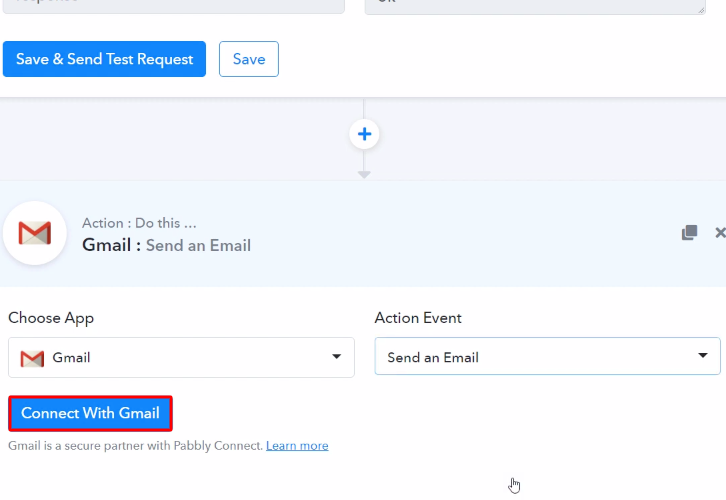
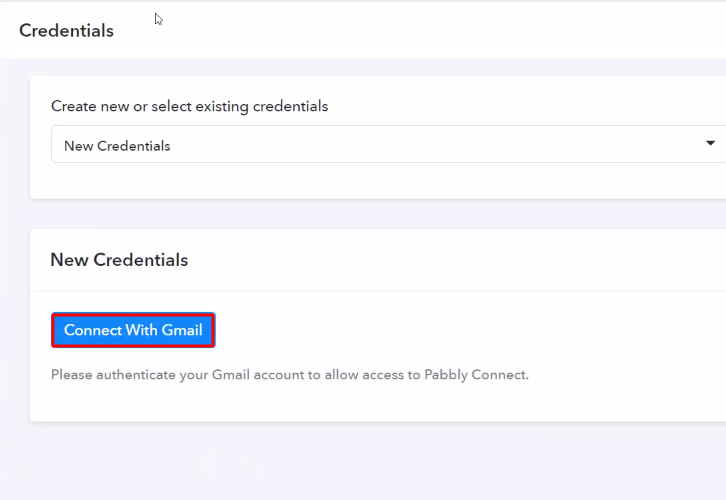
After choosing the application click on the ‘Connect with Gmail’ button to move forward.

(c) Authorize Application

Authorize Application Gmail for Google Sheets to Gmail Integration

Next, to authorize your Gmail account, you need to click on the ‘Connect with Gmail’ button and then select your Google account through which you want to send an email.

(d) Map the Fields

Map the Fields

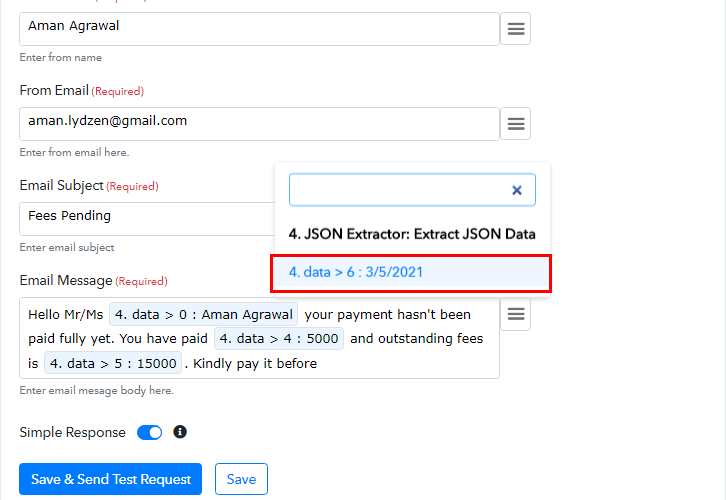
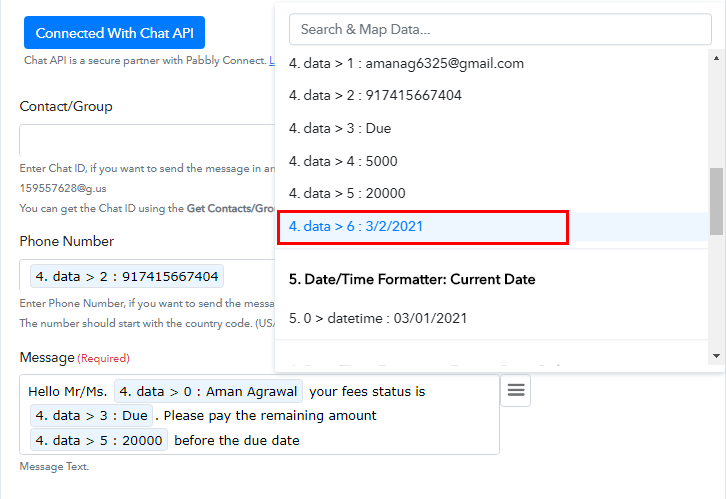
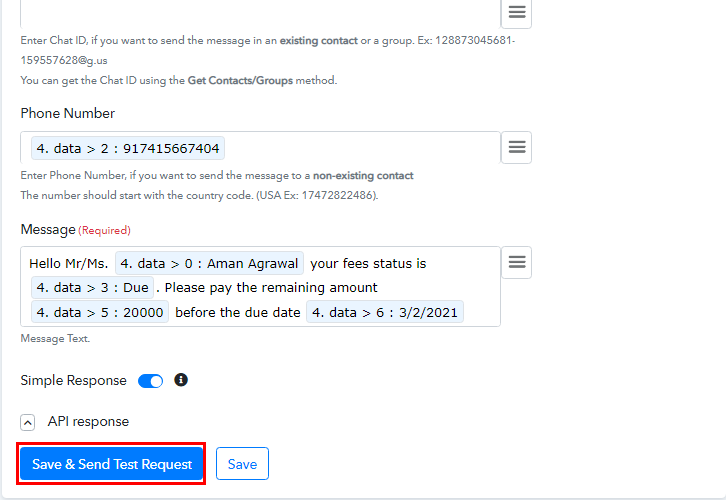
Further, map all the fields quickly like name, email address of recipient and sender, message and so on.

(e) Save and Send Test Request

Save and Send Test Request for Google Sheets to Gmail Integration

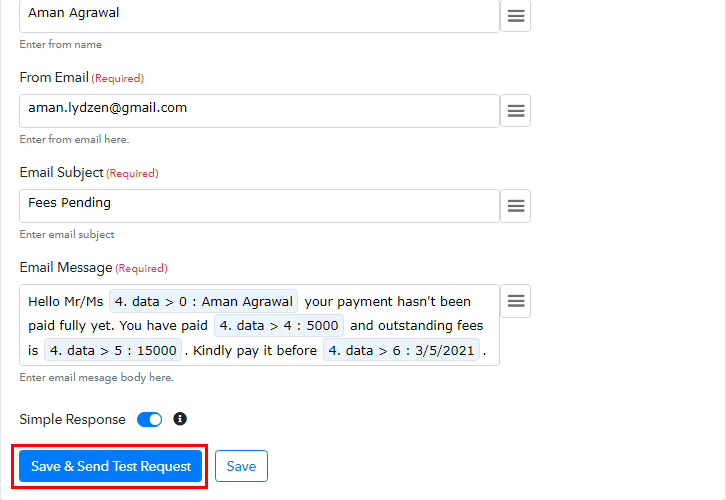
Once you are done mapping up all field data click on the ‘Save & Send Test Request’ button. Finally, click on ‘Save’ button.

Step 12: Check Response in Gmail Dashboard

Check Response for Google Sheets to Gmail Integration

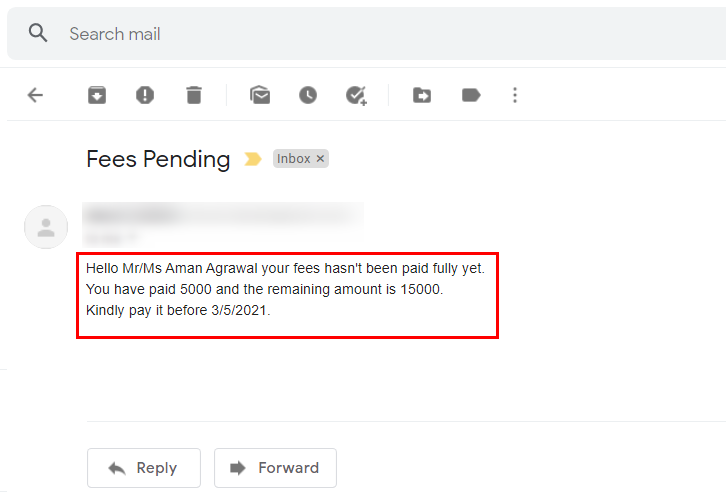
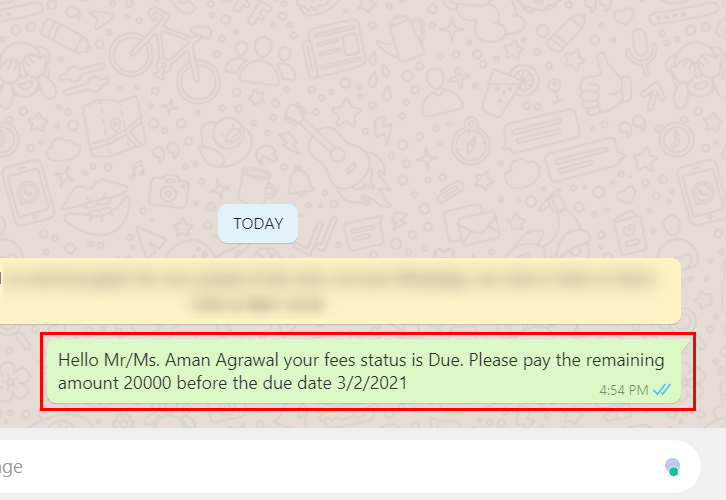
Here, you can see that integration was successful and the email has been delivered via Gmail about the payment reminder from Google Sheets.

Now, a subsequent payment reminder email will be sent to each person until the due date.

Conclusion –

Conclusively, now you know ‘How to Send Payment Reminder Emails from Google Sheets’. This is a one-time process, now all your manual work will be done by the online business automation & integration tool i.e Pabbly Connect. Just follow this step by step procedure mentioned above & your Google Sheets to Gmail integration is all set.

So, what are you waiting for? Go ahead & catch your deal by signing up for a free account.

In case of any doubts or suggestions, please leave your comments below.

You May Also Like to Read –
How to Add Salesforce Lead from New Campaign Monitor Subscriber

How to Add Salesforce Lead from New Campaign Monitor Subscriber

Tired of searching for a way to add Salesforce lead from new Campaign Monitor subscriber automatically? If yes! Then here I’m going to give you a step-by-step guide on how to automate the tasks using Pabbly Connect.

How to Add Salesforce Lead from New Campaign Monitor Subscriber

Well, as we already know that there is no direct integration possible between these two services. Therefore, we’ll be using a third-party software i.e, Pabbly Connect to integrate Campaign Monitor to Salesforce in real-time.

So basically, Pabbly Connect is an integration & automation service that enables you to share data between multiple applications.

Furthermore, this would be just a single-time setup & after that, the workflow will take care of the rest. Besides, you don’t have to be a developer for that, even a newbie can use it efficiently.

Why Choose This Method Of Integration?

In contrast with other integration services-

  • Pabbly Connect does not charge you for its in-built apps like filters, Iterator, Router, Data transformer, and more
  • Create “Unlimited Workflows” and smoothly define multiple tasks for each action
  • As compared to other services which offer 750 tasks at $24.99, Pabbly Connect offers 50000 tasks in the starter plan of $29 itself
  • Unlike Zapier, there’s no restriction on features. Get access to advanced features even in the basic plan
  • Try before you buy! Before spending your money, you can actually signup & try out the working of Pabbly Connect for FREE

Sign Up To Pabbly Connect 

Before we begin the procedure, let’s learn a bit about the services. Campaign Monitor is an email marketing service that helps you to send emails to subscribers. Whereas, Salesforce is a cloud-based software company that provides CRM service and also a complementary suite of enterprise applications focused on customer service, marketing automation, analytics, etc.

Nonetheless, once you’re done setting up this workflow. Your subscriber will get automatically listed in Salesforce as lead, whenever there is a new subscriber entry on Campaign Monitor.

Plus, we’ve embedded a video tutorial for this integration. So, have a look at it by yourself –

Not only that, but we have also embedded the template for this integration to help you begin your journey instantly. You can just click on the image available below to get started. Furthermore, visit Marketplace & look for more integrations & apps.

How

Hence, let’s begin the Campaign Monitor and Salesforce integration using Pabbly Connect in real-time.

Step 1: Sign up to Pabbly Connect

Sign Up

Start the procedure to add Salesforce lead from new Campaign Monitor subscriber by visiting the Pabbly Connect website. Now, click on the “Sign-Up Free” button available. You can either use your existing Gmail account or else manually fill in the registration form to signup.

Try Pabbly Connect for FREE

Step 2: Access Pabbly Connect

Select Connect

Now, press the “Access Now” button of the software “Connect” within the Pabbly applications.

Step 3: Workflow for Campaign Monitor with Salesforce Integration

(a) Start with a New Workflow

Create New Workflow

Then, start with creating a workflow by pressing the “Create Workflow” button.

(b) Name the Workflow

Name the Workflow

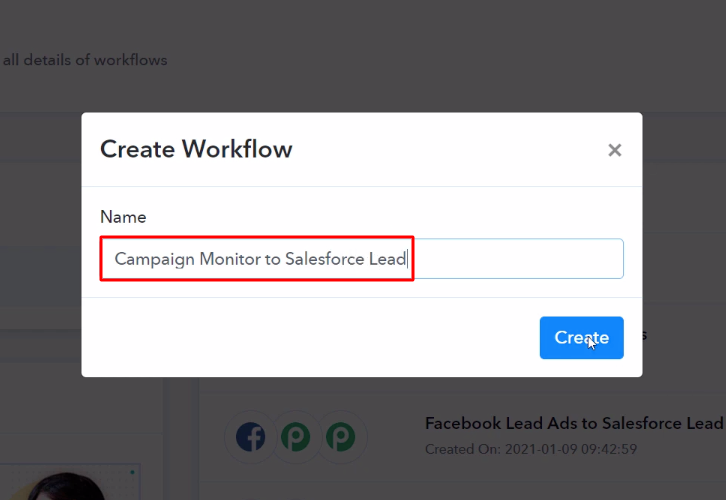
Now, name the workflow as per the integration or use-case (for example  – Campaign Monitor to Salesforce Lead, etc). Then, hit the “Create” button.

Step 4: Setting Trigger for Campaign Monitor to Salesforce Integration

Now, in order to automatically add Salesforce lead from new Campaign Monitor subscriber, you’ll need to set-up a trigger using Pabbly Connect.

(a) Select Application you Want to Integrate

Select Application you Want to Integrate Campaign Monitor
Now, select the “Campaign Monitor” as an app from the “Choose App” field drop-down options. And choose “New Subscriber” as a “Trigger Event”.

(b) Click on Connect Button

Click on Connect Button Campaign Monitor

Now, simply click on the “Connect with Campaign Monitor” button to proceed further.

Step 5: Connecting Campaign Monitor to Pabbly Connect

Now, in order to connect Pabbly Connect and Campaign Monitor for sharing data, you need to authorize the account using the API key.

(a) Go to Campaign Monitor Account Settings

Account Settings Campaign Monitor

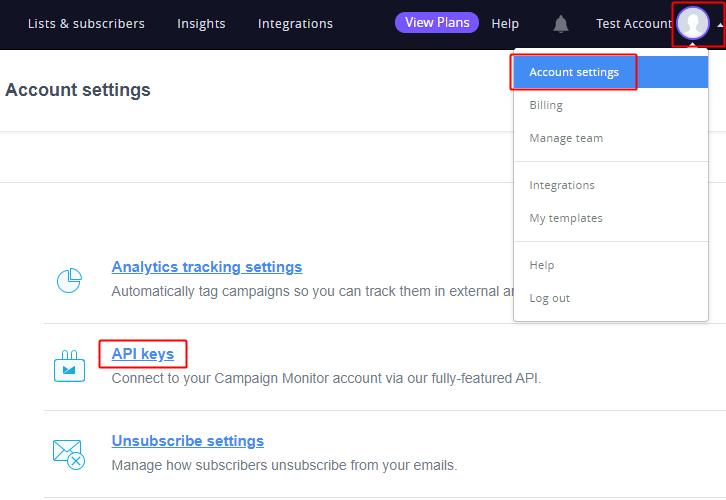
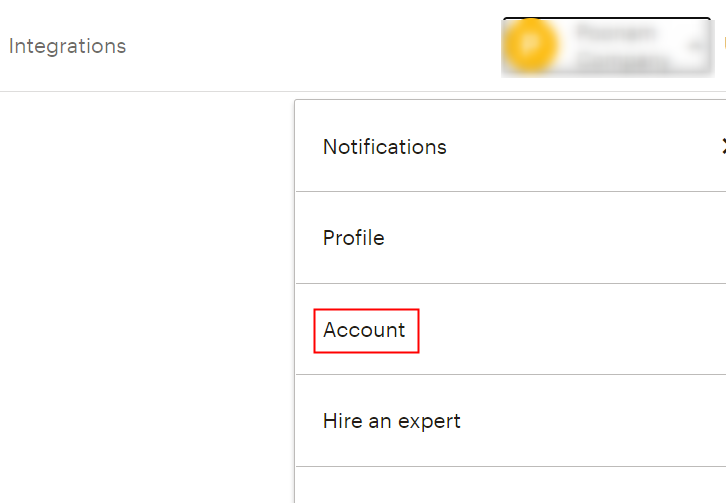
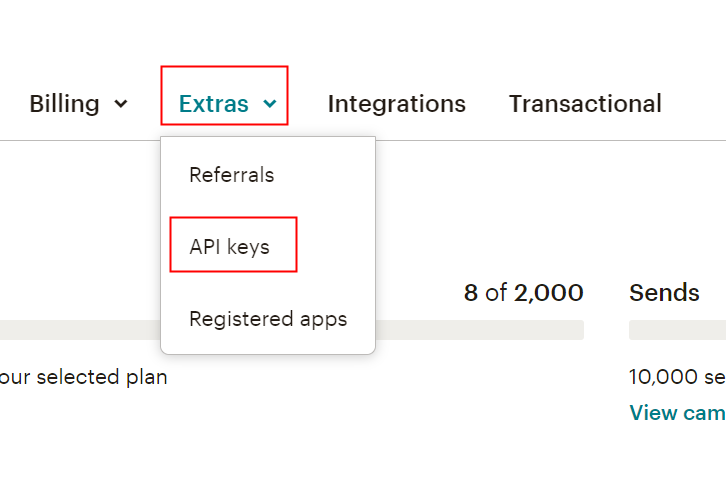
Log in to your Campaign Monitor account and click on the profile icon present at the top right corner. Then select the “Account Settings” option from the menu that opens next. Next, click on the “API Keys” section on the account settings page.

(b) Generate & Copy API Key

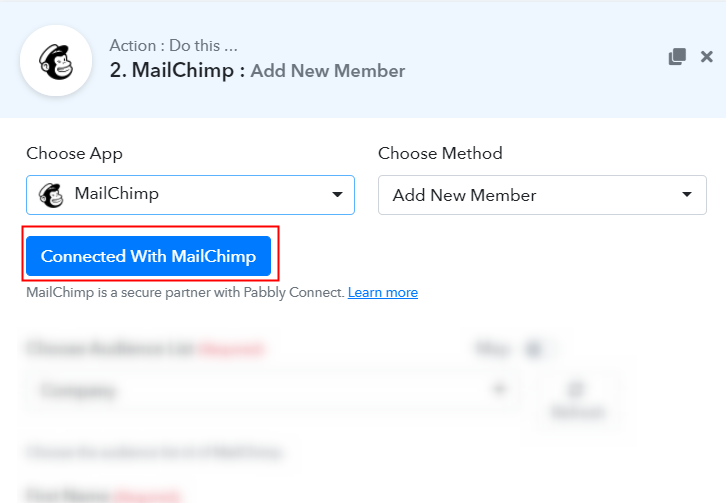
Show API Key Campaign Monitor

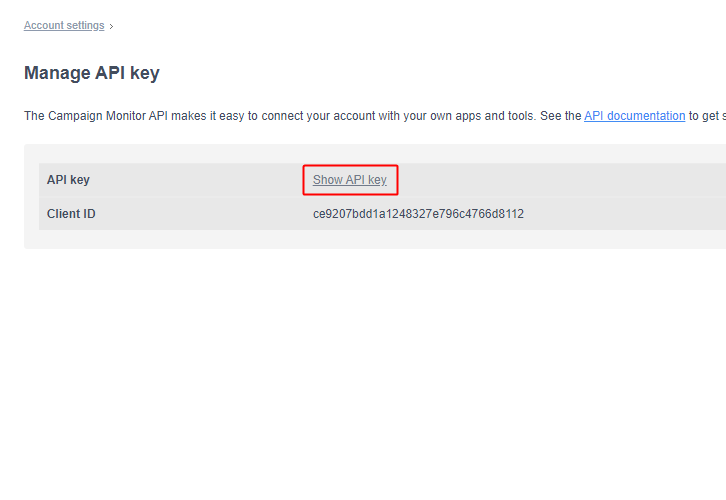
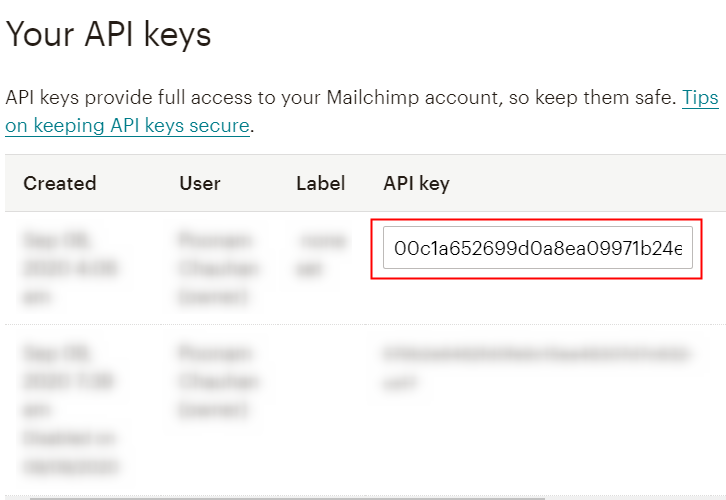
Now, click on the “Show API Key” option. Then, copy the generated API key.

(c) Paste the API Key

Paste the API Key

Next, paste the copied API key and click on the “Save” button.

(d) Map the Feilds

Map the Fields Campaign Monitor

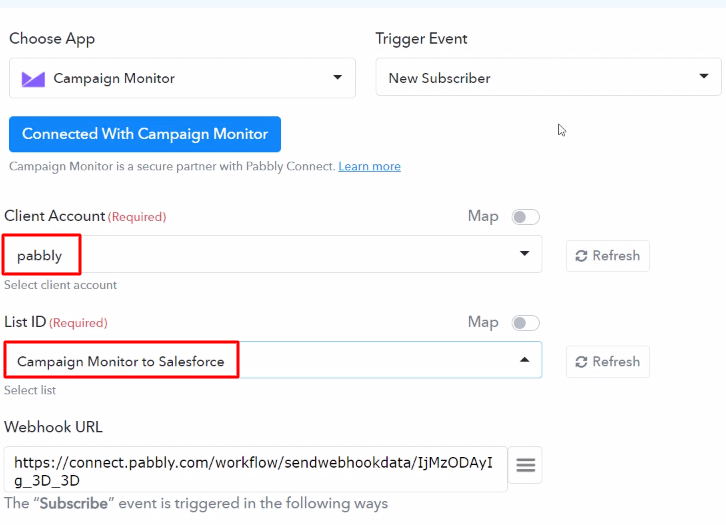
Now, map the respective fields given above to proceed further.

(e) Save & Send Test Request

Save & Send Test Request

Next,  click on the “Save & Send Test Request” button.

Step 6: Add a Subscriber

After setting up the trigger, now it’s time to make a dummy subscriber entry to connect Campaign Monitor with Pabbly Connect.

(a) Capture Webhook Response

Capture Webhook Response

Now, in order to test a trigger, hit the “Capture Webhook Response” button on the Pabbly Connect dashboard.

(b) Add New Subscriber

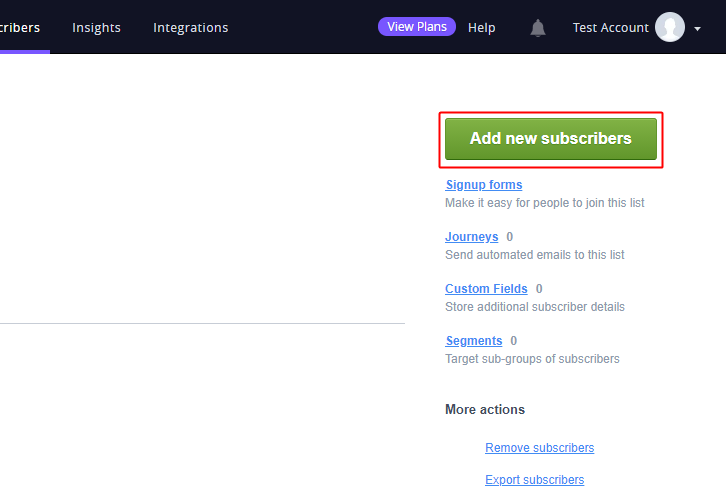
Click on the Add New Subscriber Button Campaign Monitor

Now, go to the select list’s page of Campaign Monitor and click the “Add new subscriber” button.

(c) Add Subscriber Details

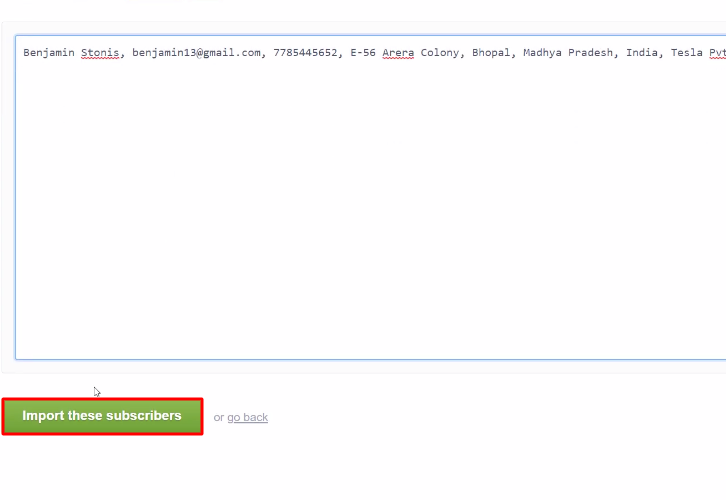
Add Subscriber Details Campaign Monitor

Add the subscriber details using comma-separated values in the text area and then hit the “Import these subscribers” button.

(d) Map the Field Values

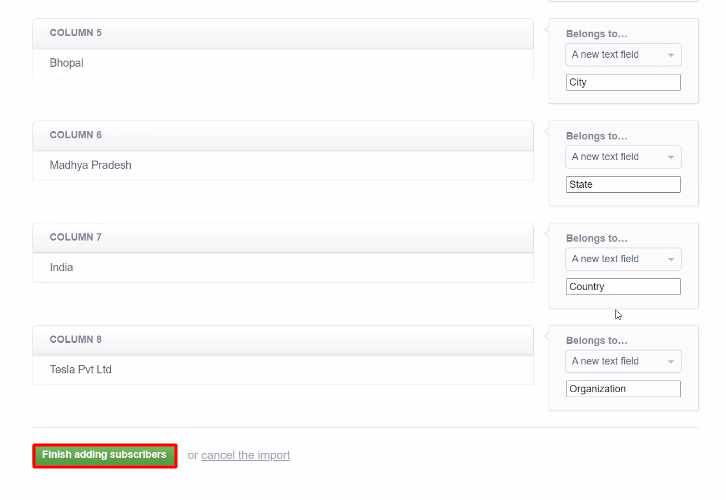
Map the Field Values Campaign Monitor

Next, map the field value entries with their respective field names and hit the “Finish Adding Subscribers” button.

Step 7: Test the Response in Pabbly Connect Dashboard

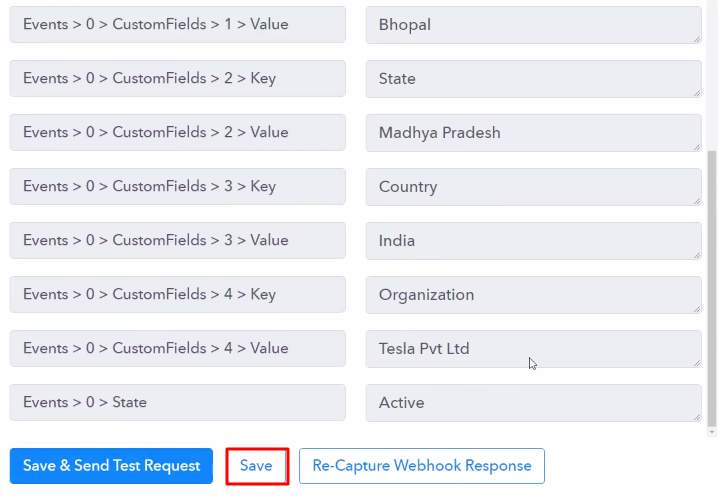
Save the Webhook Response

Once you click on the “Finish Adding Subscribers” button in Campaign Monitor, the subscriber info will appear on the Pabbly Connect dashboard. Then, click on the “Save” button.

Step 8: Setting Actions for Campaign Monitor with Salesforce Integration

To make this Campaign Monitor-Salesforce integration work, you have to choose two actions for your trigger. The first action is of Text Formatter to split the subscriber’s name according to our need. The second action is of Salesforce to add a lead.

(a) Select Application you Want to Integrate

Select Application to Format Text

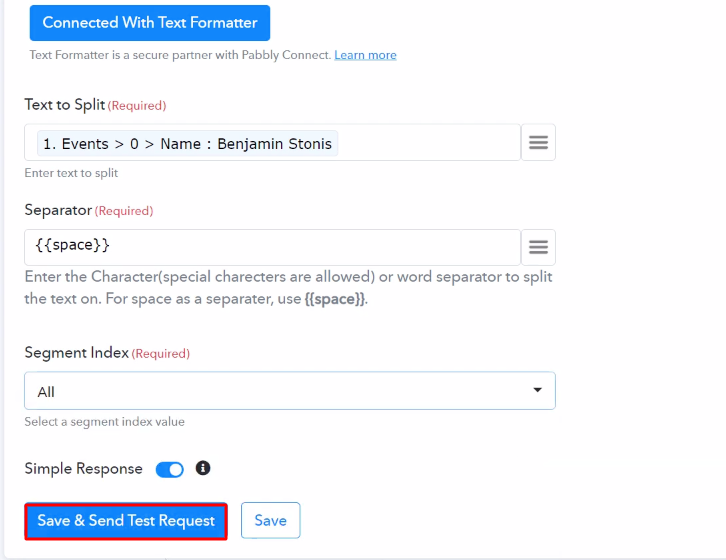
Now, to format the text, just hit the (+) button and then, select “Text Formatter” in choose app, and in the action event select “Split Text”. Then, click on the “Connect With Text Formatter” button.

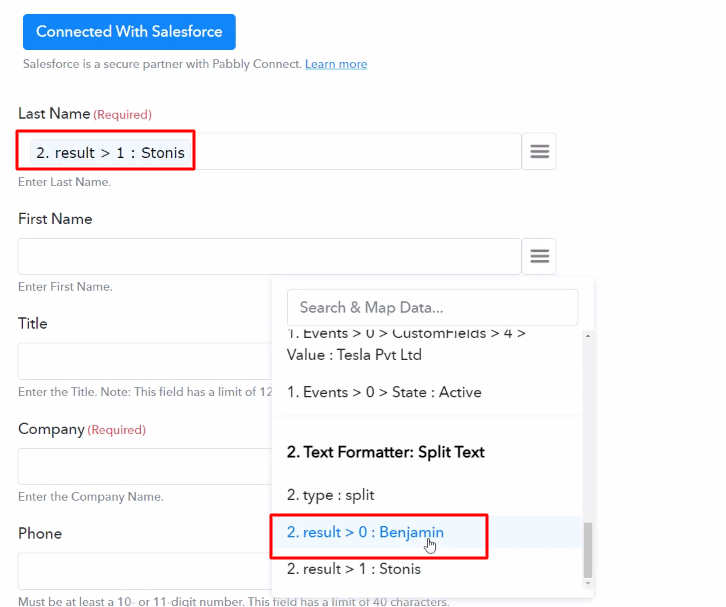
(b) Map the Fields

Map the Fields Text Formatter

Now, map the field to make the text in a proper format. After mapping all the details, simply press the “Save and Sent Request” button.

(c) Save the Response

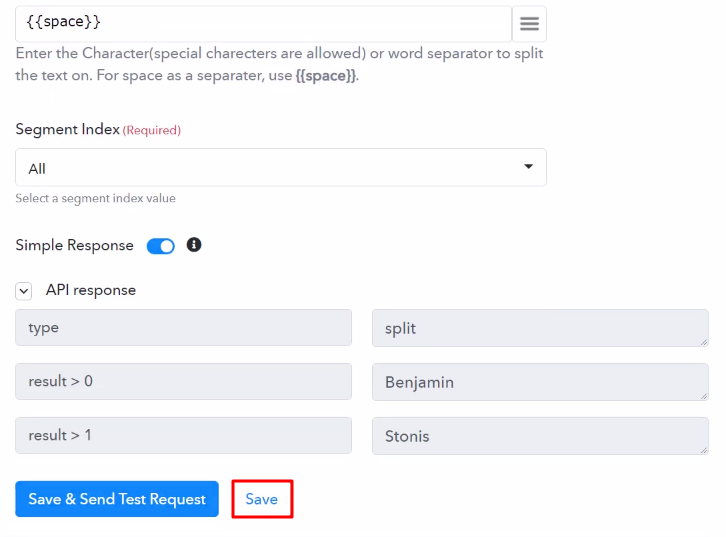
Save the API Response Text Formatter

Lastly, you will get the API response. And as you can see, now the text is in the proper format. Now, press the “Save” button.

(d) Select Application you want to Integrate

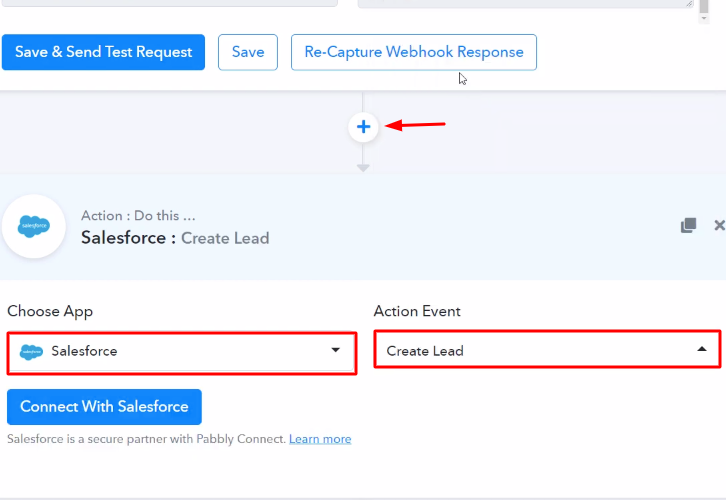
Select Salesforce

Now in this step, click on the + button below and choose the application that you want to integrate. Here we have chosen “Salesforce” to integrate and in the method section select “Create Lead”.

(e) Click the Connect Button

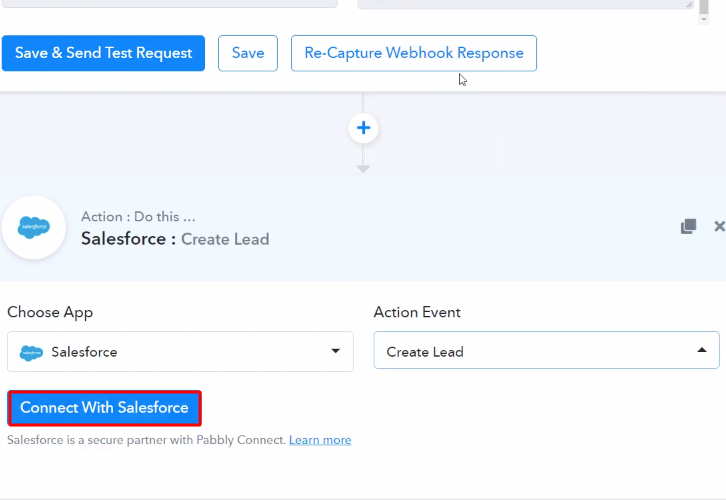
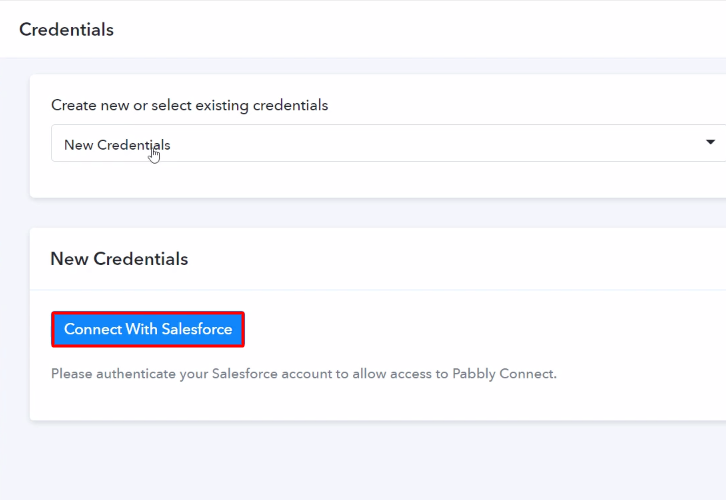
Connect with Salesforce

After choosing the application click on the “Connect with Salesforce” button to move forward.

Step 9: Connecting Salesforce to Pabbly Connect

To connect Salesforce to Pabbly Connect, you have to authorize the application. For this, you have to log in to your Salesforce account.

(a) Authorize Application

Authorize Application Salesforce

When we click on connect button, a window will slide in from the right side, here we will again click on the “Connect with Salesforce” button and grant permission to integrate Salesforce with Pabbly Connect.

(b) Map the Fields

Map the Fields

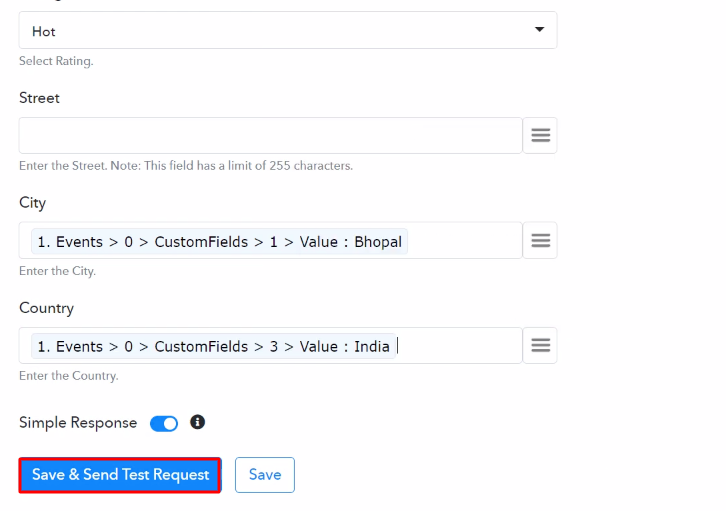
After connecting with your Salesforce account, map all the fields quickly like name, email, etc.

(c) Save and Send Test Request

Send Test Request

Once you are done adding up all field data click on the “Save & Send Test Request” button.

Step 10: Check the Response in Salesforce Dashboard

Check Response Salesforce

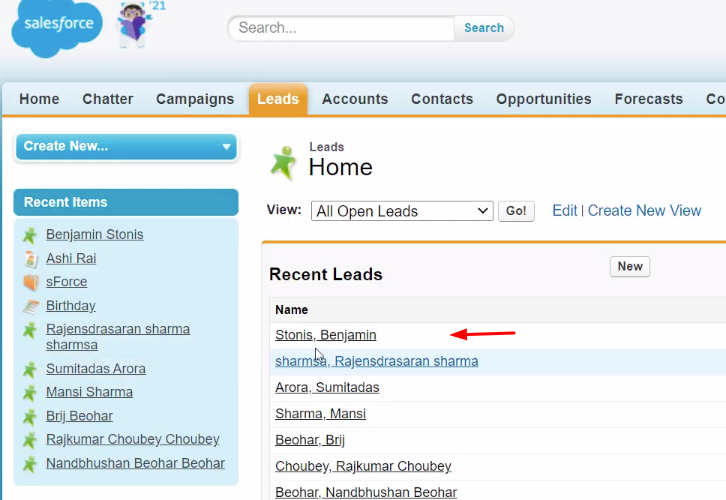
Finally, you can check the lead’s entry in your Salesforce account. So now you know how to add Salesforce lead from new Campaign Monitor subscriber using Pabbly Connect.

Conclusion –

To sum up, this was all about “How to Add Salesforce Lead from New Campaign Monitor Subscriber”. Consequently, after completing the step-by-step procedure, you will end up auto-creating the Salesforce lead from the newly added Campaign Monitor subscriber.

Meanwhile, you can opt for Pabbly Connect for FREE with all its premium features.

Also, comment below your queries and suggestions.

You May Also Like to Read:

How to Create ActiveCampaign Contact for New BigCommerce Customer

How to Create ActiveCampaign Contact for New BigCommerce Customer

Are you searching for a way through which you can create ActiveCampaign contact for new BigCommerce customer automatically? If yes! Then, look no further, as here you will get a step-by-step guide to do so.

How to Create ActiveCampaign Contact for New BigCommerce Customer

Want to know how? Well, don’t be surprised, as we have found a magical tool for all your projects i.e, Pabbly Connect. This software empowers you to integrate two or more applications to automate the entire workflow without any coding skills.

Why Choose This Method Of Integration?

In contrast with other integration services-

  • Pabbly Connect does not charge you for its in-built apps like filters, Iterator, Router, Data transformer, and more
  • Create “Unlimited Workflows” and smoothly define multiple tasks for each action
  • As compared to other services which offer 750 tasks at $24.99, Pabbly Connect offers 50000 tasks in the starter plan of $29 itself
  • Unlike Zapier, there’s no restriction on features. Get access to advanced features even in the basic plan
  • Try before you buy! Before spending your money, you can actually signup & try out the working of Pabbly Connect for FREE

Sign Up To Pabbly Connect 

Before getting started, let’s know a little bit about both software.  Primarily, BigCommerce is an eCommerce platform that offers secure hosting, advanced SEO, etc. Whereas, ActiveCampaign is a CRM tool that helps customers by automating marketing, sales, and support processes.

Using Pabbly Connect, whenever a new customer is added in BigCommerce, the contact data will be saved in ActiveCampaign automatically. We have also embedded a video tutorial for this integration, have a look at it-

Pabbly Connect enables you to integrate unlimited premium applications without any coding skills. Just integrate it once & relax, it will handle all the workload later. Also, you can access all the features even in its free plan.

Besides, we have a template for this integration that can assist you to begin your integration journey in no time. Just go to Marketplace and look for the apps you use to start integration. Simply tap on the image below to get started.

How to Create ActiveCampaign Contact for New BigCommerce Customer

So, without further ado, let’s follow the step-by-step procedure to integrate BigCommerce and ActiveCampaign.

Step 1: Sign up to Pabbly Connect

Sign Up

Begin the process to create ActiveCampaign contact for the new BigCommerce customer by pressing on the “Sign Up Free” icon on the Pabbly Connect home page. You can either manually fill-up all the details or sign up using your Gmail account.

Try Pabbly Connect for FREE

Step 2: Access Pabbly Connect

Select Connect

After logging into the account, press the “Access Now” button of the Connect section in the dashboard.

Step 3: Workflow for BigCommerce to ActiveCampaign Integration

(a) Start with a New Workflow

Create New Workflow

Begin with creating a workflow for your project by pressing the ‘Create Workflow’ button.

(b) Name the Workflow

Name the Workflow

Now, name the workflow just like in the above-shown image. As here I named the workflow as “BigCommerce to ActiveCampaign”, you can obviously change it as per your requirements.

Step 4: Setting Trigger for BigCommerce to ActiveCampaign Integration

After naming the workflow, select the application you want to integrate. Pabbly Connect enables you to integrate unlimited premium applications, create your free account now.

(a) Select Application you Want to Integrate

Select Application you Want to Integrate

Now, select the application that you want to integrate. In this case, we are choosing “BigCommerce” for integration, and in the method section, select “New Customer”.

(b) Click Connect Button

Click Connect Button

Next, press the “Connect with BigCommerce” button.

Step 5: Connecting BigCommerce to Pabbly Connect

Afterward, to connect BigCommerce with Pabbly Connect, you have to authorize the application. Thus, you have to log in to your BigCommerce account.

(a) Go to Advanced Settings

Go to Advanced Settings

Now, go to the Bigcommece dashboard & hit “Advanced Settings”.

(b) Click on API Accounts

Click on API Accounts

Later, press the “API Accounts”.

(c) Create API Account

Create API Account

Now, hit the button named “Create API Account” & then choose the option “Create V2/V3 API Token”.

(d) Copy the API Path Key

Copy the API Path Key

Furthermore, copy the API Path highlighted in the image & then hit the “Save” button.

(e) Copy the Client ID and Access Token

Copy the Client ID and Access Token

Ultimately, a window will pop-up with API keys. Just copy the “Client ID & Access Token” then hit the “Done” button.

(f) Paste the API Keys

Paste the API Keys

Promptly, paste the respective API keys & tokens in the mentioned columns. Then tap on the “Save” button.

Step 6: Enroll a Dummy Customer

Now, to check this integration, we will capture the data from BigCommerce, and for that, we will create a dummy customer in BigCommerce.

(a) Capture Webhook Response

Capture Webhook Response

Once you add the webhook URL to your BigCommerce account, just press the “Capture Webhook Response” button to capture the data from BigCommerce.

(b) Make a Dummy Customer

Enroll a Dummy Customer

Afterward, create a new customer, by simply logging in to your Bigcommerce account.

Step 7: Test the Response in Pabbly Connect Dashboard

Test the Response in Pabbly Connect Dashboard

After creating the customer in BigCommerce, the customer’s info will appear on the Pabbly Connect dashboard. Next, tap on the “Save” button.

Step 8: Setting Actions for BigCommerce to ActiveCampaign Integration

Later, to make this BigCommerce-ActiveCampaign integration work, choose two actions for your trigger. Primary, BigCommerce to get the proper customer’s info from the customer ID that we got in the trigger part. Secondary, to create a contact in ActiveCampaign.

(a) Select Application you Want to Integrate

Select Application you Want to Integrate

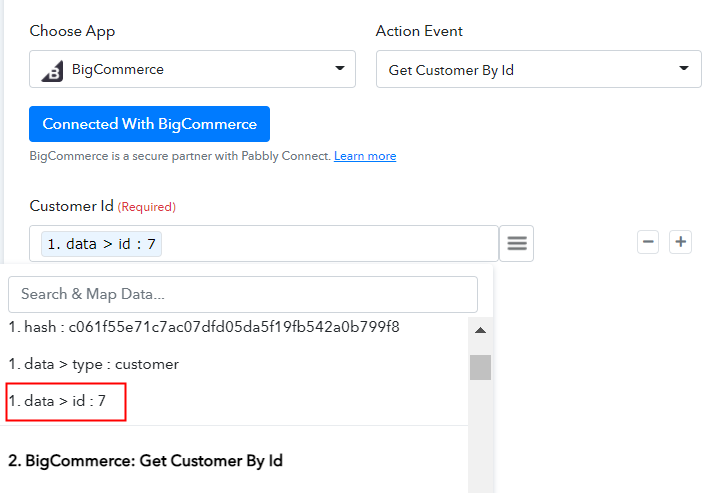
Subsequently, press the + button below & choose the application that you want to integrate. Here we will choose “BigCommerce” and in the method, section select “Get Customer By Id”. After choosing the application click on the “Connect with BigCommerce” button.

(b) Authorize Application

Authorize Application

Next, choose the previously used credentials to move forward.

(c) Save & Send Test Request

Save & Send Test Request

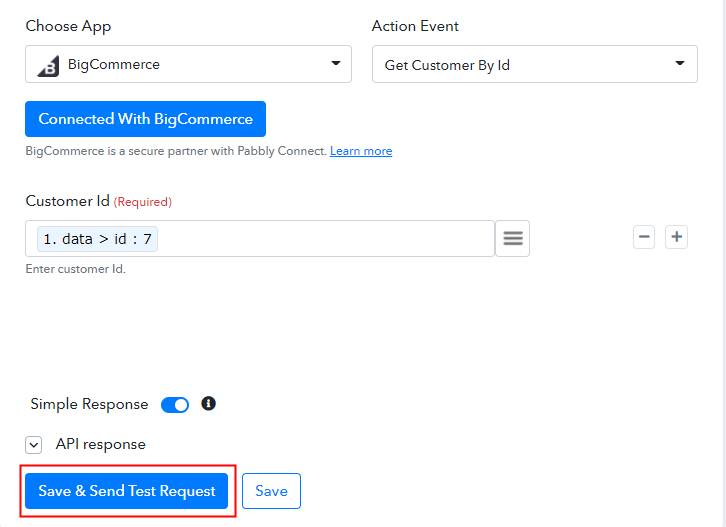
Now, map the “Customer ID” and then hit the “Save & Send Test Request” button.

(e) Save the API Response

Save the API Response

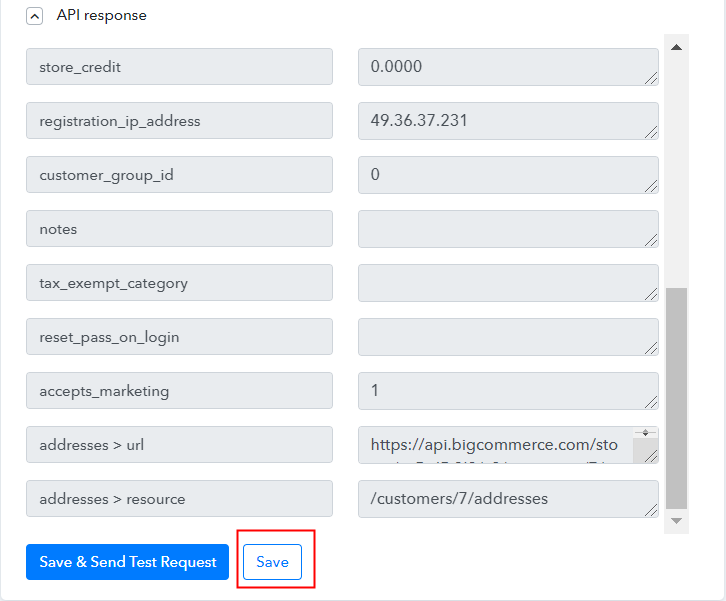
As we can see that all the information about the customer is captured within Pabbly Connect. Now, press the “Save” button.

(f) Select Application you Want to Integrate

Select ActiveCampaign

The following step is to hit the “+” icon then select “ActiveCampaign” & in the choose method option, select ”Create a Contact”.

(g) Click the Connect Button

Click the Connect Button

Forthwith, press the “Connect With ActiveCampaign” button after making all the necessary changes. After that, the authentication window will open that will ask for API Key & URL for which you have to log-in to your ActiveCampaign account.

Step 9: Connecting ActiveCampaign to Pabbly Connect

Subsequently, to connect ActiveCampaign with Pabbly Connect, log in to your ActiveCampaign account for the API keys.

(a) Click on ActiveCampaign Settings

Click on ActiveCampaign Settings

After login, go to the “Settings” option on the left side of the bottom section of the dashboard.

(b) Go to Developer Section

Go to Developer Section to Add New Stripe customers to ActiveCampaign as Contact

Once you go to “Settings”, a tab will open up, where you can see the “Developer” option, just click on it.

(c) Copy the API Key and URL

Copy the API Key and URL

Quickly, copy the API & URL appearing on the dashboard.

(d) Fill API Key

Fill API Key

Following that, paste API Key, and in the “URL” column, mention URL. After ensuring all this, hit the “Save” button.

(e) Map Field Data

Map Field Data

Next, map the required field from the drop-down such as for the email field, select the email option, and for the name field select the name option. Next, after entering all the details, hit the “Send Test Request” button to test the Shopify and ActiveCampaign integration.

Step 10: Check Response in ActiveCampaign Dashboard

Check Response in ActiveCampaign

Lastly, when you check your ActiveCampaign, you can see that the contact info is updated automatically for the newly created customer in BigCommerce.

Conclusion –

That’s it! Now you know “How to Create ActiveCampaign Contact for New BigCommerce Customer” in real-time. This is a one-time process, now all your manual work will be done by the online business automation tool i.e Pabbly Connect. Just follow the step-by-step procedure mentioned above and your Shopify to ActiveCampaign integration is set.

So what are you waiting for? Go signup for a free account now for the best automation & integration experience.

You May Also Like To Read –

How to Create WhatConverts Lead from New BigCommerce Order

How to Create WhatConverts Lead from New BigCommerce Order

Are you searching for the easiest way to create WhatConverts lead from new BigCommerce order automatically? If yes, then this blog is for you. As, in this blog, you will get a step by step guide to integrate BigCommerce to WhatConverts.

How to Create WhatConverts Lead from New BigCommerce Order

But before we begin, let’s know a wee bit about the software that we are about to integrate. Primarily, BigCommerce is considered an open SaaS platform provider and a growing headless commerce provider based on the low total cost of ownership and highly flexible APIs. Whereas, WhatConverts is an all-in-one lead tracking platform. It automatically shows marketers and business owners how well their marketing is working.

Why Choose This Method Of Integration?

In contrast with other integration services-

  • Pabbly Connect does not charge you for its in-built apps like filters, Iterator, Router, Data transformer, and more
  • Create “Unlimited Workflows” and smoothly define multiple tasks for each action
  • As compared to other services which offer 750 tasks at $24.99, Pabbly Connect offers 50000 tasks in the starter plan of $29 itself
  • Unlike Zapier, there’s no restriction on features. Get access to advanced features even in the basic plan
  • Try before you buy! Before spending your money, you can actually signup & try out the working of Pabbly Connect for FREE

Sign Up To Pabbly Connect 

Therefore, integrating these two services can help you add leads in WhatConverts automatically for the new BigCommerce orders. We have also attached a video tutorial for this integration, have a look at it-

Now, the question is how you can integrate BigCommerce with WhatConverts? Well, the answer is quite simple and that is known as Pabbly Connect.

It is one of the best integration and automation tool that can help you integrate unlimited premium applications, set unlimited triggers & actions, create infinite workflows, and so much more. However, to do so, you don’t even need to have any coding skills. Just integrate it once and relax, it will handle all the workload afterwards.

How

Moreover, you can access all the features even in its free plan. To get started with this amazing service, you just have to go to the Marketplace and search for the apps you want to use. Also, we have created a workflow template for this integration to help you. Click the image above to begin.

Hence, without wasting any more time, let’s begin with the steps to integrate BigCommerce to WhatConverts.

Step 1: Sign up to Pabbly Connect

Sign Up

We will start the process to create WhatConverts lead from new BigCommerce order by clicking on the ‘Sign Up Free’ icon on the Pabbly Connect home page. Next, either manually fill-up all the details or sign up using your Gmail account.

Try Pabbly Connect for FREE

Step 2: Access Pabbly Connect

Select Connect

Subsequently, after logging into the account, click on the ‘Access Now’ button of the Connect section in the dashboard.

Step 3: Workflow for BigCommerce to WhatConverts Integration

(a) Start with a New Workflow

Create New Workflow

Start with creating a workflow for your project by clicking on the ‘Create Workflow’ button.

(b) Name the Workflow

Name the Workflow

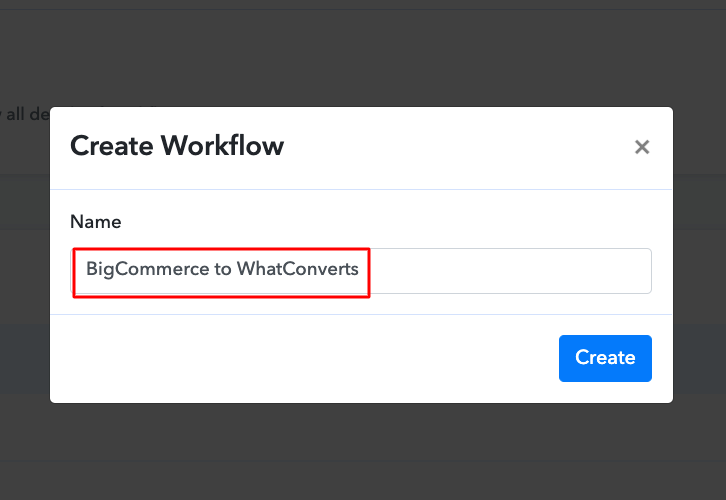
Now, you need to name the workflow just like in the above-shown image. I named the workflow ‘BigCommerce to WhatConverts’, you can obviously name the workflow as per your requirements.

Step 4: Setting Trigger for BigCommerce to WhatConverts Integration

As soon as you are done naming your workflow, you will have to select the application you want to integrate. Pabbly Connect allows you to connect unlimited premium apps, create your free account now.

(a) Select Application you Want to Integrate

Select-BigCommerce_censored

Now, you have to select the application that you want to integrate. In this case, we are choosing ‘BigCommerce’ for integration. In the method section, select ‘New Order Created’.

(b) Click the Connect Button

Connect-with-BigCommerce_censored_censored

The next step is to click on the ‘Connect with BigCommerce’ button on the dashboard just like in the above-shown image.

Step 5: Connecting BigCommerce to Pabbly Connect

To connect BigCommerce to Pabbly Connect, you have to add the client ID and access token from your BigCommerce account to Pabbly Connect. For that, you have to log in to your BigCommerce account.

(a) Click on Advanced Settings

Advanced Settings BigCommerce

After login into the BigCommerce account, go to the ‘Advanced Settings’ section on the bottom of the dashboard.

(b) Click on API Accounts

API Accounts BigCommerce

Next, you have to click on the ‘API Accounts’ option.

(c) Click on Create API Accounts

Create API Account BigCommerce

Now, click on the ‘Create API Accounts’ button then select the ‘Create V2/V3 API Token’ option.

(d) Name the API Account

Name the API Account BigCommerce

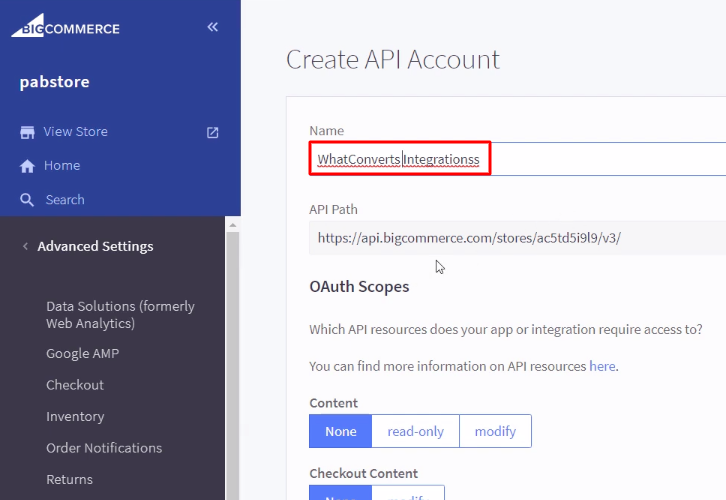
Name the API account according to your requirements to move forward.

(e) Save the API Account

Save the API Account BigCommerce

After making changes in all the settings, click on the ‘Save’ button.

(f) Copy the Credentials

Copy the Credentials BigCommerce

Simply copy the appearing credentials from the BigCommerce dashboard.

(g) Paste the Credentials

Paste the Credentials BigCommerce

Just paste the copied credentials in Pabbly Connect and hit the ‘Save’ button.

(h) Send Test Request

Send Test Request BigCommerce

Now, we need to set this webhook URL in your BigCommerce account and to do that, we will hit the ‘Save & Send Test Request’ button.

Step 6: Make a Test Purchase

To check this integration, we will make a sample purchase in BigCommerce to capture the data.

(a) Capture the Webhook Response

Capture Webhook Response

Now, to capture the data from BigCommerce, click on the ‘Capture Webhook Response’ button in Pabbly Connect.

(b) Add to Cart

Add to Cart BigCommerce

Next, select any of the listed products in your BigCommerce store and hit the ‘Add to Cart’ button.

(c) Click on Proceed to Checkout

Proceed to Checkout

The next step is to click on the ‘Proceed to Checkout’ button.

(d) Add Shipping Details

Add Shipping Details

In this step, now you have to add all the required details of the customer like email ID, address, etc and hit the ‘Continue’ button.

(e) Place an Order

Place Order

Now, add your credit/debit card details and hit the ‘Place Order’ button.

Step 7: Test the Response in Pabbly Connect Dashboard

Save the Webhook Response

Once you click on the ‘Place Order’ in BigCommerce, the order info will appear on the Pabbly Connect dashboard. Then, click on the ‘Save’ button.

Step 8: Setting Actions for BigCommerce to WhatConverts Integration

To make this BigCommerce-WhatConverts integration work, you have to choose three actions for your trigger. The first action is of BigCommerce to acquire the order details from the order ID, the second action is of Date/Time Formatter to convert the date in our desired format. And the third action is of WhatConverts to add a new lead.

(a) Select Application you Want to Integrate

Select BigCommerce Action

Now in this step, click on the + button below and choose the application that you want to integrate. Here we will choose ‘BigCommerce’ to integrate and in the method section select ‘Get Order By ID’.

(b) Click the Connect Button

Connect with BigCommerce Action

After choosing the application click on the ‘Connect with BigCommerce’ button to move forward.

(c) Add the Credentials

Paste the Credentials BigCommerce

Thereafter clicking on the ‘Connect’ button, again we have to add the credentials that we pasted in the trigger section and hit the ‘Save’ button to connect with BigCommerce.

(d) Map the Order ID

Map the Order ID BigCommerce

Next, map the order ID that we got in the trigger section of this integration and click on the ‘Save & Send Test Request’ button.

(e) Save the API Response

Save the API Response

Here, we can see that the order details are fetched, now hit the ‘Save’ button to move forward.

(f) Select Application you Want to Integrate

Date Formatter

Next, we will select ‘Date/Time Formatter’ in action and in action event, we will select ‘Format Date Only’.

(g) Click the Connect Button

Connect with Date Formatter

The next step is to click on the ‘Connect with Date/Time Formatter’ button on the dashboard just like in the above-shown image.

(h) Send Test Request

Send Test Request Date Formatter

Now map the date that we got in the trigger part and select your desired format, then hit the ‘Save & Send Test Request’ button.

(i) Save the API Response

Save the API Response Date

Here we can see that the date is converted into our desired format, now click the ‘Save’ button.

(j) Select Application you Want to Integrate

Select WhatConverts

Now, you have to select the application that you want to integrate. In this case, we are choosing ‘WhatConverts’ for integration. In the method section, select ‘Create Lead’.

(k) Click the Connect Button

Connect with WhatConverts

The next step is to click on the ‘Connect with WhatConverts’ button on the dashboard just like in the above-shown image.

Step 9: Connecting WhatConverts to Pabbly Connect

To connect WhatConverts with Pabbly Connect, you have to add the API token and secret key to Pabbly Connect from your WhatConverts account. For that, you need to login to your WhatConverts account.

(a) Click on Integrations

Integrations WhatConverts

To get the API key and secret key, click on the ‘Integrations’ option and then select the ‘API Keys’ option in your WhatConverts dashboard.

(b) Copy the API Token

Copy API Token WhatConverts

Next, simply copy the given API token and API secret key to move further.

(c) Paste the API Token

Paste API Token WhatConverts

Just, paste the copied API token and API secret key in Pabbly Connect, then hit the ‘Save’ button.

(d) Map the Fields

Map the Fields

After connecting with your WhatConverts account, map all the fields quickly like name, email, etc.

(e) Save and Send Test Request

Send Test Request

Once you are done adding up all field data click on the ‘Save & Send Test Request’ button.

Step 10: Check Response in WhatConverts Dashboard

Check Response

Finally, you can see that the lead is added automatically in WhatConverts for the new order in BigCommerce.

Conclusion –

At last, this was our take on ‘How to Create WhatConverts Lead from New BigCommerce Order’. Now you have understood how Pabbly Connect works and how it can help you in saving a lot of time and effort by allowing you to integrate any applications easily.

You just have to follow these simple steps and once the integration is done, consequently Pabbly Connect will do the rest for you. Thus, go ahead and signup for free to enjoy this amazing automation and integration service.

For further queries, please drop your comments below. We will get back to you as soon as possible.

You May Also Like to Read –
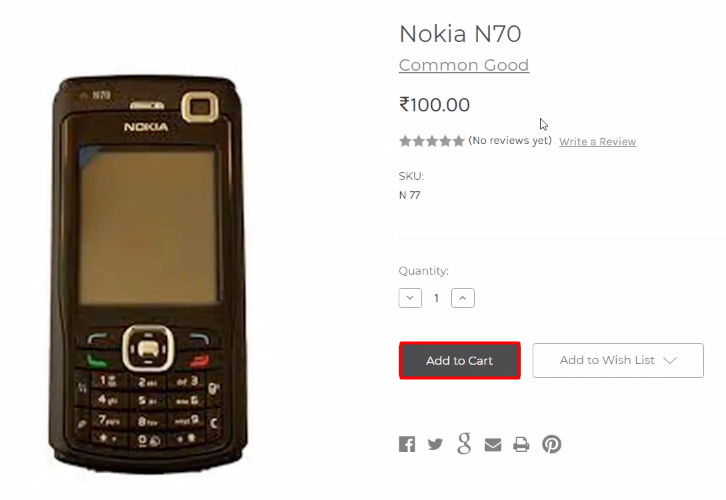
How to Send Payment Reminders on WhatsApp from Google Sheets

Send Payment Reminders on WhatsApp from Google Sheets

Tired of searching for a way to send payment reminders on WhatsApp from Google Sheets automatically? If yes, then you come to the right place because here I will guide you to the step by step procedure to integrate Google Sheets with WhatsApp using Pabbly Connect.

Send Payment Reminders on WhatsApp from Google Sheets

So basically, Pabbly Connect is an integration & automation service that enables you to share data among multiple applications. Furthermore, this would be just a single-time setup & after that, the workflow will take care of the rest. Besides, you don’t have to be a developer for that, even a newbie can use it efficiently.

Why Choose This Method Of Integration?

In contrast with other integration services-

  • Pabbly Connect does not charge you for its in-built apps like filters, Iterator, Router, Data transformer, and more
  • Create “Unlimited Workflows” and smoothly define multiple tasks for each action
  • As compared to other services which offer 750 tasks at $24.99, Pabbly Connect offers 50000 tasks in the starter plan of $29 itself
  • Unlike Zapier, there’s no restriction on features. Get access to advanced features even in the basic plan
  • Try before you buy! Before spending your money, you can actually signup & try out the working of Pabbly Connect for FREE

Sign Up To Pabbly Connect 

Before getting started with the procedure let’s first understand a little about the services & the use case. Google Sheets is a spreadsheet that helps you manage your client’s and customer’s data in one place. Whereas, WhatsApp is a free, multiplatform messaging app that lets you make video and voice calls, send text messages, and more.

Well, as we already know that there is no direct integration between these two services. Therefore, we’ll be using a third-party software i.e, Pabbly Connect for Google Sheets to WhatsApp integration.

Thus, integrating these two services can help you automatically send payment reminders on WhatsApp when a new record is added in Google Sheets in real-time.

Furthermore, you can access all the features even in its free plan. To get started with this amazing service, you just have to go to the Marketplace and search for the apps you want to use. Moreover, we have created a template for this integration to help you. Click the ‘Use Workflow’ button below to initiate the process.

Workflow for the Integration

Therefore, without wasting any more time, let’s begin with the steps for Google Sheets to WhatsApp integration.

Step 1: Sign up to Pabbly Connect

Sign Up

Begin the process to send payment reminders on WhatsApp from Google Sheets by clicking on the ‘Sign Up Free’ icon on the Pabbly Connect home page. Next, either manually fill-up all the details or sign up using your Gmail account.

Try Pabbly Connect for FREE

Step 2: Access Pabbly Connect

Select Connect

Next, after logging into the account, click on the ‘Access Now’ button of the Connect section in the dashboard.

Step 3: Workflow for Google Sheets to WhatsApp Integration

(a) Start with a New Workflow

Create New Workflow

Start with creating a workflow for your project by clicking on the ‘Create Workflow’ button.

(b) Name the Workflow

Google Sheets to WhatsApp Integration

Now, you need to name the workflow just like in the above-shown image. I named the workflow ‘Google Sheets to WhatsApp’, you can obviously name the workflow as per your requirements.

Step 4: Setting Schedule for Google Sheets to WhatsApp Integration

As soon as you are done naming your workflow, you will have to select the application to set a time for sending a payment reminder message from WhatsApp.

(a) Select Application you Want to Integrate

Select Schedule for Google Sheets to WhatsApp Integration

Now, you have to select the application to set the time. Here, we are choosing ‘Schedule’.

(b) Select Run Scenario

Select Run Scenario

After this, you have to select at what intervals you want to send the message, we are selecting ‘Every day’ option.

(c) Set the Time

Set the Time for Google Sheets to WhatsApp Integration

Further, you have to set the time at which you want the payment reminder message will be sent. By default, you have to set the time in UTC format, so select the time according to your time zone. At last, click on ‘Save’ button.

Step 5: Setting Google Sheets for the Integration

Now, you will have to select Google Sheets for the integration. Pabbly Connect allows you to integrate unlimited premium applications, create your free account now.

(a) Select Application you Want to Integrate

Select Google Sheets for Google Sheets to WhatsApp Integration

Now, click on the + button below and choose ‘Google Sheets’ in the choose app and in the method section select ‘Get Rows’.

(b) Click on Connect Button

Connect Google Sheets

After choosing the application click on the ‘Connect with Google Sheets’ button to move forward.

(c) Authorize Application

Authorize Application Google Sheets for Google Sheets to WhatsApp Integration

Promptly, to authorize Google Sheets, you need to again click on the ‘Connect with Google Sheets’ button and then allow permission to connect Google account with Pabbly Connect.

(d) Map the Fields

Map the FIelds

Next, you have to map all the fields quickly like spreadsheet, and range.

(e) Save and Send Test Request

Save and Send Test Request for Google Sheets to WhatsApp Integration

Once you are done adding up all field data click on the ‘Save & Send Test Request’ button. But before that, make sure to toggle off the ‘Simple Response’ section (to get the data of an individual row).

(f) Save the Response

Save the Response

Further, you will see the response of each individual row. Finally, click on ‘Save’ button.

Step 6: Setting Action for Iterator

Subsequently, you need to add an action step to sort out each data row from the above response and for that, we integrate ‘Iterator’ in the action step.

(a) Select Application you want to Integrate

Select Iterator for Google Sheets to WhatsApp Integration

Now, click on the + button below and select ‘Iterator’ in the choose app.

(b) Choose Array

Choose Array

After this, you have to choose ‘Array’ to sort the data from the above response.

(c) Save and Send Test Request

Save and Send Test Request for Google Sheets to WhatsApp Integration

Promptly, click on the ‘Save and Send Test Request’ button to get the response and then hit the ‘Save’ button.

Step 7: Setting Action for JSON Extractor

Now, we need the individual data of each field from the above response and for that, we have to integrate ‘JSON Extractor’ in the next action step.

(a) Select Application you want to Integrate

Select JSON Extractor for Google Sheets to WhatsApp Integration

Next, click on the (+) button and select the app to integrate as ‘JSON Extractor’ and method as ‘Extract JSON Data’.

(b) Click on Connect Button

Connect JSON Extractor

After choosing the application click on the ‘Connect with JSON Extractor’ button to move forward.

(c) Map the Field

Map the Fields for Google Sheets to WhatsApp Integration

Promptly, map the field data into the respective fields.

(d) Save and Send Test Request

Save and Send Test Request for Google Sheets to WhatsApp Integration

Once you are done mapping the field data, click on the ‘Save and Send Test Request’ button to get the response of individual fields.

Step 8: Setting Date/Time Formatter for Current Date

Now, we have to select ‘Date/Time Formatter’ to establish the current date in order to send the WhatsApp message every day till the due date.

(a) Select Application you want to Integrate

Select Date/Time Formatter for Google Sheets to WhatsApp Integration

Next, click on the (+) button and select the app as ‘Date/Time Formatter’ and method as ‘Current Date’.

(b) Connect with Data/Time Formatter

Connect Date/Time Formatter

Promptly, click on the ‘Connect With Date/Time Formatter’ button.

(c) Map the Fields

Map the Fields for Google Sheets to WhatsApp Integration

Now, you have to map the field to establish a current date like in ‘Basic Format’ field select format of date.

(d) Save and Send Test Request

Save and Send Test Request

Once you are done mapping the field data, click on the ‘Save and Send Test Request’ button.

Step 9: Setting Date/Time Formatter to change format

Subsequently, we have to select ‘Date/Time Formatter’ to change the format of current and due date in ‘Timestamp’ format.

(a) Select Application you want to Integrate

Select Date/Time Formatter for Google Sheets to WhatsApp Integration

Next, click on the (+) button and select the app as ‘Date/Time Formatter’ and method as ‘Format Date Only’.

(b) Connect with Data/Time Formatter

Connect with Date Formatter

Promptly, click on the ‘Connect With Date/Time Formatter’ button.

(c) Map the Fields

Map the Fields

Now, you have to map the field to change the format of current date in timestamp format such as map the current date in ‘Date Field’ and select ‘Timestamp’ option in the ‘To Format’ field.

(d) Save and Send Test Request

Save and Send Test Request for Google Sheets to WhatsApp Integration

Once you are done mapping the field data, click on the ‘Save and Send Test Request’ button and the format of current date is changed.

Now, to change the format of due date in the timestamp format, just follow the above steps accordingly. Simply, map the due date instead of current date in the ‘Date Field’.

Step 10: Setting Action for Filters

Subsequently, we have to set two conditions to send the payment reminder message through WhatsApp. For that, we have to add ‘Filters’ in next action step.

(a) Select Application you Want to Integrate

Select Filter for Google Sheets to WhatsApp Integration

Now, click on the plus (+) button and from the choose app select ‘Filter’.

(b) Setting First Condition

Setting First Condition

Promptly, set the first condition for filter, i.e, send the WhatsApp message only when the current date is less than the due date. For that, map the current date in first section and due date in second and set the condition as ‘Less Than’. After this, click on the + button to add another condition.

(c) Setting Second Condition

Setting Second Condition

Next, set the second condition for filter, such that send the WhatsApp message only when the fees status is due. And for that, map the fees status (due) in the first section, select the condition as ‘Equal To’ and then enter ‘Due’ in the last field (as shown in above image).

(d) Save and Send Test Request

Save and Send Test Request for Google Sheets to WhatsApp Integration

Once you are done setting the conditions, click on the ‘Save and Send Test Request’ button and you will get the API response, i.e. the condition is true. At last, click on the ‘Save’ button.

Step 11: Setting Action for Google Sheets to WhatsApp Integration

Subsequently, it’s time to set up the last action for our workflow to complete the integration process.

(a) Select Application you want to Integrate

Select Chat API for Google Sheets to WhatsApp Integration

Now, click on the + button below and choose ‘Chat API’ in the choose app and in the method section select ‘Send Message’.

(b) Click on Connect Button

Connect Chat API

After choosing the application click on the ‘Connect with Chat API’ button to move forward.

(c) Login to Chat API 

Login to Chat API for Google Sheets to WhatsApp Integration

Further, login to your ‘Chat API’ account by filling up your credentials.

(d) Copy API URL and Token

Copy API URL and Token

Next, you will be redirected to your account page. Here, copy the API URL and Token to paste in the Pabbly Connect.

(e) Paste API URL and Token

Paste API URL and Token for Google Sheets to WhatsApp Integration

Promptly, paste the copied API URL and Token in the respective fields. At last, hit the ‘Save’ button.

(f) Map the Fields

Map the Fields

Now, you have to map the data in the fields such as ‘Phone Number’ and ‘Message’.

(g) Save & Send Test Request

Save and Send Test Request for Google Sheets to WhatsApp Integration

Once you are done mapping all the fields, click on the ‘Save and Send Test Request’ button to get the API response. Finally, click on ‘Save’ button.

Step 12: Check Response in WhatsApp Dashboard

Check Response for Google Sheets to WhatsApp Integration

Lastly, when you check your WhatsApp account, a payment reminder message has been sent successfully from Google Sheets row.

Now, every day a payment reminder message will be sent to each person whose fees are due till the due date.

Conclusion –

Kudos! Now that you have learned ‘How to Send Payment Reminders on WhatsApp from Google Sheets’ you can integrate any applications via Pabbly Connect to automate your entire workflow without any coding skills. Pabbly Connect is the magic tool that you can use to automate your projects and save a lot of time and effort.

Therefore, signup for a free account now for the best integration experience.

In case of any doubts or suggestions, please leave your comments below.

You May Also Like to Read –
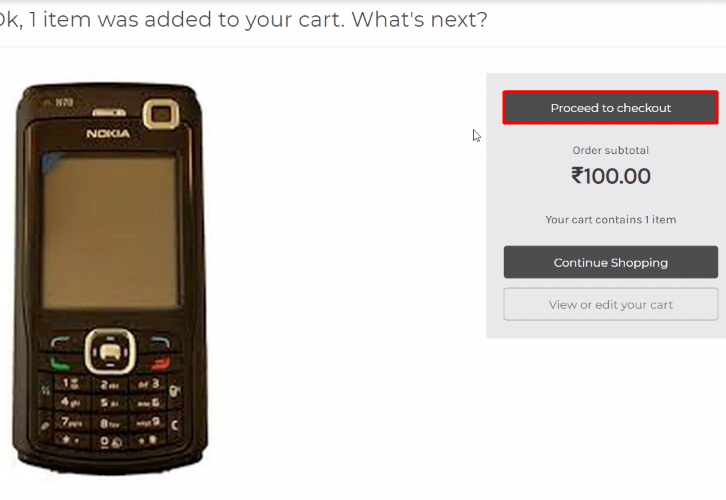
How to Add MailChimp Member from New BigCommerce Customer

How to Add MailChimp Member from New BigCommerce Customer

Do you often look for an easy way to add MailChimp member from new BigCommerce customer? If so, then you’re at the right place.

How to Add MailChimp Member from New BigCommerce Customer

Here in this blog, we are going to introduce a tool named Pabbly Connect that helps you automate this task within a couple of minutes.

Pabbly Connect is an automation and integration tool that helps you to connect unlimited premium apps in a blink of an eye. using it, you can transfer data easily without applying any kind of coding.

Why Choose This Method Of Integration?

In contrast with other integration services-

  • Pabbly Connect does not charge you for its in-built apps like filters, Iterator, Router, Data transformer, and more
  • Create “Unlimited Workflows” and smoothly define multiple tasks for each action
  • As compared to other services which offer 750 tasks at $24.99, Pabbly Connect offers 50000 tasks in the starter plan of $29 itself
  • Unlike Zapier, there’s no restriction on features. Get access to advanced features even in the basic plan
  • Try before you buy! Before spending your money, you can actually signup & try out the working of Pabbly Connect for FREE

Sign Up To Pabbly Connect 

Before moving forward to the integration process, let’s understand the service and the need for this integration. BigCommerce is a leading eCommerce builder, providing extreme scalability for online stores. On the other hand, Mailchimp is an all-in-one marketing platform that helps you manage and talk to your clients, customers, and other interested parties. The plan of the tool to focuses on healthy contact management practices, beautifully designed campaigns, and powerful data analysis.

However, there is no direct way of connecting these services. That’s why we are using Pabbly Connect. It allows you to integrate BigCommerce and MailChimp. By doing so you can easily add a subscriber in MailChimp whenever a new customer gets enrolled in BigCommerce. We have also attached a video for the same. Have a look at it.

Besides, we have a template for this integration that can help you to start your integration journey in no time. Also, if you need support with any other integration, just go to Marketplace and look for the apps you use to start integration immediately. For now, tap on the image below to get started.

Clone Template - BigCommerce and MailChimp

Here, in this article, we will understand how to integrate BigCommerce and MailChimp.

So, let’s begin the process.

Step 1: Sign up to Pabbly Connect

Sign Up

Begin the process to add MailChimp member from new BigCommerce customer by clicking on the “Sign Up Free” icon on the Pabbly Connect dashboard. Afterward, either fill-up the details manually or sign up using Gmail credentials.

Try Pabbly Connect for FREE

Step 2: Access Pabbly Connect

Select Connect

Moreover, after logging into the account, click on the “Access Now” button as shown in the above image.

Step 3: Workflow for BigCommerce to MailChimp Integration

(a) Start with a New Workflow

Create New Workflow

Start the process of creating a workflow for integration by clicking on the “Create Workflow” button.

(b) Name the Workflow

Name the Workflow

Moreover, add the name of workflow which in our case is “BigCommerce to MailChimp”. Although, you can always name the workflow according to your necessities.

Step 4: Setting Trigger for BigCommerce to MailChimp Integration

Following, after creating a workflow, you have to choose the integration app to add a MailChimp members from a new BigCommerce customer. Pabbly Connect allows you to build innumerable workflows within minutes, click here to sign up for unlimited integrations for free.

(a) Select Application you Want to Integrate

Select BigCommerce

The following step is to select “BigCommerce” from the dropdown, then choose the “New Customer” option to add MailChimp members from the new BigCommerce customer.

(b) Click on Connect Button

Click on Connect Button

The following step is to click on the “Connect with BigCommerce” button.

Step 5: Connecting BigCommerce to Pabbly Connect

Next, to integrate BigCommerce with Pabbly Connect, you have to paste the client id, access token, and store hash keys in the Pabbly Connect dashboard. For that, you must log in to your BigCommerce account.

(a) Head to BigCommerce Advanced Settings

Head to  BigCommerce Advanced Settings

After logging into your BigCommerce account, go to the dashboard and click on “Advanced Settings”.

(b) Click on API Accounts

Click on API Accounts

Now, click on the “API Accounts” to move further.

(c) Create an API Account

Create API Account

Subsequently, push the button named “Create API Account” and then pick the option “Create V2/V3 API Token”.

(d) Copy the API Path Key

Copy the API Path Key

Moreover, copy the API Path highlighted in the image and then click on the “Save” key to continue further.

(e) Copy the Client ID and Access Token

Copy the Client ID and Access Token

As soon as you click on the “Save” button, a window will pop-up with API keys. Simply copy the “Client ID and Access Token” then click on the “Done” button.

(f) Paste the Credentials in Pabbly Connect

Paste the Credentials in Pabbly Connect

Next, paste the respective API keys and tokens in the mentioned columns. Then press the “Save” button.

Step 6: Make a Dummy Customer

Now, in order to check this BigCommerce and MailChimp integration, we will capture the data from BigCommerce, and for that, we will create a dummy customer in BigCommerce.

(a) Capture Webhook Response

Capture Webhook Response

After adding the webhook URL to your BigCommerce account, now we will click on the “Capture Webhook Response” button to capture the data from BigCommerce.

(b) Make a Dummy Entry

Make a Dummy Entry

In order to add a customer, just go to Bigcommerce account and make a dummy entry.

(c) Hit Create Account Button

Hit Create Account Button

After adding all the details, click on the “Create Account” button.

Step 7: Test the Response in Pabbly Connect Dashboard

Test the Response in Pabbly Connect Dashboard

Once you are entering the customer details in BigCommerce, the customer info will appear on the Pabbly Connect dashboard. Then, click on the “Save” button.

Step 8: Setting Actions for BigCommerce to MailChimp Integration

To make this BigCommerce-MailChimp integration work, you have to choose two actions for your trigger. The first action is to get the information about the order from BigCommerce and the next is to add subscribers to MailChimp.

(a) Select Application you Want to Integrate

Select BigCommerce

Next, click on the “+” button below and choose the application that you want to integrate. Here we will choose “BigCommerce” and in the method section select “Get Customer By Id”. After choosing the application click on the “Connect with BigCommerce” button.

(b) Connect with BigCommerce

Connect with BigCommerce

Now, as we have already signed in to the account, we are going to use previous credentials.

(c) Map the Fields

Map the Fields

Next, as we all know to get the customer details, we have to map the customer id first.

(d) Save & Send Test Request

Save & Send Test Request

Now, after connecting with your BigCommerce account, map the “Customer ID” and then hit the “Save & Send Test Request” button.

(e) Save the API Response

Save the API Response

Furthermore, we can see that all the information about the new customer details is obtained within Pabbly Connect. Hit the “Save” button to move forward.

(f) Select Application you Want to Integrate

Select MailChimp

In addition, press the + icon to add an action to the trigger. Here we can pick “MailChimp” from the drop-down. Then choose the method “Add New Member”.

(g) Click the Connect Button

Click the Connect Button

Tap on the “Connected with MailChimp” button after making all the necessary adjustments. In addition, the permission window will open for which you have to log in to your MailChimp account.

Step 9: Connecting MailChimp to Pabbly Connect

To connect BigCommerce to MailChimp, you need to paste the “Bearer Token” for which you have to log in to your MailChimp account.

(a) Click on MailChimp Account Settings

Click on MailChimp Account Settings

After logging in, press the ‘Account’ button on the bottom of the dashboard.

(b) Move to Extras

Move to Extras

The new window will open when you click on ‘Account’. You’ll see an “Extras” option there, just click on it. Then, click on the option for “API Keys”.

(c) Create a Key

Create a Key

It will generate a key as soon as you press the “Create a Key” button. Just copy it.

(d) Fill API Key

Fill API Key

In the bearer token option, just paste the API Key and define the MailChimp Id that appears in the Data Center section at the beginning of your MailChimp URL. After all, this is assured, press the “Save” button.

(e) Map Field Data

Map Field Data

Further, the app has already fetched the audience list as you see it. Just map the appropriate field from the drop-down region, such as the email field, select the email option, and select the name option for the name field. Add tags too.

(f) Save and Send Test Request

Save and Send Test Request

Subsequently, after filling in all the details, save the setting and then “Send Test Request” to test the WooCommerce and MailChimp integration.

Step 10: Check Response in MailChimp Dashboard

Check Response in MailChimp Dashboard

Finally, when you check the Audience segment of MailChimp, your response will appear there.

Conclusion –
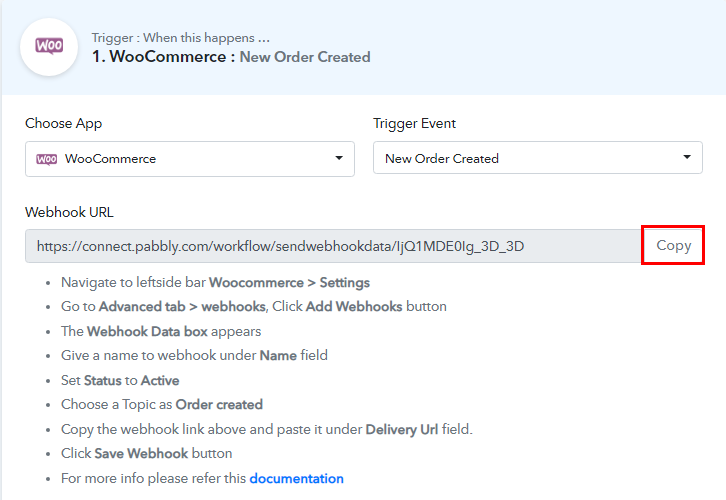
That’s all! This is our take on the “How to Add MailChimp Member from New BigCommerce Customer”. We know how daunting can be the process of connecting two services. But with Pabbly Connect, everything is easy. Just follow the above procedure and you don’t need to worry about anything.

So, what’s stopping you now? Go and grab your deal by signing up for Pabbly Connect for free.

You May Also Like to Read –