How to Send Google Sheets Data to Airtable

How to Send Google Sheets Data to Airtable

Have you ever tried to send Google Sheets data to Airtable? Yes, you might have. but here in this blog, we are going to reveal the easiest approach to automatically share data between Google Sheets and Airtable using Pabbly Connect.

How to Send Google Sheets Data to Airtable

Although the question must be rising in your mind why there is a need of integrating Google Sheets and Airtable. Basically, Google Sheets is spreadsheet software for business and personal use. Whereas, Airtable is an easy-to-use online platform for creating and sharing relational databases.

Why Choose This Method Of Integration?

In contrast with other integration services-

  • Pabbly Connect does not charge you for its in-built apps like filters, Iterator, Router, Data transformer, and more
  • Create “Unlimited Workflows” and smoothly define multiple tasks for each action
  • As compared to other services which offer 750 tasks at $24.99, Pabbly Connect offers 50000 tasks in the starter plan of $29 itself
  • Unlike Zapier, there’s no restriction on features. Get access to advanced features even in the basic plan
  • Try before you buy! Before spending your money, you can actually signup & try out the working of Pabbly Connect for FREE

Sign Up To Pabbly Connect 

By integrating Google Sheets and Airtable, we can save data from Google Sheets in Airtable software as a record.  As you all know there is no way to directly connect both software, this is why we are recommending an integrating tool named Pabbly Connect. Moreover, we’ve embedded a video below to assist you with this automation process-

Besides, if you want to save some time in making this automation from scratch, we have attached a template for the same. Just simply click on the below image to get started quickly and in case you are looking for more apps/integrations, simply visit the Marketplace.

How

Hence, without further delay, let’s follow the step-by-step procedure to integrate Google Sheets and Airtable.

Step 1: Sign up to Pabbly Connect

Sign Up

Initiate the process to send Google Sheets data to Airtable by clicking on the “Sign Up Free” icon on the Pabbly Connect dashboard. Subsequently, either fill-up the details manually or sign up using Gmail credentials.

Try Pabbly Connect for FREE

Step 2: Access Pabbly Connect

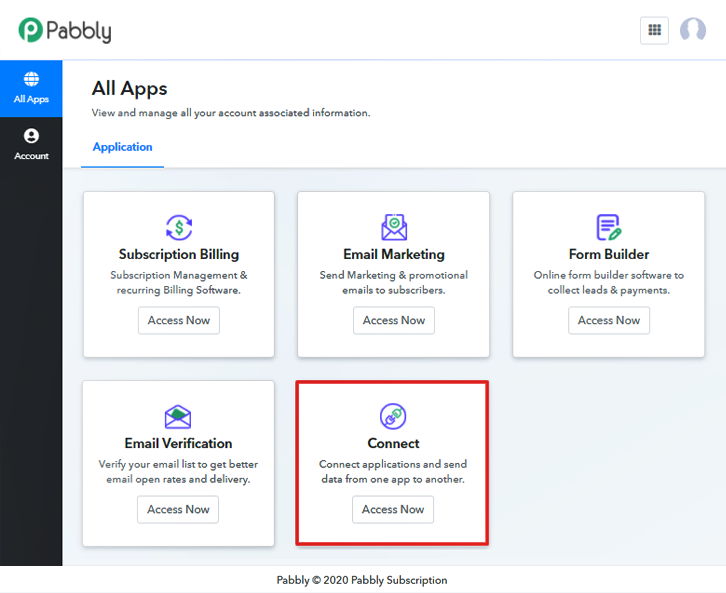
Select Connect

Further, after logging into the account, click on the “Access Now” button as shown in the above image.

Step 3: Workflow for Google Sheets to Airtable Integration

(a) Start with a New Workflow
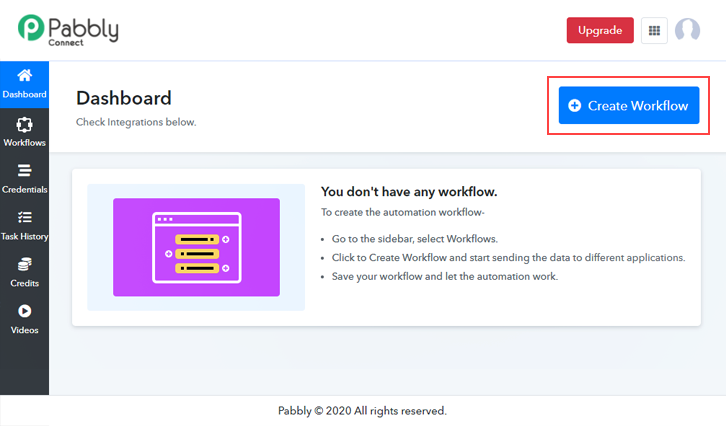
Create New Workflow

Start the process of building a workflow for integration by clicking on the “Create Workflow” button.

(b) Name the Workflow

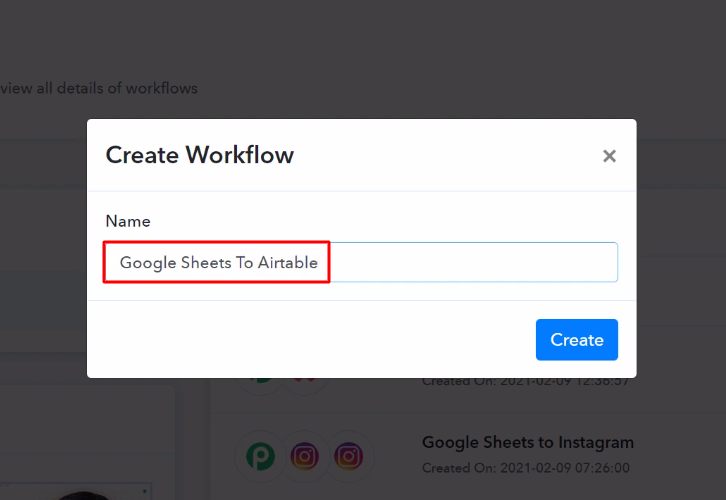
Name the Workflow

Moreover, add the name of workflow which in our case is “Google Sheets to Airtable”. Nevertheless, you can always name the workflow according to your requirements.

Step 4: Setting Trigger for Google Sheets to Airtable Integration

Next, after building a workflow, you have to choose the integration app to send Google Sheets data to Airtable. Using Pabbly Connect you can avail unlimited actions and triggers, click here to sign up for unlimited workflows for free.

(a) Select Application you Want to Integrate
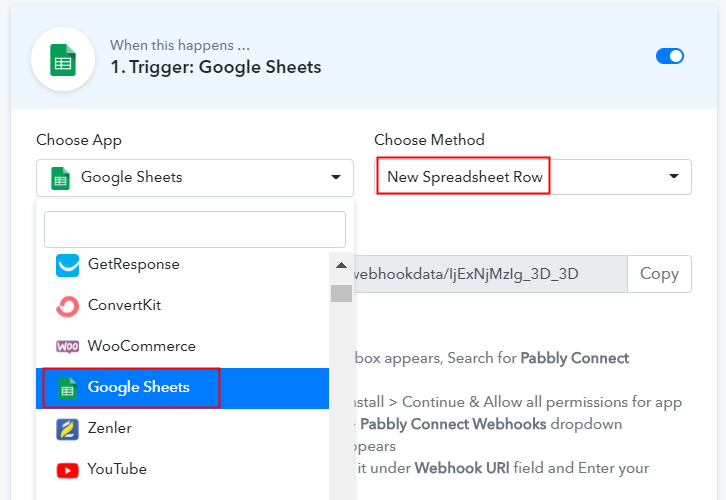
Select Google Sheet

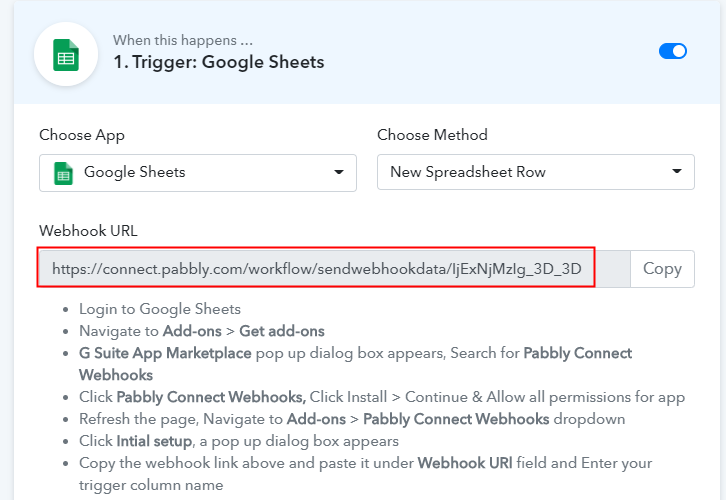
The next step is to select “Google Sheets” from the dropdown, then choose the “New Spreadsheet Row” option from choose method section.

(b) Copy the Webhook URL

Copy the Webhook URL

Now, copy the webhook URL which is appearing on the dashboard.

Step 5: Connecting Google Sheets with Pabbly Connect

To create records in Airtable, you gotta paste the copied Webhook URL in the sheet. But before that, you, have to install the Add-on named Pabbly Connect in your Google Sheet.

(a) Create a Google Sheets

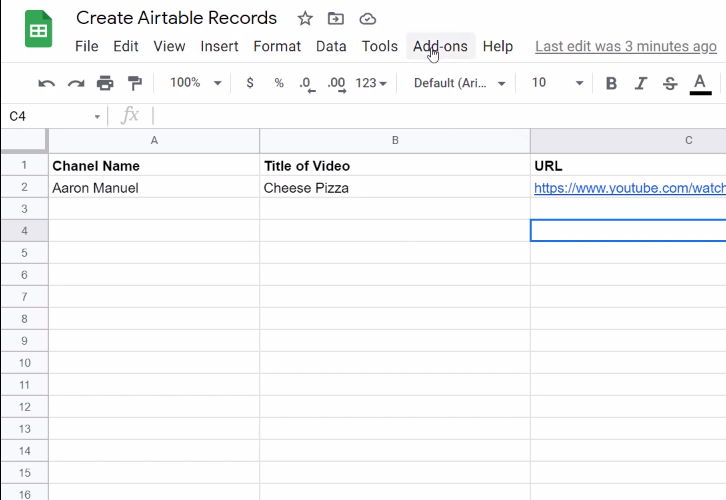
Create a Google Sheets

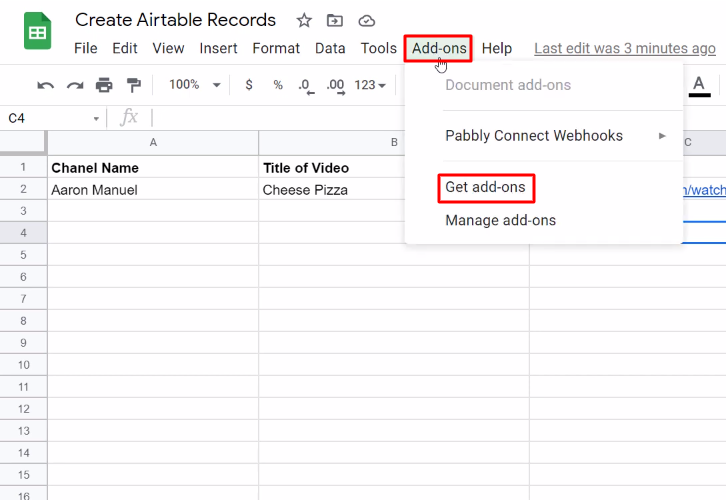
The next thing to do is create a Google Sheets with basic details like name, URL, etc.

(b) Click on Add-ons

Click on Add-Ons Google Sheets

Further, in the add-on section, you have to click on the “Get add-ons” button to download the “Pabbly Connect Webhook”.

(c) Find Pabbly Connect in G Suite Market Place
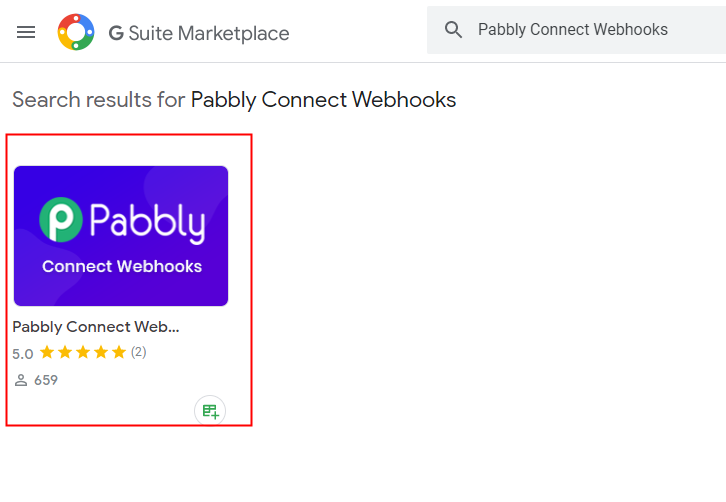
Find Pabbly Connect

After clicking on “Get Add-on” a new window will pop-up. Here in the search bar look for Pabbly Connect Webhooks.

(d) Install Pabbly Connect

Install Pabbly Connect

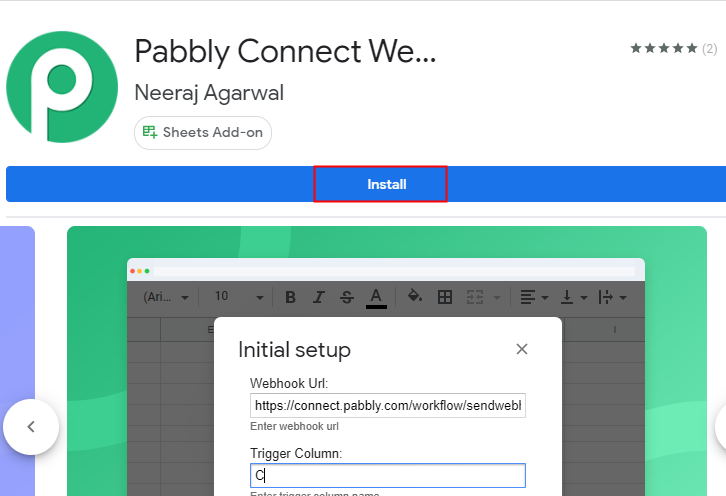
Now just click on the install option and within seconds it will get installed into your Google Sheets.

(e) Press Initial Setup in Google Sheets
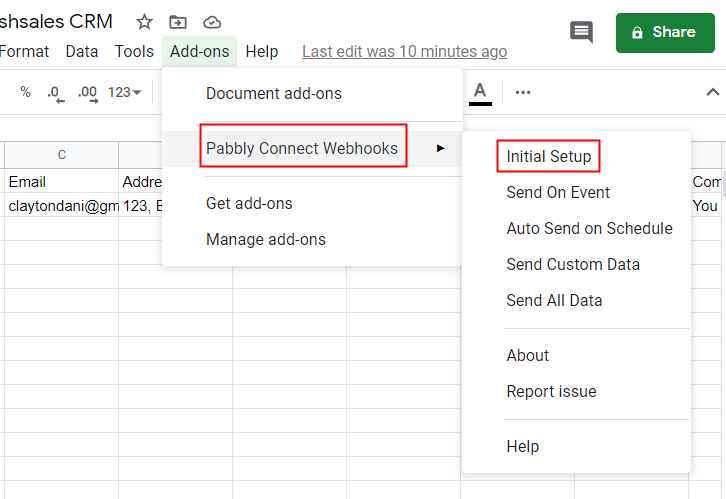
Press Initial Setup in Google Sheets

Now, when you click on add-ons, Pabbly Connect Webhook will start appearing in the add-ons section. Just click on it, it will open certain options, select “Initial Setup” to smooth the whole Google Sheets- Airtable integration process.

(f) Paste the Webhook URL

Paste the Webhook URL Google Sheets

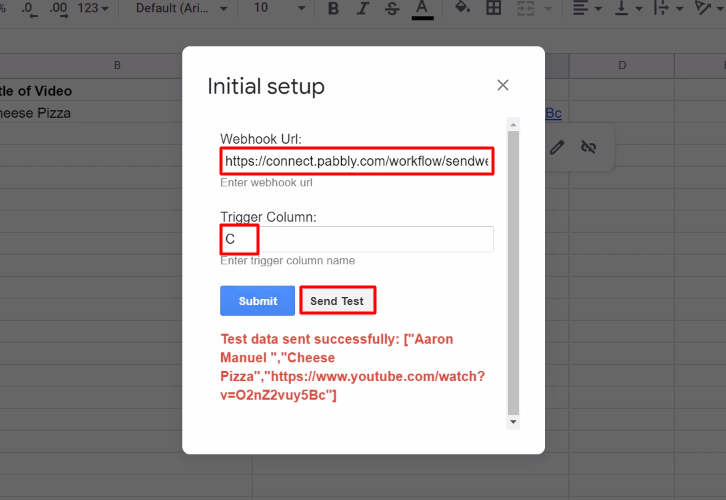
In addition, a window with two choices, the Webhook URL and Trigger Column, will appear when you press “Initial Set-Up”. In that segment, just paste your copied Webhook URL from Pabbly Connect and mention the trigger column as appropriate. To confirm the Google Sheets and Airtable integration, click on the ‘Send Test’ button. Before submitting a test message, make sure to press “Capture Webhook Response” on the Pabbly Connect dashboard.

When the test request is received, a message in red letters will indicate that the data has been submitted.

(g) Click Send On Event In Google Sheets
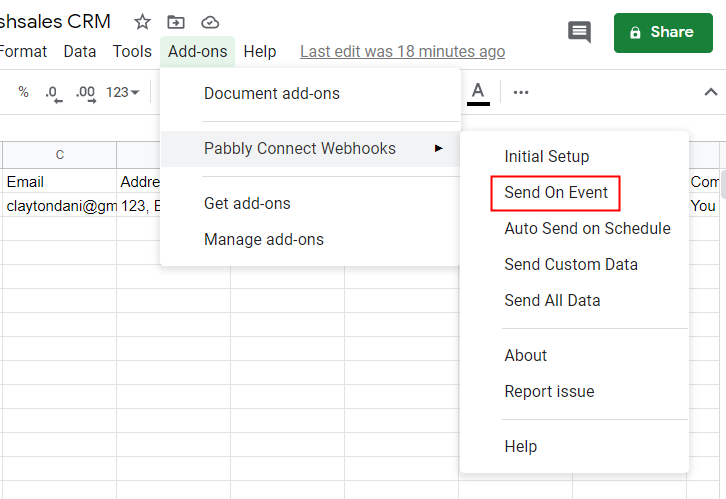
Click Send On Event In Google Sheets

This is the additional step you have to do, to ensure that every time new data added to the sheet it will automatically appear in your Airtable account. For this, all you have to do is click on “Send on Event” in the “Add-On” option.

Step 6: Test the Response in Pabbly Connect Dashboard
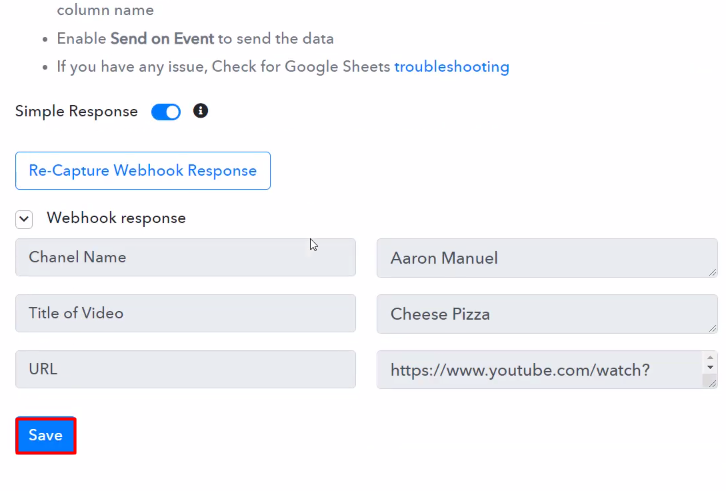
Save the Webhook Response

The entry will appear on the ”Pabbly Connect “ dashboard as soon as you click on the “Send Test“ option. Next, click on the “Save” button.

Step 7: Setting Action for Google Sheets to Airtable Integration

To make Google Sheets and Airtable integration work, you have to choose the action for your trigger.

(a) Select Application you Want to Integrate
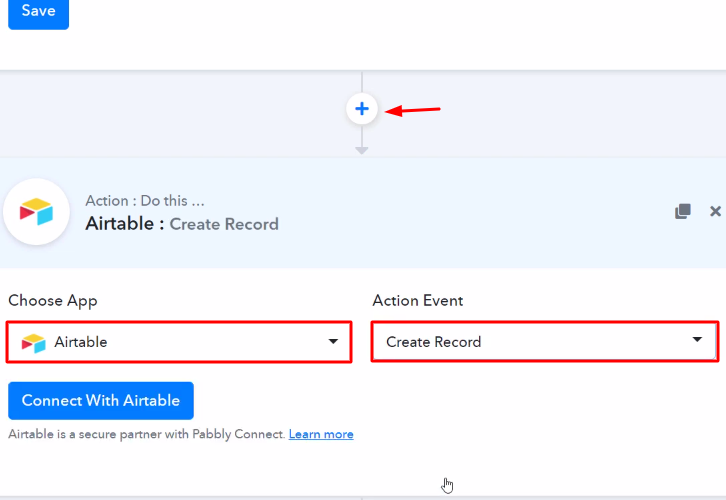
Select Airtable

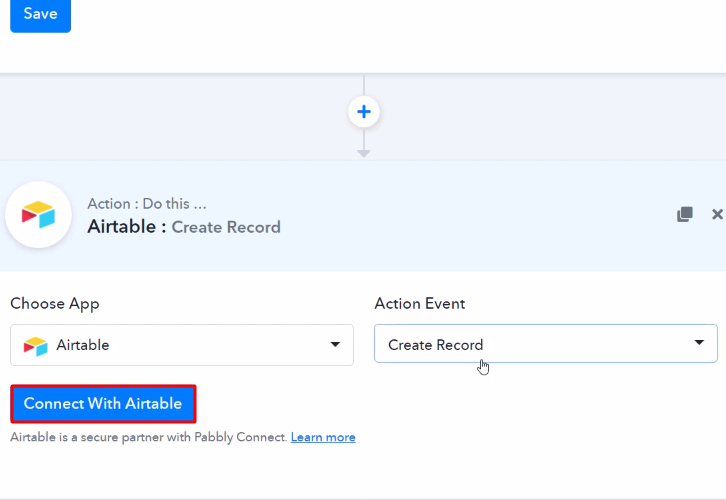
Next, press the “+” icon to add an action to the trigger. Here we can pick “Airtable” from the drop-down. Then choose the method “Create Record”.

(b) Click the Connect Button

Connect with Airtable

Click on the “Connect with Airtable” button after making all the necessary adjustments. In addition, the permission window will open asking for an API key for which you have to log in to your Airtable account.

Step 8: Connecting Airtable to Pabbly Connect

To connect Google Sheets to Airtable, you need to paste the “API Key” for which you have to log in to your Airtable account.

(a) Go to Airtable Account

Go to Airtable Account

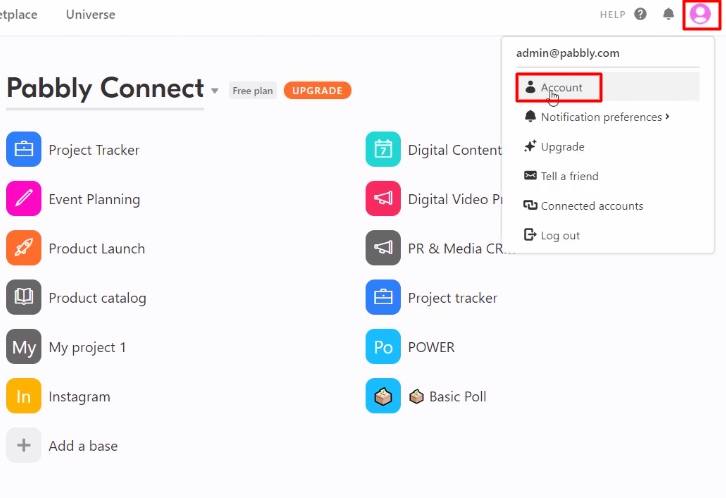
As soon as you entered into the Airtable dashboard, click on the “Profile” button appearing on the top then select the “Account” option.

(b) Copy the API Key

Copy API Key Airtable

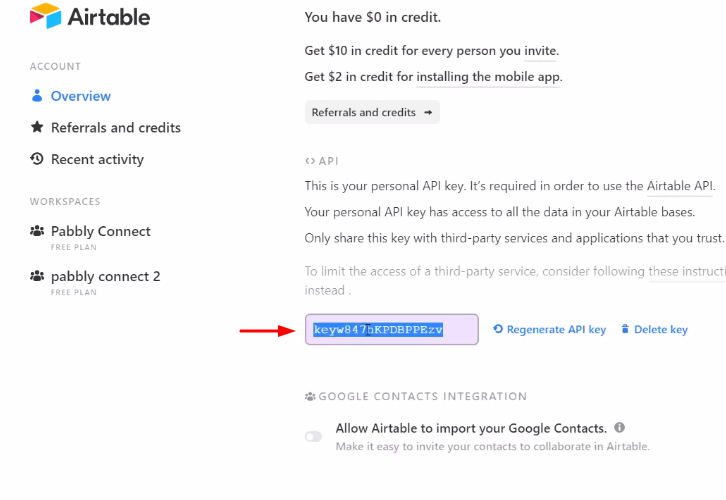
Now, scroll down and copy the given API key to move further.

(c) Paste the API Key

Paste the API Key Airtable

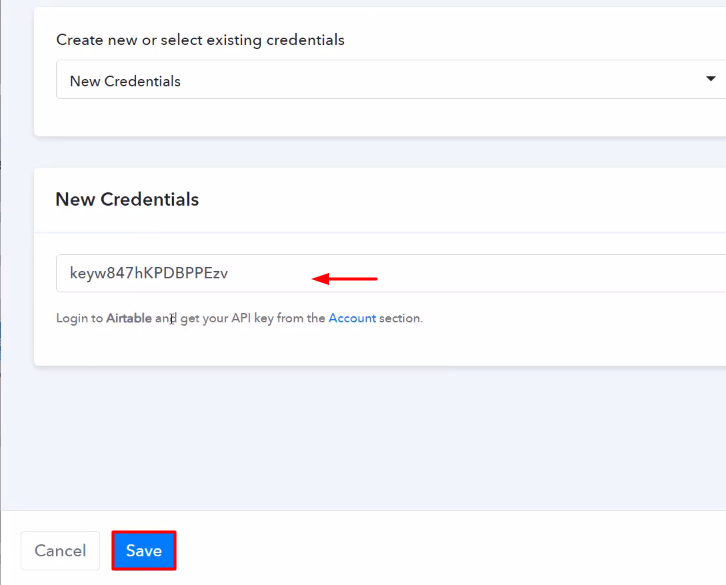
Subsequently, paste the copied API key in Pabbly Connect and hit the “Save” button.

(d) Map the Fields

Map the Fields Airtable

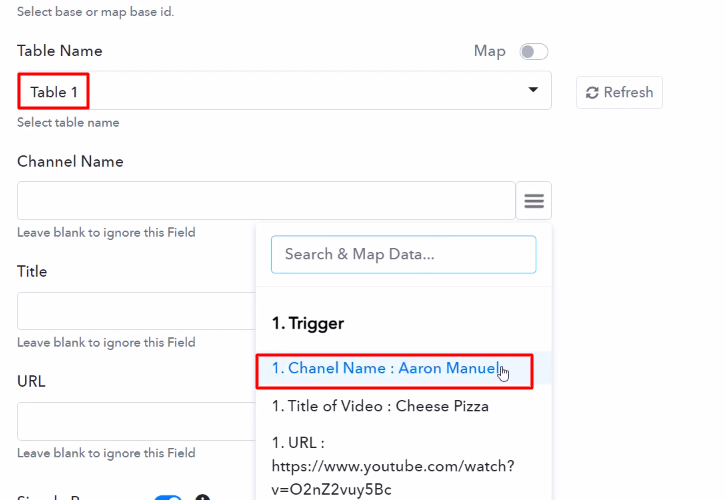
After connecting with your Airtable account, just map the appropriate field from the drop-down region, such as the table name, base ID, etc.

(e) Save and Send Test Request

Send Test Request Airtable

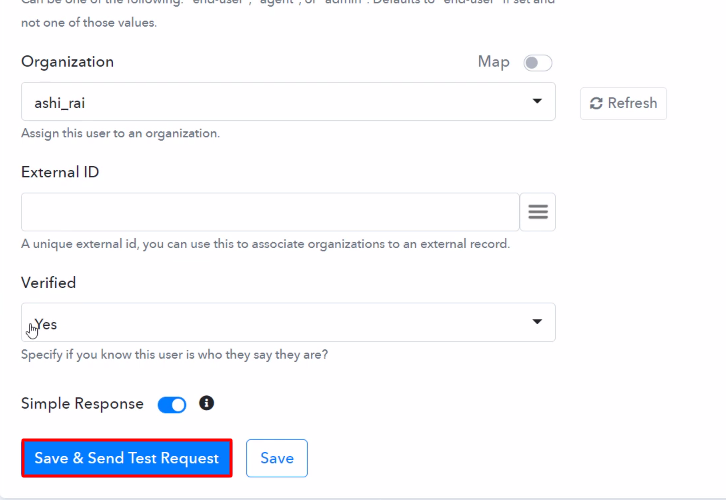
Subsequently, after filling in all the details, press the “Save & Send Test Request” button to test the Google Sheets Airtable integration.

Step 9: Check Response in Airtable Dashboard
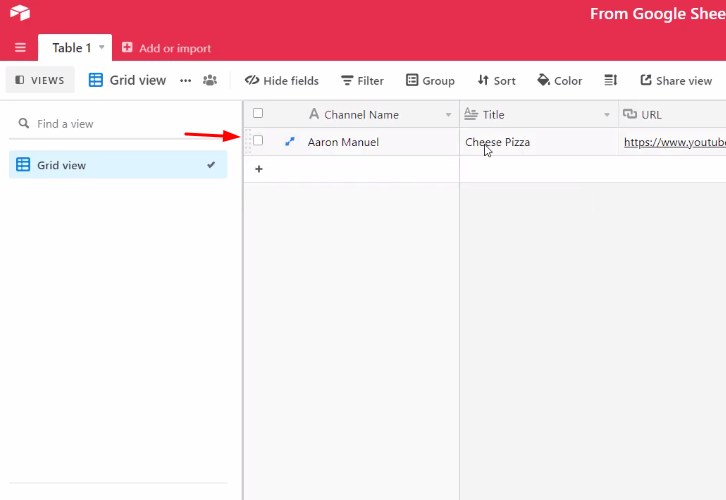
Check Response Airtable

Finally, your submission will immediately appear there when you search the record segment of Airtable.

You now know how to connect Google Sheets to Airtable automatically. This is a one-time operation. The online business automation platform, i.e. Pabbly Connect will now do all the manual work.

Conclusion –

Alright! This is our catch on how to send Google Sheets data to Airtable using Pabbly Connect. Believe us, it is one of the best integration software in the market that allows data transmission in a matter of time. Just follow all the mentioned steps and nothing else. Plus the software doesn’t restrict you from using any features even in its free plan.

So, what’s stopping you now, Go and try Pabbly Connect for Free.

You May Also Like To Read –

How to Add BigCommerce Customer to Zendesk

How to Add BigCommerce Customer to Zendesk

Looking for a way to add BigCommerce customer to Zendesk automatically? If yes, then let us introduce you to the most amazing tool named Pabbly Connect.

How to Add BigCommerce Customer to Zendesk

So basically, Pabbly Connect is an integration & automation software that enables you to connect multiple apps to transfer data from one application to another automatically in real-time.

Who doesn’t want to set themselves free from all the repetitive work and tasks to be in a single go? Hence to do so, we have the best automation tool for you to make this wish come true i.e, Pabbly Connect.

Why Choose This Method Of Integration?

In contrast with other integration services-

  • Pabbly Connect does not charge you for its in-built apps like filters, Iterator, Router, Data transformer, and more
  • Create “Unlimited Workflows” and smoothly define multiple tasks for each action
  • As compared to other services which offer 750 tasks at $24.99, Pabbly Connect offers 50000 tasks in the starter plan of $29 itself
  • Unlike Zapier, there’s no restriction on features. Get access to advanced features even in the basic plan
  • Try before you buy! Before spending your money, you can actually signup & try out the working of Pabbly Connect for FREE

Sign Up To Pabbly Connect 

But before we jump straight into the integration process, let’s know a little bit about both the software. Hence, BigCommerce is a paid-for, ‘hosted’ e-commerce solution that allows business owners to set up an online store and sell their products on the web. Whereas, Zendesk is a cloud-based help desk management solution offering customizable tools to build customer service portals, knowledge bases, and online communities.

After integrating these applications, whenever there will be any new customers added to your BigCommerce account, they will be automatically updated in Zendesk as users in real-time. You can also check out the video that we have provided here for integration –

Even though, there is no direct integration possible for these two services yet. Henceforth, we are going to use Pabbly Connect to make this integration possible.

Using this software, you can effortlessly share data within multiple premium services easily. Moreover, you don’t need to have any coding skills & even a beginner can use it efficiently.

Besides, we have a template for this integration that can assist you to get started quickly. Tap on the image below to begin. Also, you can go to Marketplace & look for more apps/integrations.

How

Now, without further ado, let’s follow the step-by-step procedure to integrate BigCommerce and Zendesk.

Step 1: Sign up to Pabbly Connect

Sign Up

Begin the process to add BigCommerce customer to Zendesk by pressing on the “Sign Up Free” button on the Pabbly Connect home page. You can either manually fill-up all the details or sign up using your Gmail account.

Try Pabbly Connect for FREE

Step 2: Access Pabbly Connect

Select Connect

After logging into the account, press the “Access Now” button of the Connect section in the dashboard.

Step 3: Workflow for BigCommerce to Zendesk Integration

(a) Start with a New Workflow

Create New Workflow

Begin with creating a workflow for your project by pressing the “Create Workflow” button.

(b) Name the Workflow

Name the Workflow

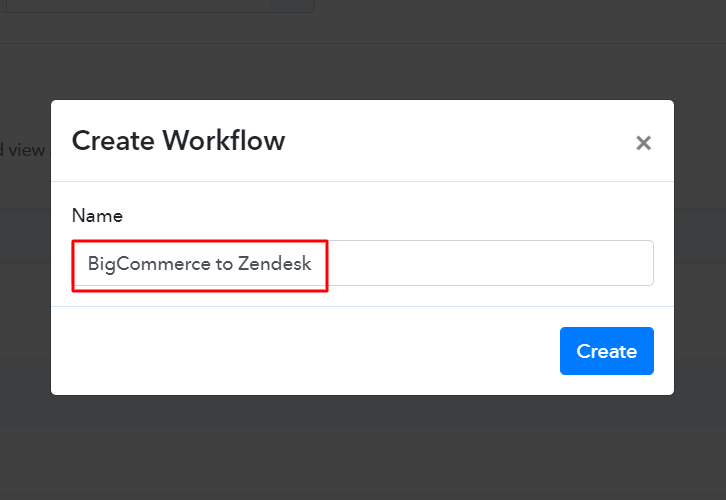
Now, name the workflow just like in the above-shown image. As here I named the workflow as “BigCommerce to Zendesk”, you can obviously change it as per your requirements.

Step 4: Setting Trigger for BigCommerce to Zendesk Integration

After naming the workflow, select the application you want to integrate. Pabbly Connect enables you to integrate unlimited premium applications, create your free account now.

(a) Select Application you Want to Integrate

Select Application you Want to Integrate BigCommerce

Now, select the application that you want to integrate. In this case, we are choosing “BigCommerce” for integration, and in the method section, select “New Customer”.

(b) Click Connect Button

Click Connect Button BigCommerce

Next, press the “Connect with BigCommerce” button.

Step 5: Connecting BigCommerce to Pabbly Connect

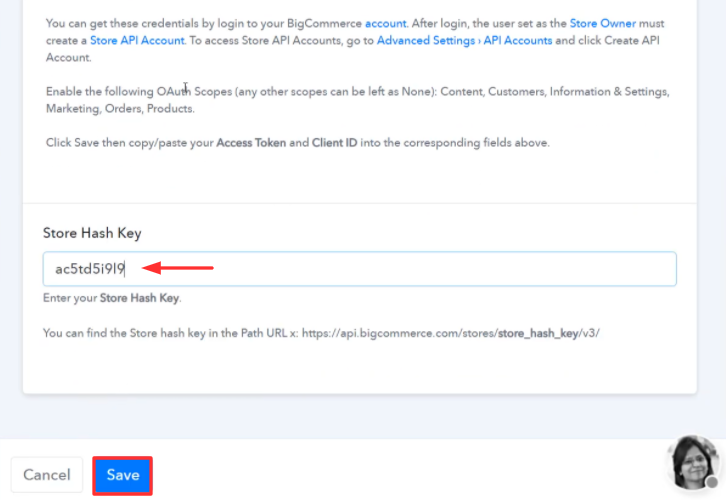
Afterward, to connect BigCommerce with Pabbly Connect, you have to authorize the application. Thus, you have to log in to your BigCommerce account.

(a) Go to Advanced Settings

Go to Advanced Settings BigCommerce

Now, go to the Bigcommece dashboard & hit “Advanced Settings”.

(b) Click on API Accounts

Click on API Accounts BigCommerce

Later, press the “API Accounts”.

(c) Create API Account

Create API Account BigCommerce

Now, hit the button named “Create API Account” & then choose the option “Create V2/V3 API Token”.

(d) Copy the API Path Key

Copy the API Path Key BigCommerce

Furthermore, copy the API Path highlighted in the image & then hit the “Save” button.

(e) Copy the Client ID and Access Token

Copy the Client ID and Access Token BigCommerce

Ultimately, a window will pop-up with API keys. Just copy the “Client ID & Access Token” then hit the “Done” button.

(f) Paste the API Keys

Paste the API Keys

Promptly, paste the respective API keys & tokens in the mentioned columns. Then tap on the “Save” button.

Step 6: Enroll a Dummy Customer

Now, to check this integration, we will capture the data from BigCommerce, and for that, we will create a dummy customer in BigCommerce.

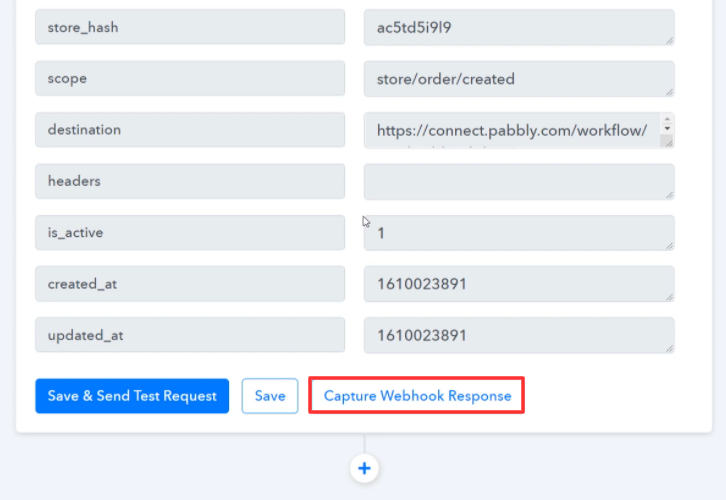
(a) Capture Webhook Response

Capture Webhook Response

Once you add the webhook URL to your BigCommerce account, just press the “Capture Webhook Response” button to capture the data from BigCommerce.

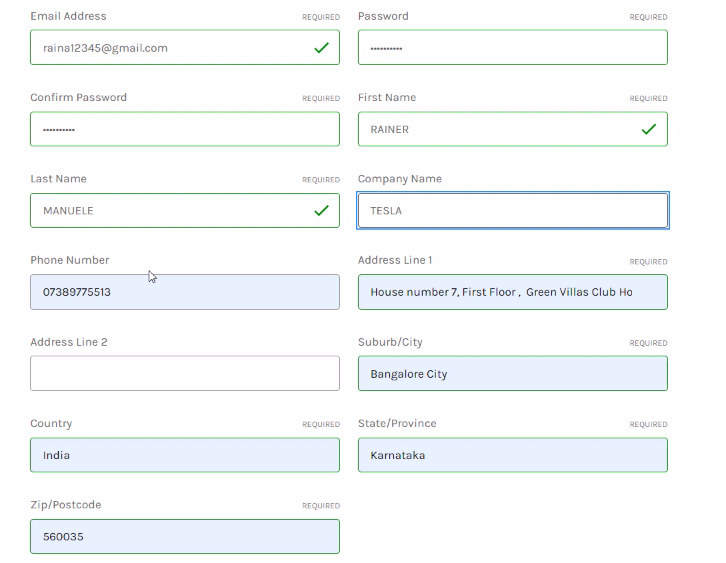
(b) Make a Dummy Customer

Add New Customer BigCommerce

Afterward, create a new customer, by simply logging in to your Bigcommerce account.

Step 7: Test the Response in Pabbly Connect Dashboard

Test the Response in Pabbly Connect Dashboard

After creating the customer in BigCommerce, the customer’s info will appear on the Pabbly Connect dashboard. Next, tap on the “Save” button.

Step 8: Setting Actions for BigCommerce to Zendesk Integration

Later, to make this BigCommerce-Zendesk integration work, choose two actions for your trigger. Primary, BigCommerce to get the proper customer’s info from the customer ID that we got in the trigger part. Secondary, to create a user in Zendesk.

(a) Select Application you Want to Integrate

Select Application you Want to Integrate BigCommerce

Subsequently, press the “+” button below & choose the application that you want to integrate. Here we will choose “BigCommerce” and in the method, section select “Get Customer By Id”. After choosing the application click on the “Connect with BigCommerce” button.

(b) Authorize Application

Authorize Application

Next, choose the previously used credentials to move forward.

(c) Save & Send Test Request

Save & Send Test Request BigCommerce

Now, map the “Customer ID” and then hit the “Save & Send Test Request” button.

(e) Save the API Response

Save the API Response

As we can see that all the information about the customer is captured within Pabbly Connect. Now, press the “Save” button.

(f) Select Application you Want to Integrate

Select Zendesk

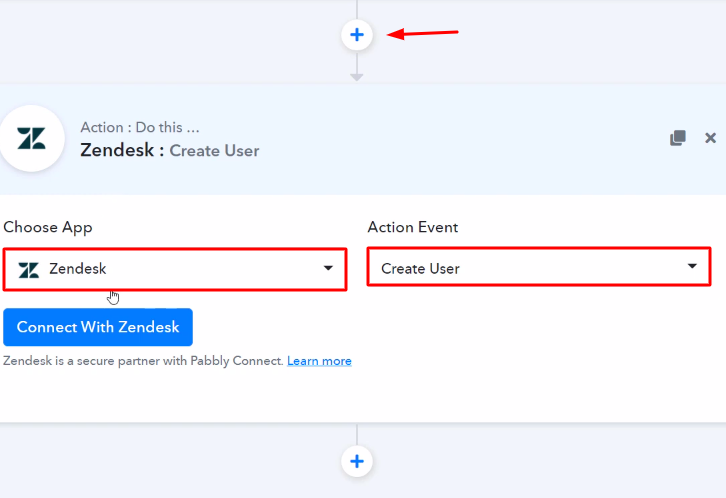
The following step is to hit the “+” icon then select “Zendesk” & in the choose method option, select ”Create User”.

(g) Click the Connect Button

Connect with Zendesk

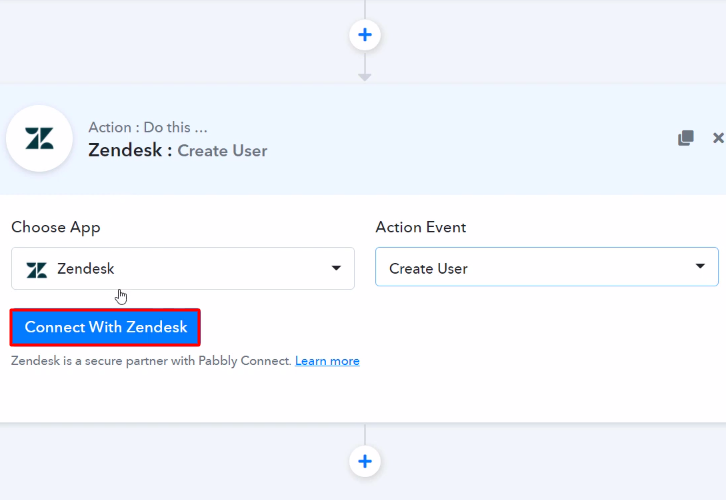
Forthwith, press the “Connect With Zendesk” button after making all the necessary changes.

Step 9: Connecting Zendesk to Pabbly Connect

Subsequently, to connect Zendesk with Pabbly Connect, log in to your Zendesk account for the authorization process.

(a) Go to Zendesk Settings

zendesk_settings_api

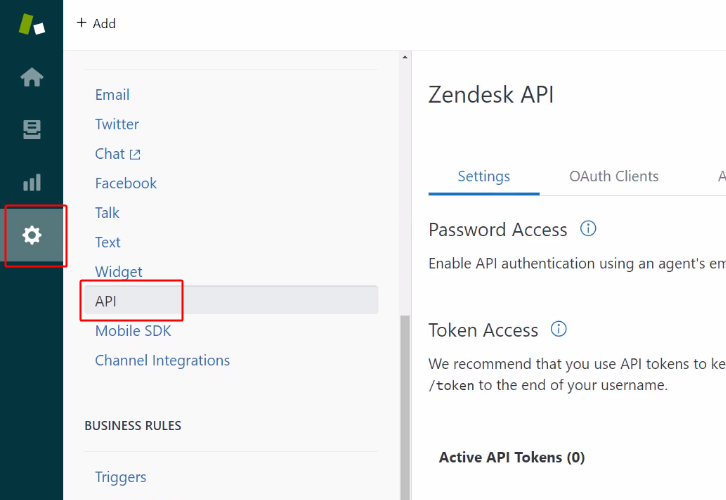
Next, sign-in and go to your Zendesk dashboard. Click on the gear icon (i.e, Settings) and select the “API” option from the secondary menu that opens.

(b) Enable Password Access

enable_api_key Zendesk

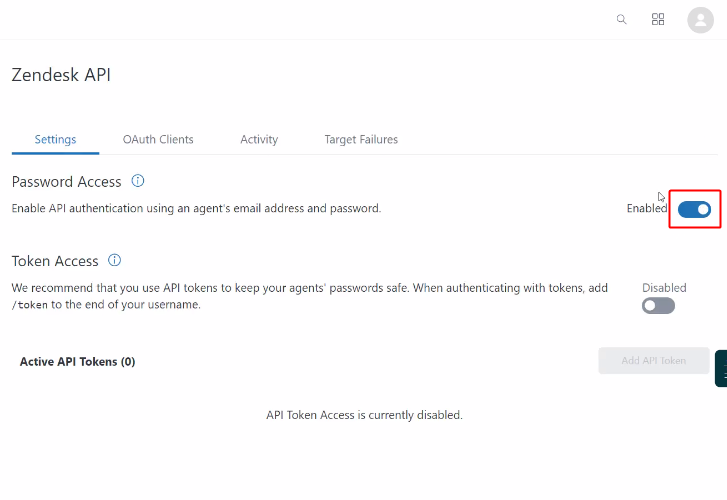
Enable password access by switching on the button to “Enabled”.

(c) Add Subdomain & Save

add_sub_domain_for_razorpay_to_zendesk

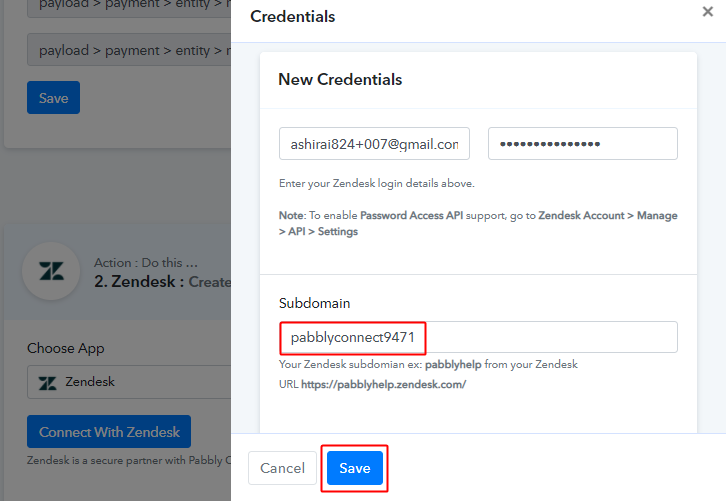
Paste the Zendesk Subdomain as per the help text given below it and after that click on “Save”.

(d) Map the Fields

Map the Fields

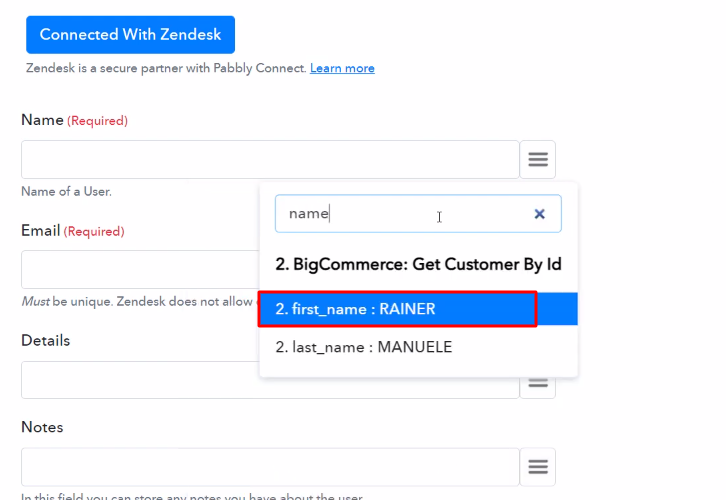
After connecting with your Zendesk account, map all the fields quickly like name, email, etc.

(e) Save & Send Test Request

Send Test Request

Subsequently, after filling in all the details, hit the “Save & Send Test Request” button.

Step 10: Check Response in Zendesk Dashboard

Check Response Zendesk

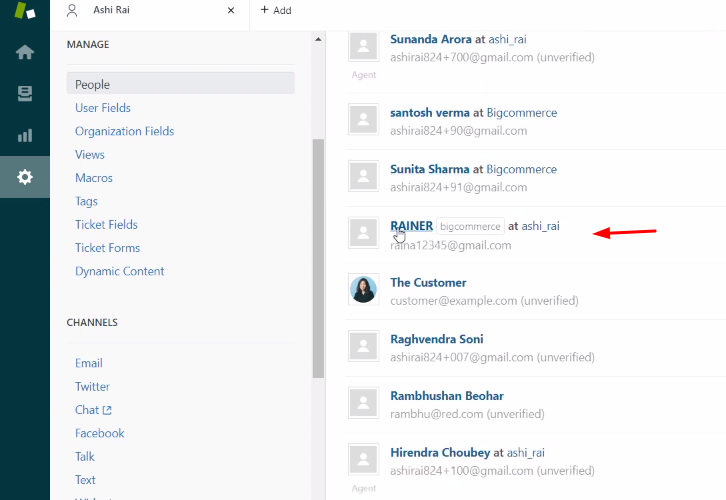
Lastly, when you check your Zendesk account, you can see that the contact info is updated automatically for the newly created customer in BigCommerce.

Conclusion –

Hopefully, now you know how to add BigCommerce customer to Zendesk. It’s simple and easy to use and you won’t have to go for any other software after using it. So, what’s stopping you now! Go and catch your deal by signing up for a free account.

If you have any suggestions or queries, please drop them down in the comment section, we will get back to you as soon as possible.

You May Also Like To Read –
How to Add Salesforce Leads to Sendpulse

How to Add Salesforce Leads to Sendpulse

Want to know the easiest way to add Salesforce leads to Sendpulse? If so, then you’re at the right place as we are presenting the best automation and integration tool named Pabbly Connect.

How to Add Salesforce Leads to Sendpulse

Pabbly Connect is a data transmission and integration platform that helps you to connect various applications for fast data transfer. The best part is that no coding knowledge is needed.

You can easily create smooth workflows in a short amount of time.

Why Choose This Method Of Integration?

In contrast with other integration services-

  • Pabbly Connect does not charge you for its in-built apps like filters, Iterator, Router, Data transformer, and more
  • Create “Unlimited Workflows” and smoothly define multiple tasks for each action
  • As compared to other services which offer 750 tasks at $24.99, Pabbly Connect offers 50000 tasks in the starter plan of $29 itself
  • Unlike Zapier, there’s no restriction on features. Get access to advanced features even in the basic plan
  • Try before you buy! Before spending your money, you can actually signup & try out the working of Pabbly Connect for FREE

Sign Up To Pabbly Connect 

Let’s understand the software and the need for this integration. Salesforce is a solution that helps companies to better communicate with clients, suppliers, and future users by using cloud technologies. On the other hand, SendPulse is a cloud-based marketing application that combines email, text messages, and push alerts into a single platform.

By connecting Salesforce and SendPulse via Pabbly Connect, you can easily add Salesforce leads as a subscriber in SendPulse without lifting fingers. Though, you need to set up integration which we also mentioned in the below video.

We already have a template for this integration that will help you get up to speed quickly. Click the ‘Use Workflow’ button below to get started. You should also look for more apps/integrations in the Marketplace.

Clone Template Salesforce Lead to SendPulse

Now, without further ado, let’s get down to business and take the steps to connect Salesforce and SendPulse.

Let’s get started

Step 1: Sign up to Pabbly Connect

Sign Up

Initiate the process to add Salesforce leads to Sendpulse by clicking on the ‘Sign Up Free‘ icon on the Pabbly Connect home page. Next, either manually fill-up all the details manually or sign up using your Gmail account.

Try Pabbly Connect for FREE

Step 2: Access Pabbly Connect

Select Connect

Next, after logging into the account, click on the ‘Access Now’ button of the Connect section in the dashboard.

Step 3: Workflow for Salesforce with SendPulse Integration

(a) Start with a New Workflow

Create New Workflow

Start with creating a workflow for your project by clicking on the ‘Create Workflow’ button.

(b) Name the Workflow

Name the Workflow

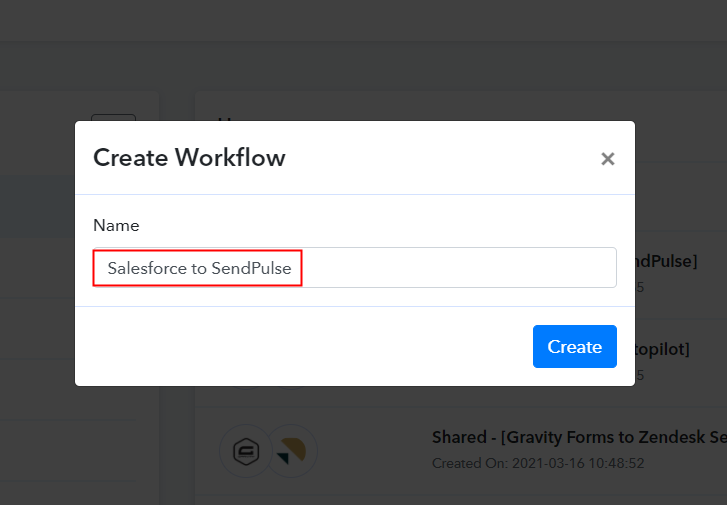
Further, add the name of workflow which in our case is ‘Salesforce to SendPulse’. Nevertheless, you can always name the workflow according to your requirements.

Step 4: Setting Trigger for Salesforce to SendPulse Integration

Further, you have to choose an app to add SendPulse subscribers from the new Salesforce lead. Pabbly Connect lets you bind or connect unlimited apps within minutes, click here to sign up for unlimited workflows.

(a) Select Application you Want to Integrate

Select Salesforce for Salesforce to MailChimp Integration

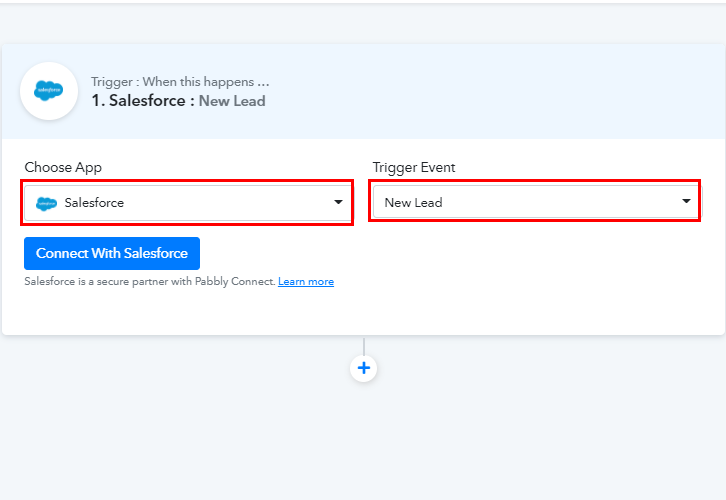
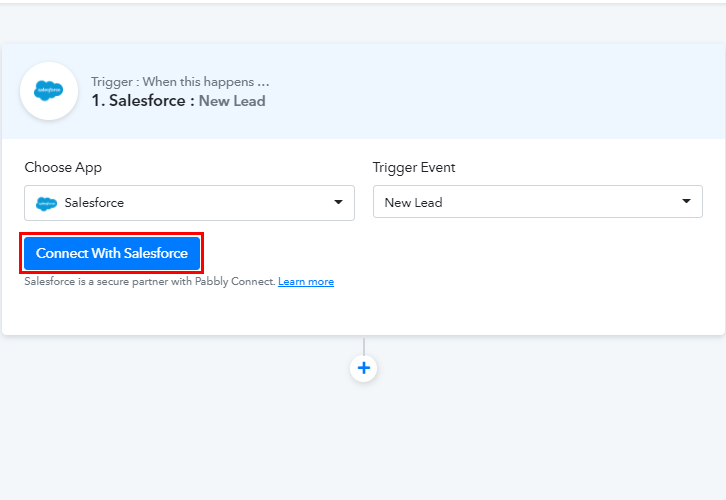
In the following step, choose ‘Salesforce’ from the choose app drop-down, and select ‘New Lead’ option from the Trigger Event.

(b) Connect with Salesforce

Connect with Salesforce

After choosing the application click on the ‘Connect With Salesforce’ button for the next step.

Step 5: Connecting Salesforce to Pabbly Connect

Later, to connect Salesforce with Pabbly Connect, you have to authorize the application. For this, you have to log into your Salesforce account.

(a) Authorize Salesforce Account

Authorize Salesforce for Salesforce to MailChimp Integration

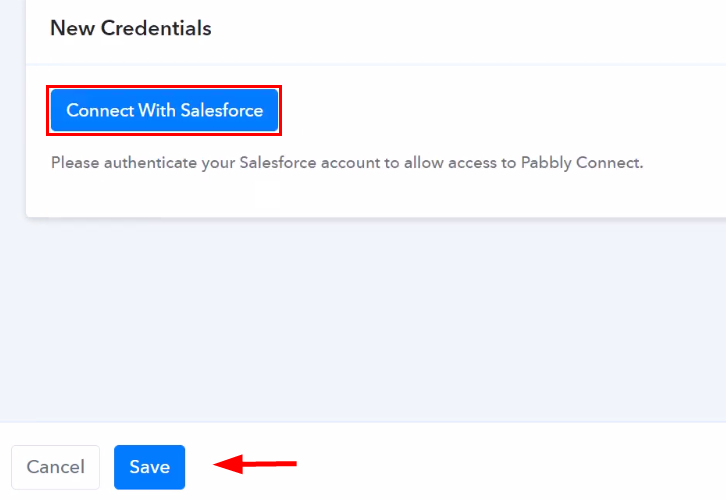
In the next window that slides in from the right, again click on the ‘Connect with Salesforce’ button. Authorize your Salesforce account to connect with Pabbly Connect by allowing access. Then, click on the ‘Save’ button.

(b) Paste Instance URL

Paste Instance URL

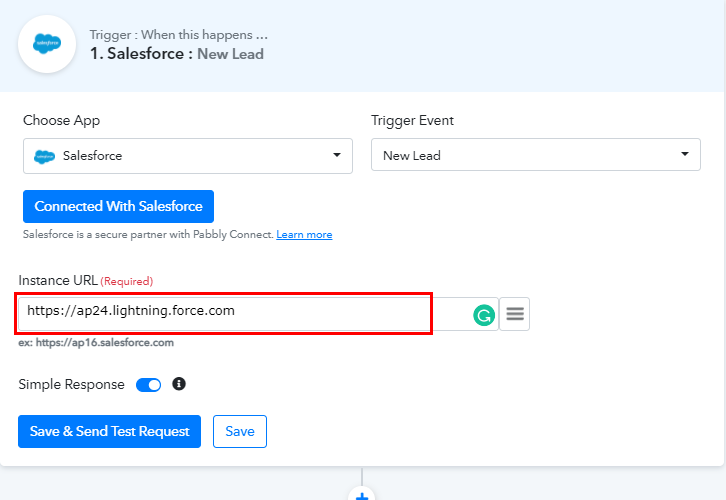
Now, you get the ‘Instance URL’ from Salesforce website URL. Simply copy and paste it in the respective column as shown in the above image.

Step 6: Create a New Lead

To check if the integration is capturing data or not, we will be going to create a new lead in Salesforce.

(a) Click on Leads

Click on Leads

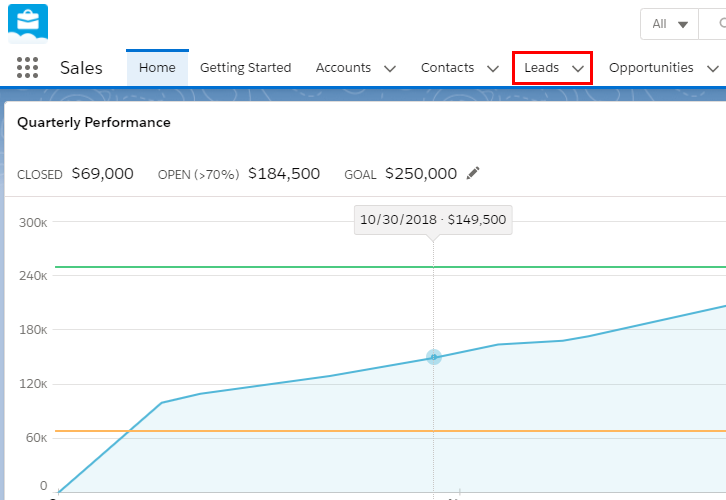
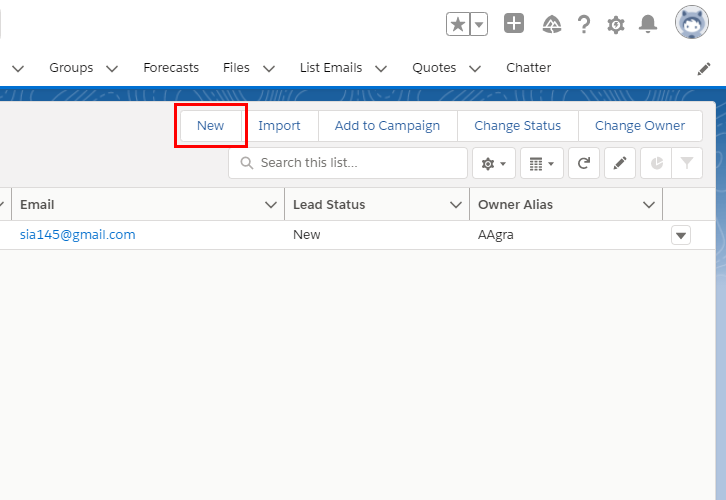
Now, go to the Salesforce dashboard, and click on ‘Leads’ menu.

(b) Create a New Lead

Create a New Lead for Salesforce to MailChimp Integration

Promptly, click on the ‘New’ button to create a new lead.

(c) Enter Lead Info

Enter Lead Info

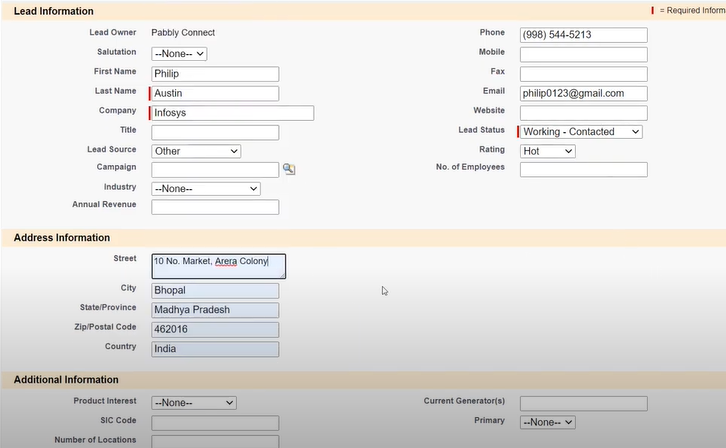
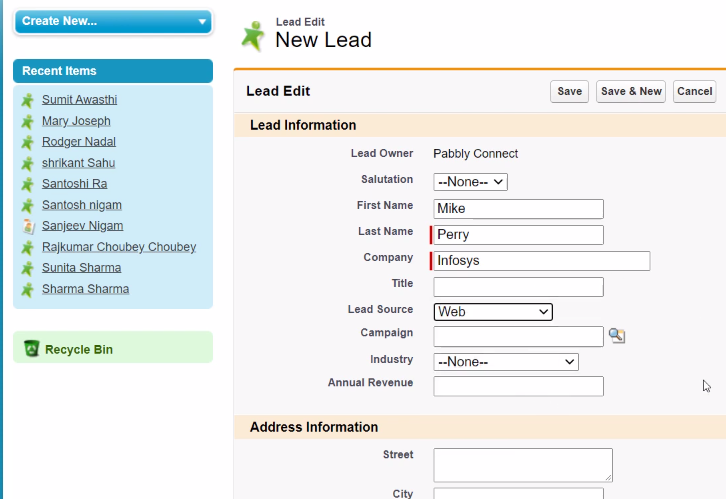
Further, you have to enter the new lead details such as first name, last name, address, and so forth.

(d) Save the Lead Details

Save the Lead Details for Salesforce to MailChimp Integration

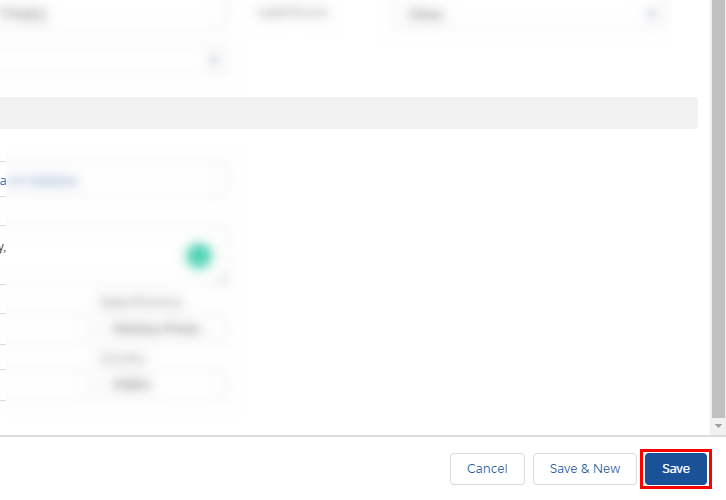
After you entered all the details for the new lead, click on the ‘Save’ button to save the details.

Step 7: Test the Response in Pabbly Connect Dashboard

Test the Response in Pabbly Connect Dashboard

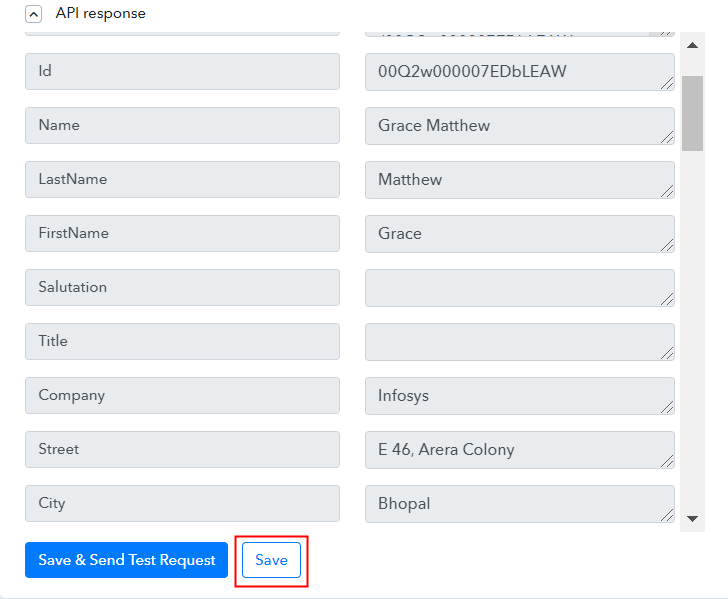
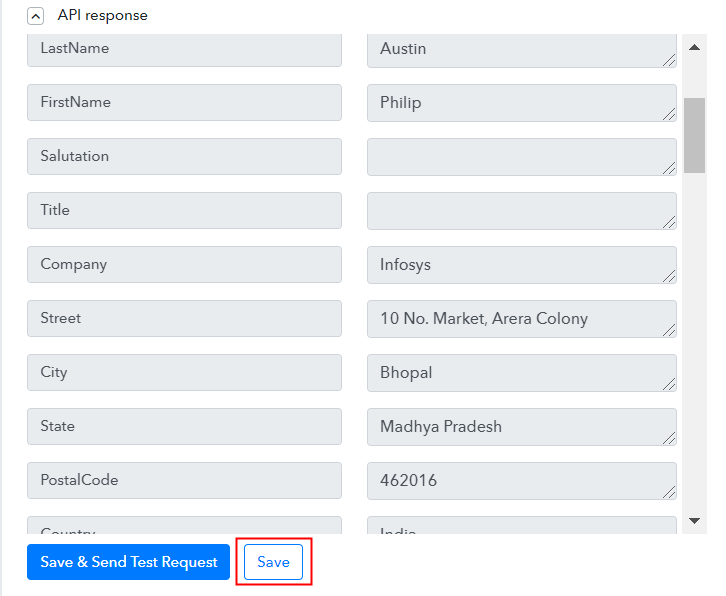
Subsequently, go to the Pabbly Connect window, and click on the ‘Save and Send Test Request’ button to get the response. At last, hit the ‘Save’ button.

Step 8: Setting Action for Salesforce to SendPulse Integrations

To make this Salesforce-SendPulse integration work, you have to choose the action for your trigger.

(a) Select Application you Want to Integrate

Select SendPulse

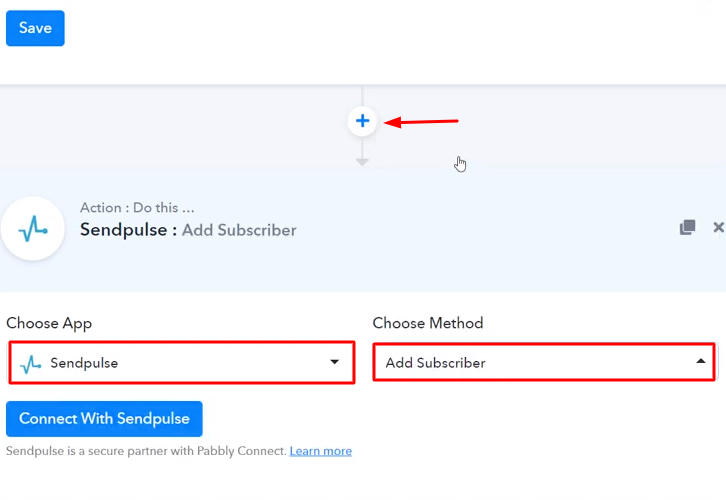
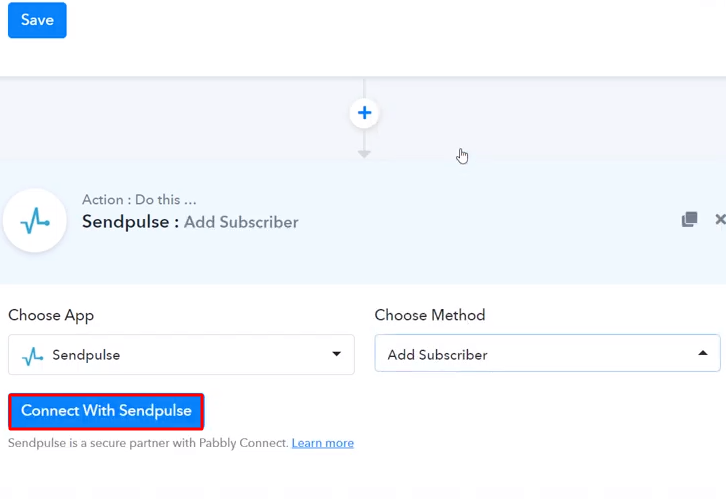
Now in this step, click on the + button below and choose the application that you want to integrate. Here we will choose “SendPulse” to integrate and in the method section select “Add Subscriber”.

(b) Click the Connect Button

Click Connect SendPulse

After choosing the application click on the “Connect with SendPulse” button to move forward.

Step 9: Connecting SendPulse to Pabbly Connect

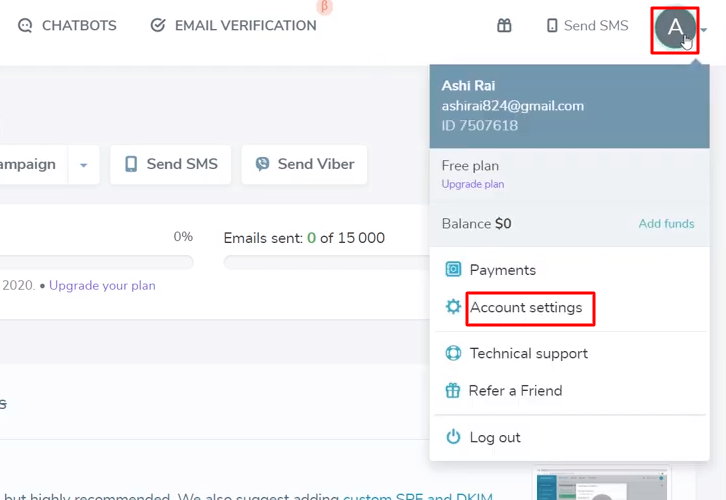
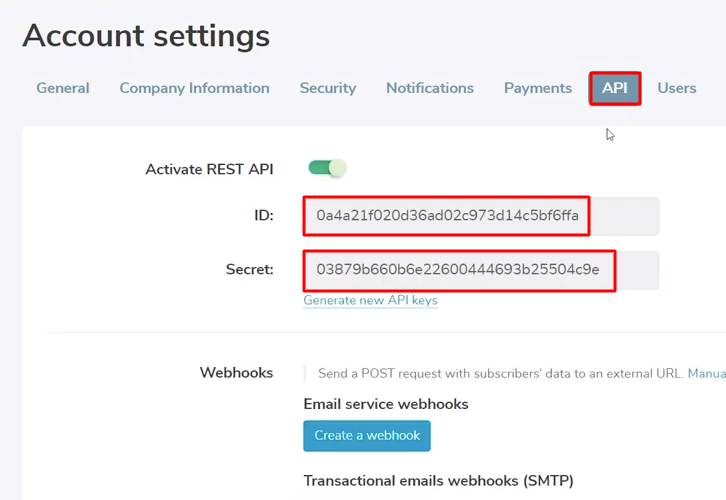
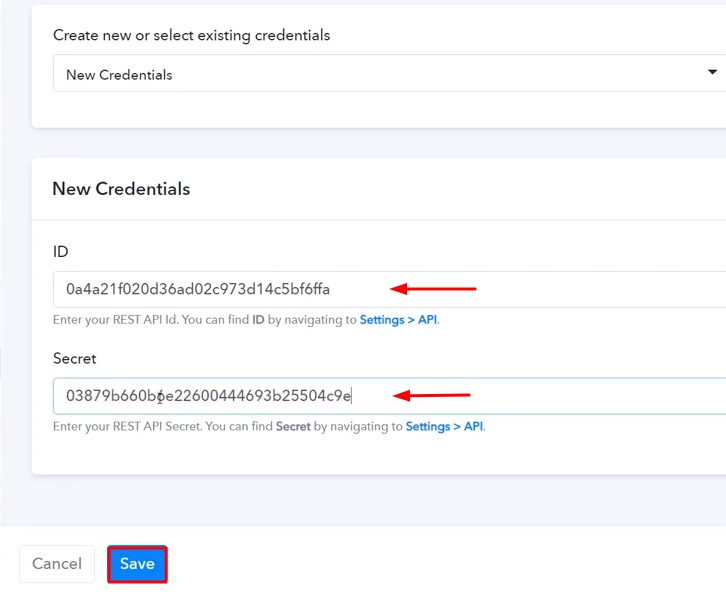
To connect SendPulse with Pabbly Connect, you need to paste the ID and secret key from your SendPulse account to the Pabbly Connect dashboard. For that, you have to log in to your SendPulse account.

(a) Click on SendPulse Account Settings

Click on Account Settings Sendpulse

After clicking on the connect button, a window will slide in from the right side asking for an “ID” and “Secret Key”. Next, you have to click on the “Profile” icon in your SendPulse account and then click on the “Account Settings” option.

(b) Copy ID and Secret Key

Copy API Key Sendpulse

Once you reach the account settings page, then click the given “API” option among several other options, and then copy the ID and secret key.

(c) Paste the ID and Secret Key

Paste the API Key Sendpulse

Paste the copied ID and secret key and then click on the “Save” button.

(d) Map the Fields

Map the Fields

Once you are connected with your SendPulse account, now you have to add all the field data like name, email id, etc. Map up all the fields quickly.

(e) Save & Send Test Request

Save & Send Test Request

Once you are done mapping up all fields click on the “Send Test Request” button.

Step 10: Check Response in SendPulse Dashboard

Check Response in SendPulse Dashboard

Here, you can see that integration was successful and the lead from Salesforce has been added to the SendPulse automatically as a subscriber.

Conclusion –

Hopefully, now you know “How to Add Salesforce Leads to Sendpulse”. This is a one-time process, after that everything will be automatically done by Pabbly Connect. Just follow all the step-by-step procedures mentioned above & your Salesforce to SendPulse integration is set.

So, don’t wait anymore. Go and create your free account on Pabbly Connect today.

You May Also Like to Read –


How to Add Autopilot Contact from New Salesforce Lead

How to Add Autopilot Contact from New Salesforce Lead

Aren’t you tired of manually efforts to add Autopilot contact from new Salesforce lead? If you’re still doing that, you need to upgrade right now and start using Pabbly Connect.

How to Add Autopilot Contact from New Salesforce Lead

Well, Pabbly Connect is an integration and automation software that allows you to integrate multiple apps for easy data transmission. The best part is there is no need for coding skills.

You can create seamless workflows in a matter of time without any difficulty.

Why Choose This Method Of Integration?

In contrast with other integration services-

  • Pabbly Connect does not charge you for its in-built apps like filters, Iterator, Router, Data transformer, and more
  • Create “Unlimited Workflows” and smoothly define multiple tasks for each action
  • As compared to other services which offer 750 tasks at $24.99, Pabbly Connect offers 50000 tasks in the starter plan of $29 itself
  • Unlike Zapier, there’s no restriction on features. Get access to advanced features even in the basic plan
  • Try before you buy! Before spending your money, you can actually signup & try out the working of Pabbly Connect for FREE

Sign Up To Pabbly Connect 

Let’s understand the software and the need for this integration. Salesforce is a cloud computing solution that helps companies to better communicate with clients, suppliers, and future users by using cloud technologies. On the other hand, Autopilot is a visual communications platform for creating marketing plans and tracking lead conversions. Multi-channel marketing capabilities are provided by the product, including online, email, in-app, SMS, and conventional mail communications.

By connecting Salesforce and Autopilot using Pabbly Connect, you can easily add a contact in Autopilot whenever there is a new lead added in Salesforce. Here, we have also attached a video regarding the same.

Furthermore, we have a template for this integration that will help you move up and operating fast. To get started, click the ‘Use Workflow’ button below. You can also search the Marketplace for more apps/integrations.

Clone Template Salesforce and Autopilot

Now, without further ado, let’s get down to business and take the steps to connect Salesforce and Autopilot.

Let’s get started!

Step 1: Sign up to Pabbly Connect

Sign Up

Initiate the process to add Autopilot contact from new Salesforce lead by clicking on the ‘Sign Up Free‘ icon on the Pabbly Connect home page. Next, either manually fill-up all the details or sign up using your Gmail account.

Try Pabbly Connect for FREE

Step 2: Access Pabbly Connect

Select Connect

Next, after logging into the account, click on the ‘Access Now’ button of the Connect section in the dashboard.

Step 3: Workflow for Salesforce with Autopilot Integration

(a) Start with a New Workflow

Create New Workflow

Start with creating a workflow for your project by clicking on the ‘Create Workflow’ button.

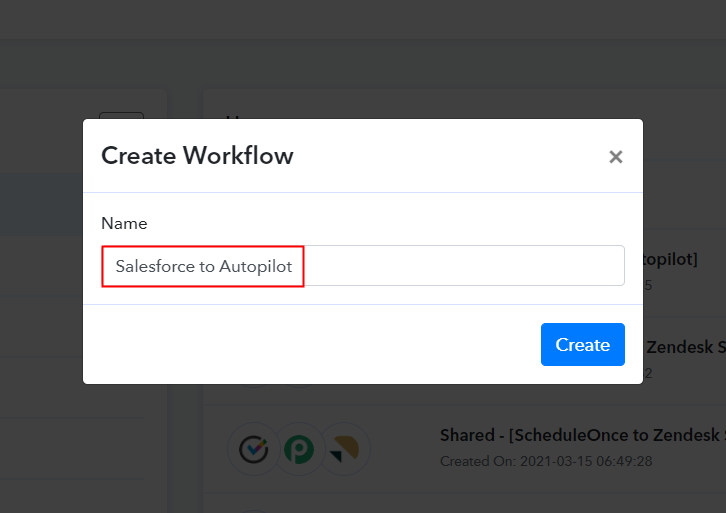
(b) Name the Workflow

Name the Workflow

Further, add the name of workflow which in our case is ‘Salesforce to Autopilot’. Nevertheless, you can always name the workflow according to your requirements.

Step 4: Setting Trigger for Salesforce to Autopilot Integration

Further, you have to choose an app to add Autopilot contact from the new Salesforce lead. Pabbly Connect lets you bind or connect unlimited apps within minutes, click here to sign up for unlimited workflows.

(a) Select Application you Want to Integrate

Select Salesforce for Salesforce to MailChimp Integration

In the following step, choose ‘Salesforce’ from the choose app drop-down, and select ‘New Lead’ option from the Trigger Event.

(b) Connect with Salesforce

Connect with Salesforce

After choosing the application click on the ‘Connect With Salesforce’ button for the next step.

Step 5: Connecting Salesforce to Pabbly Connect

Later, to connect Salesforce with Pabbly Connect, you have to authorize the application. For this, you have to log into your Salesforce account.

(a) Authorize Salesforce Account

Authorize Salesforce for Salesforce to MailChimp Integration

In the next window that slides in from the right, again click on ‘Connect with Salesforce’ button. Authorize your Salesforce account to connect with Pabbly Connect by allowing access. Then, click on the ‘Save’ button.

(b) Paste Instance URL

Paste Instance URL

Now, you get the ‘Instance URL’ from Salesforce website URL. Simply copy and paste it in the respective column as shown in the above image.

Step 6: Create a New Lead

To check if the integration is capturing data or not, we will be going to create a new lead in Salesforce.

(a) Click on Leads

Click on Leads

Now, go to the Salesforce dashboard, and click on ‘Leads’ menu.

(b) Create a New Lead

Create a New Lead for Salesforce to MailChimp Integration

Promptly, click on the ‘New’ button to create a new lead.

(c) Enter Lead Info

Enter Lead Info

Further, you have to enter the new lead details such as first name, last name, address, and so forth.

(d) Save the Lead Details

Save the Lead Details for Salesforce to MailChimp Integration

After you entered all the details for the new lead, click on the ‘Save’ button to save the details.

Step 7: Test the Response in Pabbly Connect Dashboard

Test the Response in Pabbly Connect Dashboard

Subsequently, go to the Pabbly Connect window, and click on the ‘Save and Send Test Request’ button to get the response. At last, hit the ‘Save’ button.

Step 8: Setting Action for Salesforce to Autopilot Integration

Subsequently, to make Autopilot and Salesforce integration work, you have to choose the action for your trigger.

(a) Select Application you Want to Integrate

Select Application you Want to Integrate

The consequent step is to hit the “+” icon then select “Autopilot” & in the choose method option, select ”Add New Contact to List”.

(b) Click the Connect Button

Click the Connect Button

Later, press the “Connect With Autopilot” button after making all the significant changes.

Step 9: Connecting Autopilot to Pabbly Connect

Moving on to the next step, now it’s time to add Salesforce lead as a contact in Autopilot.

(a) Click on the Given Link

Click on the Given Link

Now, click on the given link in order to get the “Autopilot Key” from Autopilot software. Once you click on the link, you will get redirected to your Autopilot account. Simply, log into your account and go to settings.

(b) Copy the API Key

Copy the API Key

Moving on, now click on the gear icon of settings, then hit the “Autopilot API” option. After that, simply copy the given API Key.

(c) Paste the API Key

Paste the API Key

Later, paste the API key in the given box and then hit the “Save” button to proceed further.

(d) Map the Fields

Map the Fields

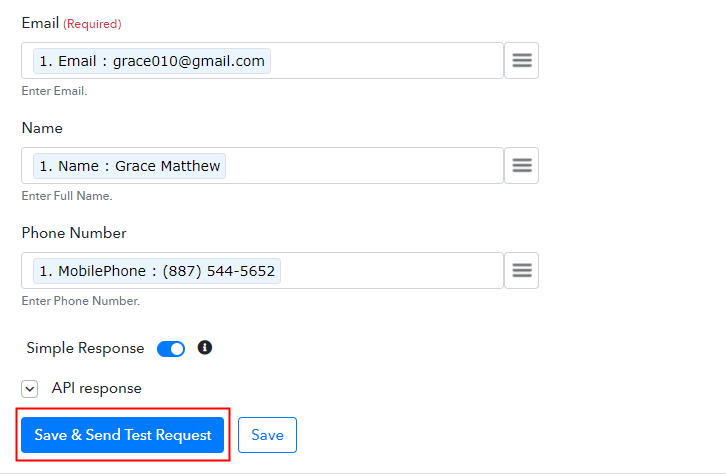
Later on, map the required field from the drop-down option.

(e) Save & Send Test Request

Save & Send Test Request

After entering all the details, hit the “Send Test Request” button to test the Salesforce and Autopilot integration.

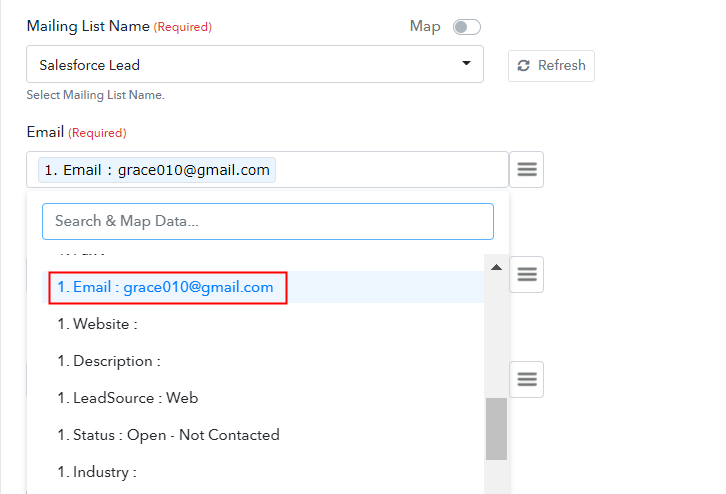
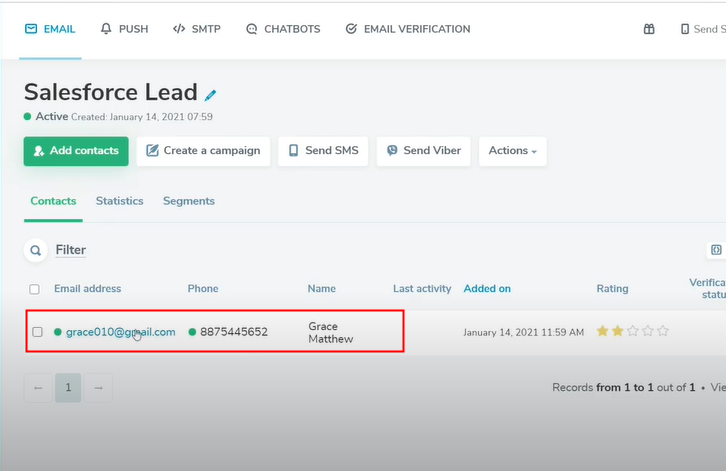
Step 10: Check Response in Autopilot Dashboard

Check Response in Autopilot Dashboard

Finally, when you check the Contact section in Autopilot, your customer entry will automatically appear there.

Conclusion –

Hopefully, now you know “How to Add Autopilot Contact from New Salesforce Lead”. This is a one-time process, after which it will be automatically done by Pabbly Connect. Just follow all the step-by-step procedures mentioned above & your Salesforce to Autopilot integration is set.

So, don’t wait anymore. Go and try Pabbly Connect for Free.

You May Also Like To Read –
How to Add Google Calendar Event for New Salesforce Task

How to Add Google Calendar Event for New Salesforce Task

Tired of manually adding Google Calendar event for new Salesforce task?

How to Add Google Calendar Event for New Salesforce Task

If yes then worry not as we are going to tell you, how to integrate Salesforce with Google Calendar and automate tasks within a few minutes. You must be aware that there is no direct integration between these two services. So, we’ll be using Pabbly Connect to achieve this automation.

So, basically, Pabbly Connect is integration & automation software that lets you transfer data among multiple applications in real-time.

Most importantly, you don’t have to do any hard coding & even a fresher can use it efficiently. Also, this procedure will be just a one-time setup & after that, the workflow will take care of the rest.

Why Choose This Method Of Integration?

In contrast with other integration services-

  • Pabbly Connect does not charge you for its in-built apps like filters, Iterator, Router, Data transformer, and more
  • Create “Unlimited Workflows” and smoothly define multiple tasks for each action
  • As compared to other services which offer 750 tasks at $24.99, Pabbly Connect offers 50000 tasks in the starter plan of $29 itself
  • Unlike Zapier, there’s no restriction on features. Get access to advanced features even in the basic plan
  • Try before you buy! Before spending your money, you can actually signup & try out the working of Pabbly Connect for FREE

Sign Up To Pabbly Connect 

But, before jumping directly on the procedure first, let’s learn a bit about the services. Salesforce is a customer relationship management solution that brings companies and customers together. It’s a platform that gives all your departments — including marketing, sales, commerce, and service — a single, shared view of every customer. Whereas, Google Calendar is a time-management and scheduling calendar service developed by Google.

Consequently, once you’re done setting up this workflow your events will be created automatically in your Google Calendar whenever there is a new task created in Salesforce.

Additionally, we’ve embedded a video tutorial for this integration. So, have a look at it by yourself –

Besides, we have added the template for this integration to help you get started more quickly. You can click on the image given below to begin. Additionally, you can also visit the Marketplace & look for more integrations and apps.

How

So, get ready as we’re going to discover the Salesforce and Google Calendar integration.

Step 1: Sign up to Pabbly Connect

Sign Up

To add Google Calendar event for new Salesforce task first, visit the Pabbly Connect website & hit the ‘Sign-Up Free‘ button. Next on the registration page that opens subsequently either use your existing Gmail account or manually fill the registration form to signup.

Try Pabbly Connect for FREE

Step 2: Access Pabbly Connect

Select Connect

Next, after logging into the account, click on the ‘Access Now’ button as shown in the above image.

Step 3: Workflow for Salesforce to Google Calendar Integration

(a) Start with a New Workflow

Create New Workflow

Start with creating a workflow to add Google Calendar event for new Salesforce task & to do this push the ‘Create Workflow’ button first.

(b) Name the Workflow

Name the Workflow

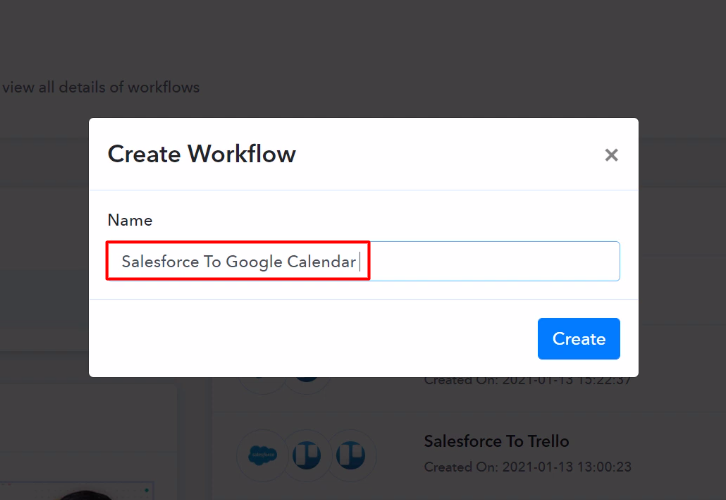
Now, name the workflow as per your need (for instance: Salesforce to Google Calendar) and push the ‘Create’ button available here.

Step 4: Setting Trigger for Salesforce to Google Calendar Integration

To automatically add Google Calendar event for new Salesforce task, you’ll need to set-up a trigger using Pabbly Connect.

(a) Select Application you Want to Integrate

Select Salesforce

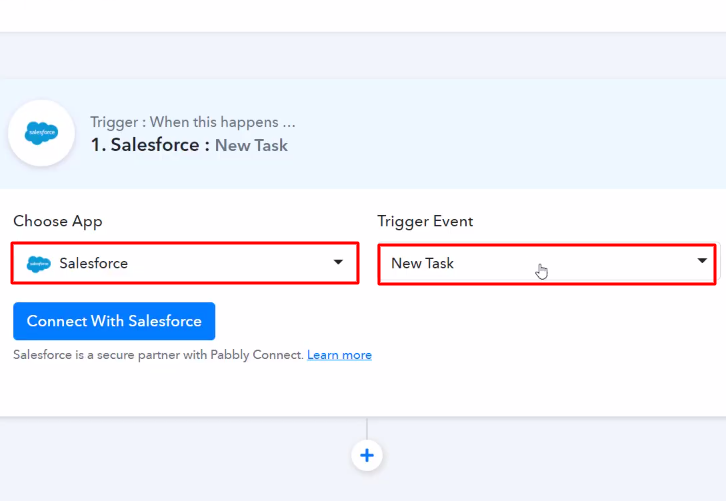
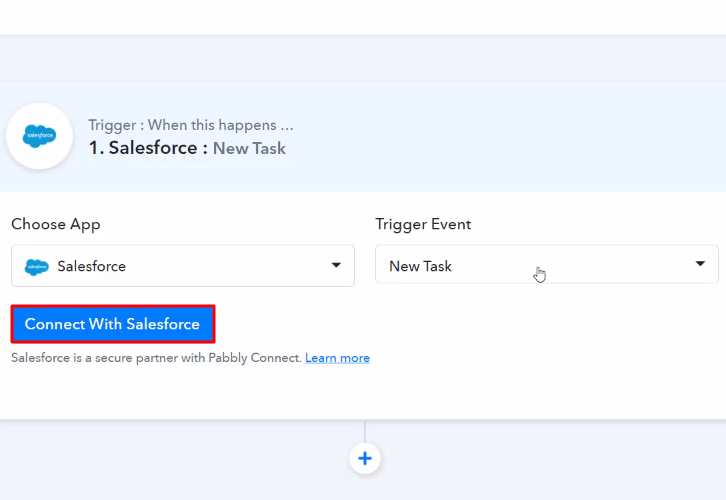
When you click on the create button to generate the workflow, a page containing the trigger window will open next. Select the ‘Salesforce’ app from the ‘Choose App’ field drop-down options and in the ‘Trigger Event’ section select ‘New Task’.

(b) Click Connect Button

Connect with Salesforce

After choosing the app, click on the given ‘Connect with Salesforce’ button.

Step 5: Connecting Salesforce to Pabbly Connect

Authorize Application Salesforce

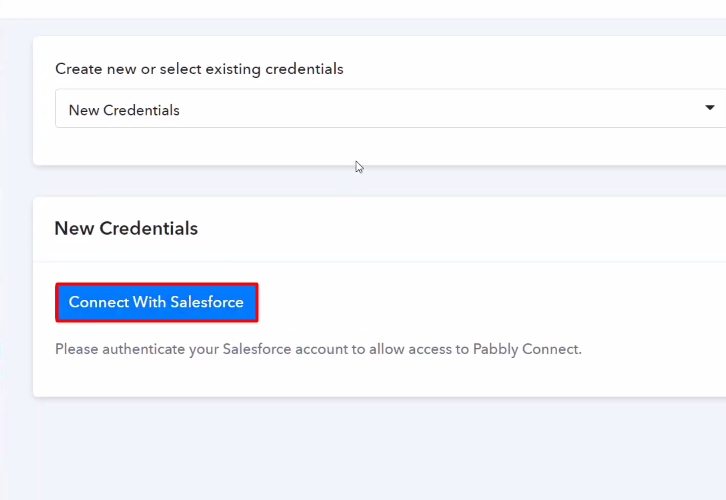
To connect Salesforce to Pabbly Connect, you have to authorize the application. Now, click on the given ‘Connect with Salesforce’ button and grant permission to connect Salesforce and Pabbly Connect.

Step 6: Add a Test Task

To check whether this integration is working or not, we will add a dummy task in our Salesforce account.

(a) Create a Task

Create Task Salesforce

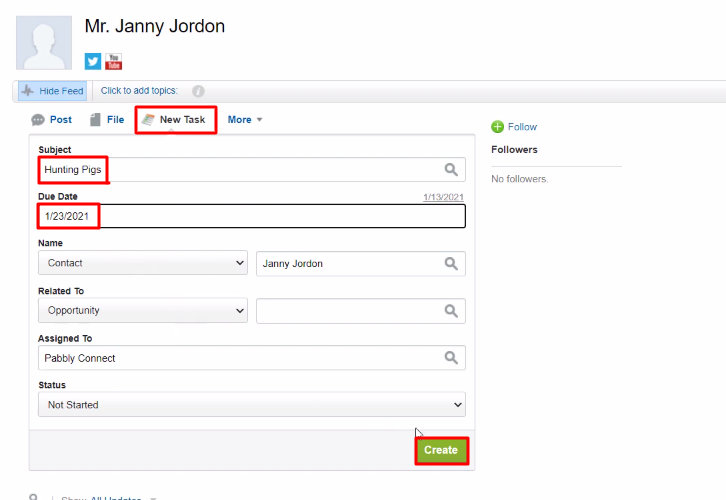
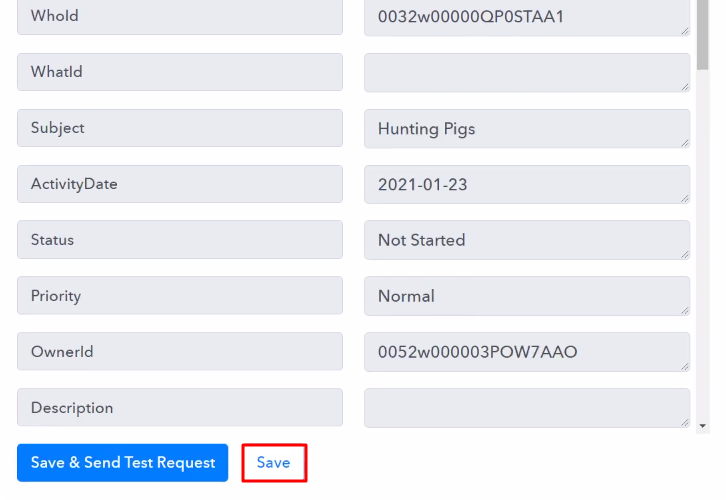
To create a new task, click on any of the listed contacts in your Salesforce dashboard then click on the ‘New Task’ option. Now, add all the required details of the task like subject, dates, etc, and hit the ‘Create’ button.

(b) Send Test Request

Send Test Request Salesforce

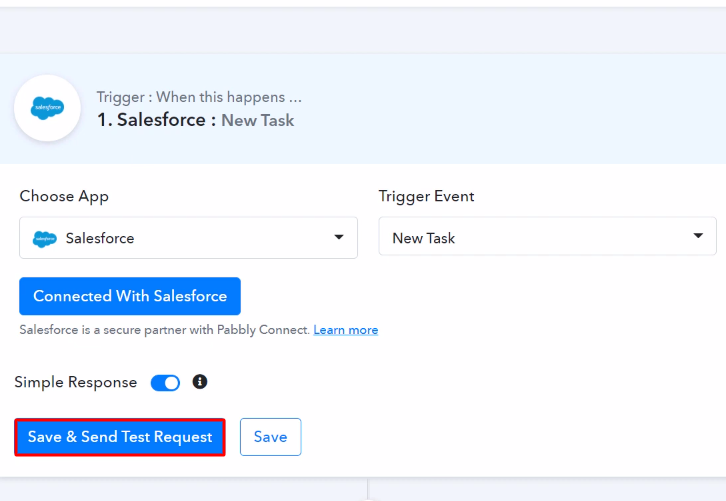
Next, we will click on the ‘Save & Send Test Request’ button to capture the data in Pabbly Connect.

Step 7: Test the Response in Pabbly Connect Dashboard

Save the Webhook Response

Once you click on the ‘Create’ in Salesforce, the task info will appear on the Pabbly Connect dashboard. Then, click on the ‘Save’ button.

Step 8: Setting Actions for Salesforce to Google Calendar Integration

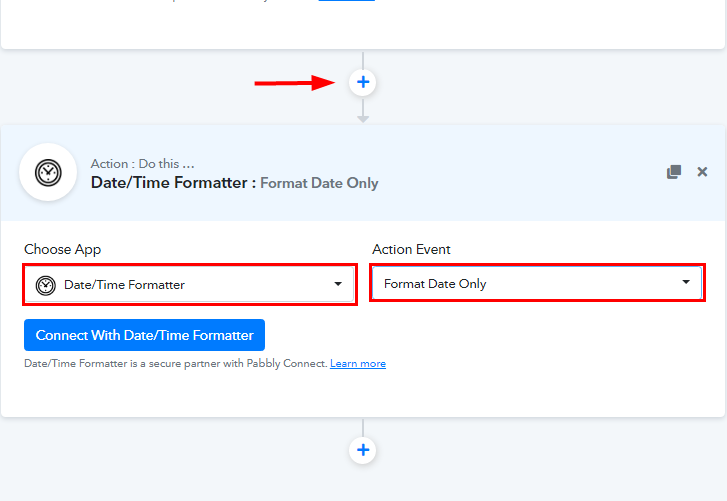
To make this Salesforce-Google Calendar integration work, you have to choose two actions for your trigger. The first action is of ‘Date/Time Formatter’ to convert the dates into the desired pattern. The second action is of ‘Google Calender’ to create an event.

(a) Select Application you Want to Integrate

select-date-time-formatter

Now in this step, click on the ‘+’ button below and choose the application that you want to integrate. Here we will choose ‘Date/Time Formatter’ to integrate and in the method section select ‘Format Date Only’.

(b) Click the Connect Button

Connect Date/Time Formatter

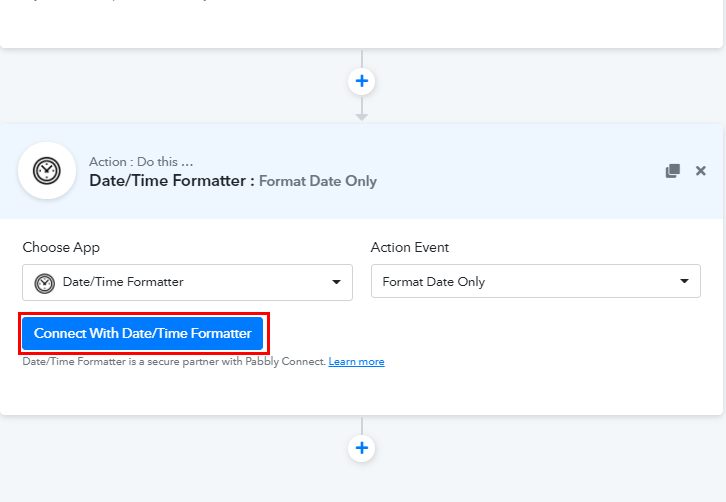
After choosing the application click on the ‘Connect with Date/Time Formatter’ button to move forward.

(c) Map the Fields

Map the Fields Date Formatter

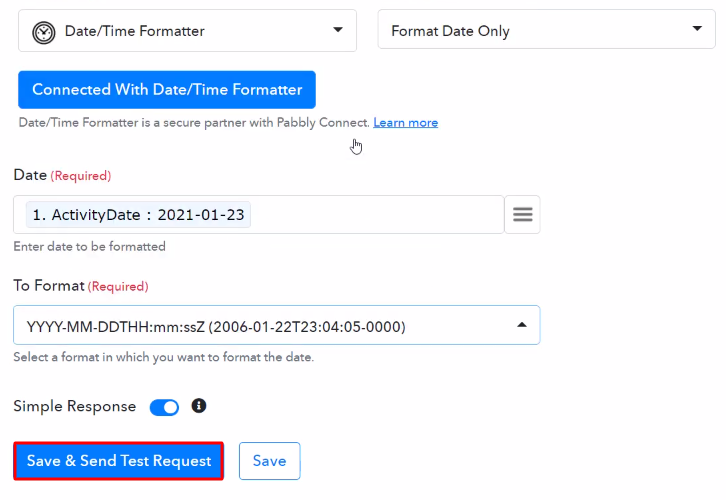
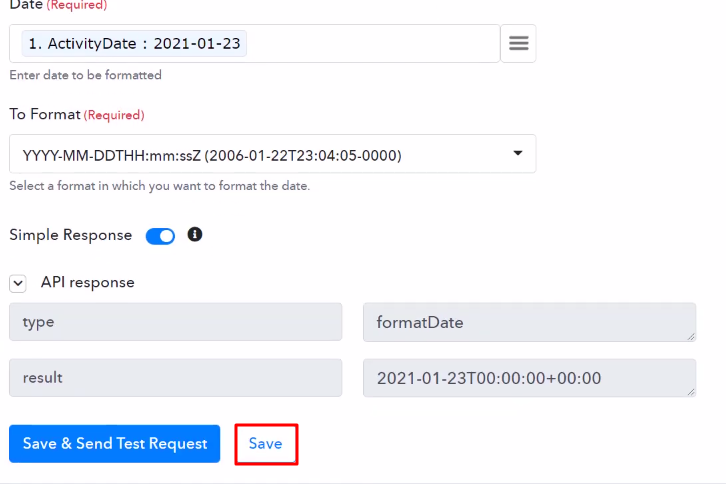
Next, we will map the date and the format in which we want to convert it and then hit the ‘Save & Send Test Request’ button.

(d) Save the API Response

Save the API Response Date Formatter

Here, we can see that the date is converted in the desired format, now hit the ‘Save’ button. You have to repeat this procedure for both the dates of the task.

(e) Select Application you Want to Integrate

Select Google Calender

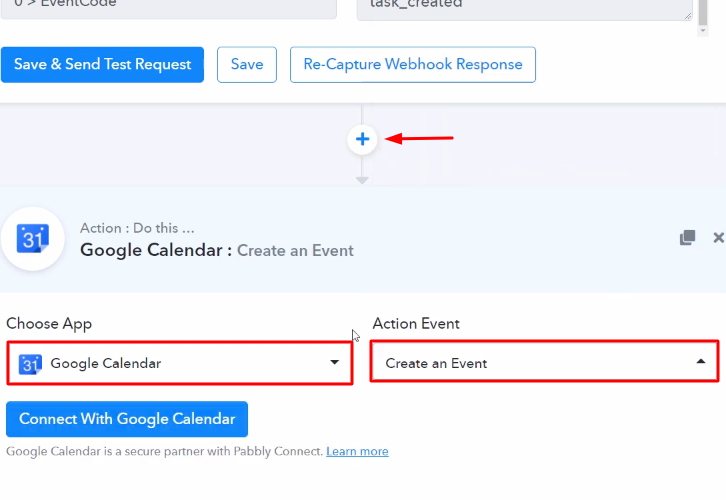
Now in this step, click on the ‘+’ button below and choose the application that you want to integrate. Here we will choose ‘Google Calendar’ to integrate and in the method section select ‘Create an Event’.

(f) Click the Connect Button

Connect with Google Calender

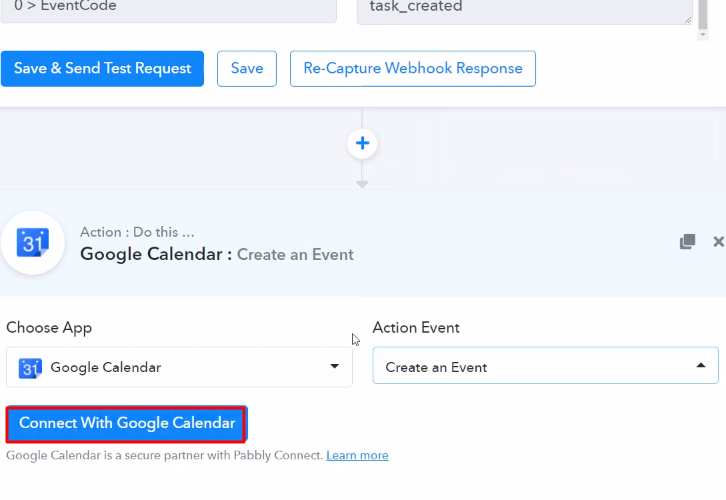
After choosing the application click on the ‘Connect with Google Calendar’ button to move forward.

Step 9: Connecting Google Calendar to Pabbly Connect

To connect Google Calendar to Pabbly Connect, you have to authenticate your Google account. For that, you need to log in to your Google Account.

(a) Authorize Application

Authorize Application Google Calender

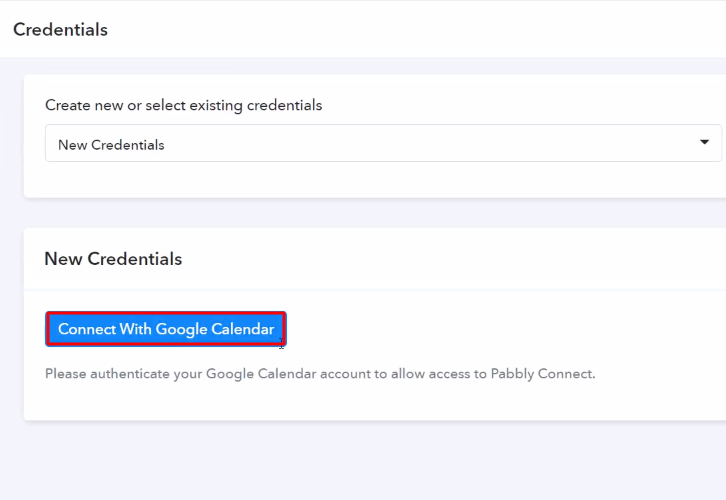
To authorize the application, again click on the ‘Connect with Google Calendar’ button and then select the Google account through which you want to integrate the application.

(b) Map the Fields

Map the Fields

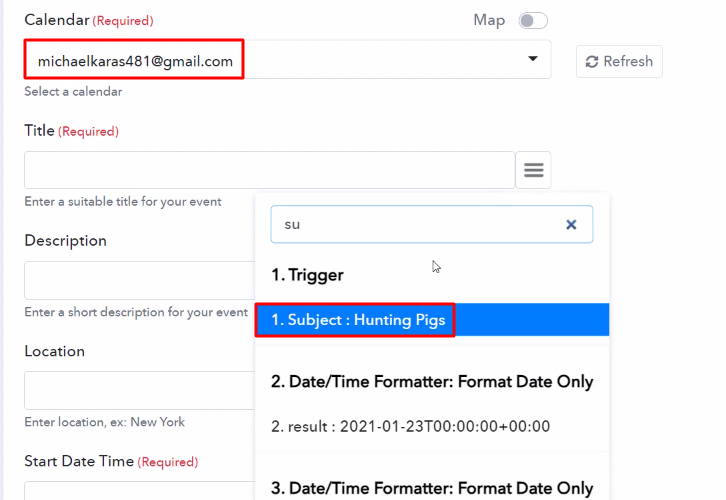
After connecting with your Google account, map all the fields quickly like the calendar, title, etc.

(c) Save and Send Test Request

Send Test Request

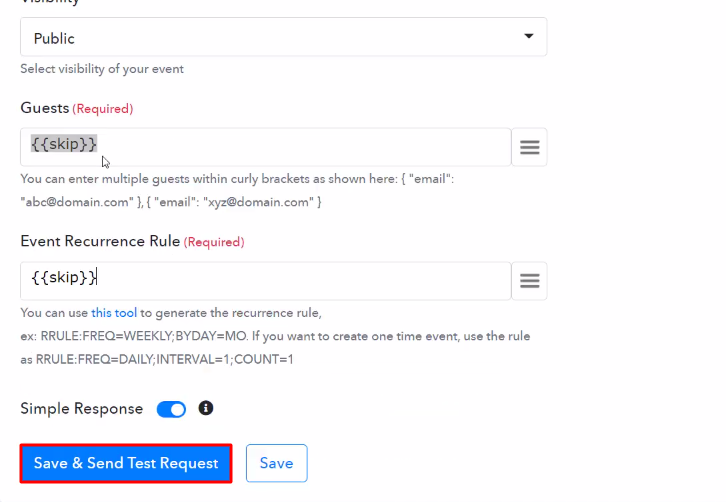
Once you are done adding up all field data click on the ‘Save & Send Test Request’ button.

Step 10: Check Response in Google Calendar

Check Response

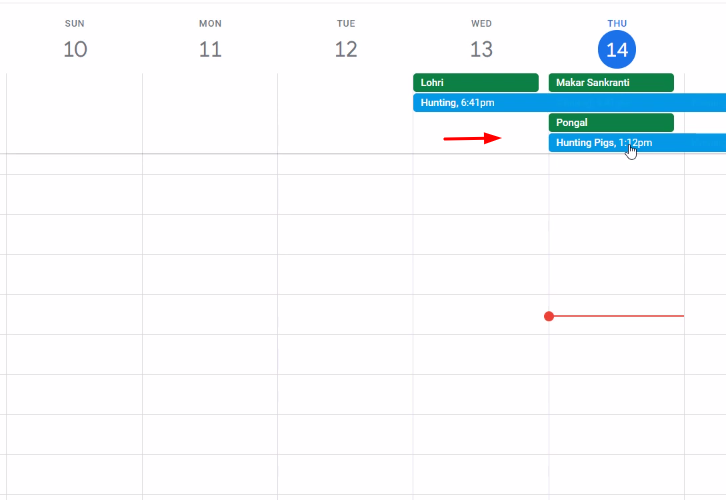
In the end, when you check your Google Calendar, the event has been created automatically.

Conclusion –

All in all, this was all about ‘How to Add Google Calendar Event for New Salesforce Task’. Consequently, after completing the step-by-step procedure, you will end up auto-creating events in Google Calendar for every new Salesforce task.

However, in the meantime go and try Pabbly Connect for FREE with all its premium features.

Also, do comment us your queries in the section given below.

You May Also Like To Read –
How to Create ClickUp Task from New Gravity Forms Response

How to Create ClickUp Task from New Gravity Forms Response

What if we say that there is an easy way to create ClickUp task from new Gravity Forms response automatically?

How to Create ClickUp Task from New Gravity Forms Response

You might doubt that! But let us introduce to you the awesome and best integration tool named Pabbly Connect which not only puts a full stop on all the repetitive work but also offers great efficiency.

Now the question here is what is Pabbly connect? Basically, Pabbly Connect is an integration and automation tool that lets you connect different applications for data transmission without using a single line of code. In a few minutes, you can create automated workflows and transfer the data between your favorite apps and services without any manual efforts. Also, the software offers all premium features like path routers, filters, etc even in its free plan.

Why Choose This Method Of Integration?

In contrast with other integration services-

  • Pabbly Connect does not charge you for its in-built apps like filters, Iterator, Router, Data transformer, and more
  • Create “Unlimited Workflows” and smoothly define multiple tasks for each action
  • As compared to other services which offer 750 tasks at $24.99, Pabbly Connect offers 50000 tasks in the starter plan of $29 itself
  • Unlike Zapier, there’s no restriction on features. Get access to advanced features even in the basic plan
  • Try before you buy! Before spending your money, you can actually signup & try out the working of Pabbly Connect for FREE

Sign Up To Pabbly Connect 

But before we move forward to the integration process, let’s understand both the services and the need of integrating them. Basically, Gravity Forms is a WordPress plugin used originally for contact forms, but in a more general sense, it allows site owners to create forms to collect information. Whereas ClickUp is a cloud-based collaboration and project management tool suitable for businesses of all sizes and industries.

By integrating these two services via Pabbly Connect, you can easily automate the task. Plus, this would be just a one-time setup. Later on, the data will automatically be transferred in real-time. Also, we have attached a video for the same, have a look at it-

Besides, we’ve provided a template for this integration to help you to commence more quickly. You can click on the image below to get started. Plus, you can go to Marketplace & look for more apps/integrations.

How

Hence, let’s start the process to integrate Gravity Forms with ClickUp.

Step 1: Sign up to Pabbly Connect

Sign Up

Begin the process to create ClickUp task from new Gravity Forms response by clicking on the “Sign Up Free” icon on the Pabbly Connect dashboard. Afterward, either fill-up the details manually or sign up using Gmail credentials.

Try Pabbly Connect for FREE

Step 2: Access Pabbly Connect

Select Connect

Further, after logging into the account, click on the “Access Now” button as shown in the above image.

Step 3: Workflow for Gravity Forms to ClickUp Integration

(a) Start with a New Workflow

Create New Workflow

Begin the process of creating a workflow for integration by clicking on the “Create Workflow” button.

(b) Name the Workflow

Name the Workflow

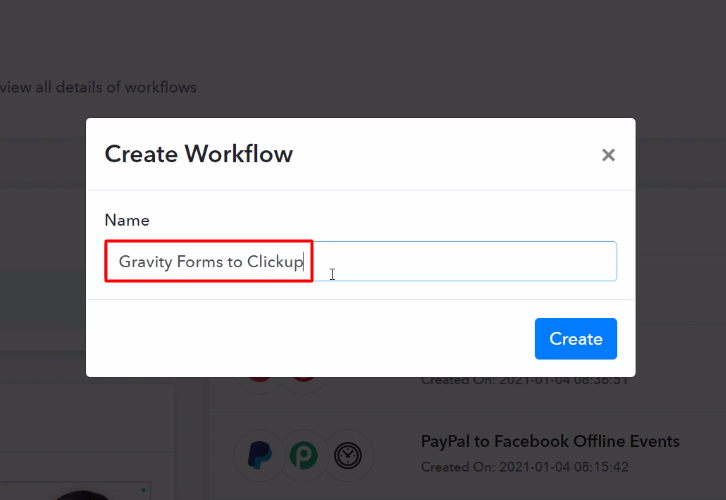
Moreover, add the name of workflow which in our case is “Gravity Forms to ClickUp”. Although, you can always name the workflow according to your necessities.

Step 4: Setting Trigger for Gravity Forms to ClickUp Integration

Following, after creating a workflow, you have to choose the integration app to create ClickUp task from new Gravity Forms response. Pabbly Connect permits you to build countless workflows within minutes, click here to sign up for unlimited integrations for free.

(a) Select Application you Want to Integrate

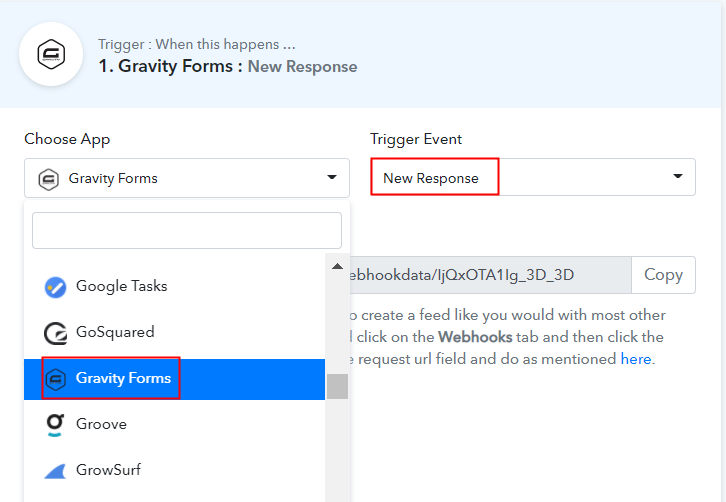
Select Gravity Forms

The following step is to select “Gravity Forms” from the dropdown, then choose the “New Response” option to create a lead in Salesforce from the form response.

(b) Copy the Webhook URL

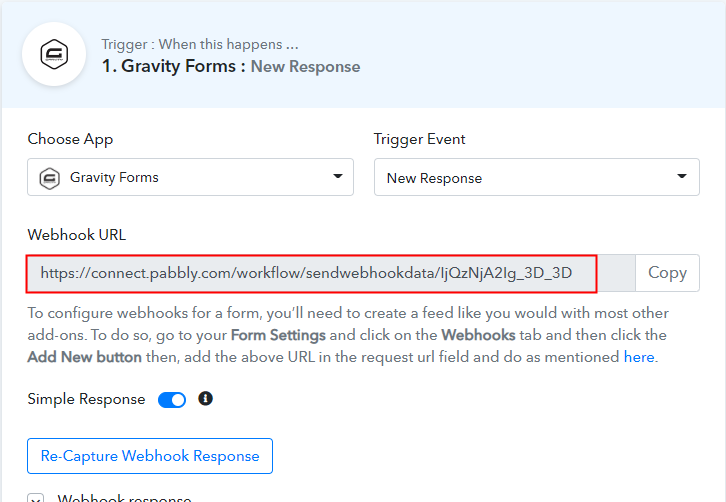
Copy the Webhook URL

The next step is to copy the webhook URL which is appearing on the dashboard.

Step 5: Connecting Gravity Forms to Pabbly Connect

Now in order to connect Gravity Forms with Pabbly Connect, you need to paste the webhook URL in Gravity Forms. Proceed with the integration process by login into your Gravity Forms account. We are accessing Gravity Forms from the WordPress dashboard.

(a) Go to Gravity Forms Settings

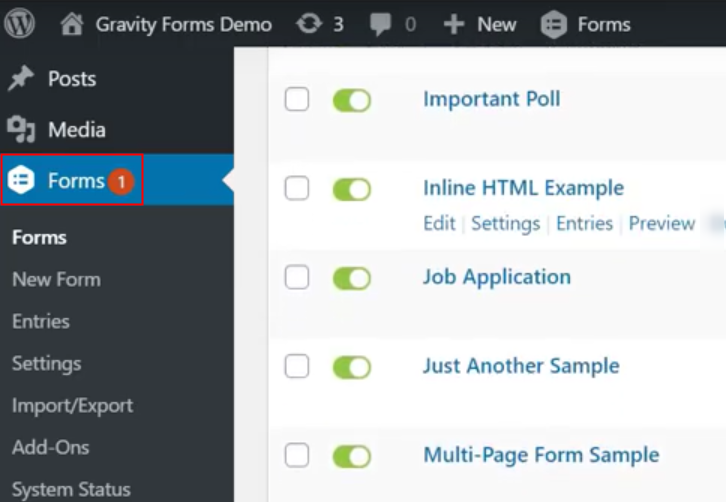
Go to Gravity Forms Settings

Login to your WordPress account and then click on the “Forms” section.

(b) Select Form

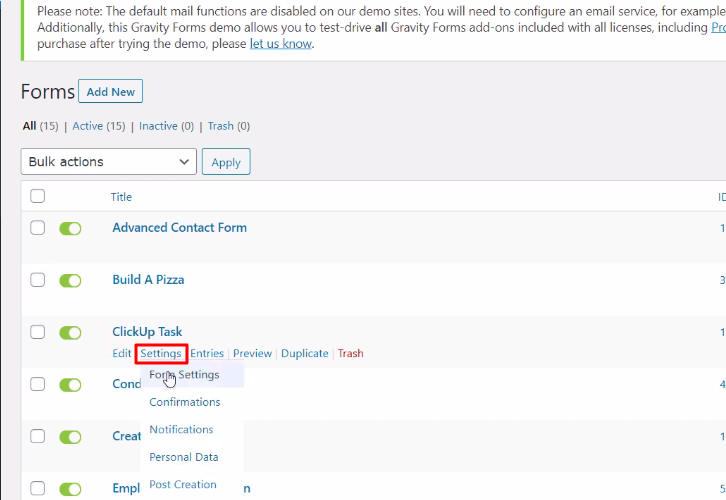
Select Form Gravity Forms

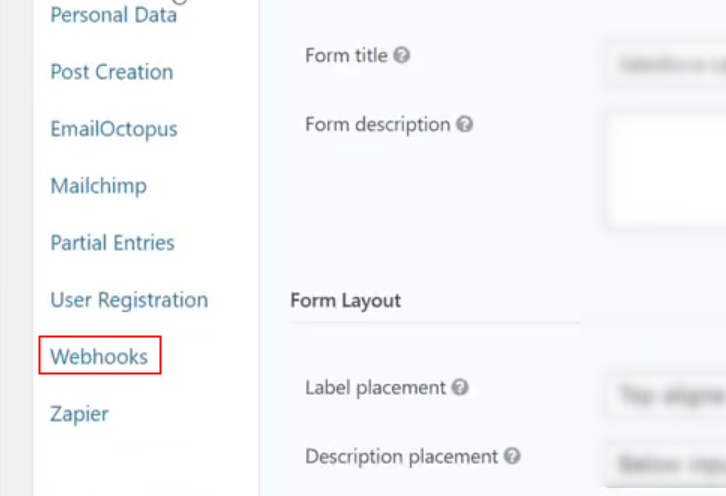
Simply select one of the forms, then click on its “Form Settings” as shown in the image.

(c) Click on Webhooks Option

Click on Webhooks Option

Next, click on the webhook option to paste the copied URL.

(d) Head to Add New Option

Head to Add New Option

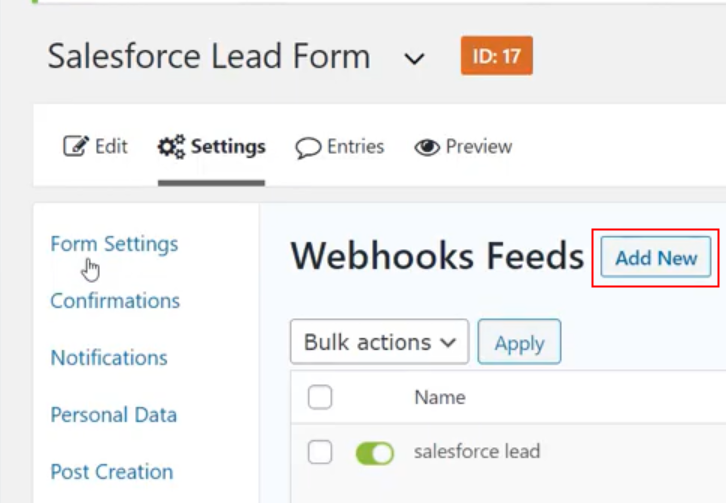
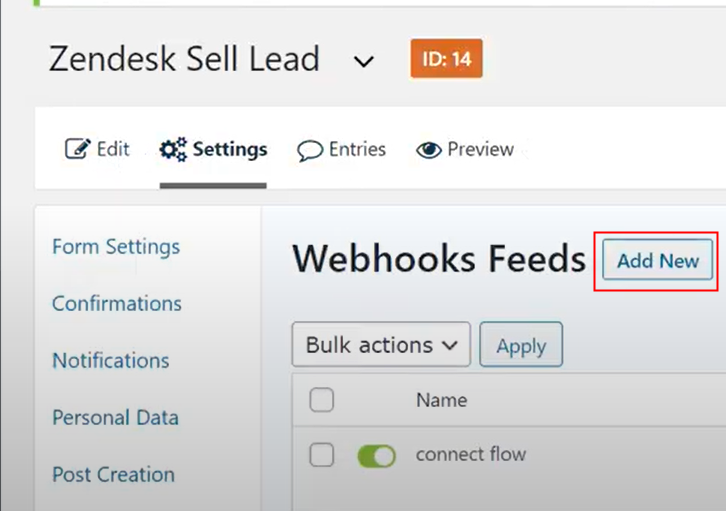
Further, you have to click on the “Add New” button to paste the copied URL.

(e) Paste the Webhook URL

Paste the Webhook URL

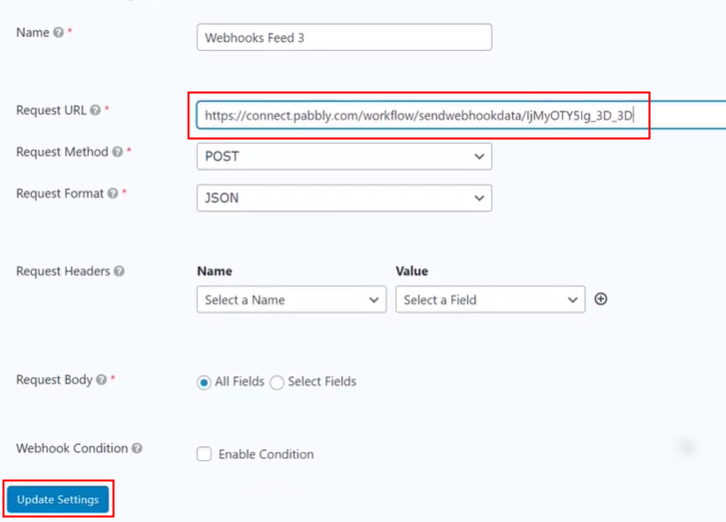
After you click the button the webhook page will appear on your screen where you have to paste the URL. Just paste the webhook URL copied earlier and click on the “Update Settings” button.

Step 6: Make a Dummy Entry

Now in order to check the Gravity Forms and Pabbly Connect integration, we are going to make a dummy entry in Gravity Forms.

(a) Capture Webhook Response

Capture Webhook Response

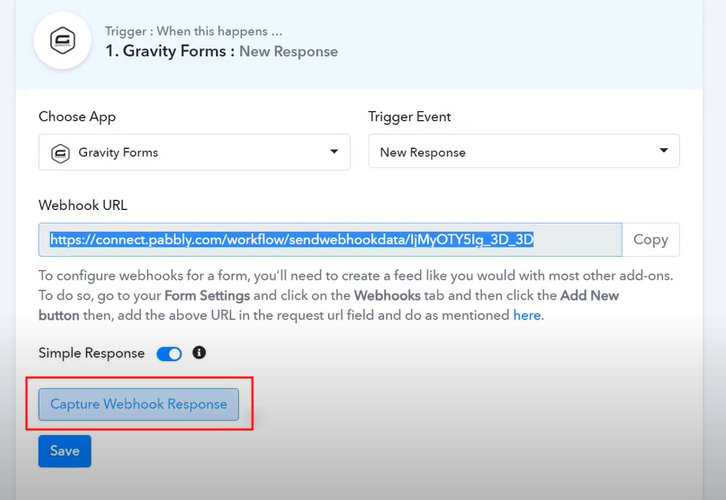
To test a trigger, hit the ‘Capture Webhook Response’ button on the Pabbly Connect trigger window.

(b) Add All the Details

Fill the Form Gravity Forms

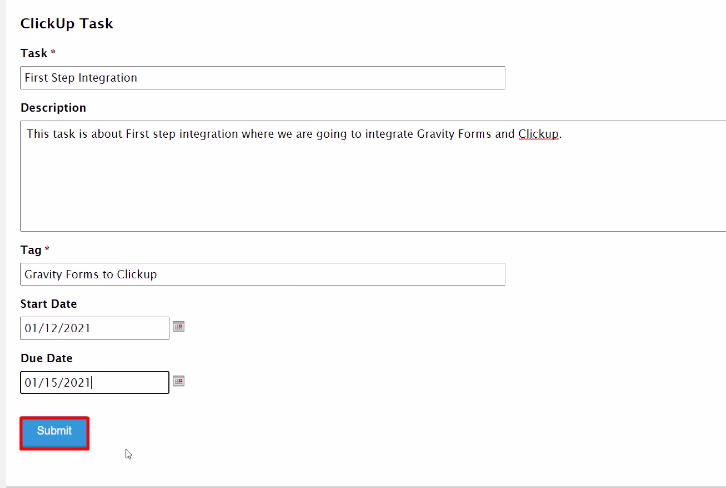
Simply fill out the form and hit the “Submit” button.

Step 7: Test the Response in Pabbly Connect Dashboard

Save the Webhook Response

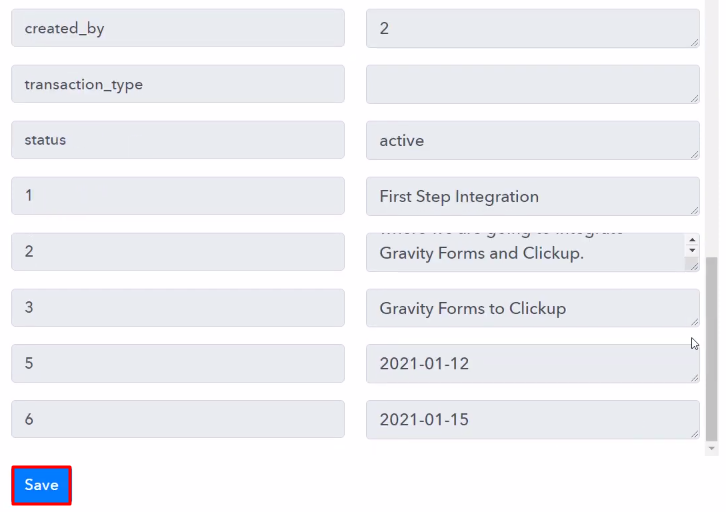
Now as you can see the response has been captured in the Pabbly Connect dashboard, now hit the “Save” button.

Step 8: Setting Actions for Gravity Forms to ClickUp Integration

Subsequently, in order to make this Gravity Forms-ClickUp integration work, you have to choose three actions for your trigger.

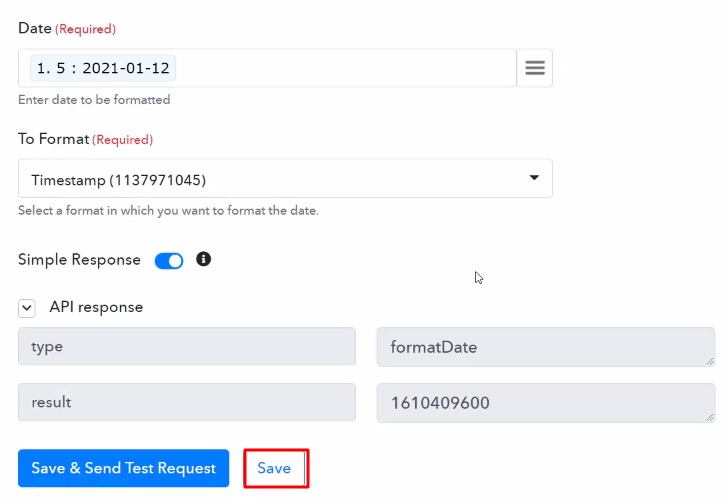
  • The first action is of “Date/Time Formatter” to convert the date into “Timestamp” format.
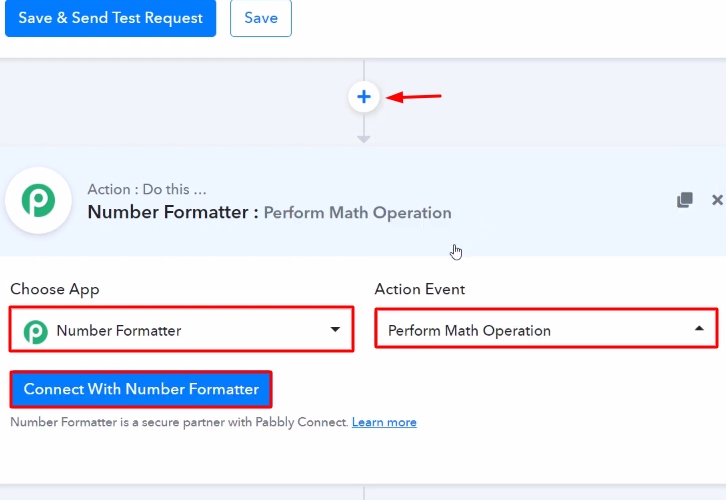
  • The second action is of “Number Formatter” to convert the date into the desired format by performing a math operation.
  • The third action is of “ClickUp” to create the task.

(a) Select Application you Want to Integrate

select-date-time-formatter

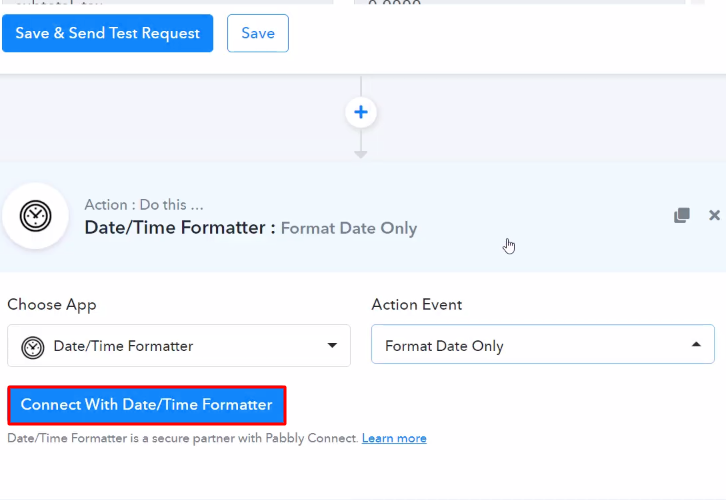
Now, press the + icon to add an action to your trigger. We will choose “Date/Time Formatter” from the drop-down field here. Then, select the choose the method as “Format Date Only”.

(b) Click the Connect Button

Connect with Date Formatter

Immediately, after selecting the application, press the “Connect with Date/Time Formatter” button.

(c) Map the Fields

Map the Fields Date Formatter

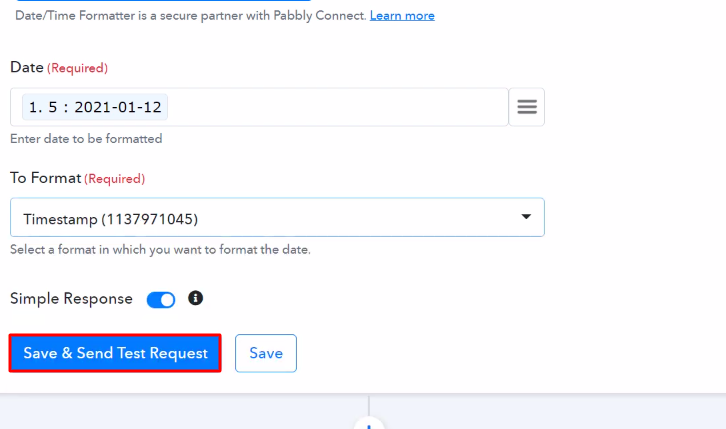
Now, map the date and select the format in which we want to convert it and then hit the “Save & Send Test Request” button.

(d) Save the API Response

Save the API Response Date Formatter

The date is converted into timestamp format, now hit the “Save” button.

(e) Select Number Formatter

Select Number Formatter

Next, we will select the “Number Formatter” from the choose app drop-down, and in the action event, we will select “Perform Math Operation”, then hit the “Connect” button.

(f) Map the Fields

Map the Fields Number Formatter

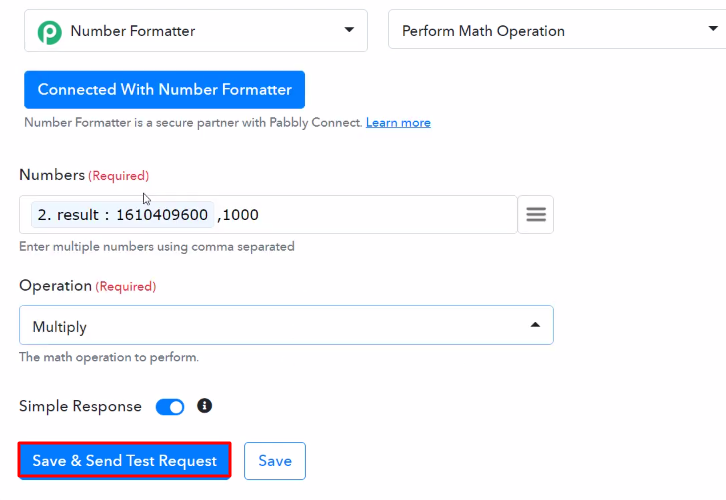
Subsequently, map the converted date and select the “Multiply” option in the operation section and click on the “Save & Send Test Request” button.

(g) Save the API Response

Save the API Response Number Formatter

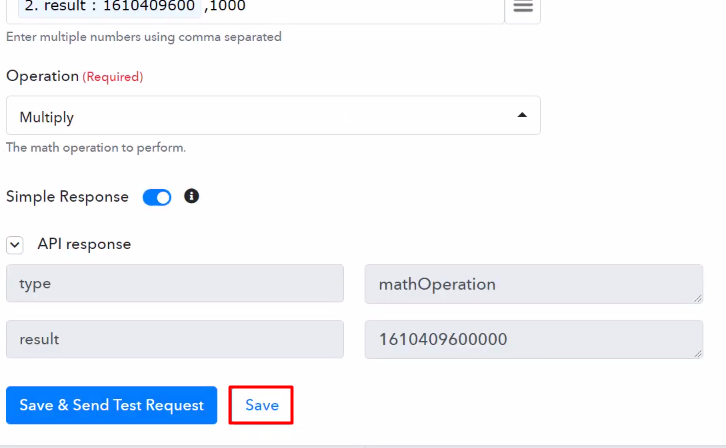
Here, we can see that our math operation is successful and the date has been converted into the desired format. You have to repeat this procedure for both start and finish dates of the task.

(h) Select Application you Want to Integrate

Select ClickUp

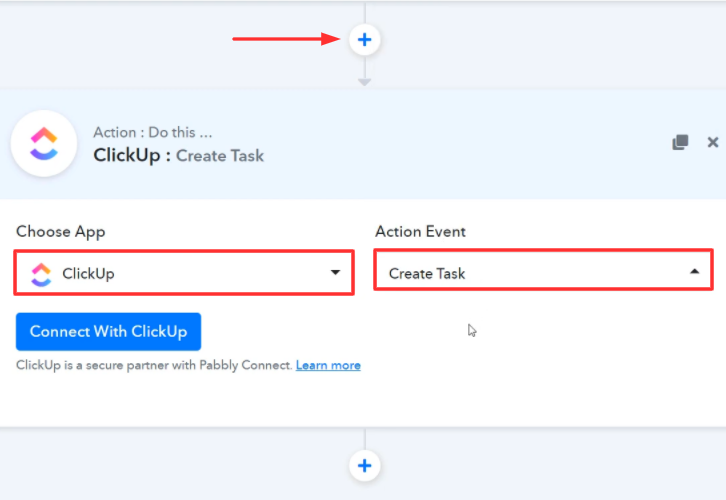
In addition, press the + icon to add an action to the trigger. Here we can pick “ClickUp” from the drop-down. Then choose the method “Create Task”.

(i) Click the Connect Button

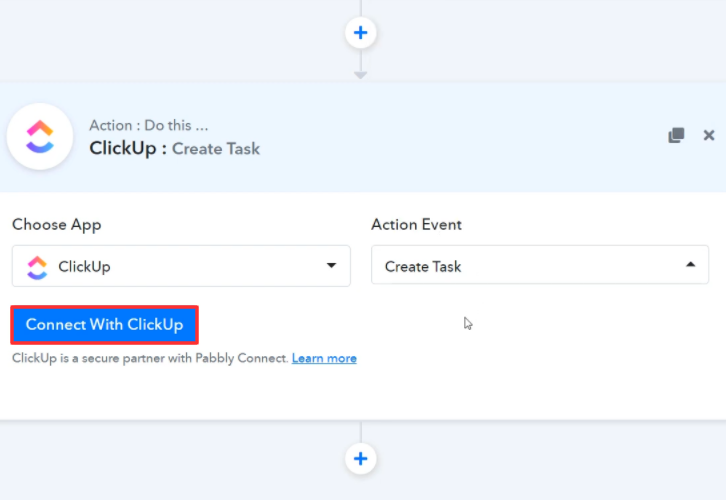
Connect with ClickUp

Further, click on the “Connect with ClickUp” button. It will ask for an API token for which you have to log in to your ClickUp account.

Step 9: Connecting ClickUp to Pabbly Connect

To connect ClickUp with Pabbly Connect, you need to log in to your ClickUp account.

(a) Head to ClickUp Profile

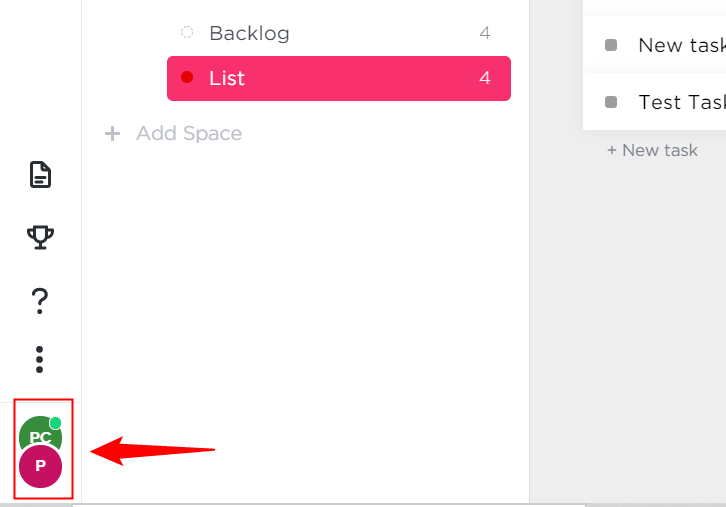
ClickUp Profile

At the bottom of the ClickUp dashboard, you will notice the “Profile” option, just hit on it.

(b) Click on Apps Option

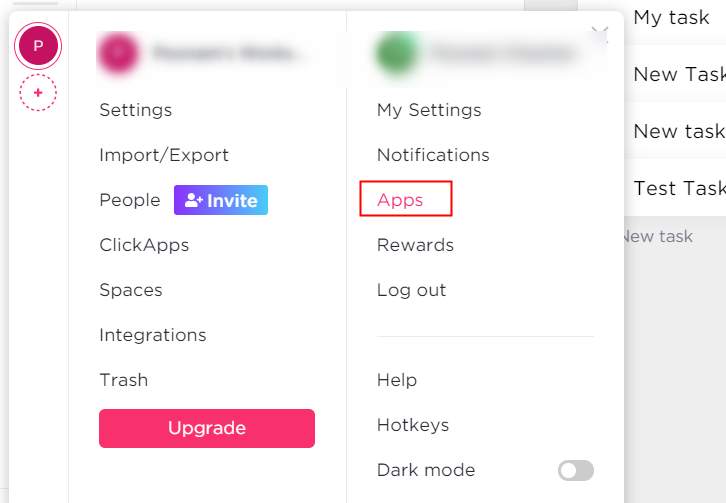
ClickUp Apps

Soon, it will offer different choices, choose “Apps” from it.

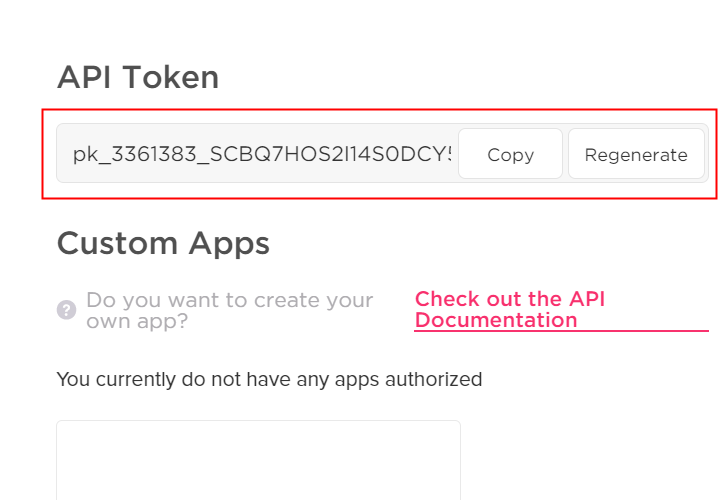
(c) Copy the API Token

Copy API Token ClickUp

Now, easily copy the “API Token” which is appearing on the dashboard.

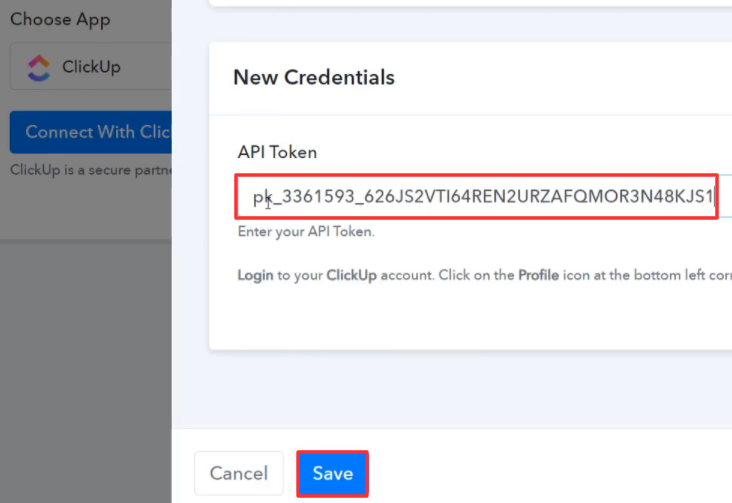
(d) Paste the API Key

Paste API Token

Then, head back to the Pabbly Connect dashboard and paste the copied API Key, and hit the “Save” button.

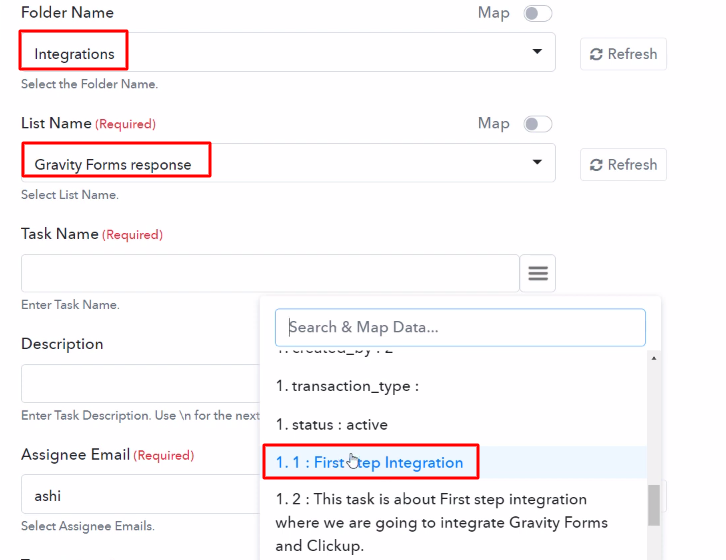
(e) Map the Fields

Map the Fields

Next, map all the field’s data like list name, task name, etc.

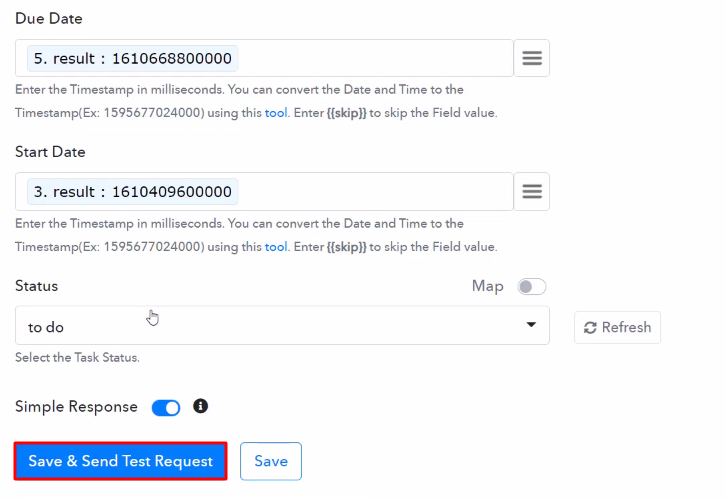
(f) Send a Test Request

Send Test Request

After mapping up all fields click on the “Save & Send Test Request” button.

Step 10: Check Response in ClickUp Dashboard

Check Response

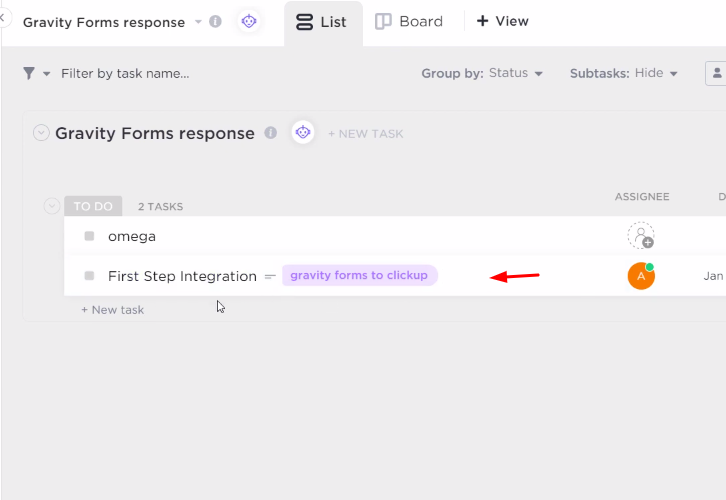
Lastly, when you check your ClickUp dashboard, the task has been successfully created from the Gravity Forms response.

Conclusion –

That’s it! Here we mentioned in detail “How to Create ClickUp Task from New Gravity Forms Response”. Pabbly Connect makes data transmission a walk in a park. Other than this integration, you can integrate thousands of other applications on Pabbly Connect.  You don’t have to worry about anything.

Therefore, signup for free, integrate, and relax. For any doubts, please leave your comments below.

You May Also Like to Read –

How to Create Zendesk Sell Lead from New Gravity Forms Response

How to Create Zendesk Sell Lead from New Gravity Forms Response

Are you looking for the simplest way to create Zendesk Sell lead from new Gravity Forms response? If yes, we are presenting a tool named Pabbly Connect to simplify all your repetitive tasks.

How to Create Zendesk Sell Lead from New Gravity Forms Response

Basically, Pabbly Connect is a top-notch integration and automation tool available in the market that puts stops on all kinds of repetitive work.

All you have to do is connect countless premium applications for easy data transmission. And the best part about using the software is, you don’t have to do any kind of hard coding.

Why Choose This Method Of Integration?

In contrast with other integration services-

  • Pabbly Connect does not charge you for its in-built apps like filters, Iterator, Router, Data transformer, and more
  • Create “Unlimited Workflows” and smoothly define multiple tasks for each action
  • As compared to other services which offer 750 tasks at $24.99, Pabbly Connect offers 50000 tasks in the starter plan of $29 itself
  • Unlike Zapier, there’s no restriction on features. Get access to advanced features even in the basic plan
  • Try before you buy! Before spending your money, you can actually signup & try out the working of Pabbly Connect for FREE

Sign Up To Pabbly Connect 

Before jumping straight to the integration process, let’s know more about the services involved and the need for integration. Gravity Forms is a WordPress plugin that enables site owners to generate forms to capture information. It was initially designed for communication forms, but it can be used in a broader context.

Whereas Zendesk Sell is a sales CRM automation platform that helps sales teams improve efficiency, operations, and pipeline visibility.

Many times we want responses received via forms in our sales CRM software which we can do easily with the help of Pabbly Connect. It allows you to integrate Gravity Forms and Zendesk Sell so that whenever a new form is submitted via Gravity Forms, it will get added as a lead in Zendesk Sell.

We have also attached a video to help you out.

Moreover, if you want to try this integration, just click on the image to avail the entire workflow. For more apps and integration, knock yourself out by visiting Marketplace.

Clone Template Gravity Forms and Zendesk Sell

Here in this blog, we will connect Gravity Forms and Zendesk Sell.

So, shall we begin the process?

Step 1: Sign up to Pabbly Connect

Sign Up

Begin the process to create a Zendesk Sell lead from the new Gravity Forms response by clicking on the “Sign Up Free” icon on the Pabbly Connect dashboard. Afterward, either fill-up the details manually or sign up using Gmail credentials.

Try Pabbly Connect for FREE

Step 2: Access Pabbly Connect

Select Connect

Further, after logging into the account, click on the “Access Now” button as shown in the above image.

Step 3: Workflow for Gravity Forms to Zendesk Sell Integration

(a) Start with a New Workflow

Create New Workflow

Begin the process of creating a workflow for integration by clicking on the “Create Workflow” button.

(b) Name the Workflow

Name the Workflow

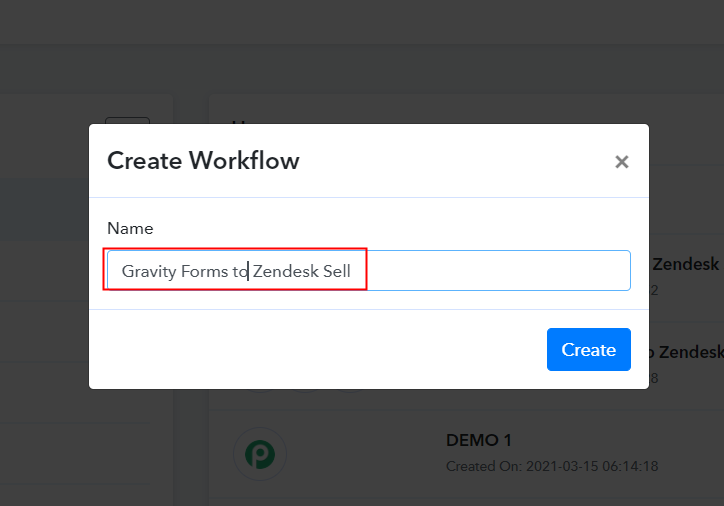
Moreover, add the name of workflow which in our case is “Gravity Forms to Zendesk Sell”. Although, you can always name the workflow according to your necessities.

Step 4: Setting Trigger for Gravity Forms to Zendesk Sell Integration

Following, after creating a workflow, you have to choose the integration app to create a Zendesk Sell lead from the Gravity Forms response. Pabbly Connect sanctions you to build countless workflows within minutes, click here to sign up for unlimited integrations for free.

(a) Select Application you Want to Integrate

Select Gravity Forms

The following step is to select “Gravity Forms” from the dropdown, then choose the “New Response” option to create a lead in Zendesk Sell from the form response.

(b) Copy the Webhook URL

Copy the Webhook URL

The next step is to copy the webhook URL which is appearing on the dashboard.

Step 5: Connecting Gravity Forms to Pabbly Connect

Now in order to create a Zendesk Sell lead from the Gravity Forms response, you need to paste the webhook URL in Gravity Forms. Proceed with the integration process by login into your Gravity Forms account. We are accessing Gravity Forms from the WordPress dashboard.

(a) Go to Gravity Forms Settings

Go to Gravity Forms Settings

Login to your WordPress account and then click on the “Forms” section. Simply select one of the forms, then click on its “Form Settings” as shown in the image.

(b) Click on Webhooks Option

Click on Webhooks Option

Next, click on the webhook option to paste the copied URL.

(c) Head to Add New Option

Head to Add New Option

Further, you have to click on the “Add New” button to paste the copied URL.

(d) Paste the Webhook URL

Paste the Webhook URL

After you click the button the webhook page will appear on your screen where you have to paste the URL. Just paste the webhook URL copied earlier and click on the “Update Settings” button.

Step 6: Make a Dummy Entry

Now in order to check the Gravity Forms and Zendesk Sell integration, we are going to make a dummy entry in Gravity Forms.

(a) Capture Webhook Response

Capture Webhook Response

To test a trigger, hit the ‘Capture Webhook Response’ button on the Pabbly Connect trigger window.

(b) Add All the Details

Add All the Details

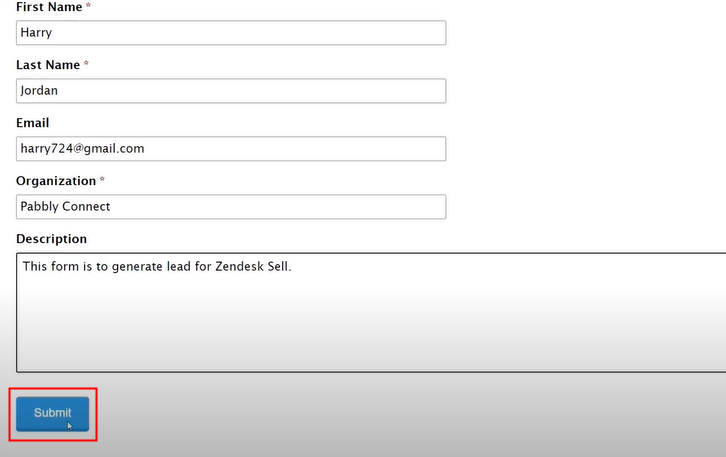
Simply fill out the form and hit the “Submit” button.

Step 7: Test the Response in Pabbly Connect Dashboard

Test the Response in Pabbly Connect Dashboard

Now as you can see the response has been captured in the Pabbly Connect dashboard.

Step 8: Setting Action for Gravity Forms to Zendesk Sell Integration

To make this Gravity Forms – Zendesk Sell integration work, you have to add an action for your trigger.

(a) Select Application you want to Integrate

Select Application you want to Integrate

Now, select the app to integrate here as “Zendesk Sell” & method as “Create Lead”. Conclusively, press the “Connect with Zendesk Sell” button.

(b) Connecting Zendesk Sell to Pabbly Connect

click_on_connect_with_zendesk_sell

Next, click on the “Connect with Zendesk Sell” button and authorize your Zendesk Sell account to connect with Pabbly Connect.

(c) Map the Fields

Map the Fields

After connecting with your Zendesk Sell account, map all the fields quickly like the first name, last name, email, etc.

(d) Save & Send Test Request

Save & Send Test Request

Further, hit the “Save & Send Test Request” button to proceed further. Afterwards, you can check the response of your API in the action window. Lastly, hit the “Save” button to save the action API’s response.

Step 9: Check Response in Zendesk Sell Dashboard

Check Response in Zendesk Sell Dashboard

Ultimately, you can check the lead’s entry in your Zendesk Sell account. So now you know how to add Zendesk Sell lead for new Gravity Forms response using Pabbly Connect.

Conclusion –

That’s it! Here we mentioned in detail “How to Create Zendesk Sell Lead from New Gravity Forms Response”. Pabbly Connect makes data sending a walk in a park. Other than this integration, you can integrate thousands of other applications on Pabbly Connect. You don’t have to worry about anything.

Therefore, signup for free, integrate, and relax. For any doubts, please leave your comments below.

You May Also Like to Read –

How to Add Zendesk Sell Lead for New ScheduleOnce Booking

How to Add Zendesk Sell Lead for New ScheduleOnce Booking

Tired of monotonous work? Want to know the easiest way to add Zendesk Sell lead for new ScheduleOnce booking?

How to Add Zendesk Sell Lead for New ScheduleOnce Booking

If the answer is “Yes”, then here we are presenting the simplest approach to integrating ScheduleOnce and Zendesk Sell using Pabbly Connect.

Basically, Pabbly Connect is an integration and automation tool that lets you transfer data easily in minutes without requiring any kind of coding.

Why Choose This Method Of Integration?

In contrast with other integration services-

  • Pabbly Connect does not charge you for its in-built apps like filters, Iterator, Router, Data transformer, and more
  • Create “Unlimited Workflows” and smoothly define multiple tasks for each action
  • As compared to other services which offer 750 tasks at $24.99, Pabbly Connect offers 50000 tasks in the starter plan of $29 itself
  • Unlike Zapier, there’s no restriction on features. Get access to advanced features even in the basic plan
  • Try before you buy! Before spending your money, you can actually signup & try out the working of Pabbly Connect for FREE

Sign Up To Pabbly Connect 

Using the tool, you can integrate multiple premium applications without any difficulty.

But let’s first understand the service and need for this integration. ScheduleOnce is a cloud-based scheduling solution that allows organizations of all types to organize and handle online experiences with their clients and prospects. Whereas Zendesk Sell is a sales force automation (SFA) platform that helps sales teams improve efficiency, operations, and pipeline visibility.

By connecting ScheduleOnce with Zendesk Sell using Pabbly Connect, one can easily create a lead from booking. We have also embedded a video, just look at it.

Apart from the video, we have also attached the template for this integration to help you begin your journey instantly. You can just press the “Use Workflow” button available below to get started. Furthermore, visit Marketplace & look for more integrations & apps.

Clone Template ScheduleOnce and Zendesk Sell

Here in this blog, we will understand how to integrate ScheduleOnce with Zendesk Sell.

Let’s begin the process.

Step 1: Sign up to Pabbly Connect

Sign Up

Start the procedure of connecting ScheduleOnce with Zendesk Sell by visiting the Pabbly Connect website. Next, hit the “Sign-Up Free” button available. You can either use your existing Gmail account or else manually fill in the registration form to signup.

Try Pabbly Connect for FREE

Step 2: Access Pabbly Connect

Select Connect

Promptly, press the “Access Now” button of the software “Connect” within the Pabbly applications.

Step 3: Workflow for ScheduleOnce with Zendesk Sell Integration

(a) Start with a New Workflow

Create New Workflow

Afterwards, start with creating a workflow to create a lead in Zendesk Sell for new ScheduleOnce appointment by pushing the “Create Workflow” button.

(b) Name the Workflow

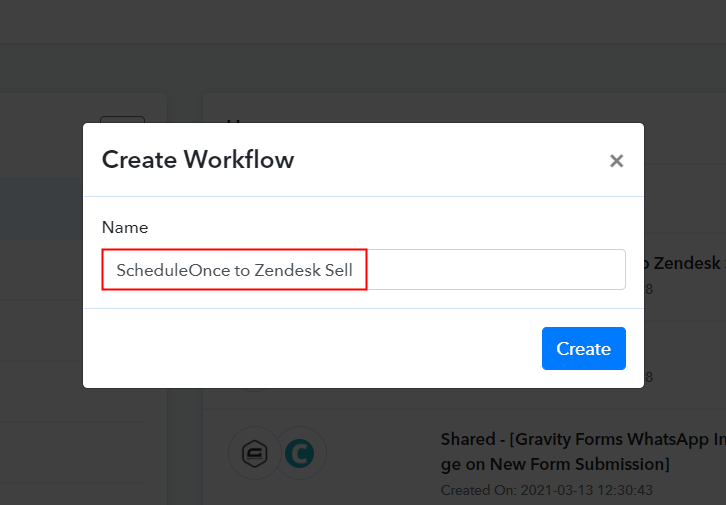
Name the Workflow

Now, name the workflow as per the integration or use-case. Here we named it “ScheduleOnce to Zendesk Sell”, you can name it according to your needs. Then, press the “Create” button.

Step 4: Setting Trigger for ScheduleOnce to Zendesk Sell Integration

Next, to automatically add Zendesk Sell lead for new ScheduleOnce booking, you’ll need to set-up a trigger using Pabbly Connect.

(a) Select Application you Want to Integrate

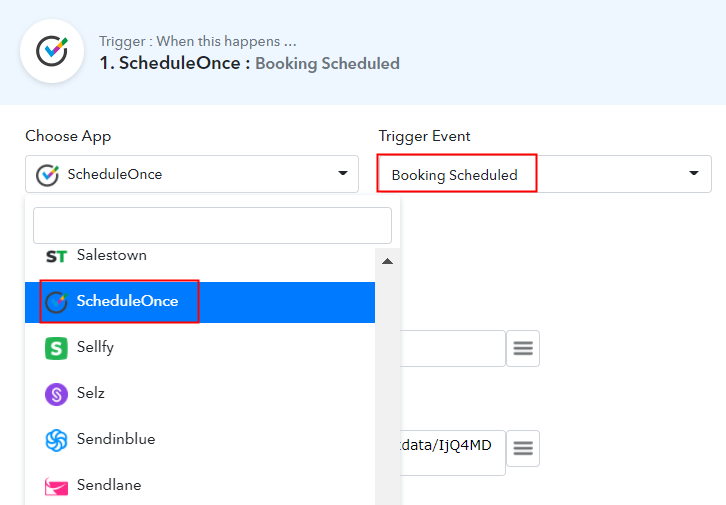
Select ScheduleOnce

The following step is to select “ScheduleOnce” from the dropdown, then choose the method as the “Booking Scheduled” option.

(b) Connect with ScheduleOnce

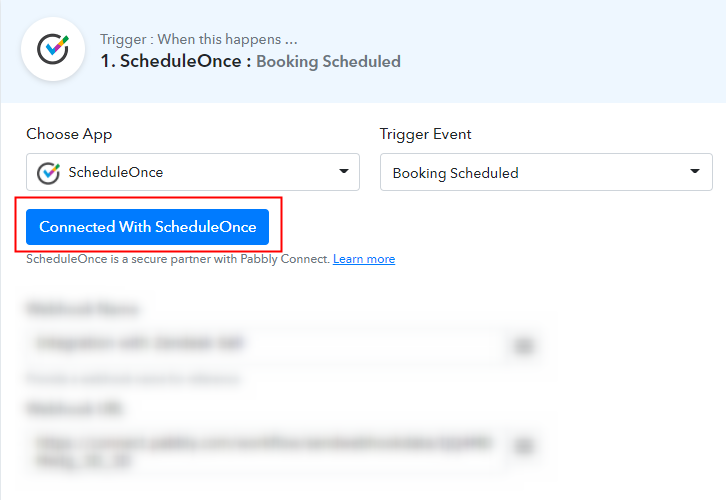
Connect with ScheduleOnce

After choosing the application click on the ‘Connect With ScheduleOnce’ button for the next step.

Step 5: Connecting ScheduleOnce to Pabbly Connect

Now to connect ScheduleOnce with Pabbly Connect, you need to paste the API key, for which you have to log in to your ScheduleOnce account.

(a) Click on Integration API

Click on Integration API

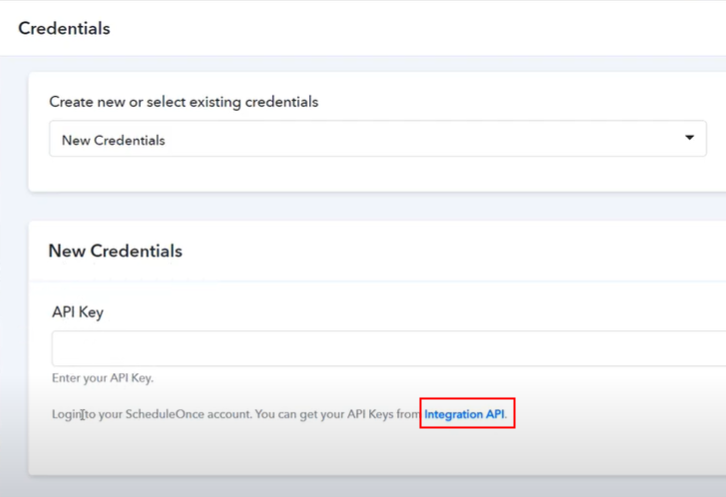
Next, to get the API key, just click on the anchor text “Integration API”

(b) Copy the API Key

Copy the API Key

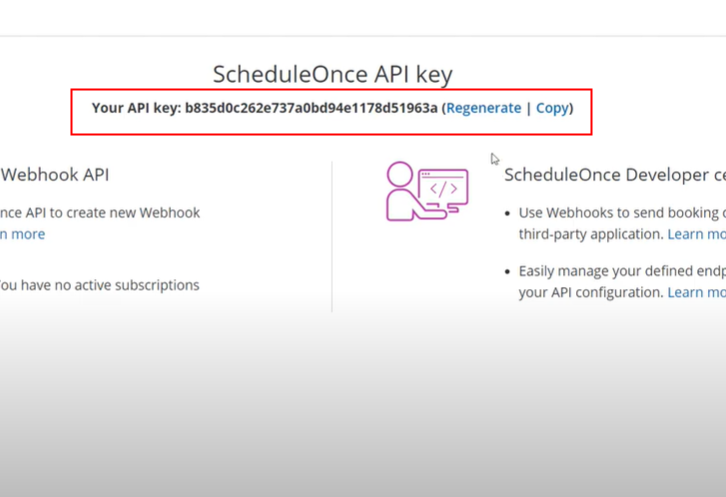
Now as soon as you click on the link, it will open the tab with the API key. Simply copy it.

(c) Paste the API Key

Paste the API Key

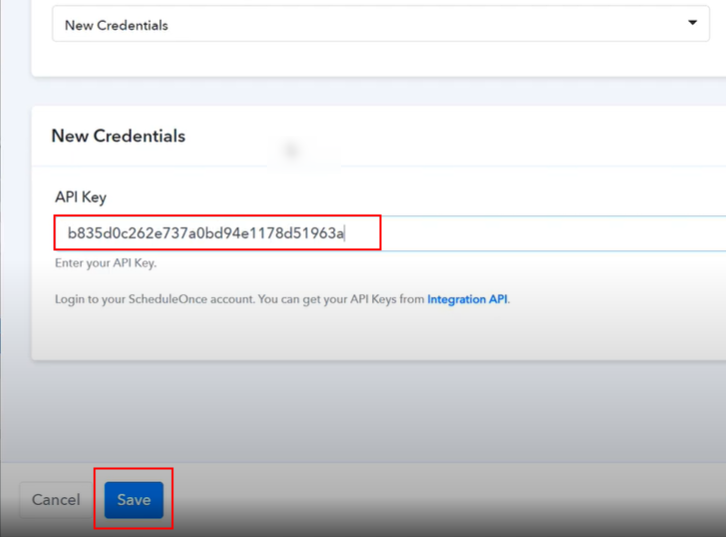
Next, all you have to do is paste the API key into the Pabbly Connect dashboard.

(d) Save & Send Test Request

Save & Send Test Request

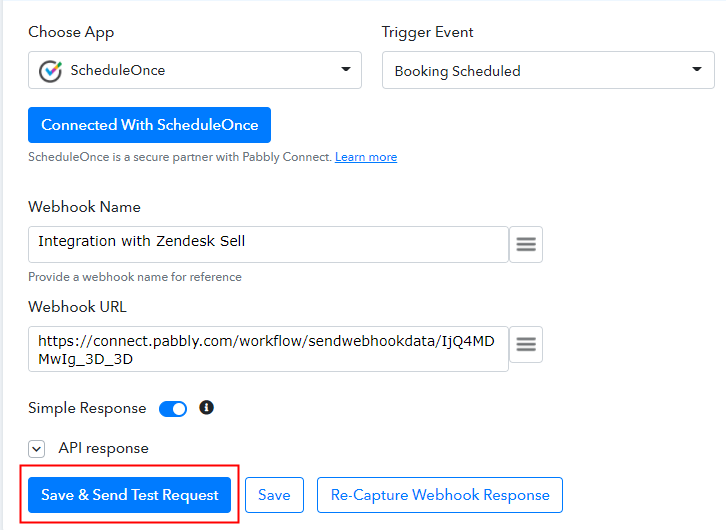
As we have established the connection with ScheduleOnce and Pabbly Connect, now all we have to do is click on “Save & Send Test Request” to see if it is working fine or not.

Step 6: Make a Dummy Booking

Now to check the integration, we will create a dummy or test booking in ScheduleOnce to see if the Pabbly Connect is capturing data or not.

(a) Capture Webhook Response

Capture Webhook Response

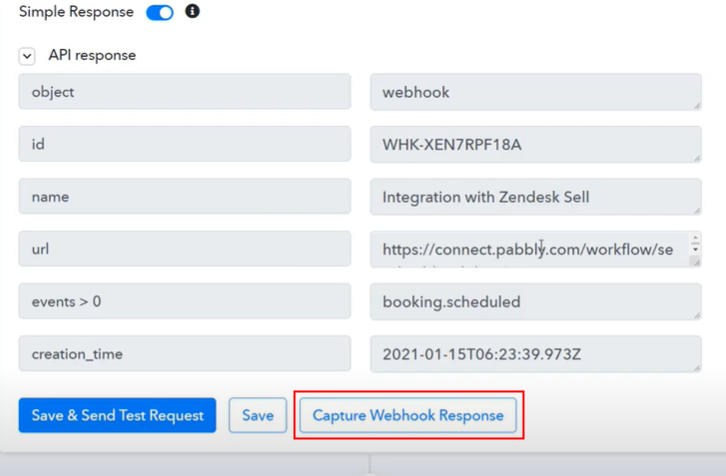
Before creating a test booking, make sure to click on “Capture Webhook Response”

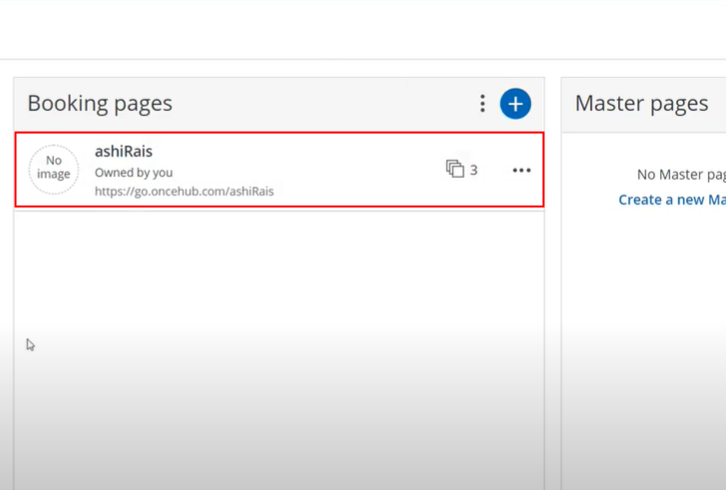
(b) Head to Booking Page

Head to Booking Page

Just head to your booking page, you can create one according to your need too.

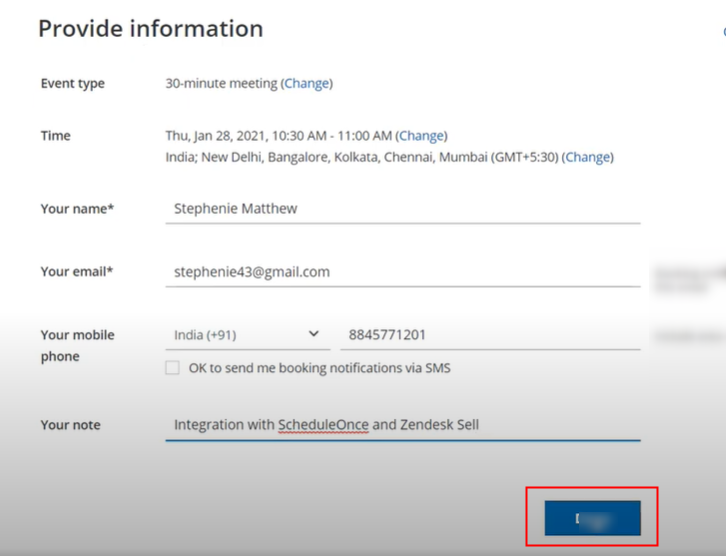
(c) Book an Appointment

Book an Appointment

Now all you have to do is pick a time and date, and add all the details. After making all the changes, click on the “Done” button.

Step 7: Test the Response in Pabbly Connect Dashboard

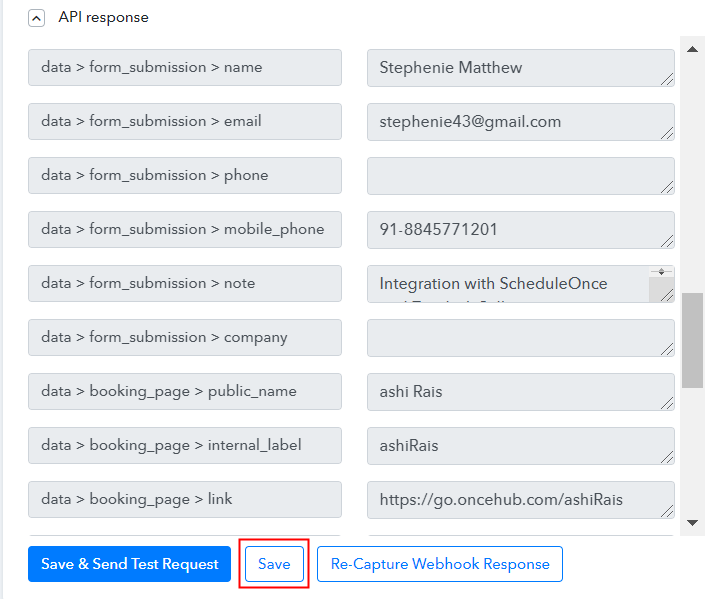
Test the Response in Pabbly Connect Dashboard

As soon as you click on the “Done” button, the entry will appear on the “Pabbly Connect” dashboard. Next, hit the “Save” option.

Step 8: Setting Actions for ScheduleOnce to Zendesk Sell Integration

To make this ScheduleOnce – Zendesk Sell integration work, you have to choose two actions for your trigger. The first action of ‘Text Formatter’ to simplify the data that we got in the trigger event, the second action of ‘Zendesk Sell’ to create a lead.

(a) Select Application you Want to Integrate

Select Text Formatter

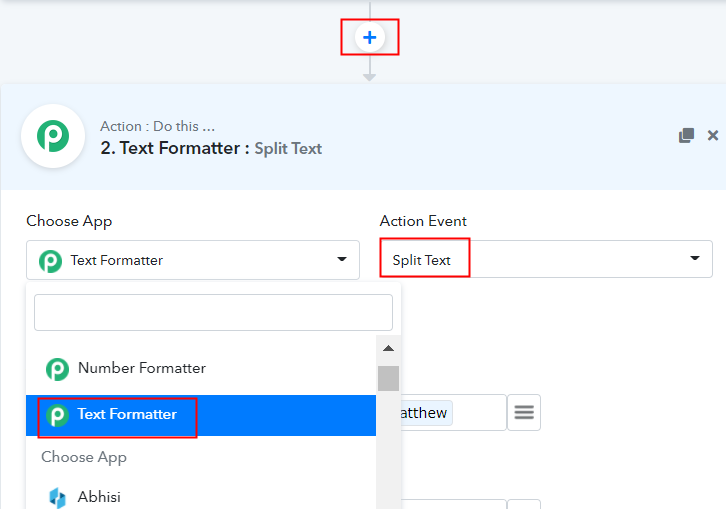
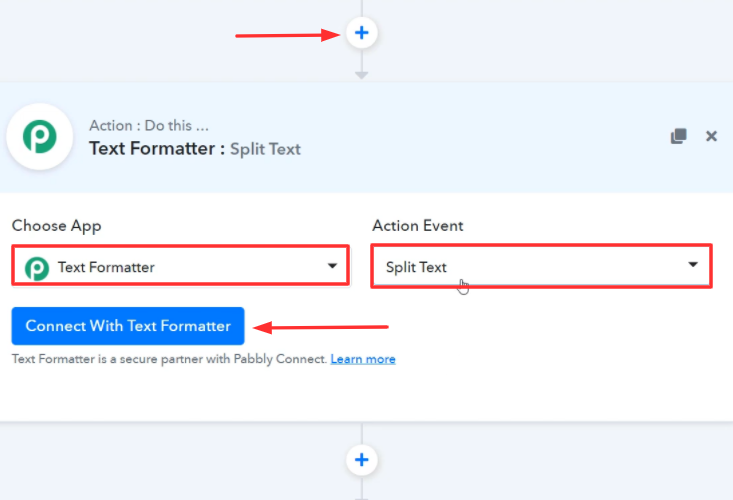
To add the “Text Formatter”, click on the plus (+) button and select ‘Data Transformer’ from the chosen app drop-down and select method as ‘Split Text’

(b) Click the Connect Button

Click the Connect Button

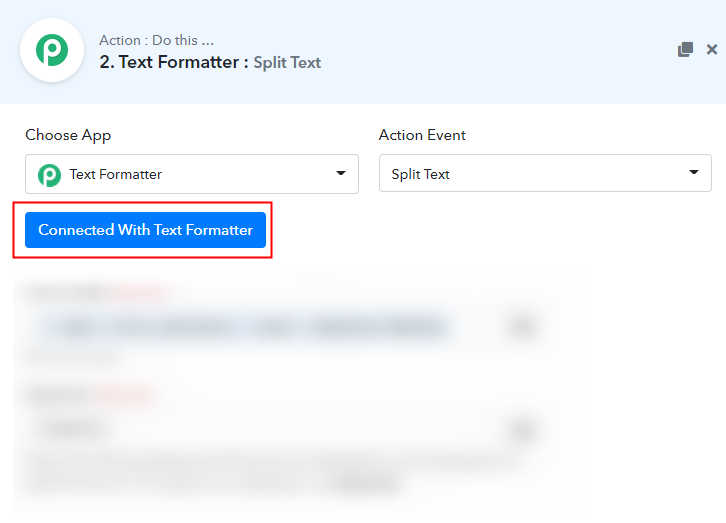
After choosing the application, click on the ‘Connect With Text Formatter’ button.

(c) Map the Fields

Map the Fields

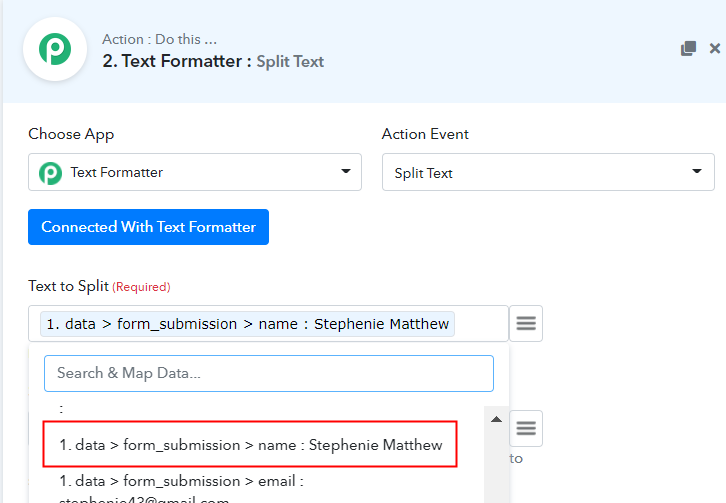
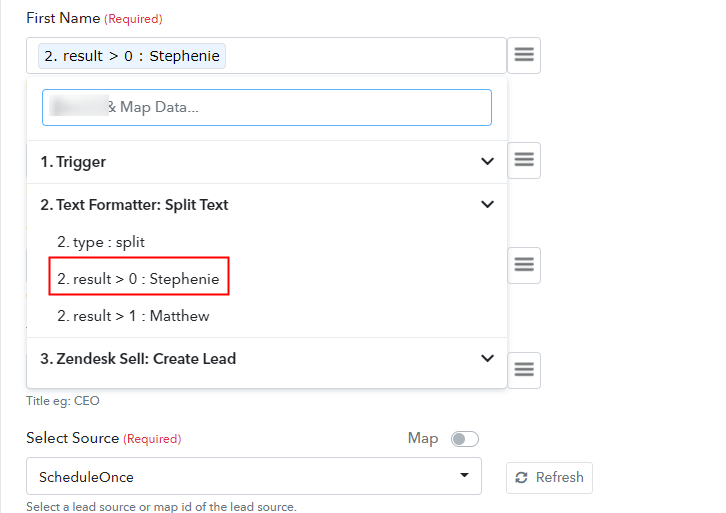
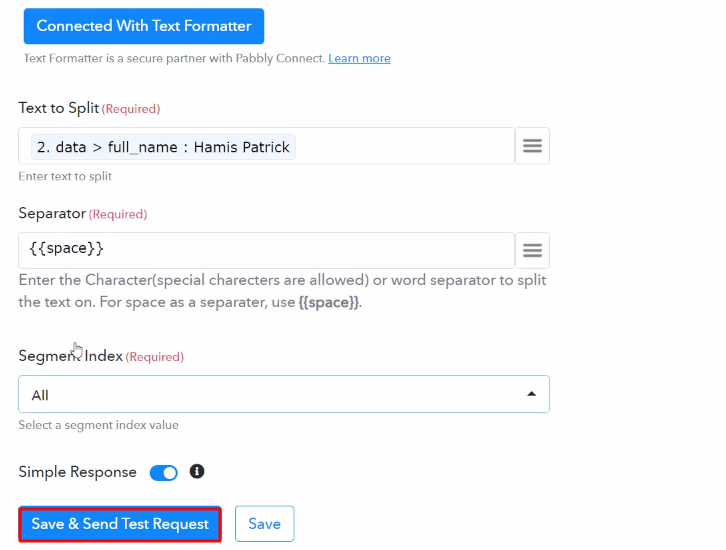
Now, it’s time to map the field data. Simply click on the map button and select the ‘field_data’ which you received through the ScheduleOnce trigger and then hit the ‘Save & Send Test Request’ button.

(d) Save the API Response

Save the API Response

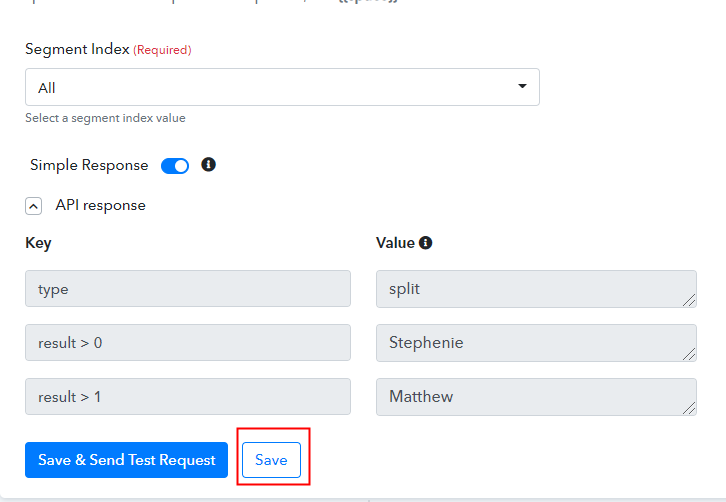
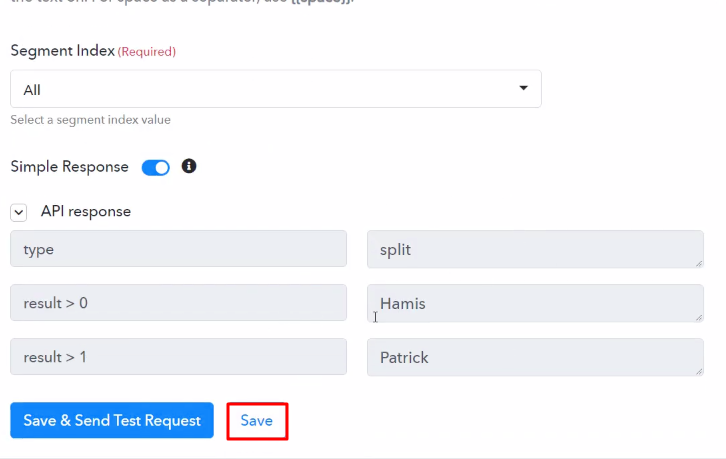
Here, we got the response in the correct format, click on the ‘Save’ button.

(e) Select Application you want to Integrate

Select Application you want to Integrate

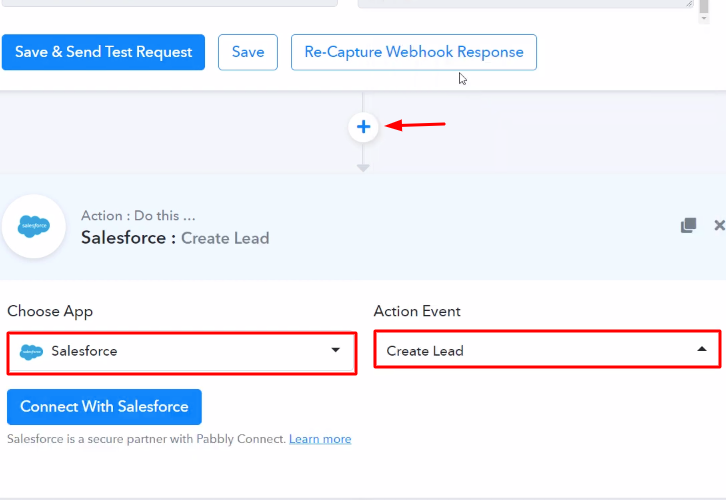
Now, select the app to integrate here as “Zendesk Sell” & method as “Create Lead”. Conclusively, press the “Connect with Zendesk Sell” button.

(f) Connecting Zendesk Sell to Pabbly Connect

click_on_connect_with_zendesk_sell

Next, click on the “Connect with Zendesk Sell” button and authorize your Zendesk Sell account to connect with Pabbly Connect.

(g) Map the Fields

Map the Fields

After connecting with your Zendesk Sell account, map all the fields quickly like the first name, last name, email, etc.

(h) Save & Send Test Request

Save & Send Test Request

Further, hit the “Save & Send Test Request” button to proceed further. Afterwards, you can check the response of your API in the action window. Lastly, hit the “Save” button to save the action API’s response.

Step 9: Check Response in Zendesk Sell Dashboard

Check Response in Zendesk Sell Dashboard

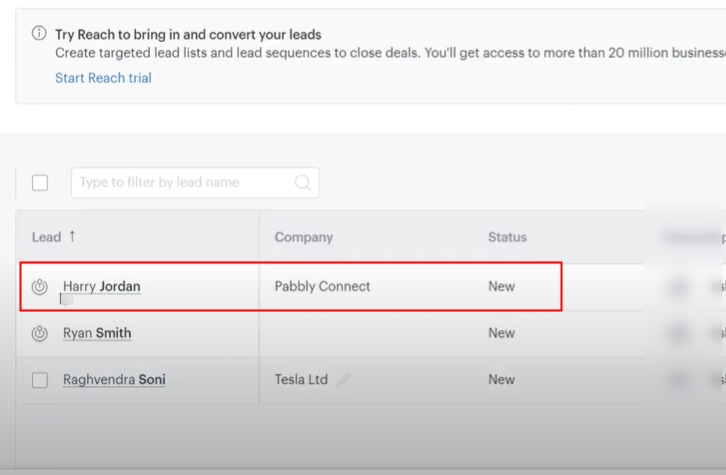
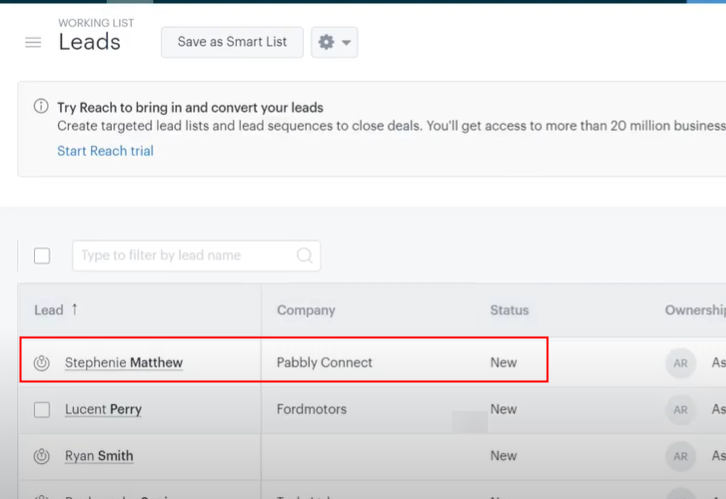
Ultimately, you can check the lead’s entry in your Zendesk Sell account. So now you know how to add Zendesk Sell lead for new ScheduleOnce booking using Pabbly Connect.

Conclusion –

To sum up, this was all about “how to add Zendesk Sell lead for new ScheduleOnce booking”. Consequently, after completing the step by step procedure, you will end up auto-creating the Zendesk Sell lead from the newly added ScheduleOnce booking.

Meanwhile, you can opt for Pabbly Connect for FREE with all its premium features.

Also, comment below your queries and suggestions.

You May Also Like to Read:

How to Send Twilio Message from New Salesforce Lead

How to Send Twilio Message from New Salesforce Lead

Looking for a way to send Twilio message from new Salesforce lead automatically? If yes, then let us introduce you to the most amazing tool named Pabbly Connect.

How to Send Twilio Message from New Salesforce Lead

So basically, Pabbly Connect is an integration & automation software that enables you to connect multiple apps to transfer data from one application to another automatically in real-time.

Who doesn’t want to set themselves free from all the repetitive work and tasks to be in a single go? Hence to do so, we have the best automation tool for you to make this wish come true i.e, Pabbly Connect.

Why Choose This Method Of Integration?

In contrast with other integration services-

  • Pabbly Connect does not charge you for its in-built apps like filters, Iterator, Router, Data transformer, and more
  • Create “Unlimited Workflows” and smoothly define multiple tasks for each action
  • As compared to other services which offer 750 tasks at $24.99, Pabbly Connect offers 50000 tasks in the starter plan of $29 itself
  • Unlike Zapier, there’s no restriction on features. Get access to advanced features even in the basic plan
  • Try before you buy! Before spending your money, you can actually signup & try out the working of Pabbly Connect for FREE

Sign Up To Pabbly Connect 

But before we jump straight into the integration process, let’s know a little bit about both the software. Hence, Salesforce is a cloud computing service that allows businesses to use cloud technology to better connect with customers, partners, and potential users.

On the other hand, Twilio is a cloud communications platform that enables users to make and receive phone calls, send and receive text messages, etc using its web service APIs.

After integrating these applications, whenever there will be any new lead added to your Salesforce account, an SMS will be sent automatically via Twilio in real-time. You can also check out the video that we have provided here for integration –

Even though, there is no direct integration possible for these two services yet. Henceforth, we are going to use Pabbly Connect to make this integration possible.

Using this software, you can effortlessly share data within multiple premium services easily. Moreover, you don’t need to have any coding skills & even a beginner can use it efficiently.

Moreover, we have a template for this integration that can assist you to get started quickly. Tap on the image below to begin. Also, you can go to Marketplace & look for more apps/integrations.

How

Now, without further ado, let’s follow the step-by-step procedure to integrate Salesforce and Twilio.

Step 1: Sign up to Pabbly Connect

Sign Up

Initiate the process to send Twilio message from new Salesforce lead by clicking on the ‘Sign Up Free‘ icon on the Pabbly Connect home page. Next, either manually fill-up all the details or sign up using your Gmail account.

Try Pabbly Connect for FREE

Step 2: Access Pabbly Connect

Select Connect

Next, after logging into the account, click on the ‘Access Now’ button of the Connect section in the dashboard.

Step 3: Workflow for Salesforce with Twilio Integration

(a) Start with a New Workflow

Create New Workflow

Start with creating a workflow for your project by clicking on the ‘Create Workflow’ button.

(b) Name the Workflow

Name the Workflow

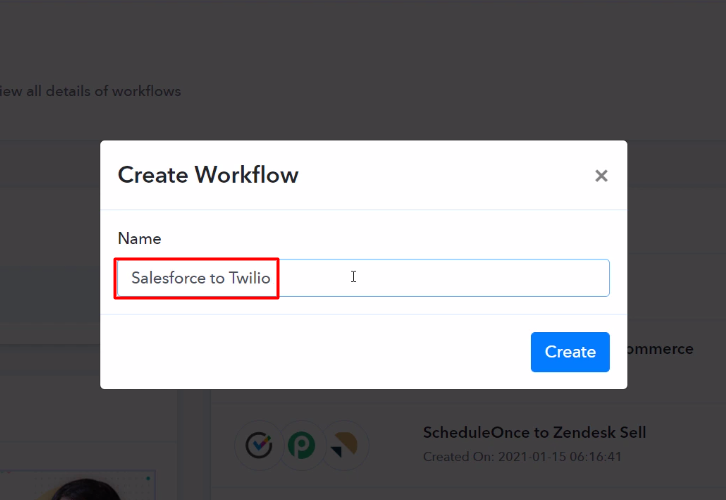
Further, add the name of workflow which in our case is ‘Salesforce to Twilio’. Nevertheless, you can always name the workflow according to your requirements.

Step 4: Setting Trigger for Salesforce to Twilio Integration

Further, you have to choose an app to send Twilio message from new Salesforce lead. Pabbly Connect lets you bind or connect unlimited apps within minutes, click here to sign up for unlimited workflows.

(a) Select Application you Want to Integrate

Select Salesforce for Salesforce to MailChimp Integration

In the following step, choose ‘Salesforce’ from the choose app drop-down, and select ‘New Lead’ option from the Trigger Event.

(b) Connect with Salesforce

Connect with Salesforce

After choosing the application click on the ‘Connect With Salesforce’ button for the next step.

Step 5: Connecting Salesforce to Pabbly Connect

Later, to connect Salesforce with Pabbly Connect, you have to authorize the application. For this, you have to log into your Salesforce account.

(a) Authorize Salesforce Account

Authorize Salesforce for Salesforce to MailChimp Integration

In the next window that slides in from the right, again click on the ‘Connect with Salesforce’ button. Authorize your Salesforce account to connect with Pabbly Connect by allowing access. Then, click on the ‘Save’ button.

(b) Paste Instance URL

Paste Instance URL

Now, you get the ‘Instance URL’ from Salesforce website URL. Simply copy and paste it in the respective column as shown in the above image.

Step 6: Create a New Lead

To check if the integration is capturing data or not, we will be going to create a new lead in Salesforce.

(a) Click on Leads

Click on Leads

Now, go to the Salesforce dashboard, and click on ‘Leads’ menu.

(b) Create a New Lead

Create a New Lead for Salesforce to MailChimp Integration

Promptly, click on the ‘New’ button to create a new lead.

(c) Enter Lead Info

Add Lead Details Salesforce

Further, you have to enter the new lead details such as first name, last name, address, and so forth.

(d) Save New Lead

Create Lead Salesforce

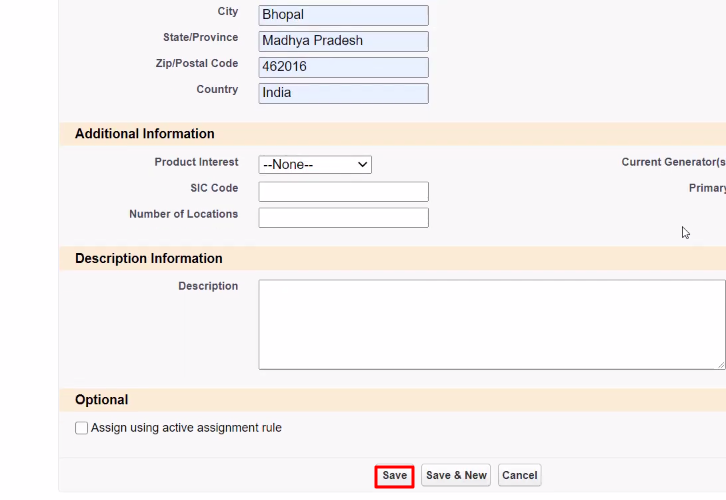
Subsequently, after filling in all the details, hit the ‘Save’ button.

Step 7: Test the Response in Pabbly Connect Dashboard

Save the Webhook Response

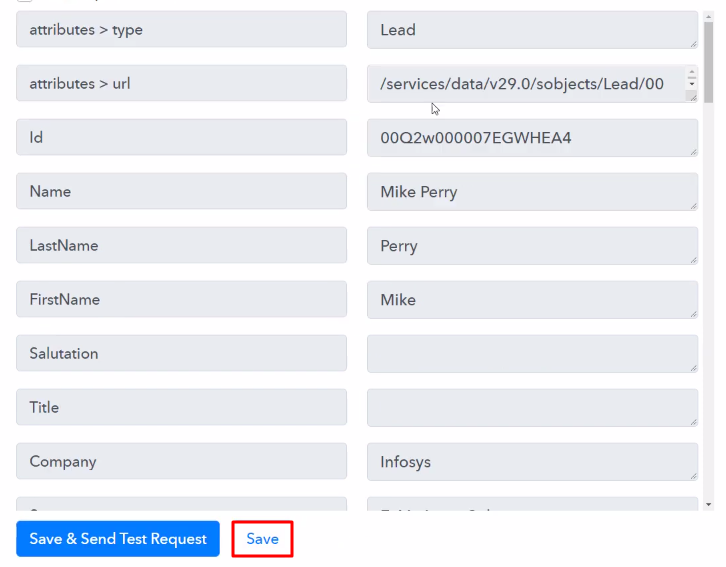
Later, go to the Pabbly Connect window, and click on the ‘Save and Send Test Request’ button to get the response. At last, hit the ‘Save’ button.

Step 8: Setting Action for Salesforce to Twilio Integration

To make this Salesforce-Twilio integration work, you have to choose the action for your trigger.

(a) Select Application you Want to Integrate

Select Twilio for PayKickstart to Twilio

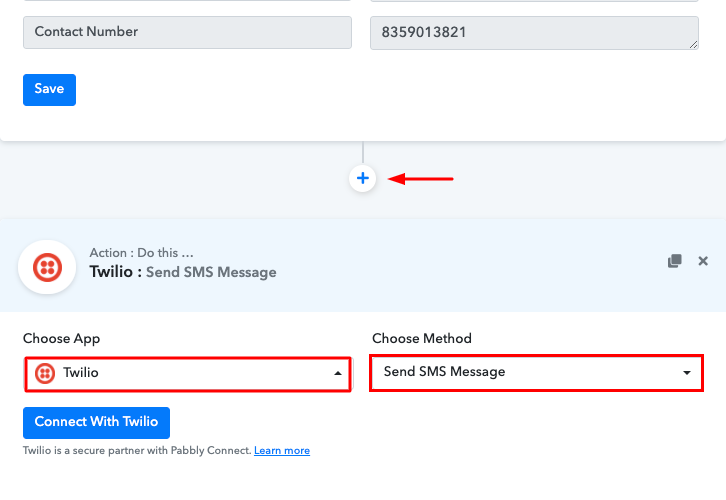
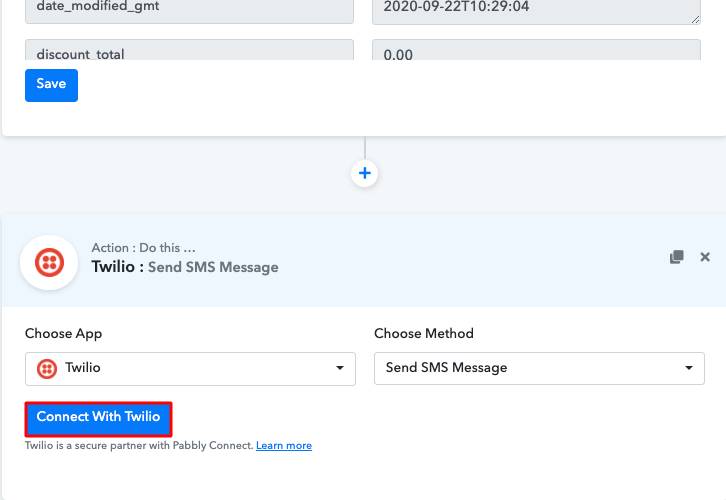
Now, in order to select the application for action, press the ‘+’ icon, and in the choose app select ‘Twilio’ and set the method as ‘Send SMS Message’.

(b) Connect with Twilio

Click on Connected with Twilio

After choosing the application press the ‘Connect With Twilio’ button.

Step 9: Connecting Twilio to Pabbly Connect

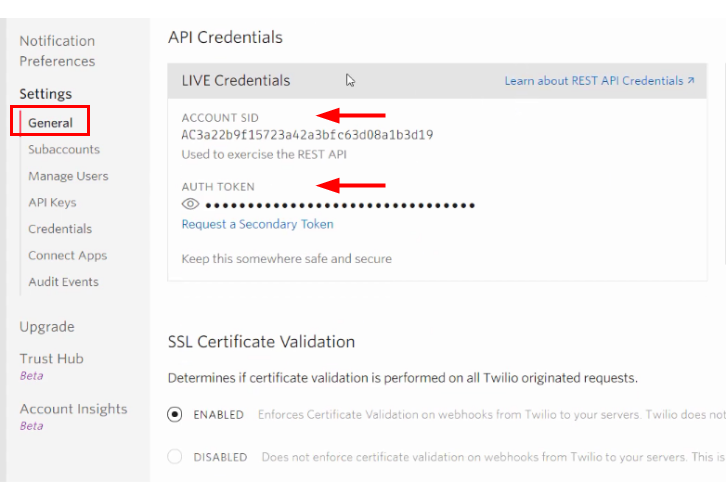
Next, in order to connect Twilio to Pabbly Connect, you have to enter the account SID and authorization token of your Twilio account in the Pabbly Connect dashboard. Hence for that, you have to log in to your Twilio account and go to Settings.

(a) Copy Authorization Token

Copy Authorization Token

After log in to your Twilio account, go to settings from the Twilio dashboard. There you see, ‘ACCOUNT SID’ and ‘AUTH TOKEN’ simply copy them.

(b) Add Account SID and Authorization Token

Paste API Token

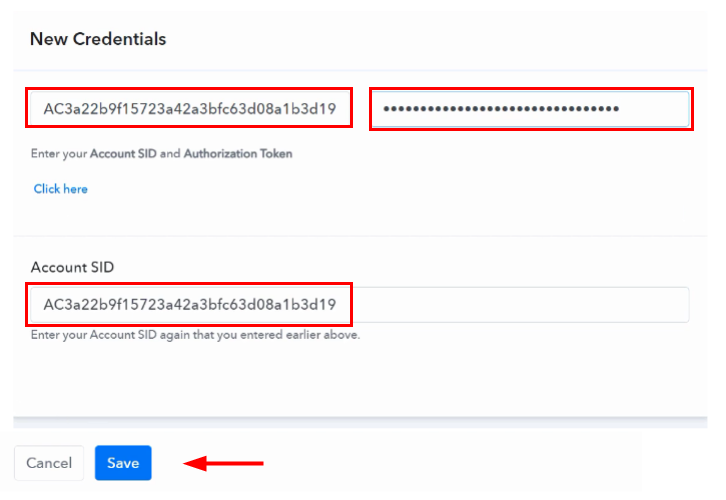
Now, paste the Account SID and Authorization Token in the given fields and then hit the ‘Save’ button.

(c) Map the Fields 

Map the Fields

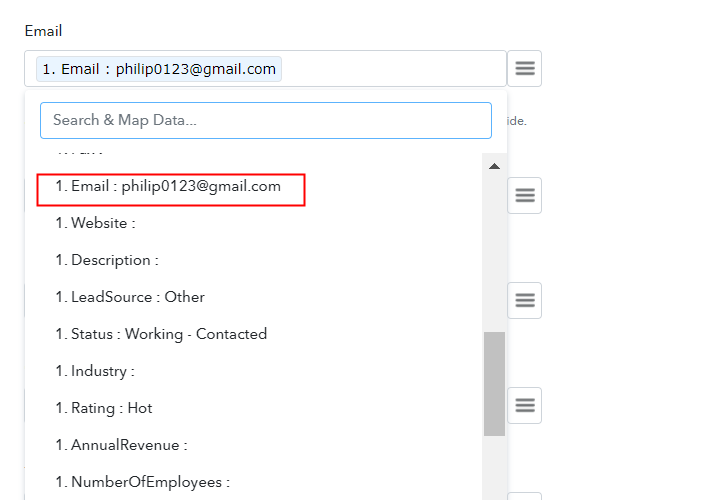
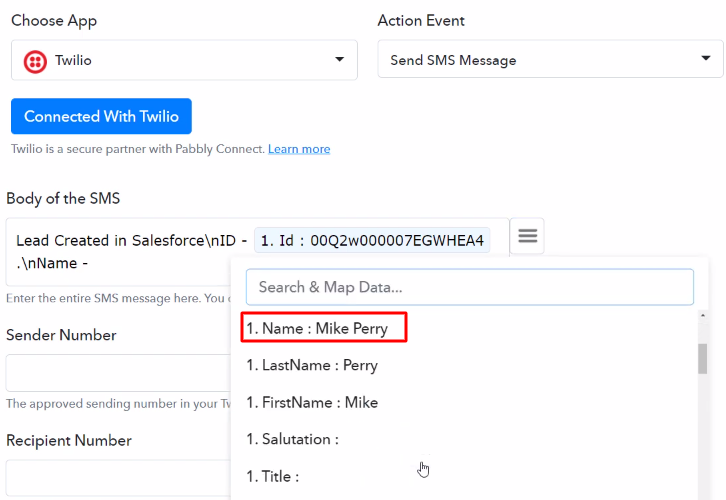
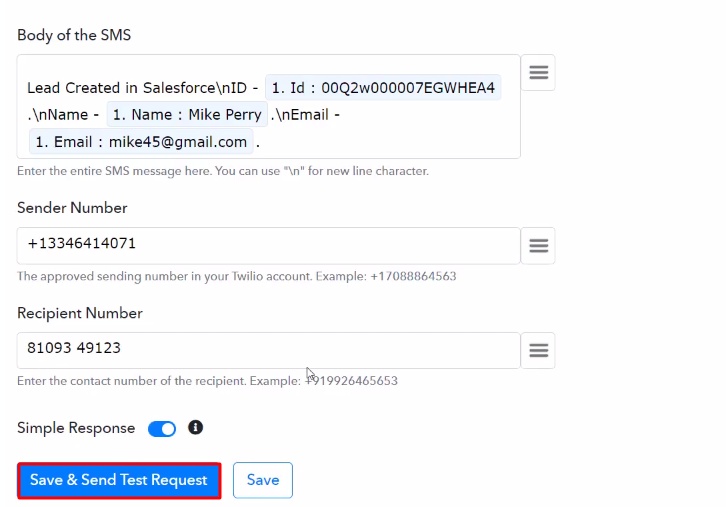
Later, in order to build an SMS, we have to map the details in respective fields like Message Body, Sender, and Recipient Number.

(d) Save & Send Test Request

Send Test Request

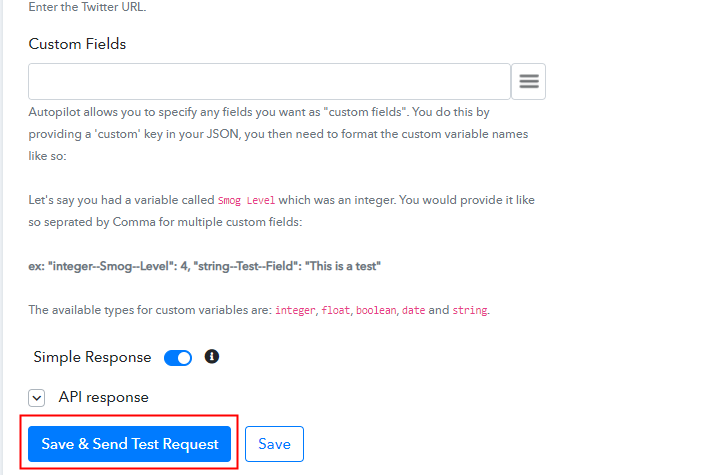
Once, you are done mapping all the fields press the ‘Save and Sent Test Request’ button.

Step 10: Check Response in the Twilio dashboard

Check Response

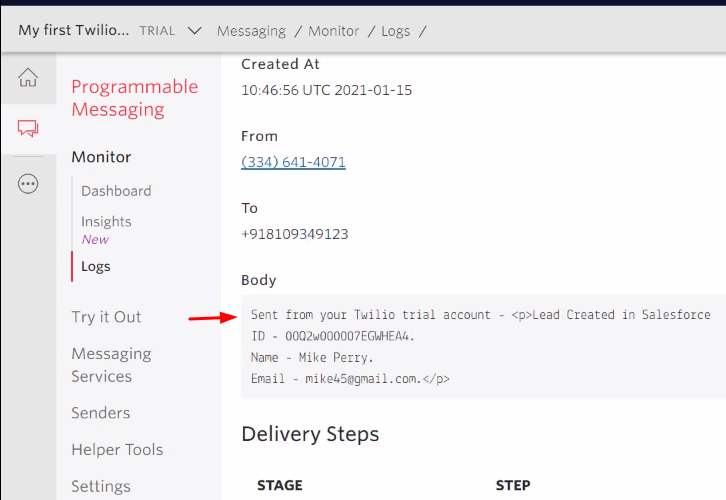
Here, you can see that our integration was successful and the message has been sent from the Twilio account automatically for a new Salesforce lead.

Conclusion –

Hopefully, now you know ‘How to Send Twilio Message from New Salesforce Lead?’. It’s simple and easy to use and you won’t have to go for any other software after using it. So, what’s stopping you now! Go and catch your deal by signing up for a free account.

If you have any suggestions or queries, please drop them down in the comment section, we will get back to you as soon as possible.

You May Also Like To Read –

How to Create Salesforce Lead from New Facebook Lead Ads

How to Create Salesforce Lead from New Facebook Lead Ads

Do you want to know how to create Salesforce lead from new Facebook lead ads in real-time? If that’s the case then we are suggesting a technique to integrate Facebook and Salesforce using Pabbly Connect.

Basically, Pabbly Connect is an integration and automation software that lets you transfer data automatically between remote applications.

How to Create Salesforce Lead from New Facebook Lead Ads

Before we bounce straight into the integration process, let us get a smidgen of information about both services. Facebook is a social media platform or social networking site that allows the user all over the world to connect and interact. However, Salesforce is a cloud-based software company that provides CRM service and also a complementary suite of enterprise applications focused on customer service, marketing automation, analytics, etc.

Since Facebook and Salesforce don’t have any direct way of integration between them, that’s why here we are using Pabbly Connect.

Why Choose This Method Of Integration?

In contrast with other integration services-

  • Pabbly Connect does not charge you for its in-built apps like filters, Iterator, Router, Data transformer, and more
  • Create “Unlimited Workflows” and smoothly define multiple tasks for each action
  • As compared to other services which offer 750 tasks at $24.99, Pabbly Connect offers 50000 tasks in the starter plan of $29 itself
  • Unlike Zapier, there’s no restriction on features. Get access to advanced features even in the basic plan
  • Try before you buy! Before spending your money, you can actually signup & try out the working of Pabbly Connect for FREE

Sign Up To Pabbly Connect 

After integrating these services, you can easily add new Facebook leads to Salesforce as leads automatically. Moreover, we’ve embedded a video below to assist you with this automation process-

Moreover, if you want to save some time in making this automation from scratch, we have attached a template for the same. Just simply click on the below image to get started quickly and in case you are looking for more apps/integrations, simply visit the Marketplace.

How

Hence, without further delay, let’s follow the step by step procedure to integrate Facebook and Salesforce.

Step 1: Sign up to Pabbly Connect

Sign Up

Begin the process to create Salesforce lead from new Facebook lead ads by pressing the ‘Sign Up Free’ button on the Pabbly Connect dashboard. Later, either fill-up all the details manually or sign up using Gmail credentials.

Try Pabbly Connect for FREE

Step 2: Access Pabbly Connect

Select Connect

Next, after logging into the account, tap on the ‘Access Now’ button as shown in the above image.

Step 3: Workflow for Facebook to Salesforce Integration

(a) Start with a New Workflow

Create New Workflow

Start by creating a workflow for your integration by pressing the ‘Create Workflow’ button.

(b) Name the Workflow

Name the Workflow

Now, you need to name the workflow just like in the above-shown image. I named the workflow ‘Facebook Lead Ads to Salesforce Lead’, you can obviously name the workflow as per your requirements.

Step 4: Setting Trigger for Facebook to Salesforce Integration

As soon as you are done naming your workflow, you have to select the application you want to integrate. Pabbly Connect allows you to connect unlimited premium apps, create your free account now.

(a) Select Application you Want to Integrate

Select-Facebook-1_censored

Now, we will select the application that we want to integrate. In this case, we are selecting ‘Facebook Lead Ads’ for integration. In the method section, select ‘New Lead’.

(b) Click the Connect Button

Connect-with-Facebook_censored

After choosing the application, click on the ‘Connect with Facebook Lead Ads’ button to move forward.

Step 5: Connecting Facebook to Pabbly Connect

Authorize Application Facebook

To connect Facebook to Pabbly Connect, you have to authorize the application. For that, you need to log in to your Facebook account.

Next, a window will pop up, here click on the ‘Connect With Facebook Lead Ads’ button and authorize your Facebook account.

Step 6: Add a Test Lead

To check if the integration is capturing data or not, we will add a dummy lead in Facebook.

(a) Click on Publishing Tools

Publishing Tools Facebook

Now, go to your Facebook page and click on the ‘Publishing Tools’ option.

(b) Go to Forms Library

Forms Library Facebook

Next, you have to click on the ‘Forms Library’ option to reach the forms page that you have created.

(c) Preview Form

Preview Forms Facebook

Here, select any of the listed forms and then click on the ‘Preview’ link to add a new lead.

(d) Create Lead

Create Lead Facebook

Next, add the name and email of the lead and hit the ‘Next’ button and submit the lead.

(e) Send Test Request

Send Test Request Facebook

Subsequently, Pabbly Connect fetches all the pages and forms available on that Facebook account. Simply, select the page and forms from which you want to get the leads. And then click on the ‘Save & Send Test Request’ button to capture the data from Facebook.

Step 7: Test the Response in Pabbly Connect Dashboard

Save the Webhook Response

Once you click on the ‘Save & Send Test Request’ in Pabbly Connect, the lead info will appear on the Pabbly Connect dashboard. Then, click on the ‘Save’ button.

Step 8: Setting Actions for Facebook to Salesforce Integration

To make this Facebook-Salesforce integration work, you have to choose three actions for your trigger. The first action of ‘Data Transformers’ to simplify the data that we got in the trigger event, the second action of ‘Text Formatter’ to split the lead’s name in a proper format. And the third action is of ‘Salesforce’ to create a lead.

(a) Select Application you Want to Integrate

Data Transformer

To add the Data Transformer, click on the plus (+) button and select ‘Data Transformer’ from the choose app drop-down and select in the ‘Action Event’ ‘Facebook Leads Ad’.

(b) Click the Connect Button

Connect with Data Transformer

After selecting the application, click on the ‘Connect With Data Transformer’ button.

(c) Map the Fields

Map the Fields Data Transformer

Now, it’s time to map the field data. Simply click on the map button and select the ‘field_data’ which you received through Facebook Lead Ads trigger and then hit the ‘Save & Send Test Request’ button.

(d) Save the API Response

Save the API Response Data Transformer

Here, we got the response in the correct format, click on the ‘Save’ button.

(e) Select Application you want to Integrate

Select Text Formatter

Now, to format the text, just hit the (+) button and then, select ‘Text Formatter’ in choose app, and in the action event select ‘Split Text’. Then, click on the ‘Connect With Text Formatter’ button.

(f) Map the Fields

Map the Fields Text Formatter

Now, map the field to make the text in a proper format. After mapping all the details, simply press the ‘Save & Send Test Request’ button.

(g) Save the API Response

Save the API Response Text Formatter

Lastly, you will get the API response. And as you can see, now the text is in the proper format. Now, press the ‘Save’ button.

(h) Select Application you want to Integrate

Select-Salesforce

Now in this step, click on the + button below and choose the application that you want to integrate. Here we have chosen ‘Salesforce’ to integrate and in the method section select ‘Create Lead’.

(i) Click the Connect Button

Connect-with-Salesforce

After choosing the application click on the ‘Connect with Salesforce’ button to move forward.

Step 9: Connecting Salesforce to Pabbly Connect

To connect Salesforce with Pabbly Connect, you need to authorize the application. For that, you need to log into your Salesforce account.

(a) Authorize Application

Authorize Application Salesforce

When you click on the ‘Connect’ button, a window will slide in from the right, here you have to again click on the ‘Connect with Salesforce’ button and then grant permission to integrate your Salesforce account with Pabbly Connect.

(b) Map the Fields

Map the Fields

Once you are connected with your Salesforce account, now you have to add all the field’s data like name, email, etc. Map up all the fields quickly.

(c) Send a Test Request

Send Test Request

Once you are done mapping up all fields click on the ‘Save & Send Test Request’ button.

Step 10: Check Response in Salesforce Dashboard

Check Response

Here, you can see the integration was successful and the lead from Facebook lead ads has been added to the Salesforce as a Lead automatically.

Conclusion –
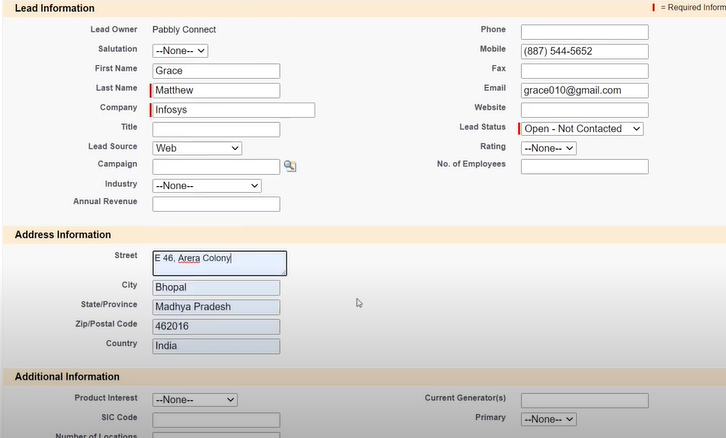
Finally, so this is our way and it is the easiest and fastest method to create Salesforce lead from new Facebook lead ads automatically. Because of Pabbly Connect, you can integrate unlimited apps, create unlimited workflows, automate all your projects, and so much more.

You can experience all of these perks without even paying anything as you get to signup for free. You just have to make a few clicks and you are good to go. Therefore, signup now to experience the best integration and automation service.

In case of any queries or suggestions, leave your comments below. We will try to get back to you as soon as possible.

You May Also Like to Read –