ThemeIsle Rates Pabbly Connect as the Top Zapier Alternative!

ThemeIsle

We are thrilled to announce that ThemeIsle, a leading provider of WordPress themes and plugins, has featured Pabbly Connect on its blog as one of the top Zapier alternatives.

At Pabbly Connect, we strive to provide our users with a powerful and easy-to-use integration platform that allows them to connect their favorite apps and automate their workflows. We are honored that ThemeIsle has recognized our efforts and included Pabbly Connect in their list of top alternatives to Zapier.

ThemeIsle

We would like to take this opportunity to thank the team at ThemeIsle for their support and for sharing our story with their community. We are grateful for their recognition and will continue to work hard to improve our platform and provide the best possible experience for our users.

If you are not familiar with Pabbly Connect, we encourage you to check out the Pabbly Connect website and try our platform for yourself. With Pabbly Connect, you can easily connect your favorite apps, automate your workflows, and save time and effort. And if you have any questions or feedback, our support team is always here to help.

Thank you again to ThemeIsle for featuring Pabbly Connect on their blog. We are humbled and grateful for their recognition and support.

Zapier vs Pabbly Connect

Zapier

Pabbly Connect is a top automation software that provides integrations across various applications to automate business processes. It allows you to integrate with multiple applications associated with CRM, Sales, Marketing, Productivity, or any other apps that you’re using.

Following are the points of its variance with Zapier, as we got lot of request asking about how does Pabbly Connect compares with Zapier.

1. Paths/Routers are available from Zapier’s Professional plan (Requires a minimum $74/month plan)

Zapier offers the logical paths/router features starting from $74 monthly plans only, which cost you $588 on yearly pricing. While with Pabbly Connect, you can get access to logical paths and routers with just one time payment of $699.Zapier software

Zapier

2. Huge Pricing Benefit compared to Zapier 10,000 Tasks for $699 (One Time) Vs 2,000 Tasks for $588 (Every Year)

Zapier’s 10,000 Tasks plan costs $194/month, while with Pabbly Connect, you will get 10,000 Tasks every month just with one time payment of $699. That’s it.

You don’t have to pay monthly if you opt for Pabbly Connect One time payment plans.Zapier

3. All Internal Tasks are Free in Pabbly Connect whereas, Zapier charges for all internal operations.

Zapier counts filters, routers and every internal operation like Number Formatting, Addition, Subtraction as a task.

Pabbly Connect however offers all the internal tasks for free. We do not charge anything when you run the internal tasks.  The following modules will be considered as free tasks in Pabbly Connect –

    • Webhooks
    • Email Parser
    • Schedule
    • Number Formatter
    • Iterator
    • Text Formatter
    • Data Transformer
    • Router
    • Filter
    • Date/Time Formatter
    • JSON Extractor
    • Array Functions

Pabbly Connect

4. Limit on Automation Workflows (Zapier has 20 Workflows Limit on $468/year plan Vs Pabbly Connect has Unlimited Workflows on one time payment plan)

Zapier limits you on the number of automation workflows on the small plans.

For example: The 1,500 Tasks plan costs $58.50/month and allows you to set up only 20 Zaps/Automation workflows. 

On the other hand Pabbly Connect does not restrict you on the number of automation workflows that you can create with one time payment plans starting from $699.AUTOMATION

Zapier

5. Routers (3 Level Deep Routers Vs Unlimited Depth Router)

Routers inside Zapier can go utmost 3 levels deep. Whereas on Pabbly Connect you can move routers to any level depth.

Pabbly Connect does not limit you on the level of router that you want to go with while creating workflows.

6. Schedule Trigger (minimum limit of 10 mins in Zapier Vs 1 min in Pabbly Connect)

The Schedule trigger inside Zapier allows you to run a recurring schedule with the minimum limit of 10 minutes.

With Pabbly Connect, you can enable the schedule trigger to run every 1 minute. This means if you want to pull data from a source every 1 minute, you can pull the data using Pabbly Connect while you can’t do the same with Zapier.

On the higher side: Zapier allows you to run recurring schedule triggers with maximum allowed limit of 30 days.

On the other hand, With Pabbly Connect, you can run recurring triggers with No limits whatsoever.

For example: You can trigger a workflow, every 45 days, Every 6 months. You can even trigger an automation workflow to run every 1 year. With Zapier, the maximum allowed limit of trigger runs is every 1 month.

7. Share Files to Specific Users with Pabbly Connect without making them publicly accessible like Zapier.

With Pabbly Connect, you can share the file from your Google Drive to any specific email address.

For example: Someone buys using Stripe -> Send them file access from your Google Drive( Just to that buyer)

Now, Zapier restricts you to share the file only within the organization email or the other option is to share the file and make it publicly accessible for everyone all across.

While with Pabbly Connect, you can share files to specific email addresses without making it publicly accessible.

8. The Delay Module of Pabbly Connect is available with no limits and restrictions while this feature is not available in Zapier.

The Delay module inside Pabbly Connect does not have limitations on the maximum allowed delay. Zapier allows you to set the maximum delay of up-to 30 days.

This means if you are asking your customers to schedule an appointment that is 40 days ahead of time and if you want them to send an email/SMS reminder 2 days before their scheduled day on the 38th day, you won’t be able to do that with Zapier.Zapier

9. Unlimited Premium Apps are available from Zapiers’s Professional plans Only (Requires minimum $74/month plan)

Zapier limits the usage of premium apps inside their application. For example: If you are on their $30/month plan, you can only add up to 3 premium apps inside all your different workflows.

Comparing this with Pabbly Connect, we offer the usage of unlimited regular and premium apps, on all plans.

Further we do not limit any apps in any ways. The only restriction is on tasks that are based on plans.

Examples of Premium Apps includes: Webhooks, Facebook Lead Ads etc. They are all available inside Pabbly Connect  in $699 one time payment plan.Zapier

Pabbly Connect

10. Dynamic Web Page Module (Only available inside Pabbly Connect)

Pabbly Connect comes with a dynamic web page module that allows you to generate dynamic web pages based on dynamic data that you are generating in your workflow.

For example: If you want to generate a webpage with a dynamic ticket, dynamic document, you can do that with Pabbly Connect.

The same module is not available inside Zapier.

11. Number Counter Module (Only available inside Pabbly Connect)

This module allows you to increase the number on each successive workflow execution. It is useful when you want to pick the successive rows from Google Sheets for every single workflow execution.

For example: On the first workflow execution, you want to pick Row 1.
On the second workflow execution, you want to pick Row 2.
And so on.

With the number counter module, you can generate successive numbers on each workflow execution.

12. Data Forwarder  (Only available inside Pabbly Connect)

Sometimes, you may want to return a custom response to the incoming webhook request that’s been made to the workflow.

With the Data Forwarder module, you can return a custom JSON response to the original requester.

For example: You can use the data forwarder module on your custom made applications as well and use Pabbly Connect as a middle layer to call external API to process your data and return response back to the original source of data origination.

13. Extensive Video Library of 2,500+ video tutorials on different automation use-cases (Only available with Pabbly Connect)

Pabbly Connect has an extensive video library of 2,500+ videos on different use-cases, which are much simpler to understand and execute while creating workflows.

Here is the link to the YouTube Channel.zapier vs pabbly connect

14. Sharing Permissions are available only from the $449 per month monthly plan. It is available on all plans.

Sharing permissions are only available at Team and Company level plans in Zapier.

Whereas there are no such restrictions in Pabbly Connect, you can create and share workflows across all the plans including the free sign-up.

It is an accessible part of the application to all who create automation workflows in Pabbly Connect.Zapier

Final Words

The above pointers not only projects the distinctiveness of Pabbly Connect over Zapier, but also put up its effectiveness as the best automation solution for all.

You can sign-up for the trial account of Pabbly Connect and get 100 tasks every month.

Moreover, Pabbly Connect is currently offering one time plans as well i.e. you will just need to pay once and you will get access to Pabbly Connect for lifetime, without bearing any recurring fees at all.

Grab your Pabbly Connect Lifetime deal before it ends. Buy it now!

Make (Formerly Integromat) Vs Pabbly Connect

Pabbly Connect is a strong and top automation platform that provides integrations across 1000+ applications. It lets you automate your business processes without manual efforts and zero coding skills. Moreover, it is the only platform that gives you unrestricted access to all features across all plans.

Make

Following are the points of its distinctiveness and variance with Make (Formerly Integromat), a Pabbly Connect alternative that allows you to visualize, design, and automate your work.

1.  Make (Formerly Integromat) consumes 2X tasks for each workflow execution because it charges you for both Trigger and Actions. In Pabbly Connect, Triggers are not chargeable.

Let’s say, you have a simple automation workflow that collects data from Jotform and sends the same data to Google Sheets.

Now in Pabbly Connect, this simple workflow to send data from Jotform to Google Sheets will cost you 1 task as the trigger is free inside Pabbly Connect.

However, in the case of Make (Formerly Integromat), the same workflow will cost you 2 operations as they count both triggers (receiving data from Jotform) and action (sending data to Google Sheets).

This means for each execution cycle, you will have to spend 2X the number of tasks/operations compared to Pabbly Connect.

Trigger in Pabbly Connect

Operations - top automation platform

2.  Each check for new data costs you an operation inside Integromat (Make).  All checks to look for new data are free in Pabbly Connect.

All automation platforms keep on checking the external platforms to see if there is any new data on the external platform. They do these checks every 5-10 minutes so that any new fresh data is fetched and the workflow execution can happen.

In Make (Formerly Integromat) every check to identify new data through polling is counted in operations.

E.g. if the trigger runs to check any new data on Facebook Lead Ads every 10 minutes in a day, it will be counted as 6 Checks every hour * 24 Hours = 144 operations. This will be equivalent to 4320 operations per month. 

If you have 10 automation workflows in your account, it will be equivalent to 43200 operations irrespective of any new data or not.

We made it simple in Pabbly Connect. We never charge for any data checks at all. This means you save a lot of tasks every month.

Pabbly Connect

Make

3.  Make (Formerly Integromat) charges for the paths/routers while creating scenarios. While Pabbly Connect does not charge for routers at all.

Pabbly Connect does not charge for routers/paths at any point while creating the automation workflows across the plans.

While they are charged in Make (Formerly Integromat) each time you apply a router while creating scenarios and thus counted in operations on each execution.

Moreover, Pabbly Connect allows you to add multiple routers in a single automation workflow.

4.  Adding a team member feature is only available in the Teams plan in Make (Formerly Integromat). Whereas it is accessible to all in Pabbly Connect.

Teams feature is accessible at 34$/month and further enterprise-level plans in Make (Formerly Integromat) which makes it difficult to add members to use and create automation workflows as a team.

This is a must-have feature for businesses to keep track of business operations efficiently, for which they have to move to a higher plan in Make.

While it is accessible across all plans including free sign-ups as well in Pabbly Connect. 

Integromat vs Pabbly Connect

Make

5.  Access to apps is bifurcated as per plans in Make (Formerly Integromat) while in Pabbly Connect all apps are accessible across all the plans.

 Make (Formerly Integromat) does not allow access to all the applications and has bifurcated their accessibility according to the plans. And all the premium apps are available in the most higher-level plans.

Whereas there is no restriction to access all the 850+applications even in the free plan in Pabbly Connect. And there is no bifurcation of applications as well.

6.  Create and share scenarios are only available at teams and enterprise-level plans in Make (Formerly Integromat).

Create and share scenarios are only available at teams and enterprise-level plans in Make (Formerly Integromat) which restricts the usage of the application to an extent. And you have to buy a higher-level plan to access the feature.

Whereas there are no such restrictions in Pabbly Connect, you can create, share and clone the scenarios across all the plans including the free sign-up.

Integromat vs Pabbly Connect

Integromat Alternatives

7.  Pabbly Connect has an extensive video library to guide users to make workflows with ease whereas Make (Formerly Integromat) has generic textual help.

Pabbly Connect has an extensive video library of 3500+ videos on different use-case scenarios and also on different application integrations which are much simpler to understand and execute.

Here’s the link to the YouTube Channel.

While Make (Formerly Integromat) has textual help to create automation workflows through generic templates and use-cases.

Automation Platform

8.  The Delay Module of Pabbly Connect is available with no limits and restrictions while this feature is not available in Make (Formerly Integromat).

Pabbly Connect offers a Delay Module with no limits and restrictions to delay any particular event to a certain point time in the future.

E g. If an event has to be delayed by 30 days to a certain time in the future, you can easily execute such use-cases using the delay module in Pabbly Connect. 

Note that you are not going to find any delay module in Make (Formerly Integromat).

9.  A range of internal tasks is not counted under task consumption in Pabbly Connect. Make (Formerly Integromat) charges for all of them.

A range of internal tasks are not counted under tasks consumption in Pabbly Connect and are provided for free in workflow execution whereas they all are counted in Make (Formerly Integromat), which adds to your operations under each scenario execution.

Pabbly Connect does not eat up too many tasks to run your workflow, which eventually saves you a lot of tasks in executing a workflow.

Internal tasks - Pabbly Connect

10.  Pabbly Connect offers WhatsApp Cloud API Integration to set automation workflows across different applications.

 Pabbly Connect offers WhatsApp Cloud API integration which is widely used by users in different industries to automate business operations.

You will not find this integration in Make (Formerly Integromat) to create automation workflows.

WhatsApp Cloud API - Integromat

WhatsApp Cloud API - Pabbly Connect

11.  Pabbly Connect has more facile and simple navigation than Make (Formerly Integromat).

The interface is simpler to navigate across the application in Pabbly Connect than in Make. It is more facile to get a clearer understanding in layman’s terms of the entire functioning of the application in both visual and language terms. 

 Pabbly Connect is simpler to understand and execute even for beginners and businesses starting to automate, with simple navigation and video tutorials for specific use-cases. 

Make (Formerly Integromat) has a little complex to understand and execute interface with generic written guides to understand the application.

Make

Trigger & Action - Pabbly Connect

Conclusion

The above pointers not only project the variance of Pabbly Connect with Make (Formerly Integromat) but also efficiently put up its accessibility across a wider audience base around the globe.

You can sign-up for the trial account of Pabbly Connect and get 100 tasks every month.

Moreover, Pabbly Connect is currently offering one time plans as well i.e. you will  just need to pay once and you will get access to Pabbly Connect for lifetime, without bearing any recurring fees at all.

You can get the Pabbly Connect one time plan at a pretty straight price of $249. Grab your Pabbly Connect Lifetime deal before it ends. Buy it now!

Top Benefits of Marketing Automation in 2022

Like most business owners, you’re always looking for ways to improve your marketing efforts and want to travel more by leaving your business to automation tools. Then You should definitely know about marketing automation.

After all, effective marketing is key to driving growth and improving your bottom line. But what if I told you that there was a way to make your marketing even more effective? Many of them don’t know the benefits of marketing automation, which will save you time and money while helping you generate more leads and sales.


Top Benefits of Marketing Automation in 2022


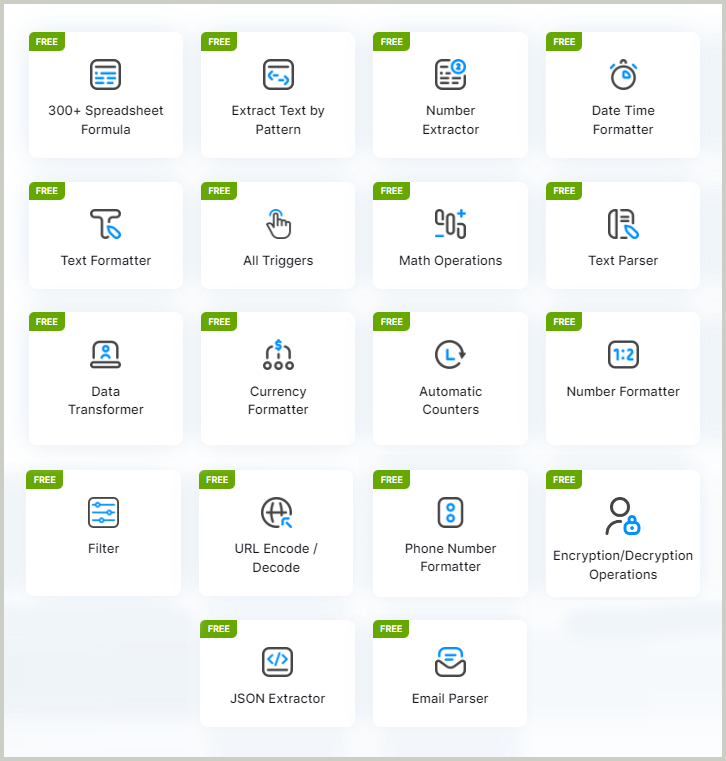
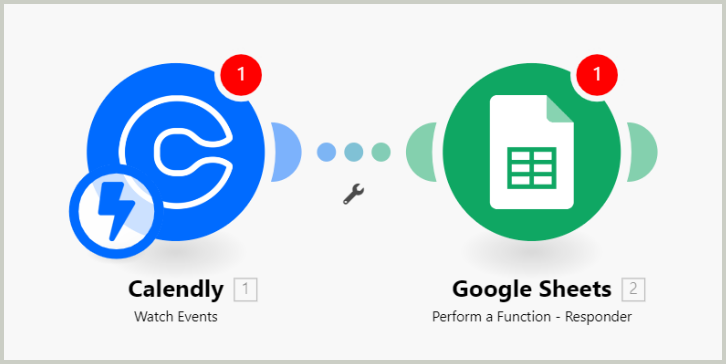
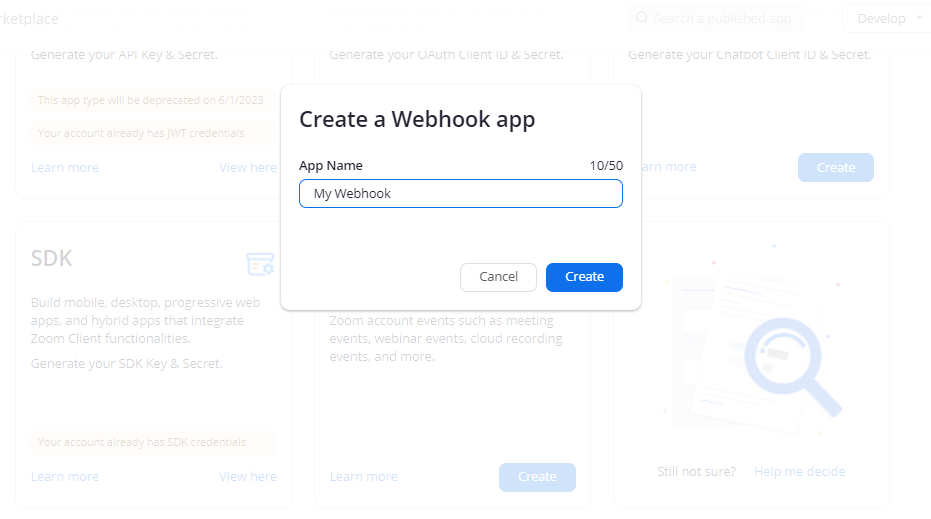
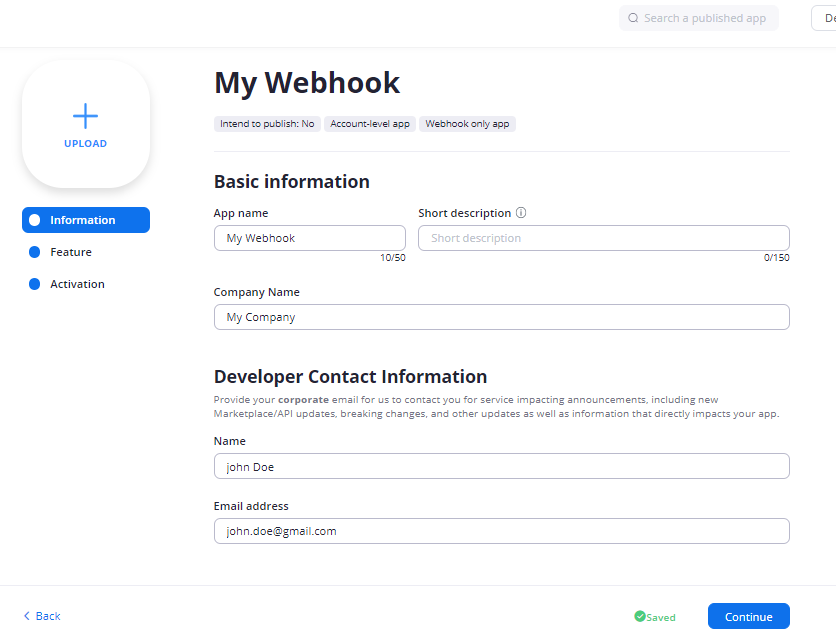
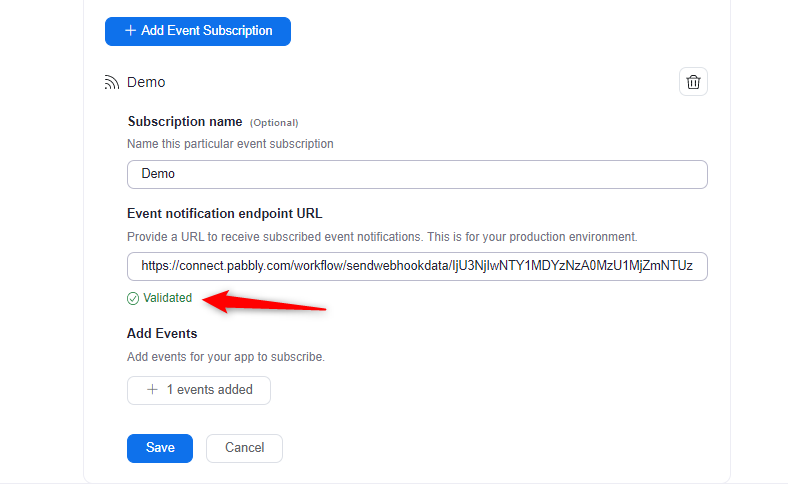
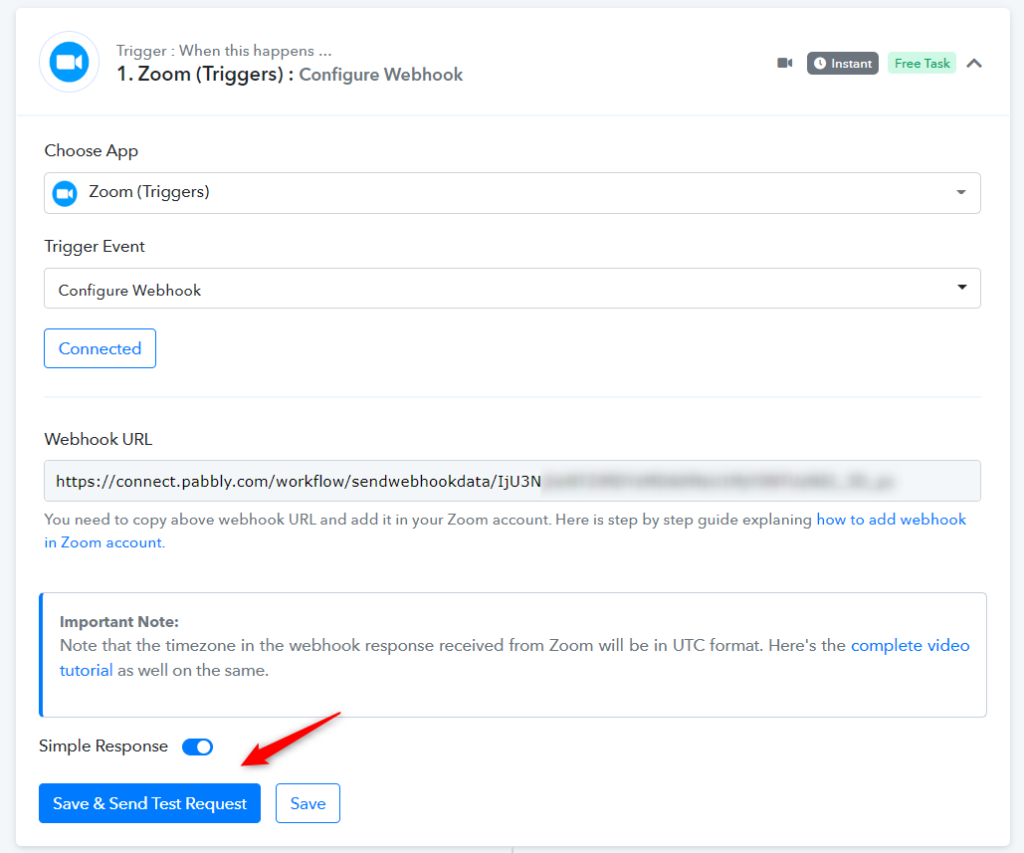
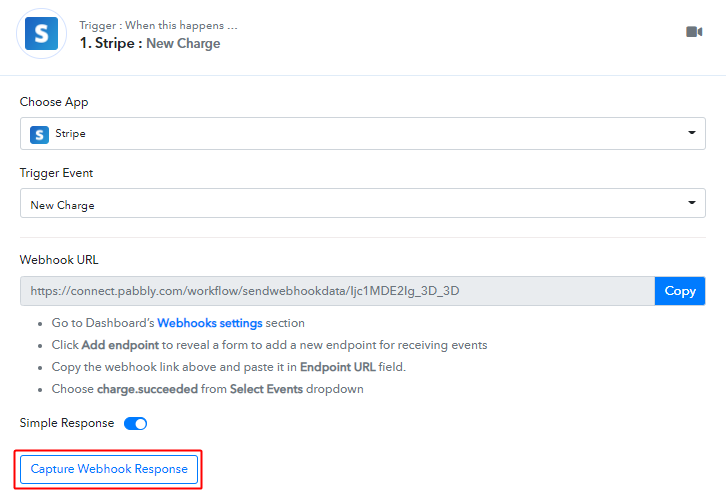
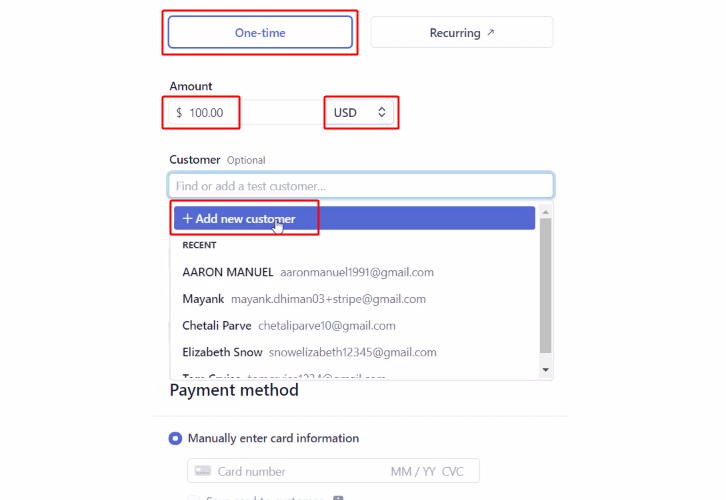
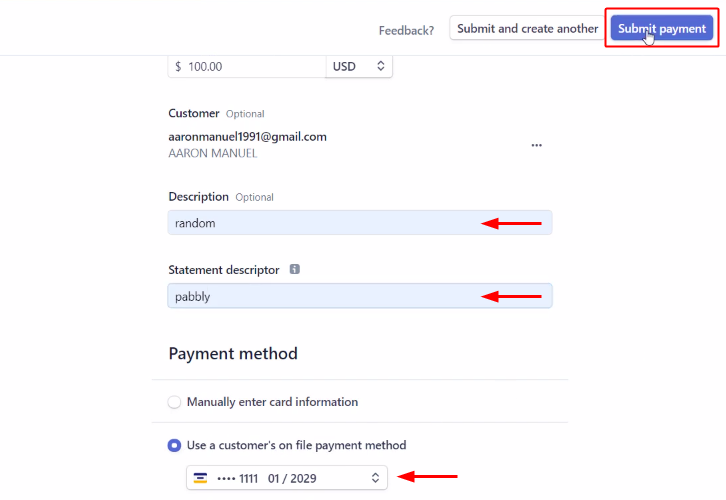
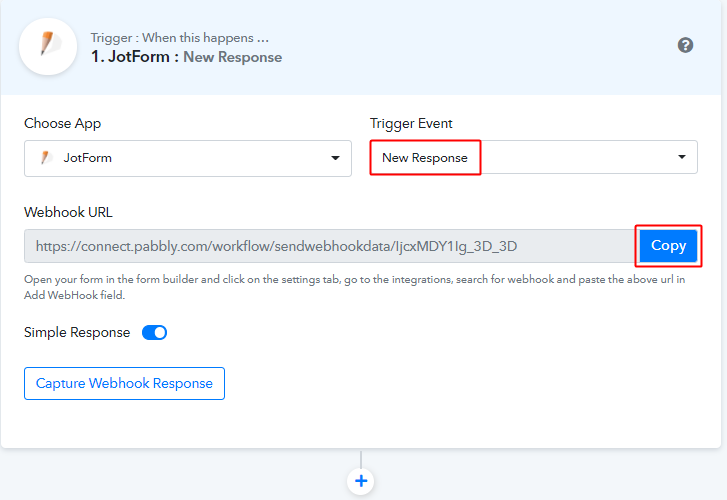
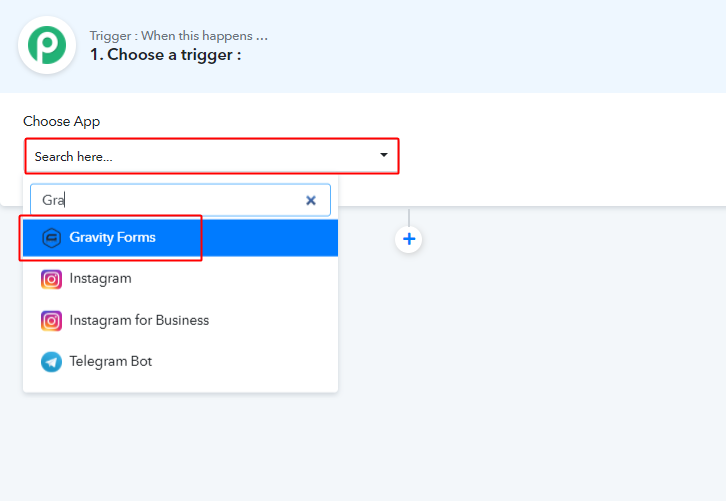
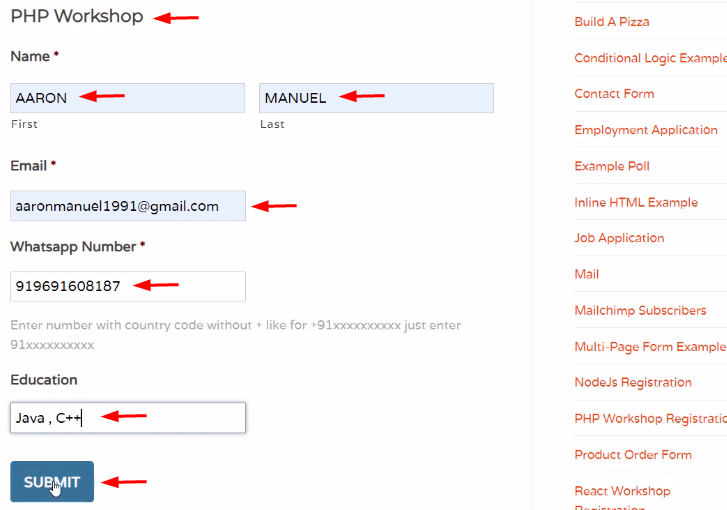
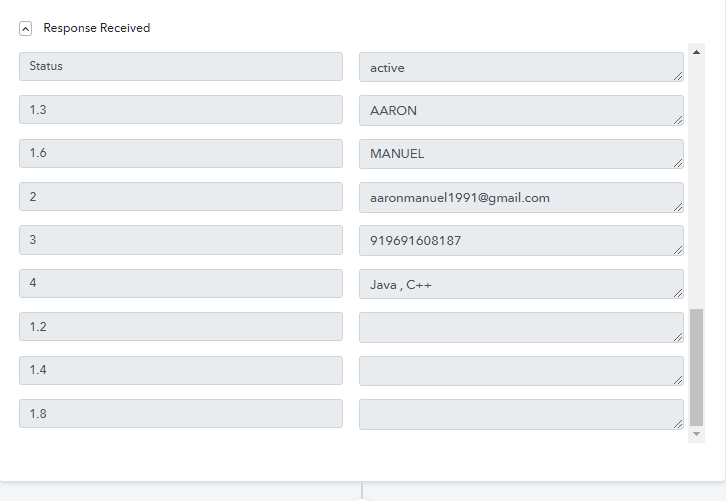
Selling tickets are achieved by Marketing automation with the use of a tool like Pabbly to streamline sales and marketing processes.

Businesses can create and grow customer relationships with marketing automation by automating data collection and analysis. Marketing automation also streamlines the sending of emails, social media posting, and more.

That is why, with the help of tools like Pabbly, we train our Digital Scholar students to grasp the implementation of automation flow to a higher level. One of the reasons for the digital scholar’s rapid rise in the digital marketing industry in just two years is our online course in marketing automation taught by Rishi Jain.

Also, In this article, we have listed the ten key benefits of marketing automation that can help make Marketing automation a marketing powerhouse in your company.

Before knowing about the benefits, let’s look at marketing automation and why we need one for any business happening online.

Let’s start!

What does automation mean?

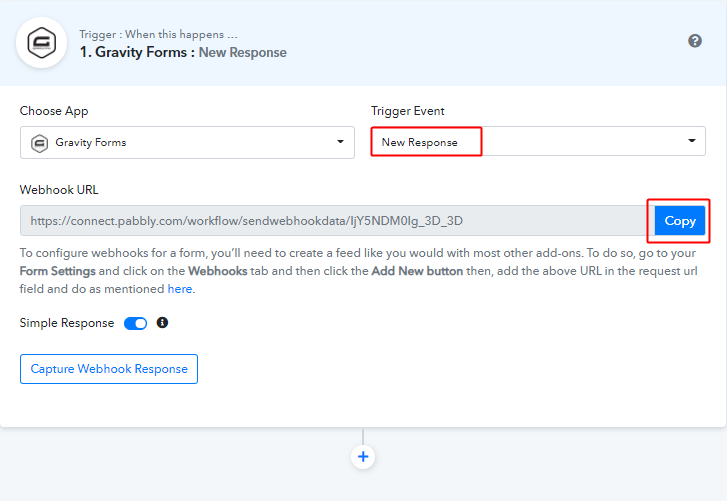
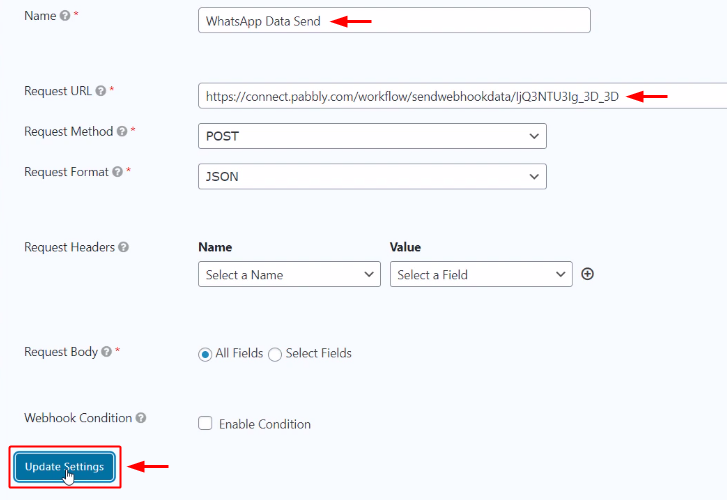
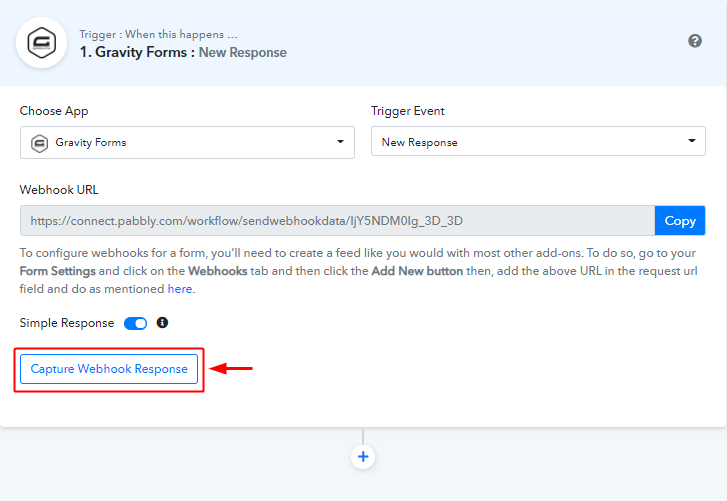
Automated marketing is a technique that involves using an automated tool, such as Pabbly, to generate a flow of automation over time, resulting in a hassle-free solution for business owners.

Automation tools will relieve you of the time-consuming marketing procedure, allowing you to focus on increasing engagement with your targeted campaign, which will, in turn, increase your revenue in the long term.

As a result, marketing automation is critical for any online firm. If you’re still using traditional marketing methods, it’s not too late to learn about and adapt to automated marketing. Take this online digital marketing course to discover how to become a computerised marketing expert in no time.

If you’re confident in your ability to design an automation flow, collaborate with your marketing team and use the trial-and-error process to find an automation flow that works for you.

Does marketing automation really work?

Automation is a better option for marketing than traditional marketing since it is easier, more cost-effective, requires less effort, and takes less time. It is also more target-oriented.

Let’s look at some of the statistics that show how automation works in the digital age.

  • According to research, when businesses invest in marketing automation, they can expect a 14.5% increase in sales and a 12.7% reduction in marketing costs.
  • In addition, 4 out of 5 businesses increased their leads using marketing automation, with an average conversion rate of 80%.
  • According to the Annuitas Group, businesses that implement marketing automation have seen a 45.1% boost in quality and recurring prospects.
  • Similarly, 78 % of businesses favour marketing automation, which has helped them reach a higher ROI in less than a year.

Future of Marketing Automation

With the rise of digital marketing, marketing automation has become an essential component of every company’s marketing strategy, with a dedicated budget set aside for it. As online businesses grow, digital marketing automation will undoubtedly continue to evolve.

Here are some marketing automation predictions for the future.

  • AI technologies are fast rising in response to the expansion of digital business transformation, allowing business owners to acquire more insights than the old way of automation.
  • Since chatbots are becoming more important for every website to convert leads into sales, every B2b company is incorporating the same strategy into their websites.
  • CRM software’s use grows as it becomes more connected with business tools. There is no need for a marketing automation briefing without CRM technologies. CRM assists business owners in truly understanding the step-by-step process of a consumer accessing a website, where they are loading, where they are exiting, and when converted from leads to sales. The business will earn far more in the future due to this complete analysis.

    Top 10 Benefits of Marketing Automation

1. Nurture Leads More Effectively

Another great benefit of marketing automation is that it helps you target your customers more effectively. Automated marketing tools allow you to segment your customer base and send them targeted messages based on their interests and needs. This can result in increased engagement and better ROI. In short, marketing automation and how it can help your business grow!

Marketing automation tools, such as live chat, can save you time discovering the right consumers you require for your business. All your website visitors want to do is click on the chat menu, select the desired flow, and follow the steps prompted by the automation flow.

However, for complicated questions and concerns, you should always include the option of speaking directly with the agents or sales rep.

2. Generate More Qualified Leads

Working in an admin role can send one into a seemingly endless cycle of paperwork, emails, and phone calls, but it doesn’t have to be that way.
Marketing automation allows companies to streamline their marketing processes, saving them time and money in the long run. Instead of hiring a full-time marketing department or agency, companies can use marketing automation software to try their own marketing essentially.

That’s why we highlighted how marketing automation might improve lead generation, resulting in more sales and a higher organic customer rate.
Marketing generation aims to increase your chances of converting prospects into leads, which can then be converted into sales with less effort and no loss of money.

This is accomplished through a marketing automation tool that tracks your leads and allows users to use the link to retarget website visitors who do not convert; this strategy will undoubtedly improve your CRO.

You may also use a tool like Pabbly to analyse your marketing approach and plan to convert visitors into buyers.

3. Track & Analyse Campaigns

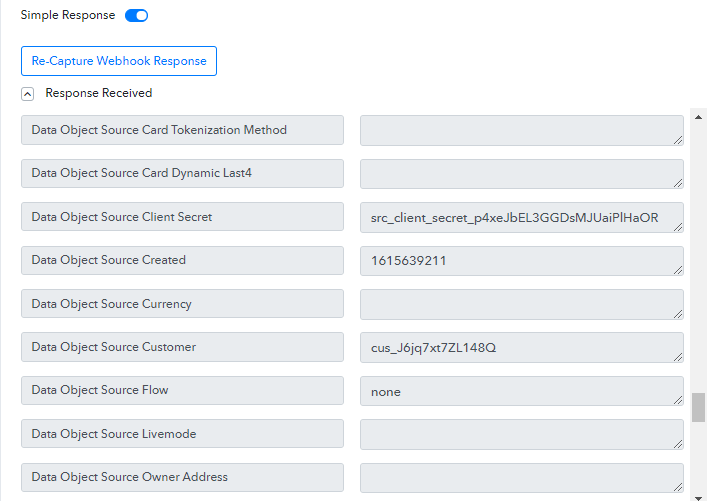
Getting an accurate analysis of your sales analytics can be a difficult task. Still, it won’t be so difficult if you use a tool like Pabbly, which allows you to get an accurate analytical report with prior data in a short amount of time.


Track & Analyse Campaigns


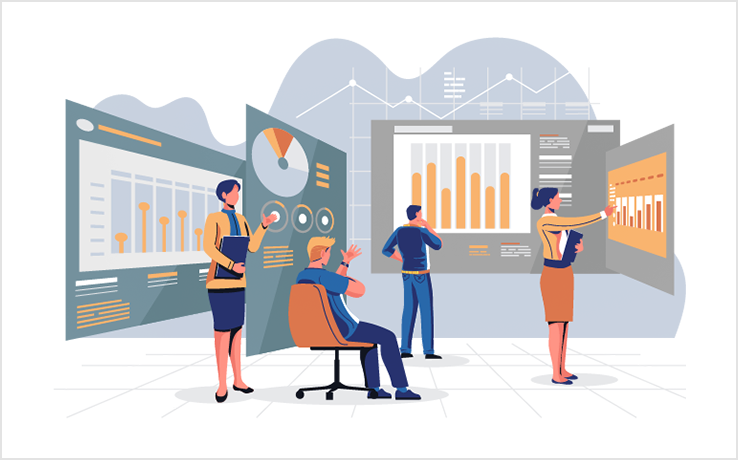
You can get the tough and frictional spots where you should maintain and improve your sales talent with the help of marketing automation tools.

Marketing automation tools help business owners understand the ups and downs of their marketing initiatives by projecting lead dropoff during an email campaign or during the sales process.

4. Personalized Messaging Benefits Marketing Strategy

Today, to grow your business successfully, you need to establish a personalized marketing strategy, which will allow you to target your prospective and existing clients with the most relevant content.

With report categorisation, personalised content may be created by identifying which flow works best and which does not.

Marketing automation allows you to target your persona across several media platforms, including social media, search ads, and email campaigns.

How is personalized messaging achieved with marketing automation?

Marketing automation will convert your website visits into leads, and once you know who they are, you can segment them based on their behaviour and qualities.

Personalise the entire lead nutrition process, such as inviting your leads hosted by your team.

Lead nurturing, for example, is the process of increasing customer engagement by sharing relevant content or information with them even if they aren’t actively looking for the product or service.

You may deliver customised emails to your leads and track their engagement score in this way.

5. Lead Scoring Technique For Getting More Leads

Lead scoring is a practice used by marketers to analyse email responses to website activity and form completions to determine how well a particular content or product resonates with an audience.

Once a prospect is deemed highly valuable and worthy of further conversation, or shortly after, the marketer should move the lead from “marketing automation” to “sales automation.”

Understand, Lead scoring is a technique that you can use to determine your leads’ value based on their behaviour. It’s useful because marketing automation tools can score leads automatically.

If your passion is to create the best customer experiences, a challenge can be using all the data that marketing automation produces. Luckily, lead scoring can make it easier for you to identify hot leads interested in your products or services.

6. Marketing Automation Helps To Manage Data

Email marketing, marketing automation, and CRM are the three pillars of a successful digital marketing strategy. For email marketing, data management is considered the foundation of the entire marketing process. Use an effective data management strategy to manage email data effectively to send targeted campaigns and improve your customer’s engagement.

A marketing automation platform (MAP) is a type of cloud-based software designed to help businesses create targeted, automated marketing campaigns. These campaigns often consist of email, social media, and text messages, and they combine data from different systems to develop and track movements. This is where the benefits of marketing automation lie.

MAPs can also track customers’ behaviour (e.g. social media activity, emails opened, website pages viewed, etc.) and use this information to create personalised campaigns.

7. Marketing and Sales Goes Hand in Hand

Marketing automation revolutionises how businesses market to their customers and is a crucial element in any company’s growth strategy. When marketing and sales are aligned, companies can maximize profits and visibility.


Marketing and Sales Goes Hand in Hand


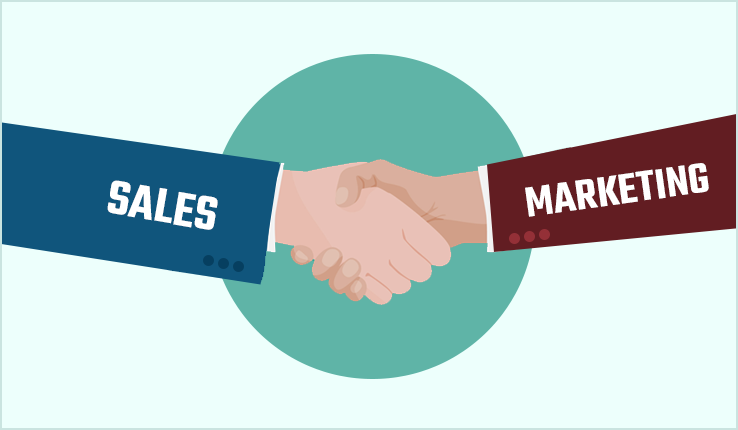
Marketing automation and sales alignment should go hand-in-hand, and many companies have tried using marketing automation tools for sales, but sales still haven’t seen the benefits.

One secret to successful sales enablement is aligning sales and marketing, which means that both teams need to be on the same page.
According to statistics, marketing automation can result in a 15.5 percent increase in revenue and a 13.2 percent decrease in marketing costs.
When your sales staff boosts productivity through calls, you’ll need to spend more time planning how to increase the conversation rate to mix sales and marketing.

8. Marketing Automations Boost Customer Lifetime Value

Marketing automation helps brands boost repeat customer purchases. A recent study by eDigitalResearch showed that 90% of marketers believe that customers are more valuable if they buy a product or service from a brand more than once.

This statistic is promising, as it suggests that companies see repeat customers as more valuable than one-time customers. For brands, this also means there are opportunities for marketing automation to increase the value of repeat customers.

9. Automation Improves ROI and Lead Conversion

For most business owners, marketing is one of the hardest parts of running a business. Marketing knows no boundaries. It encompasses social media, email marketing, trade shows, print ads, pay-per-click and many other online methods. However, it’s no longer enough to create marketing tactics.

B2B marketers benefit the most in areas where statistics show there is much room for development in terms of conversion and quick ROI.

Using tools like Pabbly will make your job easier and allow you to focus on what your customers want. By displaying your product or service across multiple channels, hiring an appropriate marketing strategy, and successfully generating and nurturing leads, you can expect better conversion and profit results.

Bottom Line:

Marketing automation has dramatically changed how companies market to and engage their customers.

You can increase marketing, spend efficiency, reduce marketing costs, improve campaign delivery, and positively impact your customer relationships with the help of marketing automation.

Overall, automation is an amazing way to improve your marketing and business processes. By taking the time to research and plan how you will use automation tools, you can greatly increase your efficiency and customer satisfaction. Have you tried using marketing automation in your business? If not, what’s stopping you when you have a tool like Pabbly in the market? Let us know in the comment.

Thanks for reading!

How to add Pabbly Connect webhooks in Zoom account?

In this documentation, we will learn how to add the Pabbly Connect webhook URL in your Zoom account.

Follow the steps mentioned below in order – 

For Webhooks connection to Pabbly Connect, follow these steps:

  1. Login to Zoom account.
  2. Navigate to left sidebar Admin > Advanced > App Marketplace.
  3. Open Zoom App Marketplace.
  4. Select “Build App” from the “Develop” drop-down menu in the top right corner

How

5. Choose the App type as Webhooks Only

How

6. Click on Create button.

7. Give a name to your Webhooks Only app.

How


8. Provide Information Details

How

9. Navigate to the “Feature” tab. Enable the “Event Subscription” option. Copy the Webhook URL and Paste the copied URL into the Event notification endpoint URL field and validate it then click the “Add events” button to choose the events you would like to be notified of.


How


How

10. Once you’re done with setting up the webhook in your Zoom account, simply click on “Save & Send Test Request” button, and then do the corresponding trigger event on your Zoom account.

How

That’s it you need to do. Incase you have any questions, please reach out to the support team here for any assistance – forum.pabbly.com

How to Send Telegram Messages for New Form Submissions

Have you ever tried sending messages for every new form submission?

How to Send Telegram Messages for New Form Submissions

Maybe you have but what if I tell you, you can automate this task without coding. Yes! In this article, I’m going to walk you through the step by step procedure to integrate Gravity Forms and Telegram using Pabbly Connect.

Pabbly Connect is an automation and integration tool that helps you connect unlimited premium applications to automate manual & routine tasks in real-time.

Most importantly, you only have to follow this procedure once after that the created workflow will automatically send messages on form submissions.

Why Choose This Method Of Integration?

In contrast with other integration services-

  • Pabbly Connect does not charge you for its in-built apps like filters, Iterator, Router, Data transformer and more
  • Create “Unlimited Workflows” and smoothly define multiple tasks for each action
  • As compared to other services which offer 750 tasks at $24.99, Pabbly Connect offers 50000 tasks in the starter plan of $29 itself
  • Unlike Zapier, there’s no restriction on features. Get access to advanced features even in the basic plan
  • Try before you buy! Before spending your money, you can actually signup & try out the working of Pabbly Connect for FREE

Sign Up To Pabbly Connect  

Before heading straight to the procedure, let’s first discuss Gravity forms and Telegram. Gravity Forms is an online form builder software. Whereas, Telegram is a freeware messaging application.

By integrating Gravity Forms with Telegram we are going to automatically send messages for every new form submission. This way, whenever a form is submitted on the connected Gravity Form, a message will be sent automatically on the Telegram group.

Also, you can check out the video tutorial given below for this automation.

Additionally, click on the image given below and copy the workflow template for this integration this will help you get started more quickly. Moreover, you can also visit the Pabbly Connect Marketplace to explore more such integrations & apps.

Send Telegram Messages for New Form Submissions

Now, without further ado let’s discover the Gravity Forms and Telegram integration.

Step 1: Sign up to Pabbly Connect

Sign Up

Begin the procedure to auto send Telegram messages for new form submission by visiting the Pabbly Connect website. Next, click on the ‘Sign-Up Free‘ button available here. Further, either directly sign-in using an existing Google account or register manually by filling the sign-up form.

Try Pabbly Connect for FREE

Step 2: Access Pabbly Connect

Select Connect

Subsequent to successfully logging in, click on the ‘Access Now’ button of the service ‘Connect’ amidst all the other Pabbly applications.

Step 3: Workflow for Gravity Forms and Telegram Integration

(a) Start with a New Workflow

Create New Workflow

Then, start with creating a workflow for Gravity Forms to Telegram integration & for this click on the ‘Create Workflow’ button available on your Pabbly Connect dashboard.

(b) Name the Workflow

Workflow to Send Telegram Messages for New Form Submissions

Enter a workflow name based on your integration or use-case (for instance: Gravity Forms to Telegram etc). After that, click on the ‘Create’ button.

Step 4: Setting Trigger for Gravity Forms to Telegram Integration

At first, we’ll set up a trigger condition on the new Gravity Form entries using Pabbly Connect.

(a) Select Application you want to integrate

Integrate Gravity Forms to Send Telegram Messages for New Form Submissions

After naming your workflow, select the trigger condition app as ‘Gravity Forms’ from the ‘Choose App’ drop-down choices.

(b) Select Event & Copy Webhook URL

Select Event & Copy Webhook URL to Send Telegram Messages for New Form Submissions

Next, select the trigger event option as ‘New Response’ & also copy the webhook URL given.

Step 5: Connecting Gravity Forms to Pabbly Connect

To connect and gather the form data, we need to set-up webhook on your WordPress plugin settings. For this first, log into your WordPress website where you already have the Gravity Forms plugin installed.

(a) Go to the WordPress Plugins

Plugins Add New

On your WordPress dashboard, click on the ‘Plugins’ option from the left vertical menu. Then, click on ‘Add New’ from the secondary menu that opens next. And install the ‘Gravity Forms Webhook Add-on’.

If you already have the plugin installed, skip the installation step.

(b) Make Sure You Have Gravity Forms Plugin Installed

Installed Gravity forms Plugin

Now, after successfully installing the plugin, go to the installed plugin section.

(c) Go to PHP Workshop

Edit PHP Workshop Forms

Next, click on the ‘Forms’ option available in the left verticle menu. A page will open up containing all form, click on the ‘Edit’ link of the form that you want to connect.

(d) Add New Webhook

Add New Webhook

Now, go to the Form Settings by clicking on the ‘Settings’ tab from the menu.

On this section, click on the ‘Webhooks’ option available in the left-verticle menu.

Then, click on the ‘Add New’ button.

(e) Paste Webhook URL

Paste Webhook URL to Send Telegram Messages for New Form Submissions

Name the Webhook and then paste the copied webhook URL into the ‘Request URL’ field.

Lastly, click on the ‘Update Settings’ button.

Step 6: Test the Response in Pabbly Connect Dashboard

As we can see, we are done setting up the trigger for Gravity Forms and Telegram integration. So, let’s test the Gravity Forms trigger by submitting a test form.

(a) Capture Webhook Response

Capture Webhook Response to Send Telegram Messages for New Form Submissions

First, click the ‘Capture Webhook Response’ button available in the trigger window.

(b) Go to the Connected Form & Make a Test Purchase

Submit Test Form to Send Telegram Messages for New Form Submissions

Next, go to the recently connected Gravity Form & fill in all the required form details. Lastly, ‘Submit’ the test form.

(c) Check & Save the Trigger API Response

Trigger Response to Send Telegram Messages for New Form Submissions

Check the form data in the Gravity Forms trigger response & save it.

Step 7: Setting Action for Gravity Forms to Telegram Integration

We have the test data from the trigger response, we will use this data in the action settings for further automation.

(a) Select Application you want to Integrate

Integrate Telegram Bot to Send Telegram Messages for New Form Submissions

Click on the plus button that is next to your Gravity Forms trigger window.

Select the Choose App field value as ‘Telegram Bot’.

(b) Select Event & Connect with Telegram

Select Action Event & Connect to Send Telegram Messages for New Form Submissions

Next, select the action event as ‘Send a Text Message or a Reply’ and click ‘Connect’.

Step 8: Connecting Telegram to Pabbly Connect

Our next step is to connect the Telegram account with Pabbly Connect. For this first, log in to your Telegram account.

(a) Click on the BotFather Link

Click the BotFather Link

In the connection window that slides in from the right. Either click on the BotFather link available in the help text or access the ‘BotFather’ chat window by typing ‘BotFather in the Telegram app’s search.

(b) Click Start on BotFather Chat

Click Start on BotFather Chat

Next, in the BotFather chat window, click on ‘START’.

(c) Create a New Bot

Create New Bot

Now, create a new bot by typing the command ‘/newbot’ & then hit Enter or Send button.

(d) Name Your Created Bot

Bot Name to Send Telegram Messages for New Form Submissions

Next, the system asks for a bot name. Type a bot name that you want to assign to the recently created bot & then click on send.

(e) Enter a Bot Username

Bot Username to Send Telegram Messages for New Form Submissions

Lastly, feed a username for the created bot that must end with the suffix ‘bot’.

(f) Copy the Token

Token to Send JotForm Submissions to Telegram Account

You’ll see a token generated for the recently created bot, simply select and copy it.

(g) Paste the Token

Paste the Telegram Token

Paste the copied Telegram token in the connection window & click on ‘Save’.

(h) Create Telegram Group

Create Group to Send Telegram Messages for New Form Submissions

Now, create a group on your Telegram account, add members to it, remember to add the created bot in the group and also promote the bot as the admin of the group.

(I) Copy Chat ID

Copy Chat ID to Send Telegram Messages for New Form Submissions

When you open your account on a browser window. You’ll get the Chat Id in the group’s URL. The digit sequence between ‘=<some_letter>’ and underscore is your chat ID, copy this digit sequence.

You can also refer to the help text below about the Chat ID field in the connection window.

(j) Paste Chat ID & Create Message

Map Values to Send Telegram Messages for New Form Submissions

Now, paste the copied Telegram group Chat ID in the Chat ID field with the prefix ‘-100’ for a private channel message.

Also, draft a message to send to your team by combining the trigger response values with some plain text. To use the simply place our cursor in the Text Message field, a drop-down containing all the trigger response values will open up. Simply find and select the response that you want to use.

(k) Send Test Request

Send Test Request for Action to Send Telegram Messages on Form Submissions

Now, click on ‘Save & Send Test Request’.

(l) Check & Save the Action Response

Save Action Response to Send Telegram Messages for New Form Submissions
Certainly, you can check & save the Telegram action response from the Action response window.

Step 9: Check Response in Telegram

Telegram Messages for New Form Submissions

Lastly, check the message on the connected Telegram group. You can also make multiple test form entries and check the automation response yourself.

Conclusion –

To sum up, this was all about ‘How to send telegram messages for new form submissions’. Consequently, after completing the step by step procedure, you will end up sending Telegram messages automatically for every new Gravity Forms submissions.

Now, create your own account on Pabbly Connect for FREE with all its premium features and automate your routine tasks.

Do share your feedback on this integration in the comment section below.

You May Also Like to Read:

How to Notify Team Members about Stripe Payments

Want to know the easiest way to automatically notify your team about every new payment?

How to Notify Team Members about Stripe Payments

If yes then you definitely need to follow this step by step procedure. As I’m going to integrate Stripe with Telegram without any hard coding using the Pabbly Connect service.

Pabbly Connect is an easy to use automation software that helps you to integrate multiple services together to automate manual & daily tasks in real-time. Moreover, you can create any number of workflows with multi-step calls for automation. Also, you can make use of the in-built tools such as path-routers, filters, formatters etc to format the data as per your requirement.

Another great advantage of using Pabbly Connect for this automation is, you only have to carry out this procedure once, after that, the created workflow will automatically notify your team about every new payment.

Why Choose This Method Of Integration?

In contrast with other integration services-

  • Pabbly Connect does not charge you for its in-built apps like filters, Iterator, Router, Data transformer and more
  • Create “Unlimited Workflows” and smoothly define multiple tasks for each action
  • As compared to other services which offer 750 tasks at $24.99, Pabbly Connect offers 50000 tasks in the starter plan of $29 itself
  • Unlike Zapier, there’s no restriction on features. Get access to advanced features even in the basic plan
  • Try before you buy! Before spending your money, you can actually signup & try out the working of Pabbly Connect for FREE

Sign Up To Pabbly Connect  

Now, let’s discuss Stripe and Telegram a little. Stripe is a renowned payment processing software. Whereas, Telegram is a freeware messaging service.

By integrating Stripe with Telegram I’m going to notify my Telegram team about every new payment. This way, whenever a new is made on Stripe, a Telegram message will be sent instantly.

Additionally, you can follow this video tutorial for this particular automation.

Further, you can click on the image given below to make use of this workflow template. Also, you can have a visit to the Pabbly Connect Marketplace for more integrations and apps.

Notify Team Members about Stripe Payments

Now, buckle up and discover the Stripe and Telegram integration.

Step 1: Sign up to Pabbly Connect

Sign Up

Start the procedure to notify team members about Stripe payments automatically by visiting the Pabbly Connect website. Then, click on the ‘Sign-Up Free‘ button. The next step is to sign-up, either use your existing Google credentials for direct signup or you can simply fill out the registration form.

Try Pabbly Connect for FREE

Step 2: Access Pabbly Connect

Select Connect

After logging in successfully, click on the ‘Access Now’ button of the software ‘Connect’ amongst various Pabbly applications.

Step 3: Workflow for Stripe and Telegram Integration

(a) Start with a New Workflow

Create New Workflow

Further, start with creating a workflow for Stripe to Telegram integration & to do this click the ‘Create Workflow’ button available on the dashboard.

(b) Name the Workflow

Workflow to Notify Team Members about Stripe Payments

Now, name the workflow in the window that pops up as per the integration or use-case (for instance: Stripe To Telegram etc). Lastly, click on the ‘Create’ button.

Step 4: Setting Trigger for Stripe to Telegram Integration

For trigger set up, you’ll need to set up a trigger condition on the new Stripe charges and then its respective action using Pabbly Connect.

(a) Select Application you want to integrate

Integrate Stripe to Notify Team Members about Stripe Payments

Once you name the workflow, a page asking for a trigger condition will open up.

Pick the ‘Stripe’ app from the ‘Choose App’ drop-down options.

(b) Select Event & Connect

Select Event & Copy Webhook URL to Notify Team Members about Stripe Payments

Select the event as ‘New Chanrge’ & then click on ‘Copy’.

Step 5: Connecting Stripe to Pabbly Connect

(a) Go to Your Stripe Account & Add an Endpoint

Developer Webhook Add EndPoint

Log in to your Stripe account and then click on the ‘Developers’ option available in the left verticle menu. A secondary menu will open up, click on the ‘Webhook’ option from it.

Lastly, push the ‘Add endpoint’ button.

(b) Add the Endpoint on Stripe

Add Endpoint for Stripe to Salesforce

In the next pop-up window, paste the copied Webhook URL in the ‘Endpoint URL’ field. Also, select the event as ‘customer.succeeded’, then click on the ‘Add endpoint’ button.

Step 6: Test the Response in Pabbly Connect Dashboard

As we can see, we are done setting up the trigger for the Stripe and Telegram integration. So, let’s test the Stripe trigger by making a test request.

(a) Capture Webhook Response

Capture Webhook respose to Notify Team Members about Stripe Payments

Now first, click on the ‘Capture Webhook Response’ button available in your Pabbly Connect trigger window.

(b) Make a Test Payment

Make a Payment to Notify Team Members about Stripe Payments

Now, make a test payment by selecting the payment type, amount, current and then add a customer.

(c) Click on Submit Payment

Submit a Payments to Notify Team Members about Stripe Payments

Enter all the required information in the payment form and click on ‘Submit payment’.

(d) Check and Save the Trigger API Response

Check & Save Trigger Response to Notify Team Members about Stripe Payments

Check the Stripe trigger API response, you’ll notice that some data is inappropriate and the customer data isn’t even available.

Step 7: Retrieve Stripe Customer Details

(a) Select Application you want to Integrate

Retrieve a Customer to Notify Team Members about Stripe Payments

First, click on the plus button that is available next to your trigger window.

To retrieve the customer details, select the ‘Stripe’ app from the ‘Choose App’ field’s drop-down options.

Select the action event as ‘Retrieve a Customer’ and then click the ‘Connect’ button.

(b) Go to your Stripe Account & Reveal the API Key

Reveal API Key

Now, go back to your Stripe account & click on the ‘Developers’ option from the menu.

In the secondary menu, click on the API keys option.

Lastly, click on the ‘Reveal test key’ button available next to the Secret key.

(c) Copy the API Key

Copy API Key for Stripe to ConvertKit

Click on the revealed API key and it will get automatically copied to the clipboard.

(d) Paste the Stripe API Key on Pabbly Connect

Paste Stripe API Key for Stripe to ConvertKit

Paste the copied Stripe API key on the connection window.

(e) Map Fields & Send Test Request

Map Customer ID to Notify Team Members about Stripe Payments

Now, map the customer id with the field provided.

And then click on the ‘Save & Send Test Request’ button.

(f) Check API Response & Save

Check & Save Customer Response to Notify Team Members about Stripe Payments

You can check all the customer details in the response.

Also, save the Stripe API response.

Step 8: Trim Amount

(a) Select Application you want to Integrate

Integrate API to Notify Team Members about Stripe Payments

You have also noticed the amount value in the trigger response is not exactly the value entered while making the test payment.

So, we need to trim the amount here for this click on the plus button next to your Stripe action window.

And then select the ‘API’ option for the Choose App field and ‘GET’ as the Action Event.

Also, paste ‘https://forms.pabbly.com/api/trim_amount’ in the endpoint URL field.

(b) Map Amount & Send Test Request

Map Amount to Notify Team Members about Stripe Payments

Tick select the ‘Set Parameters’ checkbox and mention the field value as ‘amount’.

Next, map the amount from the gathered trigger response and click on the ‘Save & Send Test Request’ button.

(c) Check & Save the Trimmed Amount Response

Correct Amount to Notify Team Members about Stripe Payments

Check the success status and the correct amount value in the response and ‘Save’ this.

Step 9: Setting Action for Stripe to Telegram Integration

Now, we have gathered the Stripe charge data. So, now let’s move forward to the action step. After that, a message will be delivered automatically whenever a new Stripe charge is made.

(a) Select Application you want to Integrate

Integrate Telegram to Notify Team Members about Stripe Payments

Click on the plus button available next to your Stripe trigger window.

Select the app to integrate here as ‘Telegram Bot’.

(b) Select Event & Connect with Telegram

Telegram Event & Connect to Notify Team Members about Stripe Payments

Next, select the action event option as ‘Send a Text Message or a Reply’.

Then, click the ‘Connect’ button.

Step 10: Connecting Telegram to Pabbly Connect

Our next step is to connect Telegram with Pabbly Connect. For this first, sign in to your Telegram account.

(a) Click on the BotFather Link

Click the BotFather Link

In the Pabbly Connect connection window that slides in from the right. Click on the BotFather link available in the help text or type ‘BotFather’ in your Telegram App search.

(b) Click Start on BotFather Chat

Click Start on BotFather Chat

Next, in the BotFather chat window, click on the ‘START’ button.

(c) Create a New Bot

Create New Bot

Now, create a new bot by typing ‘/newbot’ & then click Enter/Send button.

(d) Name Your Created Bot

Enter Botname to Notify Team Members about Stripe Payments

Next, it’ll ask you for a bot name. So, type a bot name that you want to give to the recently created bot & then hit the send.

(e) Enter a Bot Username

Bot Username to Notify Team Members about Stripe Payments

Lastly, fill in a username for the created bot that ends with the suffix ‘bot’.

(f) Copy the Token

Token to Send JotForm Submissions to Telegram Account

You’ll see a token is generated for the created bot, simply select and copy it.

(g) Paste the Token

Paste the Telegram Token

Paste the copied token in the connection window & click on ‘Save’.

(h) Create Telegram Group

Create Group to Notify Team Members about Stripe Payments

Now, create a group on the connected Telegram account, add members along with the created bot and remember to promote the bot as the admin of the group.

(I) Copy Chat ID

Copy Chat ID to Notify Team Members about Stripe Payments

In the group URL, the digit sequence between ‘=<some_letter>’ and underscore is the chat ID, copy this digit sequence from the URL. Also, you can refer to the help text below the Chat ID field in the Connection window.

(j) Paste Chat ID & Create Message

Paste Chat ID to Notify Team Members about Stripe Payments

Now, paste the copied Chat ID in the Chat ID field with the prefix ‘-100’ for a private channel message.

Also, create a message to send to your team by combining the trigger response values and some plain text.

(k) Send Test Request

Send Test Request for Action to Send Telegram Messages on Form Submissions

Now, click on ‘Save & Send Test Request’.

(l) Check & Save the Action Response

Action Response to Notify Team Members about Stripe Payments
Certainly, you can check & save the Telegram action response. If there’s been some error while sending the data then the response window will start showing you an error message.

Step 11: Check Response in WhatsApp

Final Message to Notify Team Members about Stripe Payments

Lastly, check the message on the connected Telegram account.

Conclusion –

This was all about ‘How to notify team members about Stripe payments’. Consequently, after completing this procedure, you will end up notifying your team about every new Stripe payment automatically.

You can also use Pabbly Connect for FREE with all its premium features.

Also, share your experience with this automation in the comment section below.

You May Also Like to Read:

How to Send JotForm Submissions to Telegram Account

Tired of manually sending form submission notifications on Telegram?

How to Send JotForm Submissions to Telegram Account

Then, you can try automating this using Pabbly Connect. In this article, I’m going to walk you through the step by step procedure to automatically send JotForm submissions to Telegram account. The best part about this automation is, you don’t need to have any prior coding knowledge. Plus, you only have to create the Workflow once and after that, it’ll automatically notify you about the upcoming form submissions.

Pabbly Connect is an easy way to integrate services and automate manual & repetitive work in real-time. You can create any number of workflows along with multi-step calls for automation. Moreover, you can use many built-in tools such as path-routers, filters, formatters etc to format the data as per your requirement.

Why Choose This Method Of Integration?

In contrast with other integration services-

  • Pabbly Connect does not charge you for its in-built apps like filters, Iterator, Router, Data transformer and more
  • Create “Unlimited Workflows” and smoothly define multiple tasks for each action
  • As compared to other services which offer 750 tasks at $24.99, Pabbly Connect offers 50000 tasks in the starter plan of $29 itself
  • Unlike Zapier, there’s no restriction on features. Get access to advanced features even in the basic plan
  • Try before you buy! Before spending your money, you can actually signup & try out the working of Pabbly Connect for FREE

Sign Up To Pabbly Connect  

Now, let’s discuss the JotForm and Telegram a little. JotForm is a form builder software to create dynamic forms. Whereas, Telegram is a freeware messaging software.

By integrating JotForm with Telegram I’m going to automatically send a form submissions message on Telegram. This way, whenever a new form is submitted on JotForm, a Telegram message will be sent instantly.

Additionally, you can also have a look at the video tutorial below for this particular automation.

Further, you can click on the image given below to make use of this workflow template. Also, you can also go to the Pabbly Connect Marketplace for more integrations and apps.

Send JotForm Submissions to Telegram Account

Now, buckle up and discover the JotForm and Telegram integration.

Step 1: Sign up to Pabbly Connect

Sign Up

Start the procedure to send JotForm submissions to the Telegram account automatically by visiting the Pabbly Connect website. Then, click on the ‘Sign-Up Free‘ button. The next step is to sign-up, either use your existing Google credentials for directly signing up or you can simply fill out the registration form.

Try Pabbly Connect for FREE

Step 2: Access Pabbly Connect

Select Connect

After logging in, click on the ‘Access Now’ button of the software ‘Connect’ amongst all the Pabbly applications.

Step 3: Workflow for JotForm and Telegram Integration

(a) Start with a New Workflow

Create New Workflow

Further, start with creating a workflow for JotForm to Telegram integration & to do this click the ‘Create Workflow’ button available on the dashboard.

(b) Name the Workflow

Workflow for JotForm to TypeForm Integration

Now, name the workflow in the window that pops up as per the integration or use-case (for instance: JotForm To Telegram etc). Lastly, click on the ‘Create’ button.

Step 4: Setting Trigger for JotForm to Telegram Integration

For trigger set up, you’ll need to set up a trigger condition on the new JotForm entry and then its respective action using Pabbly Connect.

(a) Select Application you want to integrate

Integrate JotForm to Send JotForm Submissions to Telegram Account

After naming the workflow, a page will open up bearing the trigger window settings.

Pick the ‘Zoom’ app from the ‘Choose App’ drop-down choices.

(b) Select Event & Connect

Select Action Copy URL to Send JotForm Submissions to Telegram Account

Select the event as ‘New Entry’ & then click on ‘Connect’.

Step 5: Connecting JotForm to Pabbly Connect

(a) Edit the JotForm

Edit Form to Send JotForm Submissions to Telegram Account

To connect JotForm with Pabbly connect first, you need to log in to your JotForm account. Then, on ‘Edit Form’ available next to the form that you want to connect.

(b) Go to Form Settings Then Integrations

Click on Integartion to Save New JotForm Form Submissions to Google Sheets

Next, click on the ‘Settings’ option available in the top menu.

Another vehicle menu will appear, click on the ‘Integrations’ option in this menu.

(c) Click on Webhooks

Click on Webhook to Save New JotForm Form Submissions to Google Sheets

Then, search for the ‘Webhooks’ option and click on it.

(d) Paste Webhook URL

Paste the Copied URL

Now, paste the copied webhook URL in the Add Webhook field.

(e) Finish the Setup

Click on Finish

Lastly, click on the ‘Finish’ button.

(f) Click on Publish

Publlish to Send JotForm Submissions to Telegram Account

Next, click on ‘Publish’.

Step 6: Test the Response in Pabbly Connect Dashboard

As we can see, we are done setting up the trigger for the JotForm and Telegram integration. So, let’s test the JotForm trigger by submitting a test form.

(a) Capture Webhook Response

Capture Webhook Response to Send JotForm Submissions to Telegram Account

The first thing to do is, click on the ‘Capture Webhook Response’ button available in the Pabbly Connect trigger window.

(b) Submit a Test Form

Submit a Form to Send JotForm Submissions to Telegram Account

Now, open the created form in a new tab and make a test submission. For this, simply fill in all the required information and click ‘Submit’.

(c) Check and Save the Trigger API Response

Trigger Response to Send JotForm Submissions to Telegram Account

Check the JotForm trigger API response and click on ‘Save’.

Step 7: Setting Action for JotForm to Telegram Integration

Now, we have gathered the JotForm data. So, let’s perform the action step. After that, a message will be delivered automatically whenever a new form submission happens.

(a) Select Application you want to Integrate

Integrate Telegram to Send JotForm Submissions to Telegram Account

Click on the plus button available next to your JotForm trigger window.

Select the app to integrate here as ‘Telegram Bot’.

(b) Select Event & Connect with Telegram

Select Event & Connect with Telegram to Send Telegram Messages on Form Submissions

Next, select the event as ‘Send a Text Message or a Reply’.

Lastly, click the ‘Connect’ button.

Step 8: Connecting Telegram to Pabbly Connect

Our next step is to connect Telegram with Pabbly Connect. For this first, log in to your Telegram account.

(a) Click on the BotFather Link

Click the BotFather Link

In the Pabbly Connect connection window that slides in from the right. Click on the BotFather link or simply type ‘BotFather’ in your Telegram App search.

(b) Click Start on BotFather Chat

Click Start on BotFather Chat

Next, click on the ‘START’ button.

(c) Create a New Bot

Create New Bot

Now, create a new bot by typing ‘/newbot’ and then hit Enteror send button.

(d) Name Your Created Bot

Botname to Send JotForm Submissions to Telegram Account

Next, it’ll ask you for a bot name. So, type a bot name that you want to give to the recently created bot & then hit the send.

(e) Enter a Bot Username

Bot Username to Send JotForm Submissions to Telegram Account

Lastly, feed a username for the created bot that ends with a suffix ‘bot’.

(f) Copy the Token

Token to Send JotForm Submissions to Telegram Account

You’ll see a token for the created bot, copy it.

(g) Paste the Token

Paste the Telegram Token

Paste the copied token in the connection window and then click on ‘Save’.

(h) Create Telegram Group

Group to Send JotForm Submissions to Telegram Account

Now, simply create a group on the connected Telegram account, add members to the group, also add the created bot and remember to promote it as the admin of the group.

(I) Copy Chat ID

ChatID to Send JotForm Submissions to Telegram Account

In the group URL, the digit sequence between ‘=’ and underscore is the chat ID, copy this digit sequence. Also, the information about the Chat ID is given in the help text below the Telegram action ‘Chat ID’ field, which you can refer to.

(j) Paste Chat ID & Create Message

Map to Send JotForm Submissions to Telegram Account

Now, paste the copied Chat ID with the prefix ‘-100’ for a private channel message.

Also, create a message by combining the trigger response and plain text. To use a response value, simply click on the ‘Text Message’ area and then click select the value from the gathered trigger response.

(k) Send Test Request

Send Test Request for Action to Send Telegram Messages on Form Submissions

Now, click on ‘Save & Send Test Request’.

(l) Check & Save the Action Response

Save Action Response to Send JotForm Submissions to Telegram Account
Certainly, you can check and save the Telegram response in the action window. And, if there’s been some error while sending the data then the window will start showing you an error.

Step 9: Check Response in WhatsApp

Response on Telegram to Send JotForm Submissions to Telegram Account

Lastly, check the message on the connected Telegram account.

Conclusion –

This was all about ‘How to send JotForm submissions to Telegram account’. Consequently, after completing this procedure, you will end up sending form submission messages from JotForm to Telegram automatically.

Until then, you can try Pabbly Connect for FREE with all its premium features.

Also, leave a comment about this automation in the comment section below.

You May Also Like to Read:

How to Send WhatsApp Message on New Form Submission

How to Send WhatsApp Message on New Form Submission

Are you looking for some way to send a WhatsApp message on every new form submission automatically?

How to Send WhatsApp Message on New Form Submission

If yes then in this article, I’m going to demonstrate the complete step by step procedure. For this, we need to integrate both the services and to avoid any programming or hard coding we are going to use Pabbly Connect.

Pabbly Connect is an easy to use automation tool that can help you integrate multiple applications together to automate manual & routine tasks in real-time.

Moreover, you only have to do the set-up once after that your created workflow will automatically send a WhatsApp message whenever a new form is submitted.

Why Choose This Method Of Integration?

In contrast with other integration services-

  • Pabbly Connect does not charge you for its in-built apps like filters, Iterator, Router, Data transformer and more
  • Create “Unlimited Workflows” and smoothly define multiple tasks for each action
  • As compared to other services which offer 750 tasks at $24.99, Pabbly Connect offers 50000 tasks in the starter plan of $29 itself
  • Unlike Zapier, there’s no restriction on features. Get access to advanced features even in the basic plan
  • Try before you buy! Before spending your money, you can actually signup & try out the working of Pabbly Connect for FREE

Sign Up To Pabbly Connect  

Before starting the procedure, let’s first discuss a little about Gravity forms and WhatsApp. So basically Gravity Forms is a form builder software. Whereas, WhatsApp is a freeware messaging & voice-over-IP application by Facebook.

From this particular integration, we are going to accomplish automatic message sending on new form submissions. This way, whenever a form is submitted via. Gravity Forms, a message is sent automatically on the registered WhatsApp number.

Also, below is a video tutorial for this automation. Check it out-

Additionally, a template for this integration is also linked below to help you get started more quickly. You can use this workflow template by simply clicking on the image given below. Further, you can also visit the Marketplace for more such integrations & apps.

Send WhatsApp Message on New Form Submission

Now, without further ado let’s discover the Gravity Forms and WhatsApp integration.

Step 1: Sign up to Pabbly Connect

Sign Up

Start the procedure to auto send WhatsApp message on new form submission by visiting the Pabbly Connect website. Next, click on the ‘Sign-Up Free‘ button available at the top of the page. Further, you’ve two choices either sign in using your existing Google account or register by filling in the sign-up form.

Try Pabbly Connect for FREE

Step 2: Access Pabbly Connect

Select Connect

After successfully logging in to your Pabbly account, click on the ‘Access Now’ button of the service ‘Connect’ amongst all the other Pabbly applications.

Step 3: Workflow for Gravity Forms and WhatsApp Integration

(a) Start with a New Workflow

Create New Workflow

Further, start with creating a workflow for Gravity Forms to WhatsApp integration & for this click on the ‘Create Workflow’ button available on your dashboard.

(b) Name the Workflow

Workflow to Send WhatsApp Message on New Form Submission

In the Create Workflow window, simply assign a name as per the integration or use-case (for instance: Gravity Forms to WhatsApp etc). Lastly, click on ‘Create’.

Step 4: Setting Trigger for Gravity Forms to WhatsApp Integration

First, you’ll need to set up a trigger on the new Gravity Forms and then its respective action using Pabbly Connect.

(a) Select Application you want to integrate

Integrate Gravity forms to Send WhatsApp Message on New Form Submission

After naming the workflow, you can select a trigger condition. First, choose ‘Gravity Forms’ from the ‘Choose App’ drop-down options.

(b) Select Event & Copy Webhook URL

Select Event & Copy Webhook URL to Send WhatsApp Message on New Form Submission

Next, select the trigger event as ‘New Response’ & then copy the webhook URL.

Step 5: Connecting Gravity Forms to Pabbly Connect

To connect and gather the form data first, log into your WordPress website where you have the Gravity Forms plugin installed.`

(a) Go to the WordPress Plugins

Plugins Add New to Send WhatsApp Message on New Form Submission

First, log in to your Gravity Forms account then click on the ”Plugins option from the left vertical menu. Then, click on the ‘Add New’ option from the secondary menu that opens next. And install the ‘Gravity Forms Webhook Add-on’.

(b) Make Sure You Have Gravity Forms Plugin Installed

Installed Gravity forms Plugin to Send WhatsApp Message on New Form Submission

Go to the installed plugin section and make sure that you have the ‘Gravity Forms Webhooks Add-On’ installed.

(c) Go to PHP Workshop

Edit PHP Workshop Forms to Send WhatsApp Message on New Form Submission

Next, click on the ‘Forms’ option available in the left verticle menu, scroll down and click on the ‘Edit’ link given for the PHP Workdshop.

(d) Add New Webhook

Add New Webhook to Send WhatsApp Message on New Form Submission

Now, go to the PHP Workshop Settings by clicking on the ‘Settings’ tab of the PHP Workshop menu.

On the PHP Workshop Settings section, click on the ‘Webhooks’ option available in the left-verticle menu.

Then, click on the ‘Add New’ button available next to the Webhooks Feeds head.

(e) Paste Webhook URL

Paste Webhook URL to Send WhatsApp Message on New Form Submission

Name the Webhook as per your need and then paste the copied Pabbly Connect trigger URL into the ‘Request URL’ field.

Lastly, click on the ‘Update Settings’ button.

Step 6: Test the Response in Pabbly Connect Dashboard

As we can see, we are done setting up the trigger for Gravity Forms and WhatsApp integration. So, let’s test the Gravity Forms trigger by submitting a test form.

(a) Capture Webhook Response

Capture Webhook Response to Send WhatsApp Message on New Form Submission

To test the trigger first, click the ‘Capture Webhook Response’ button available in the trigger window.

(b) Go to the Connected Form & Make a Test Purchase

Submit Test Form to Send WhatsApp Message on New Form Submission

Next, go to the recently connected Gravity Form and fill in all the required details. Lastly, click on ‘Submit’.

(c) Check & Save the Trigger API Response

Check & Save the Trigger API Response to Send WhatsApp Message on New Form Submission

Check your data in the Gravity Forms trigger response & save this data.

Step 7: Setting Action for Gravity Forms to WhatsApp Integration

Now, as we have all the data to send a message on WhatsApp message on new form submission. We can use this data to perform our action. After that, a message will be sent for every form entry automatically. We can not send bulk messages directly from WhatsApp Messenger so I’m using Chat API to make this use case possible.

(a) Select Application you want to Integrate

Integrate Chat API to Send WhatsApp Message on New Form Submission

Click on the plus button ‘+’ available next to your Gravity Forms trigger window.

Then, select the Choose App field value as ‘Chat API’.

(b) Select Event & Connect with Gravity Forms

Select Action Event & Connect to Send WhatsApp Message on New Form Submission

Next, pick the action event choice as ‘Send Message’.

Lastly, click the ‘Connect’ button.

Step 8: Connecting Chat API to Pabbly Connect

When you click on the ‘Connect’ button a window will slides in from the right asking for an API URL and token. To complete our action to send WhatsApp messages to Gravity Forms subscribers. First, log in to your Chat API account.

(a) Copy API URL & Token

Copy Chat API URL & Token

You’ll easily get both the required values, simply copy the API URL & token one by one.

(b) Paste the Copied Chat API URL & Token

Paste Chat API URL & Token

And, paste the copied API URL as well as the token in the connection window. Then, click on ‘Save’.

(c) Map Fields & Send Test Request

Map Values to Send WhatsApp Message on New Form Submission

Once the connection between Pabbly Connect and Chat API is established, you’ll notice fields like phone number and message. Map the phone number from the received trigger API response.

To map a value, simply place your cursor in that field. Then, a drop-down will open up, search for an appropriate response value and finally click on it to map with the field.

(d) Send Test Request

Send Test Request For Action to Send WhatsApp Message on New Form Submission

Likewise, you can map the message field also. Additionally, you can use combinations of the response values and the plain text to draft your message.

Lastly, click on the ‘Save & Send Test Request’ button to send a message.

(d) Check & Save Response

Save Action API Response to Send WhatsApp Message on New Form Submission

Certainly, you can check the success of your action in the response window. And, if there’s been some error while sending the data then the window will display an error.

Finally, save the action API’s response.

Step 9: Check Response in WhatsApp

WhatsApp Message on New Form Submission

You can check the WhatsApp message on the mapped phone number.

Conclusion –

To sum up, this was all about ‘How to send WhatsApp message on new form submission’. Consequently, after completing the step by step procedure, you will end up sending WhatsApp messages automatically for every new Gravity Forms submissions.

You can also try Pabbly Connect for FREE with all its premium features to automate your routine tasks.

Please, share your feedback on the integration in the comment section given below.

You May Also Like to Read:

How to Send Telegram Notification for New WooCommerce Orders

How to Send Telegram Notification for New WooCommerce Orders

Are you wondering how you can automatically send notification on Telegram for every new WooCommerce orders?

How to Send Telegram Notification for New WooCommerce Orders

If your answer is Yes! then I can tell you the easiest way to do this, that too without any prior knowledge of programming language or coding. To bring automation to this repetitive task we need to integrate both the services, (WooCommerce and Telegram) and there comes the role of an integration software i.e, Pabbly Connect.

So basically, Pabbly Connect is a cost-effective integration and automation tool that can help you integrate multiple application together to automate routine tasks in real-time. The best part here is, you only have to follow this procedure once and after that, Telegram notifications will be sent automatically for every new order.

Why Choose This Method Of Integration?

In contrast with other integration services-

  • Pabbly Connect does not charge you for its in-built apps like filters, Iterator, Router, Data transformer and more
  • Create “Unlimited Workflows” and smoothly define multiple tasks for each action
  • As compared to other services which offer 750 tasks at $24.99, Pabbly Connect offers 50000 tasks in the starter plan of $29 itself
  • Unlike Zapier, there’s no restriction on features. Get access to advanced features even in the basic plan
  • Try before you buy! Before spending your money, you can actually signup & try out the working of Pabbly Connect for FREE

Sign Up To Pabbly Connect  

First, let us discuss Woocommerce and Telegram a bit. Well, WooCommerce is an open-source e-commerce WordPress plugin. Whereas, Telegram is a freeware instant messaging software.

In this WooCommerce to Telegram integration, I’m going to automatically send Telegram notifications for new WooCommerce orders. This way, whenever your WooCommerce shop receives a new order, a Telegram notification will be sent instantly.

Below is a video tutorial for this integration, you can also refer it follow the automation.

Additionally, you can click on the image below to use this workflow. This can help you get started more quickly. Also, you can visit the Pabbly Connect Marketplace for more such integrations and apps.

Send Telegram Notification for New WooCommerce Orders

Now, get ready as we are going to discover the WooCommerce and Telegram integration.

Step 1: Sign up to Pabbly Connect

Sign Up

Start the procedure to send Telegram notification for new WooCommerce orders automatically by visiting the Pabbly Connect website. Then, click on the ‘Sign-Up Free‘ button. On the sign up page, either use your existing Google credentials to sign-up or simply fill up the form to make a new registration.

Try Pabbly Connect for FREE

Step 2: Access Pabbly Connect

Select Connect

After logging in, click on the ‘Access Now’ button of the software ‘Connect’ out of all the Pabbly applications.

Step 3: Workflow for WooCommerce and Telegram Integration

(a) Start with a New Workflow

Create New Workflow

Start with creating a workflow for WooCommerce to Telegram integration & to do this click the ‘Create Workflow’ button available on the Pabbly Connect dashboard.

(b) Name the Workflow

Workflow to Send Telegram Notification for New WooCommerce Orders

Assign a name to your workflow for example WooCommerce To Telegram. Then, click on the ‘Create’ button.

Step 4: Setting Trigger for WooCommerce to Telegram Integration

For trigger set up, you’ll need to set a condition on the new WooCommerce orders and the respective action on Telegram using Pabbly Connect.

(a) Select Application you want to integrate

Integrate Woocommerce to Send Telegram Notification for New WooCommerce Orders

Once you are done with naming the workflow, a page opens up asking for a trigger condition.

Choose the ‘WooCommerce’ app from the ‘Choose App’ drop-down options.

(b) Select Event & Copy Webhook URL

select_method_and_copy_webhook_url

Select the event as ‘New Order Created’ & then copy the Webhook URL.

Step 5: Connecting WooCommerce to Pabbly Connect

For Connecting WooCommerce with Pabbly Connect first, sign in to your WordPress site where you are using the WooCommerce plugin.

(a) Go to WooCommerce Settings

WooCommerce Settings

After successfully logging into WordPress, click the ‘WooCommerce’ option available in the left vertical menu. Then, click on ‘Settings’.

(b) Go to Advanced Settings

Click on Advance for WooCommerce to Stripe

Next, click on the ‘Advanced’ option from the page’s horizontal menu.

(c) Go to Webhooks

Click on Webhook for WooCommerce to Stripe

Another page will open up, carrying a secondary menu. Click on ‘Webhooks’ option on this menu

(d) Click on the ‘Add Webhook’ Button

Click Add Webhook

Now, click on the ‘Add Webhook’ button that is available right next to the Webhooks head.

(e) Paste Webhook URL

Paste Webhook URL to Send Telegram Notification for New WooCommerce Orders

On the Webhook Data part, mention a name for the webhook, set the status to ‘Active’, select the topic as ‘Order created’ and in the Delivery URL field paste the copied Webhook URL.

Finally, click on ‘Save Webhook’.

Step 6: Test the Response in Pabbly Connect Dashboard

Up to this point, we are done setting up the trigger for the WooCommerce and Telegram integration. So, let’s test this WooCommerce trigger by making a test order.

(a) Capture Webhook Response

Capture Webhook Response

The first thing to do is, click on the ‘Capture Webhook Response’ button available in the Pabbly Connect trigger window.

(b) Click on the ‘Add to Cart’ Button of Any Product

Click on Add to Cart

For making a test purchase, simply click on the ‘Add to cart’ button of any of your WooCommerce product.

After that, click on the ‘Proceed to checkout’ button on the next page that opens up next.

(c) Add Test Billing Details

Billing Details to Send Telegram Notification for New WooCommerce Orders

Fill in as well as select all the billing and click on ‘Place Order’.

(d) Check and Save the Trigger API Response

How

Check the WooCommerce trigger response for the test order.

Step 7: Setting Action for WooCommerce to Telegram Integration

Now, as we have all the WooCommerce order data. So, let’s proceed towards the Telegram action step. After that, a notification will be sent automatically whenever a new order is made.

(a) Select Application you want to Integrate

Integrate Telegram to Notify Your Team Members about New Shopify Orders

Click on the plus button that is right next to your WooCommerce trigger window.

And then select the app as ‘Telegram Bot’.

(b) Select Event & Connect with Telegram

Select Event & Connect with Telegram

Next, pick the action event as ‘Send a Text Message or a Reply’.

Lastly, click the ‘Connect’ button.

Step 8: Connecting Telegram to Pabbly Connect

To establish a connection between Telegram & Pabbly Connect first, sign in to your Telegram account.

(a) Click on the BotFather Link

Click the BotFather Link

When you click on ‘Connect’ a window slides in from the right. Click the BotFather link given in the help text list.

Moreover, you can also type ‘BotFather’ in your Telegram App search area to access the BotFather chat window.

(b) Click Start on BotFather Chat

Click Start on BotFather Chat

On the BotFather chat, click on the ‘START’ button.

(c) Create a New Bot

Create New Bot

Now, create a new bot by typing ‘/newbot’ command in the text area and then click on the send icon.

(d) Name Your Created Bot

Bot Name to Send Telegram Notification for New WooCommerce Orders

Next, it’ll demand a bot name. So, type a bot name that you want to allot to the recently created bot & then click on ‘SEND’.

(e) Enter a Bot Username

Add Bot Username to Send Telegram Notification for New WooCommerce Orders

Also, enter a username for your created bot that ends with the suffix ‘bot’.

(f) Copy the Token

Copy token to Send Telegram Notification for New WooCommerce Orders

Finally, it’ll provide a token for the created bot, simply copy this token.

(g) Paste the Token

Paste the Telegram Token

Now, paste the copied Telegram token in the Pabbly Connect connection window & then click ‘Save’.

(h) Create Telegram Group

Create Group to Send Telegram Notification for New WooCommerce Orders

Further, create a new group on your Telegram account & add members to it to whom you want to notify for the order. Also, add the created bot to the group and remember to promote the bot as the admin of the group.

(i) Copy Chat ID

Copy Chat ID to Send Telegram Notification for New WooCommerce Orders

Now, after successfully establishing the Telegram and Pabbly Connect connection. You’ll see a Chat ID field. So, to get this chat id, open your Telegram group on a browser window and copy the chat id from the URL. The digit sequence between ‘=(some variable)’ and underscore (_) is the chat ID for your group. Copy these digits.

To learn more about the Chat ID and the prefix, you can also read the help text given under the Telegram action ‘Chat ID’ field.

(j) Paste Chat ID & Create Message

Paste Chat ID and Draft Message to Send Telegram Notification for New WooCommerce Orders

Now, paste the Chat ID with the prefix ‘-100’ that is for a private channel message.

Also, draft a notification message by combining the trigger response & some plain text.

To use the WooCommerce response values, simply place your cursor in the ‘Text Message’ field. Then, find & select any value from the gathered trigger response.

(k) Send Test Request

Send Test Request for Action to Send Telegram Messages on Form Submissions

Now, click on ‘Save & Send Test Request’.

(l) Check & Save the Action Response

Check & Save Action API Response to Send Telegram Notification for New WooCommerce Orders
Certainly, you can check and save the Telegram API response in the action window. And, if there’s been some error while sending the data then the window will start showing you an error. Lastly, save the action API’s response.

Step 9: Check Response in WhatsApp

Telegram Notification for New WooCommerce Orders

Finally, check the Telegram message on your created group. Also, you can check the automation by making another test order.

Conclusion –

This was all about ‘How to send Telegram notification for new WooCommerce orders’. Consequently, after completing the step by step procedure, you will end up notifying your Telegram group members about every new WooCommerce order automatically.

Meanwhile, you can try Pabbly Connect for FREE with all its premium features.

Also, leave feedback about this automation in the comment section below.

You May Also Like to Read: