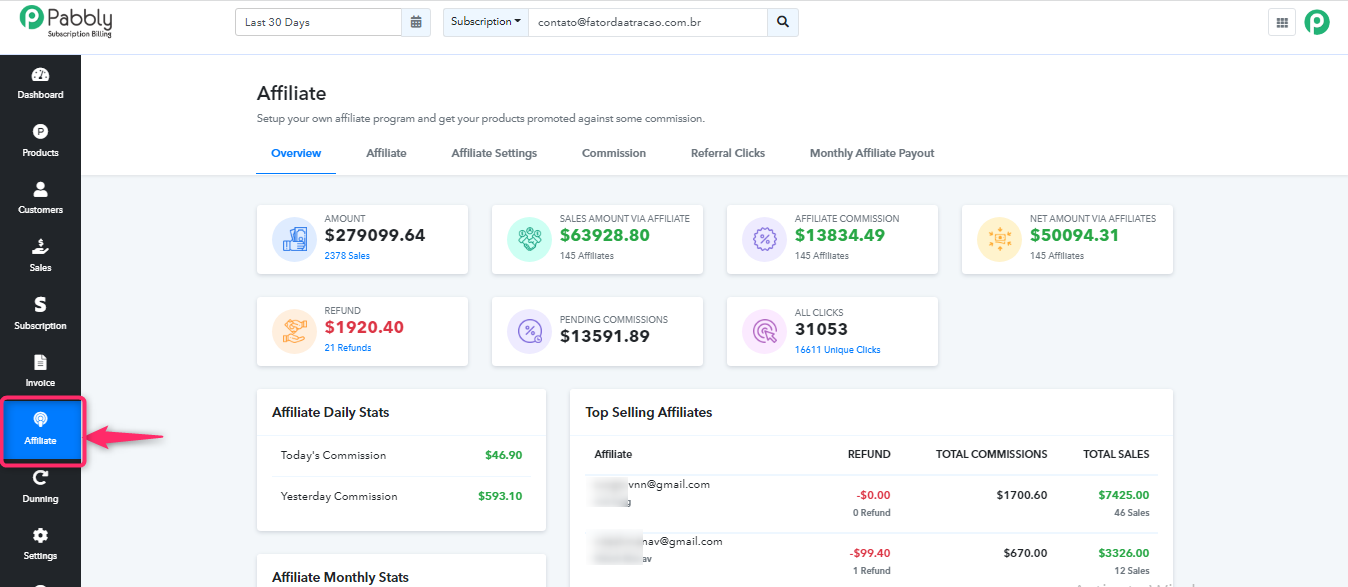
Note – “The working of affiliate management is divided into 2 halves. 1st is merchant dashboard and 2nd is client dashboard. Some settings of the affiliate system use the feature of merchant’s dashboard and some settings use the features of the client portal dashboard.”
Affiliate Management System (Merchant’s Dashboard) –
Let’s start learning about this system.
When you click on the affiliate button then 6 options will be displayed on the screen.
- Overview
- Affiliates
- Affiliate Settings
- Commission
- Referral Clicks
- Monthly Affiliate Payout
These are the 6 basic required steps that you will need to manage the affiliate/referral commissions.
1. Overview –
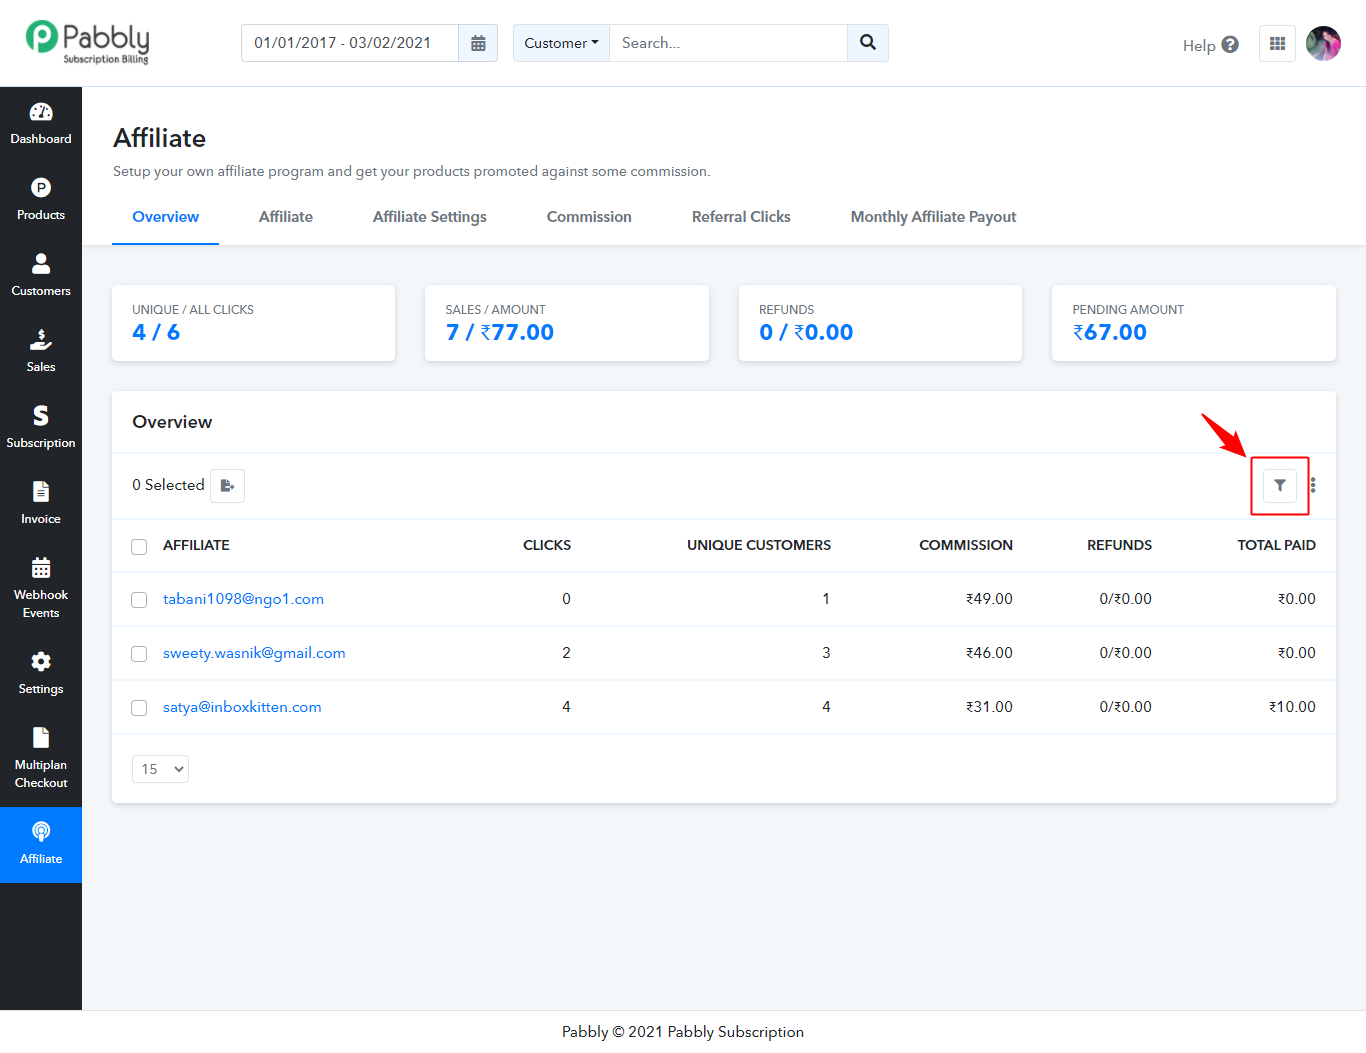
Here, in this section, you will get complete insight about your affiliates such as the number of clicks, number of sales & amount, refunds, pending amount, etc.. Along with that, you can see the details of the commission generated by your affiliates by clicking on their affiliate email address. When you click on the email, it will open a dialog box that holds all the information related to that particular affiliate like how much commission he has generated by selling which product on which date to whom. Everything that you need to know about your affiliate you can view in this section.
Furthermore, the data in the table will appear according to the commission (only affiliates who have generated some commission will appear in the table). And the best part is that you can also manage this data by using the sorting options (based on clicks, sales, and refunds).
For example: If you want to sort the data according to the sales, it will automatically arrange the data in descending order which means, the highest value of the sale amount will start appearing on the top. This way you can also identify the top affiliates according to the selected date range who have generated a high number of sales.
Moreover, there are more options available such as the export button and advanced filters.
Export: You can simply export the data in an excel sheet.
Advanced Filters:
To ease the work and reduce the manual efforts we have added an advanced filter that will help you to find what you are looking for within a sec.
This filter includes parameters like
Attributes – Affiliate Email, Customer email, Name, Product, Number of sales, Link title.
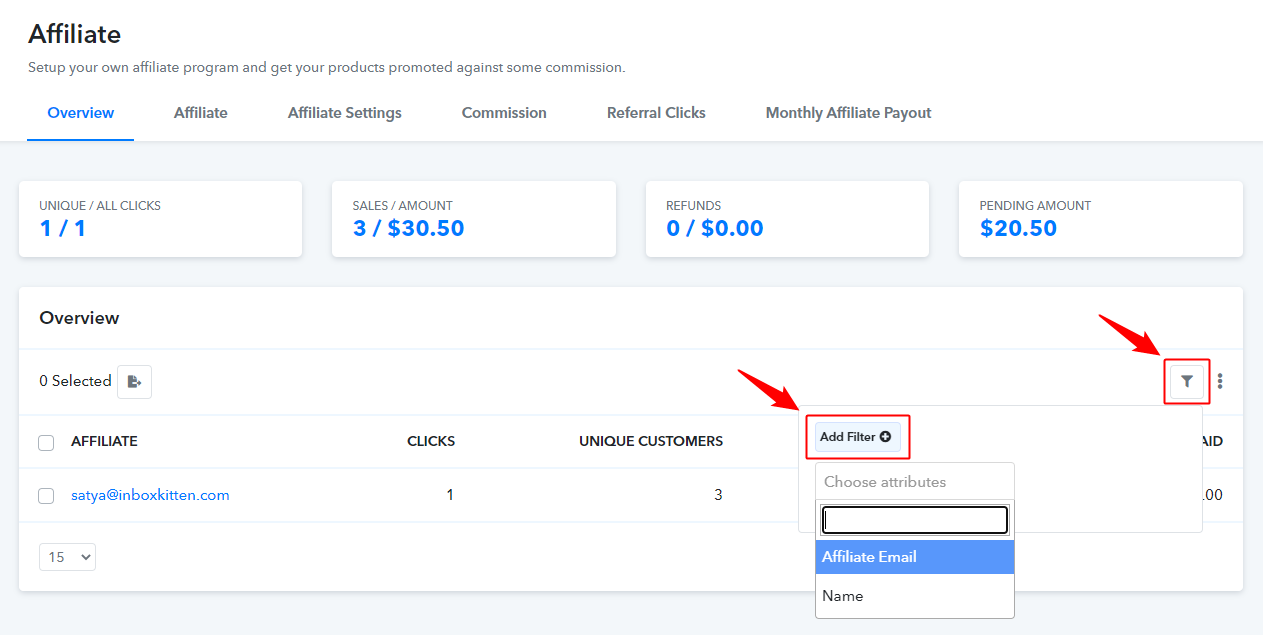
Conditions – Contains, Doesn’t contain, Equal to, Not Equals to, Starts with
Working of these Conditions –
Contains – You can randomly give any input and based on your input the system will provide you details.
Doesn’t Contain – Here you can add value that you don’t want in your filtered data.
Equals to – Provide the exact value which you want to see in your filtered data.
Not Equals to – It is just opposite to the equal to. Add the value which you don’t want to see in your filtered data.
Starts with – With this, you can filter data by just giving initials of your selected attributes.
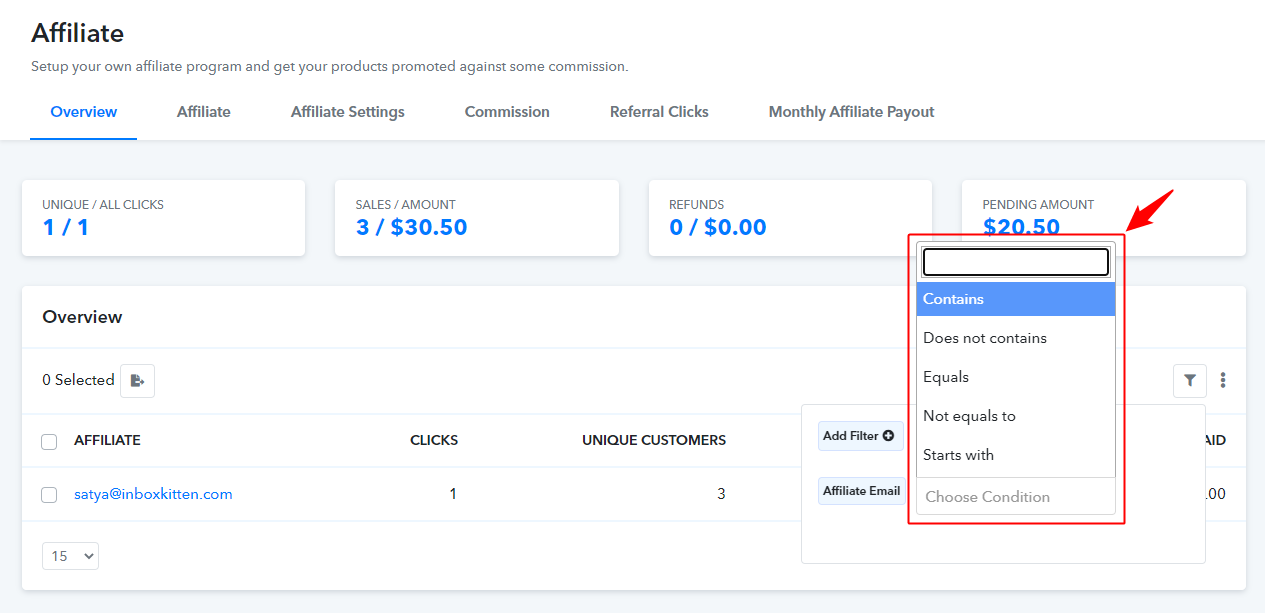
How it Works:
These filters work on two parameters which are attributes and conditions.
Attributes – You can select the category based on which attribute you want to filter the data
For example: If you want to filter out the data based on affiliate email then you need to select the affiliate email from the “Choose Attribute” option. Now you have to decide the condition on which condition you want to get your data.
These might be the possible conditions:
Contains – Let’s say you want to have a list of all the emails of affiliates who contain “Pabbly” in their email address. In this case, you can apply this condition.
Doesn’t Contain – Just opposite to the Contains option, if you do not want to have a list of all the emails of affiliates who contain “Pabbly” in their email address you can simply choose this condition.
Equals to – If you want to search an affiliate email “[email protected]” then you can use this condition.
Not Equals to– It is just opposite to the “equals to” option, if you want a list of other affiliate emails except “[email protected]” then in this case you can go with this condition.
Starts with – This option is given for the condition when you miss the affiliate ID but only remembers their initials.
You can easily filter out your data by using these filters. We have added these filters in all the sections of our affiliate module.
2. Affiliates –
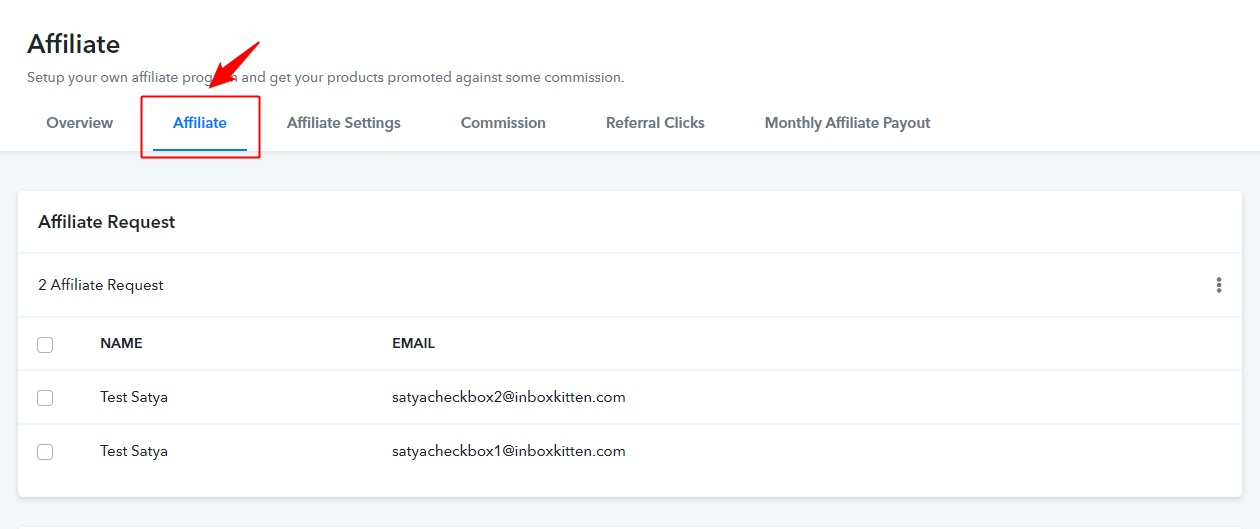
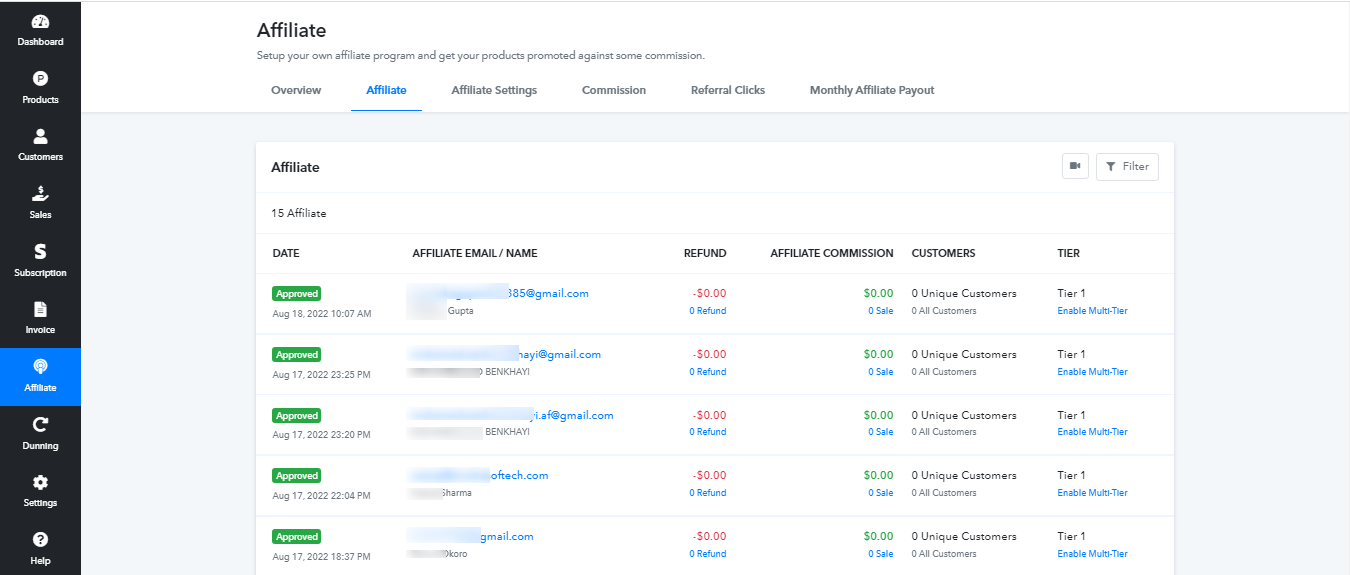
In this section, you can find a list of the members signed up for your affiliate program or requested to become an affiliate from their client portal. Along with this, you will be able to see the details of all your affiliate partners. Their email address, name, country, and date are shown.
The email addresses of these customers are also shown in the commission rules setup. You can make commission rules for individual affiliate partners as well.
3. Affiliate Settings –
In this, you will add basic details for promoting your product.
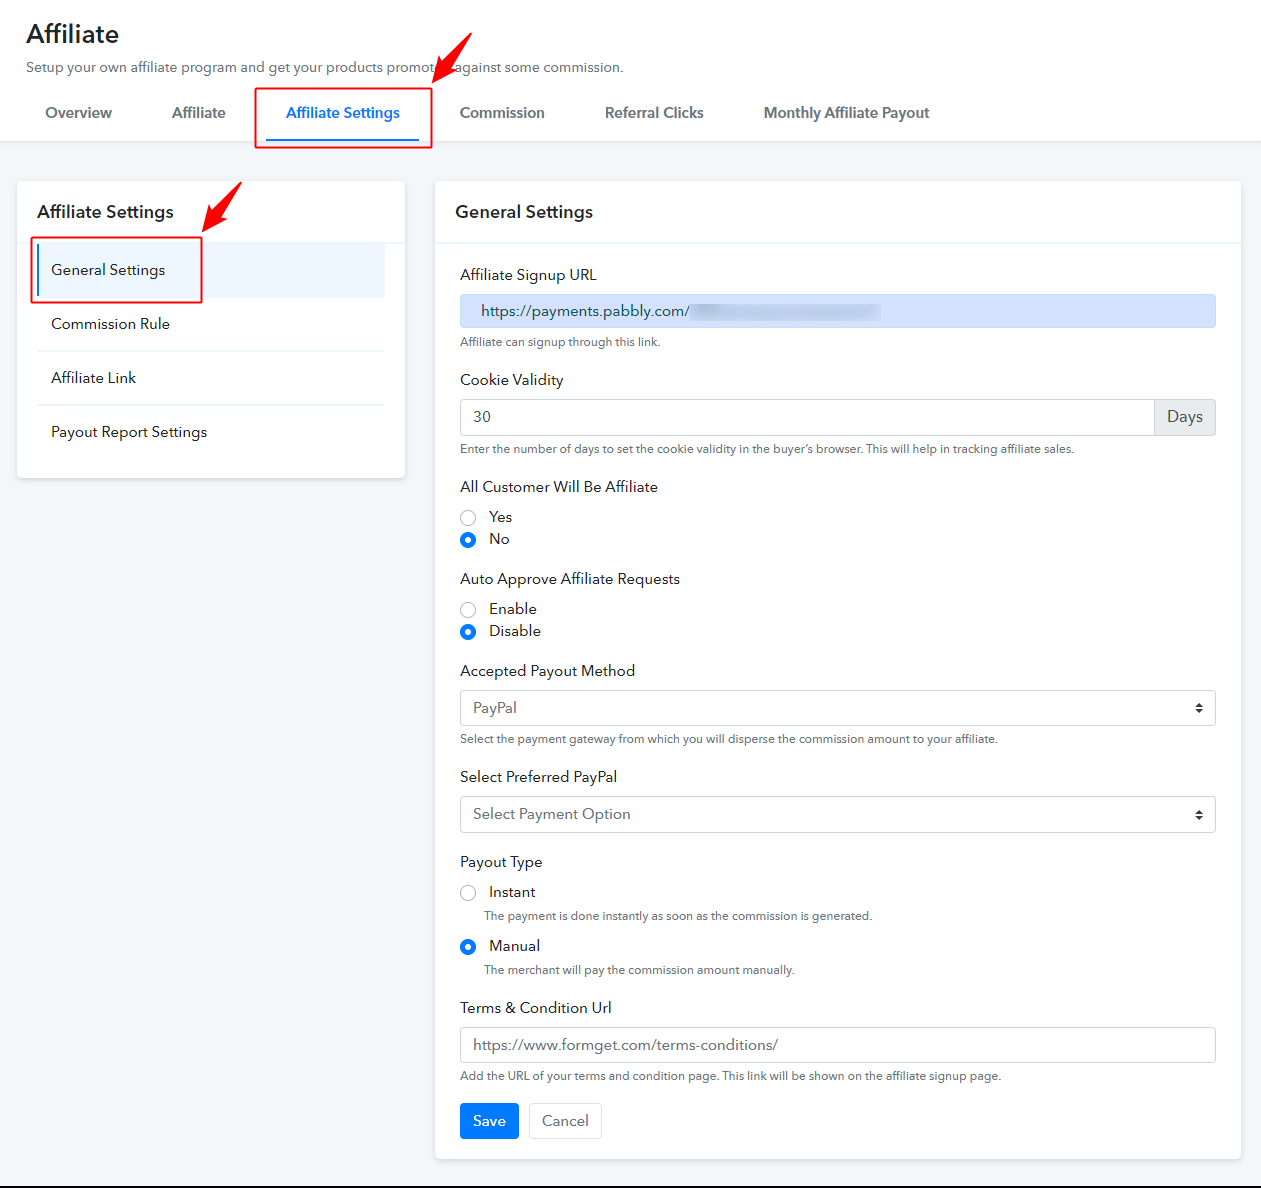
You will find 4 internal options on this page. The first option you will find is “General Settings”.
When you click on General Settings the system will first ask you to set up the client portal. Because you will get the affiliate signup URL after setting the client portal and your affiliate partner will get the promotional URL from the client portal only.
Once the setup of the client portal is complete then in –
General Settings –
First, you can see the affiliate sign up URL. You can add this URL to your website and get sign up for customers who want to become an affiliate.
Second is “Cookie Lifetime” – Suppose any visitor comes to your website via a unique affiliate link but didn’t purchase anything. After some days the same visitor directly opens your website and complete the purchase. Then also the commission will be generated for the person whose affiliate link is used some days back.
That means if you set 10 days as cookie lifetime and any visitor came to your website by the affiliate link then within 10 days if the same visitor completes the purchase then the commission will be added to the particular affiliate partner.
The third option is “All Customer will be Affiliate” – It works the same as Client portal. You can decide whether all the customers who are purchasing your product can become your affiliate partner or not.
The fourth option is “Payout Settings” – Currently there are three payout methods available which are PayPal, Bank Transfer, and Both (PayPal & Bank Transfer).
For example: If you (Merchant) choose Paypal as an accepted payout method, then this will open a dropdown in which you have the flexibility to select the PayPal accounts through which you want to disperse the commission amount to your affiliates.
Further, these options will change the payment method settings for the affiliates as well.
For example: If a merchant sets the PayPal as an accepted payout method then this setting will be visible at the affiliate dashboard as well from where they can select the payout method in order to get paid.
Further, you can choose between two options that you want to give the commission instantly or manually. If you choose instant then the commission will be paid instantly by the system and if you choose manual then you have to manually pay the commission.
The fifth option is to add the URL of your terms and condition page. This link will be shown on the affiliate signup page.
Finally, Save the changes.
Next, You have to add –
Commission Rules –
First, you have to add the rule title. setting up the commission rule. The best title you can add is your product name or plan name.
Second, you have to add Rule Condition.
From the first drop-down you can select All affiliate or any particular affiliated partner you want to select.
From second drop down you can either select all products or any particular product.
And from third drop down you can select all plans or any particular plans.
From the next section, you can choose your Commission Type –
In this there are two options – first is the commission for purchase and the second option is for the commission on recurring charge. With this, you can choose “Flat” or “Percentage” commission type also. Suppose you want to give 5% commission for first purchase then you will select percent from the drop-down section and add ‘5’ in the field.
And, in case if you don’t want to offer recurring commission then you can leave the second option which is “Commission For Recurring Payments” and then finally, save the Commission Rule. This will set up the commission rule for your affiliates.
Finally, Save the Commission Rule.
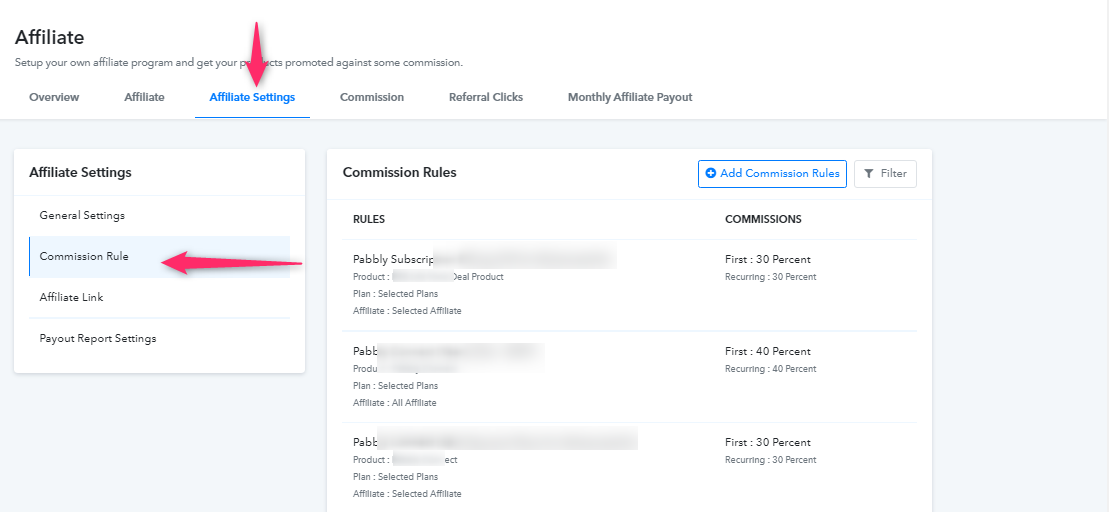
Once you save the commission rule it will be displayed something like this and you will have the option for deleting or editing the commission rules.
Next Step is –
Affiliate Link –
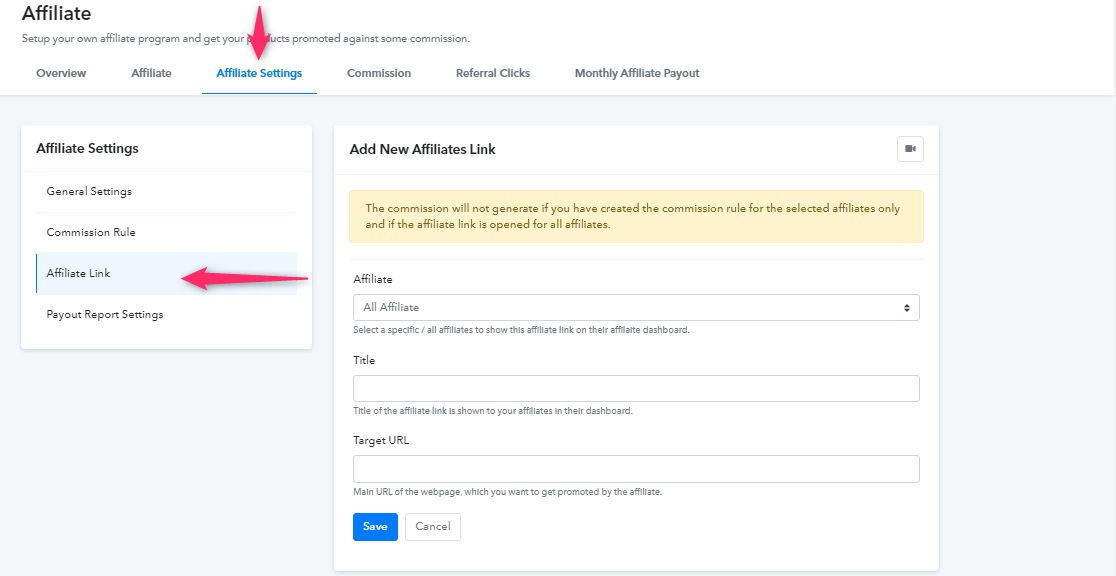
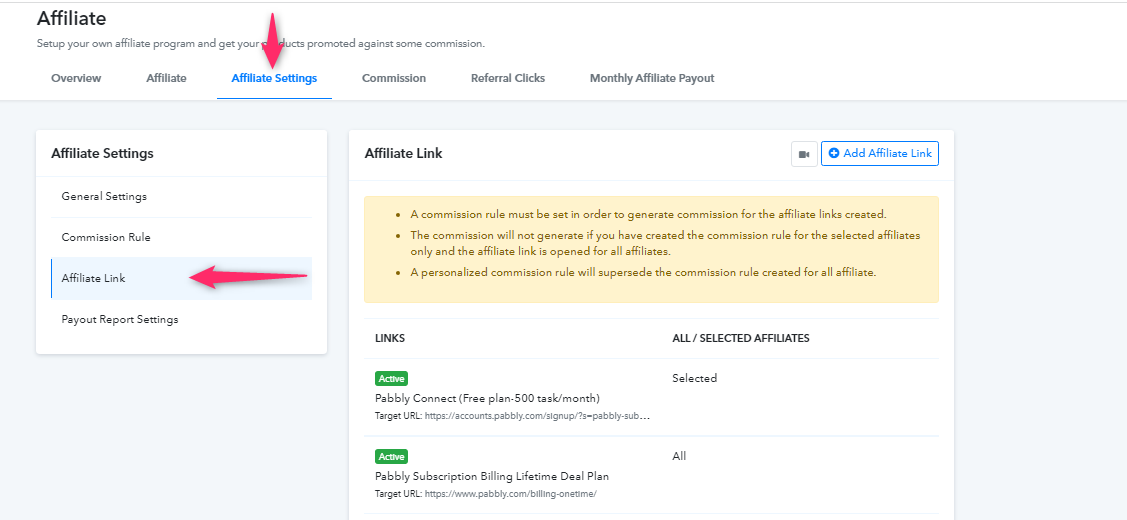
You can add a title for the affiliate link and next paste the URL of your website or the page which you want to promote in the Target URL section.
When you have added the target URL then all your affiliate partner will get a unique URL in their dashboard. With the help of these unique URLs, they will be able to promote your product and earn a commission.
Then just save the changes and you have completed the basic setup of the affiliate management system.
Final Step is –
Payout Report Settings –
In this section, you can manage the affiliate commission payouts easily. Here, we have given two options to generate the payout report.
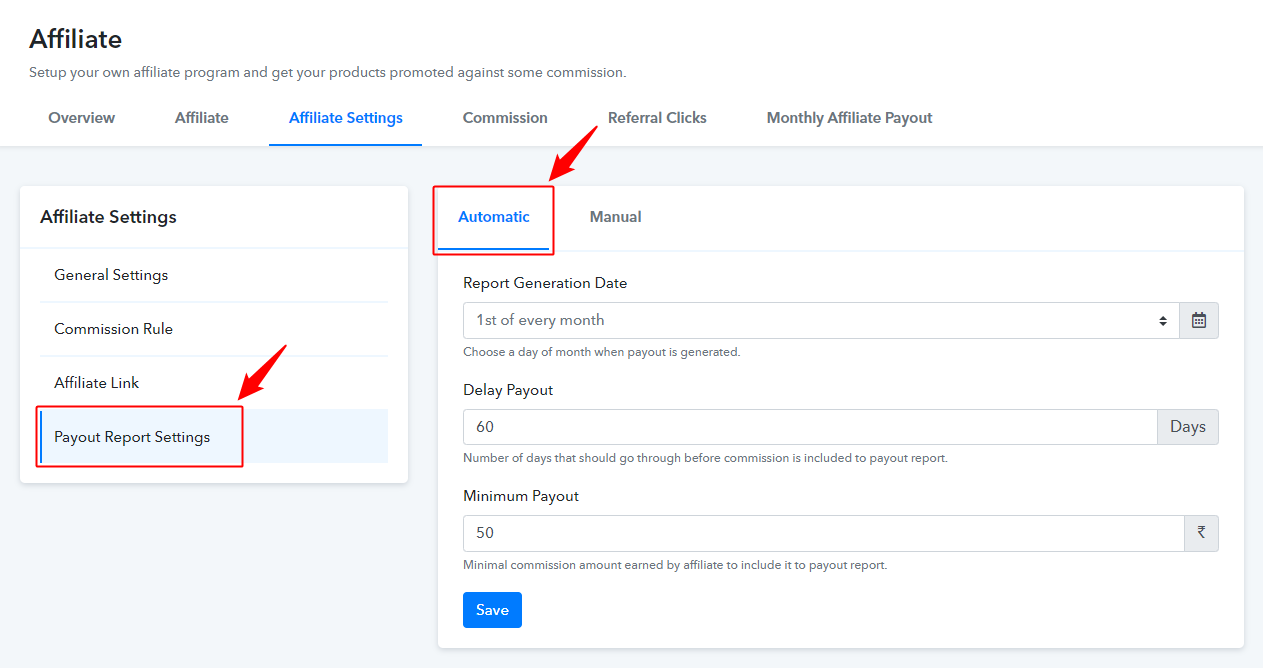
The first method is “Automatic” – You have to make some settings so that your report will get generated automatically.
Following are the details which you need to fill:-
1. Report Generation Date – Choose a day of the month when the payout is generated.
2. Delay Payout – Number of days that should go through before commission is included in the payout report. That means it will not calculate commissions after the threshold date in this payout.
The threshold date is the date which is set by the admin according to their policy and requirement. This is the date till which the affiliate commission would be considered for the payout. For example, you have set the delay payout days to 20 and you generated the report on the 30th of a particular month then it will take all the affiliates who earned commission before the 10th of that same month. So, the 10th of that month would be the threshold date.
3. Minimum Payout – Minimal commission amount earned by an affiliate to include it to the payout report.
For example: If an affiliate earned less than the minimum payout amount, then in case, his payout will not be generated.
Finally, save the changes.
Now let’s understand the process of how it works..
Let’s say:
I have added the following details-
Report generation Date: 1st of August month
Delay Payout (days): 60 Days
Minimum Payout: $50.00
So the first scenario will be like:
The report is getting generated on the 1st of August 2020. And the threshold date will be 2nd June 2020. It will include all the affiliates whose commission is greater than $50.
Note: There is one rule to avoid the redundant commissions which is “Do not add those commissions which you have already mentioned in the previous report”.
After that the second method is “Manual” – If you want to generate reports manually for a specific date then you can select this method. Here, you need to choose your preferred payout date on which you need to run this report. And then just hit the “Run Report” button in order to generate the report manually.
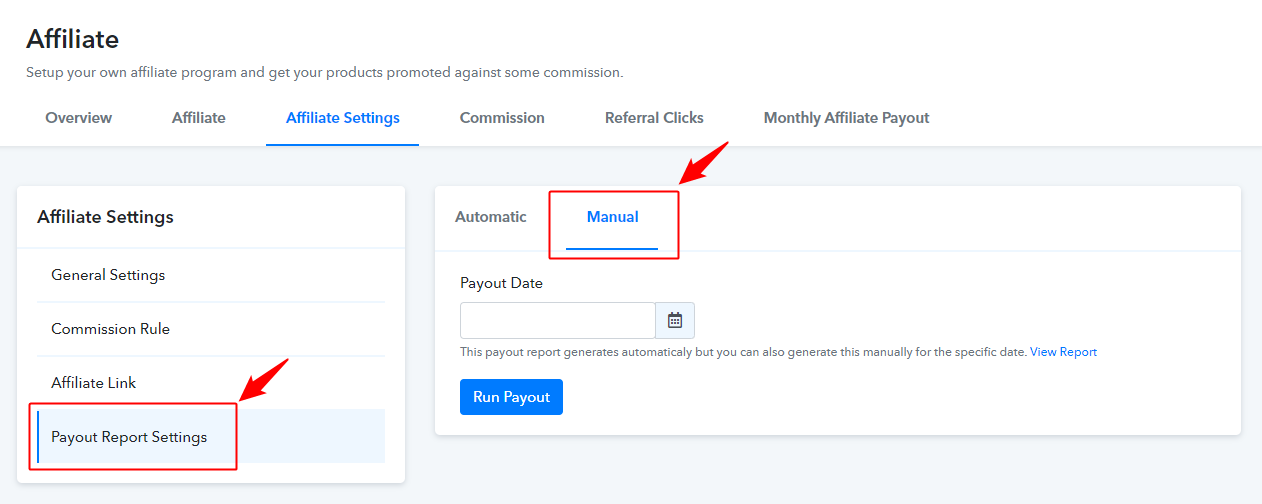
Besides, we have also provided an option to view your generated report. For this, you just need to click on the “View Report” button. This will redirect you to the Monthly Affiliate Payout section where you find all the generated reports for payouts.
The fourth option is
4. Commission –
The most important one actually.
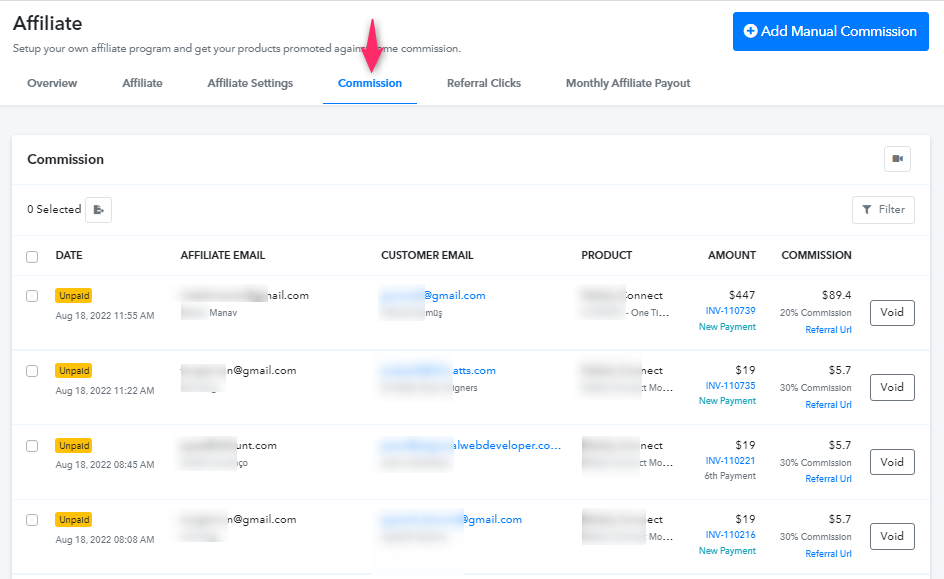
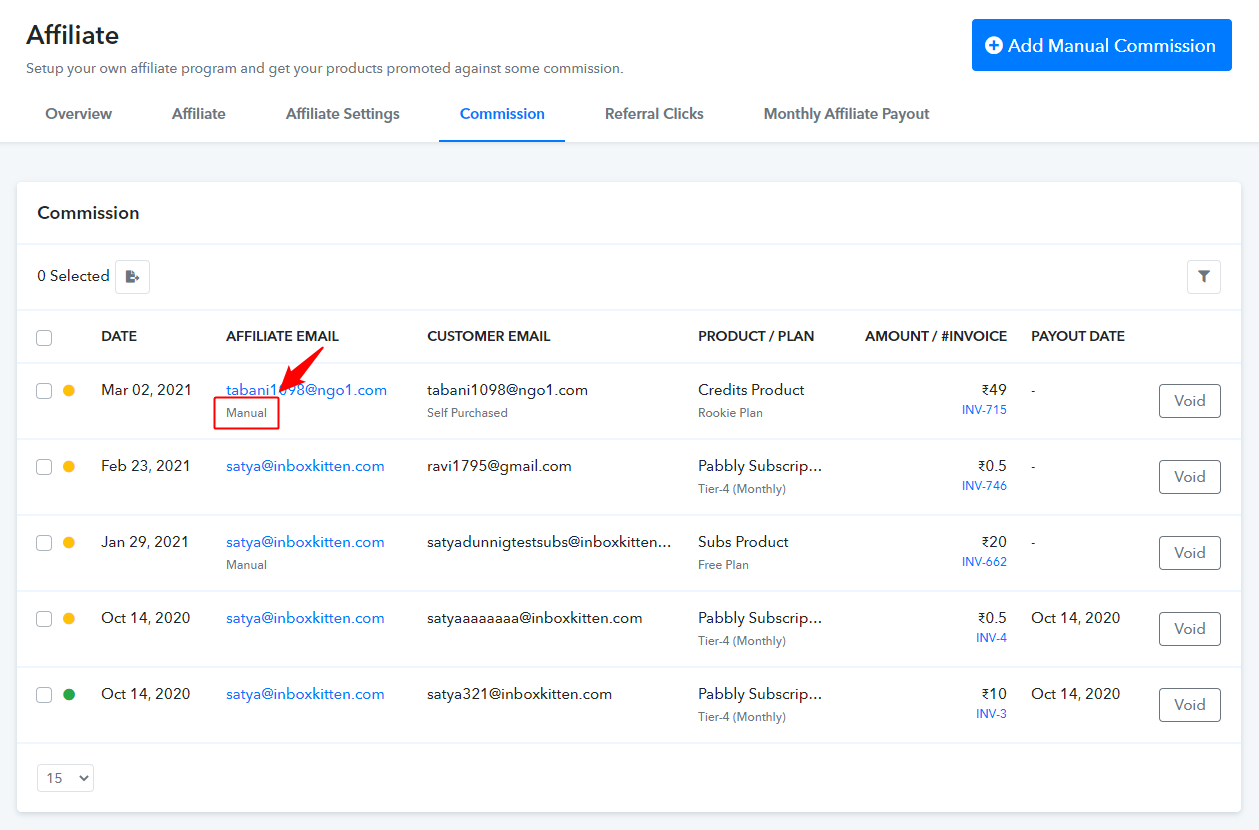
In this section, you can see by which affiliate partner (Affiliate email), your product is purchased and the email Id of the person who has purchased your Product (User). Name of the product, Invoice number and Commission amount can also be seen in this section.
Then you can see one blank section called “Payout Date”. This section will be automatically filled once you make payouts.
In the commission section, you will also find other options named “Void” and “Self Purchase Tag”.
Void – It lets you delete the unauthorized commission.
Self Purchase Tag – If you follow a policy that says “Self-referrals for affiliate purchases are strictly prohibited.” Then in this case the system will automatically detect the self purchases and add labels to that commission in order to identify the self-purchase.
How To Add Manual Commission?
We have also implemented one of the most demanding features i.e, Add Manual Commission or Manually Assign Commissions.
This feature allows you to manually add commission to an affiliate. This works great in certain situations such as:
- The affiliate commission does not get tracked for a particular purchase due to some reason.
- Your store manually keeps track of referrals.
Now, Let’s understand the functionality of this feature.
In order to manually assign the commission to an affiliate, you just need to go to the “Commissions” tab from your admin dashboard (Affiliates >> Commissions) and then hit the “Add Manual Commission” button which is placed at the top right corner of the screen.
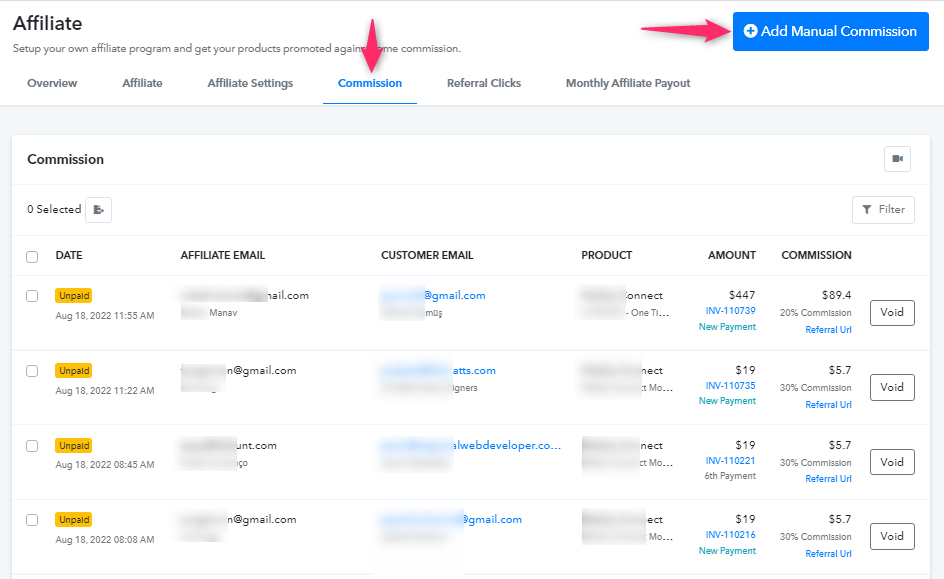
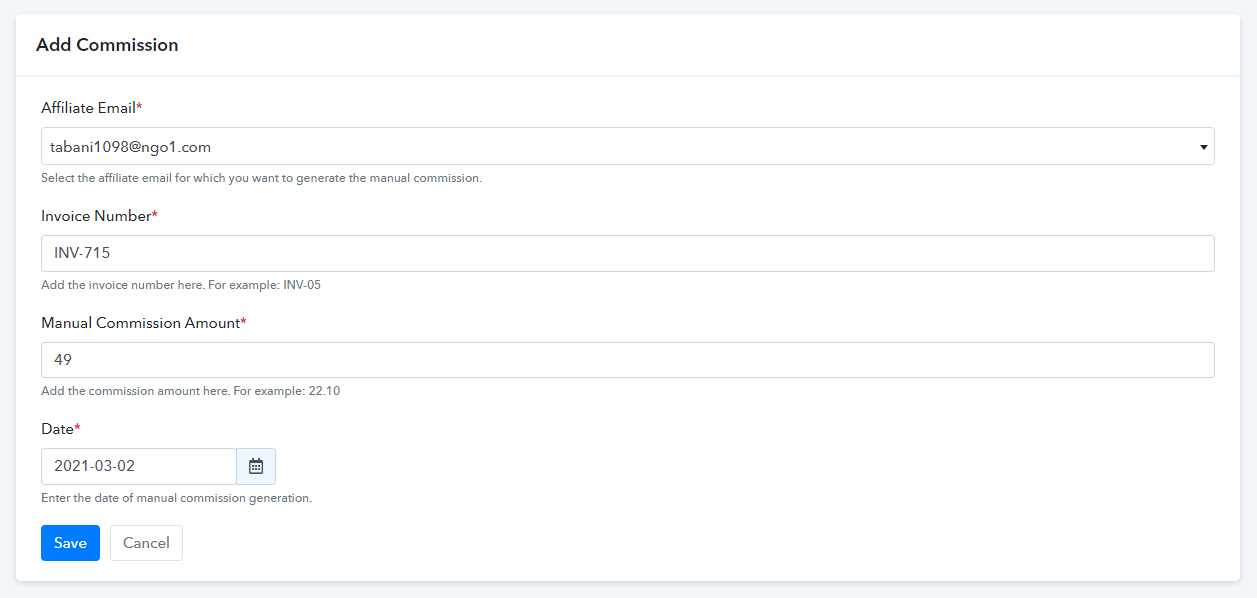
Once you hit the “Add Manual Commission” button, a next window will open where you need to fill in the following details:
- Affiliate Email
- Invoice Number
- Manual Commission Amount
- Date
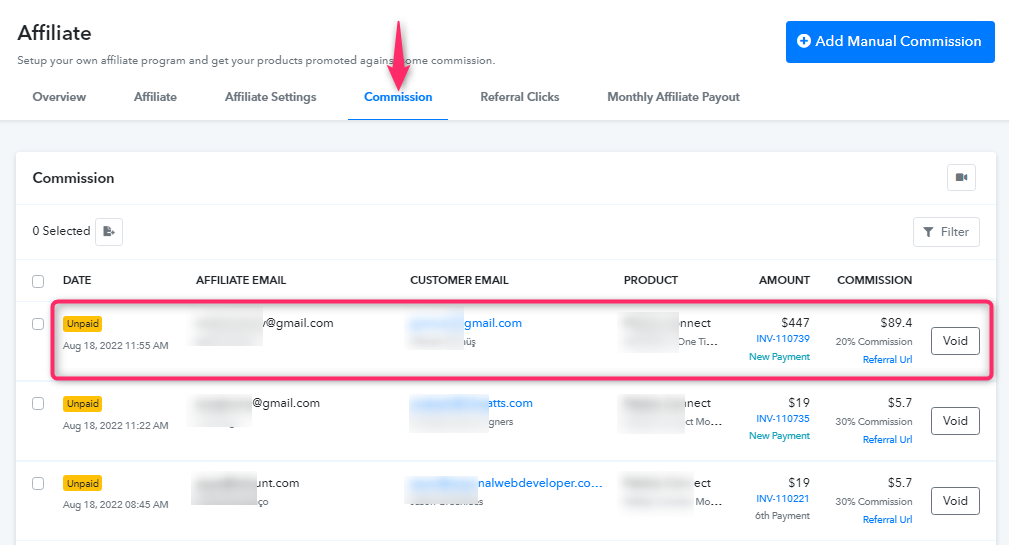
After saving the changes, your newly added commission record should now appear under the “Commissions” section with a “Manual” tag.
The next section under the Affiliate tab is
5. Referral Clicks –
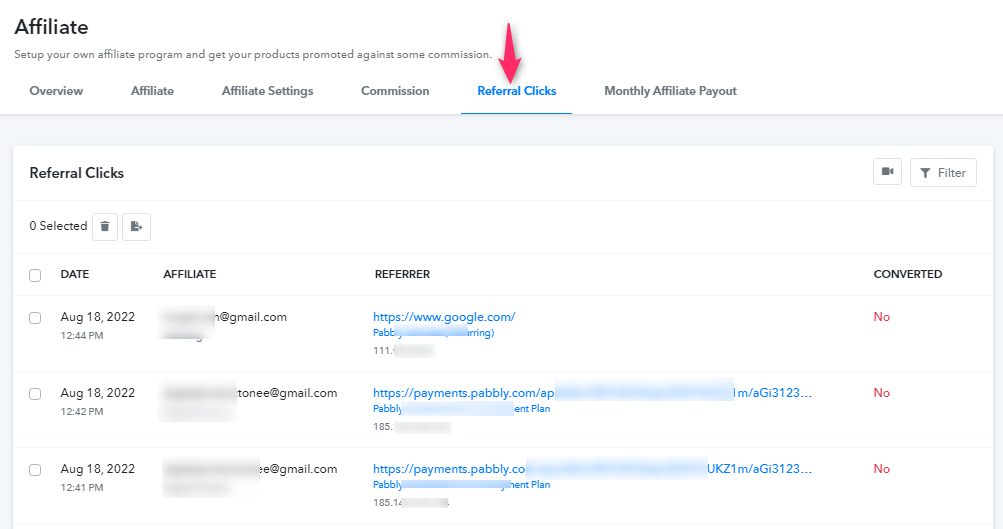
In this section, you will get all the details of unique clicks on your website and also track through which affiliate partner you were getting the clicks.
6. Monthly Affiliate Payout –
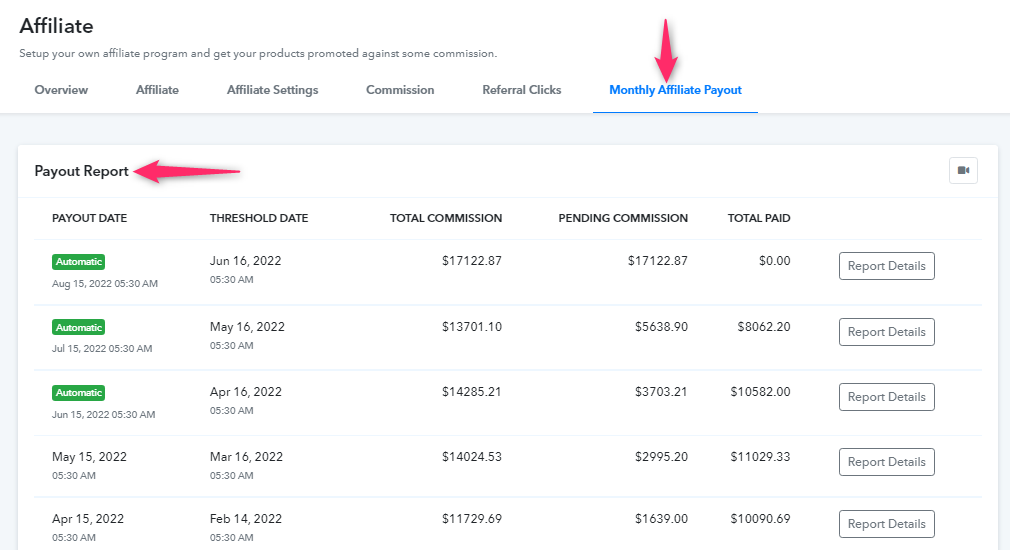
Here, you can view a list of already generated payouts. As it will calculate the affiliate commissions to the threshold date.
Overview of the report:
All the commission that you have paid on a particular date.
Details of the affiliate to whom the commission is dispersed.
The commission amount paid to the affiliate.
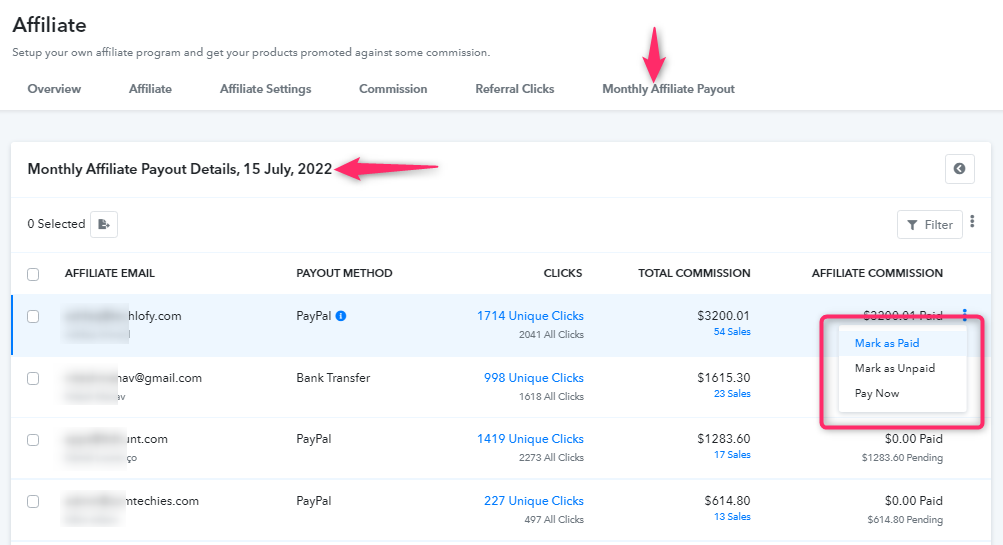
In this section, you will also find a drop-down option that has different actions Like Mark as Paid, Mark as Unpaid, PayNow. You can first select any affiliate or all the affiliate from the checkbox given on the left side and apply the following actions. Furthermore, you can perform these actions in two ways.
First way: If you want to pay or apply other actions such as Mark as Paid, Mark as Unpaid, for a particular affiliate to all his commission in bulk then you can do this by clicking on the three dots appearing at the right corner.
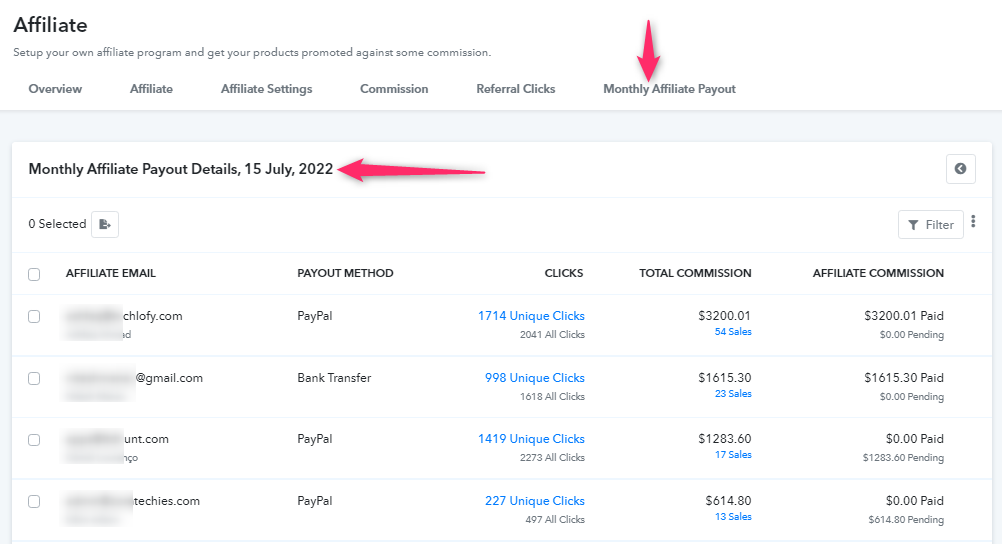
Second way: If you want to review each and every commission generated by an affiliate and pay them individually then you need to click on the number of sales this will open a popup, in which you can select which commission you want to pay and then pay him by clicking on the three dots present at the right corner.
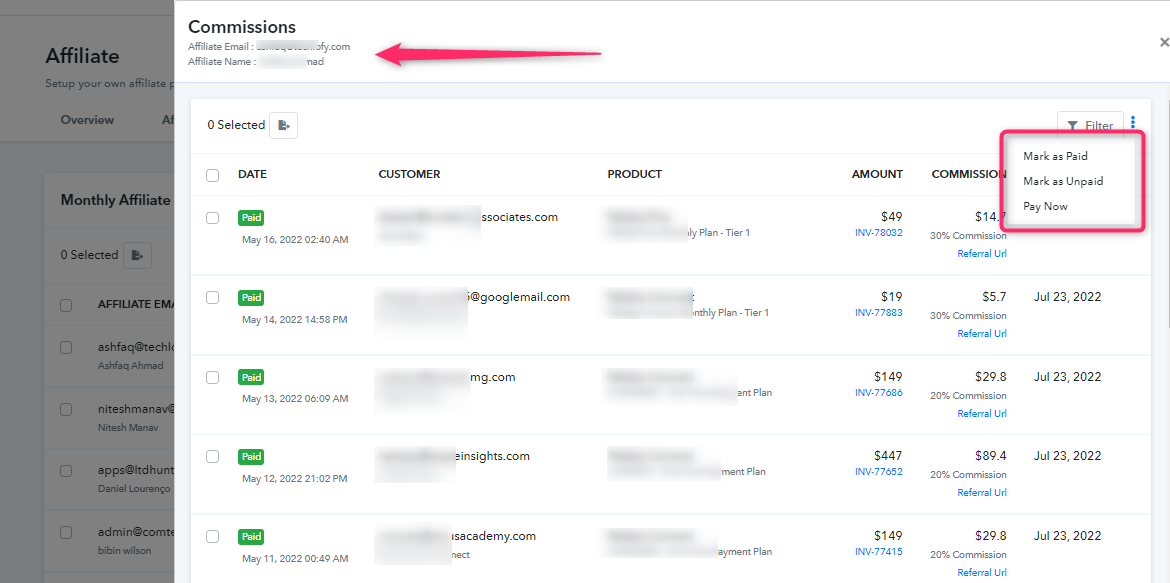
Below is the working of these actions:
Mark as Paid – If you apply this action then status “Yes” will be displayed in the Is paid column and the payout date will be filled automatically.
Mark as Unpaid – If you apply this action the status “No” will be displayed in the Is paid column and the payout date will be filled automatically.
Pay Now – If you manually want to pay the commission to your affiliate partner then you can use this action. When you apply this action then the commission amount will be automatically deducted from your PayPal account and delivered to the chosen payment option of the affiliate partner.
Points to remember while setting up the Affiliate system on the merchant’s dashboard.
-
- Before getting started with the affiliate system, you have to set up the client portal first. You will get the affiliate sign up link only when you complete the setup of Client Portal.
- You have to give the client portal access to your customer if you want to give them the access of affiliate portal. If your customer has the affiliated access but did not have access to the client portal, then the customer will not be able to get the affiliate links of your product.
- In the commission payment settings, in case if you don’t want to offer recurring commission then you can leave the second option blank which is “Commission For Recurring Payments”.
- Instant and manual payout will be sent from your integrated PayPal account
- If you do not have a PayPal account then you can give the commission from other means and mark it as paid by using the “Mark as Paid” actions.
Affiliate Partner Dashboard –
The affiliate section has 4 internal options:
- Overview
- Commissions
- Payout Settings
- Payment History
1. Overview
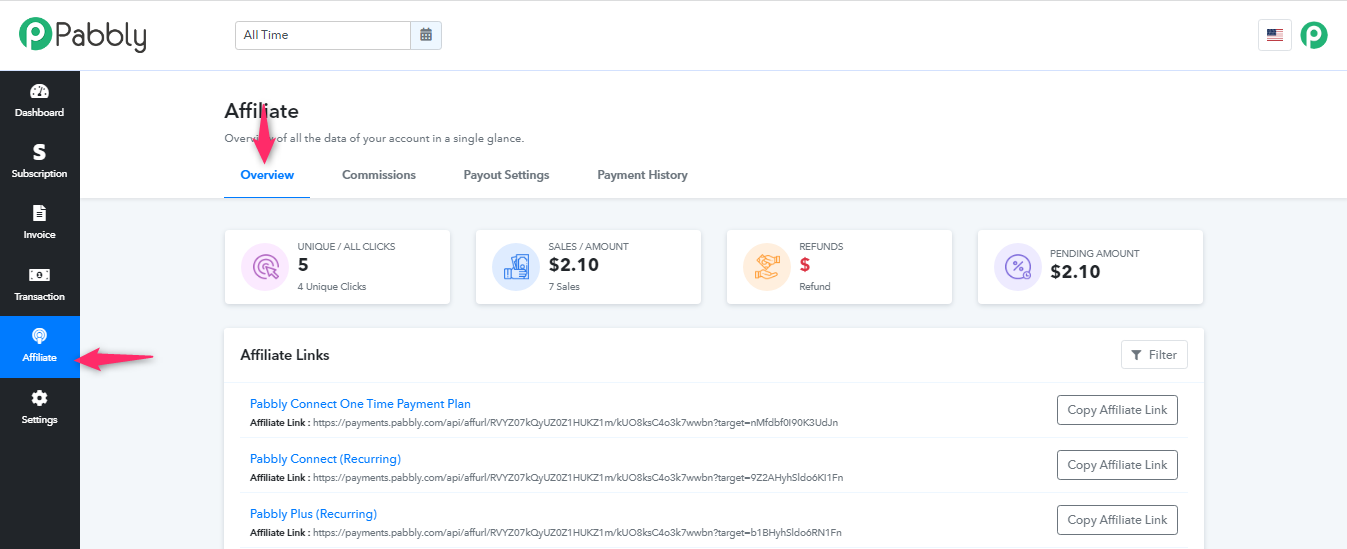
Here, in this section, you will get complete insight about your affiliates stats such as number of clicks, number of sales & amount, refunds, pending amount etc.
Affiliate Link –
From this option, your affiliate partner can get your unique URL for promoting the merchant’s product via different means of the channel.
2. Commissions –
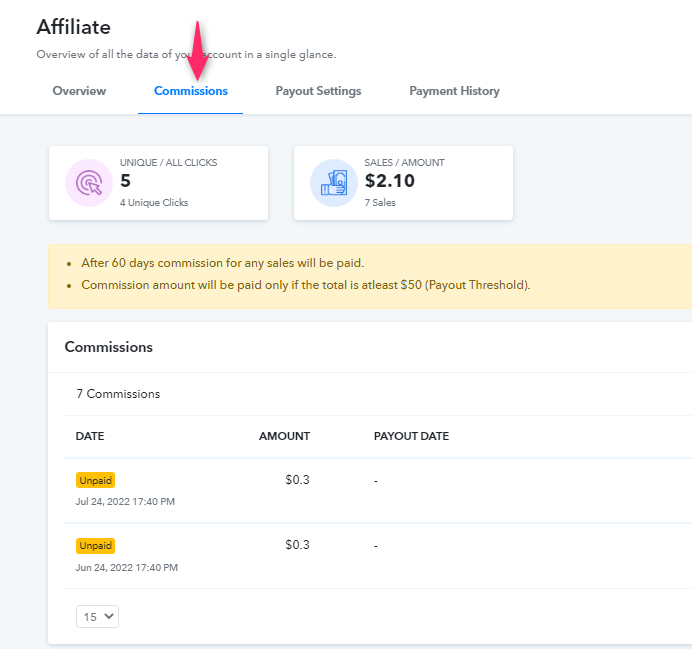
In this section, your affiliate partner will get the details of commissions like – date, Payout date, Payment status, and generated commission amount of the purchased product via their unique affiliate link. Along with this he can also see refunded and voided commission.
Next option in this section is –
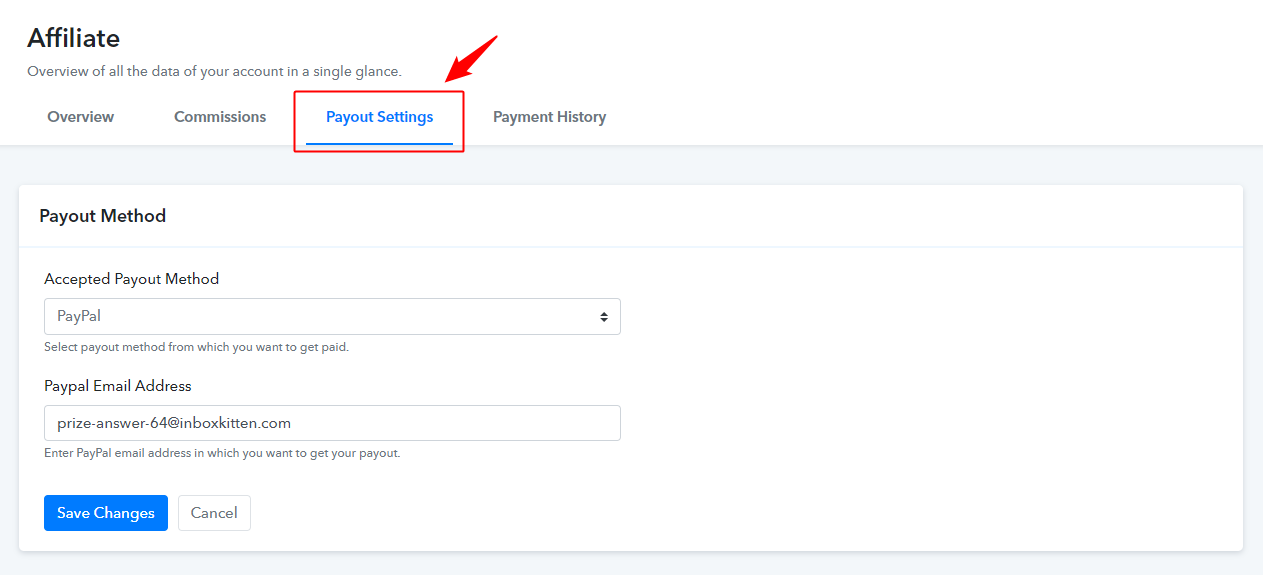
3. Payout Settings–
In which your affiliate partner will add a preferred Payment option depending upon the settings made by Merchant.
Currently, you can select PayPal or Bank Transfer as a payment option. If your merchant has given access to these options.
Example: If a merchant selected a Bank transfer as an accepted payout method then the affiliate will be able to add bank transfer as a payout method only.
The final option in this section is –
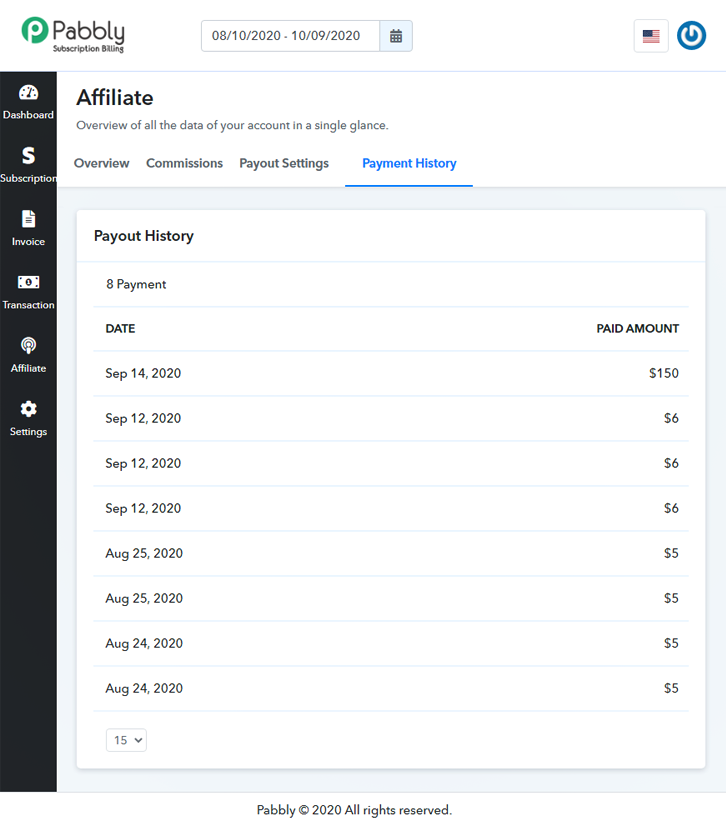
4. Payment History–
You can find the record of all the commission paid yet along with the date and amount. This will help an affiliate to get to know on which date how much amount he has received.
So these are the basic details for setting up the affiliate system for both the end (Merchant and affiliate partner)
Once the setup is done basic working of the system will be –
Suppose the merchant has a website www.xyz.com and he is selling some services by that website.
The services of that merchant will be billed monthly (That means the customer who will purchase the service from the website www.xyz.com will be charged on a monthly basis)
So the merchant will make such plan in the Pabbly Subscriptions account and also add the recurring billing cycle accordingly, then the merchant will get the checkout page link of that plan and will paste that link on the buy now button of his website www.xyz.com
This is the basic working of Pabbly Subscriptions, now to grow the business the merchant will find the option of affiliate management in the Pabbly Subscriptions account.
So let’s start setting up the affiliate module.
- Merchant will set up the client portal
- Then complete the general settings
- Setup the commission rules for the products and plans of Pabbly Subscriptions
- The merchant will add his website link in the target URL section.
Now suppose you became the affiliate partner of that merchant and started promoting the website (www.xyz.com).
You will get the affiliate dashboard by signing up from the link provided by the merchant or by sending an affiliate request to the merchant.
From the affiliate dashboard, you will set up the payment method and get the unique URL of the merchant’s website for promotion.
You will paste this unique URL on you promotional platforms (Blogs, Emails, Web Pages etc) and when a customer goes to the website www.xyz.com by your unique URL and purchase the product then you will get the commission according to the commission rules added for that product.
How the Cookie lifetime works –
Suppose you are promoting the product of any merchant. Then you will get your unique URL from the client portal or affiliate dashboard.
One of your customers has opened your link and will be redirected to the merchant’s website and when the customer will complete the payment you will get your commission.
But if your customer just opens the merchant’s website by your link and left the website without completing the purchase. The same customer comes back to the merchant’s website after 2 days and completes the payment (customer didn’t use your URL this time) then if the merchant has added cookie lifetime in the merchant’s account then you will get the commission in this case also. Because the cookies will be saved in the system of the end customer.
Besides, the commission will not be generated if the same customer comes again after some days with a different device or browser without the affiliate link, then in this case the system won’t take it as your referral because of new cookie formation.
Therefore, for generating an affiliate commission, the same device, as well as the same browser, must be used in which the cookies of your affiliate link were saved.
Hence, in order to avoid such scenarios, it would be better to advise your referrals to use your affiliate link whenever they visit your website for purchasing the products.
Note:
- Cookies are saved for the Source URL not in the destination page.
- If the merchant has added some cookie lifetime in his account then only the cookies will be saved in the end customer’s system. (For example – If merchant added cookie lifetime for 10 days then the cookies will be saved for 10 days in the end customers system)
- Cookies will be overlapped if the URL is opened more then one time.
- You will need to get the payout feature activated on your PayPal account. Then only the instant and direct payout works in the system.


